
Elderflower Chive Fritters
A savory twist on a wild spring treat.

Chives provide brightness without overpowering the elderflower.
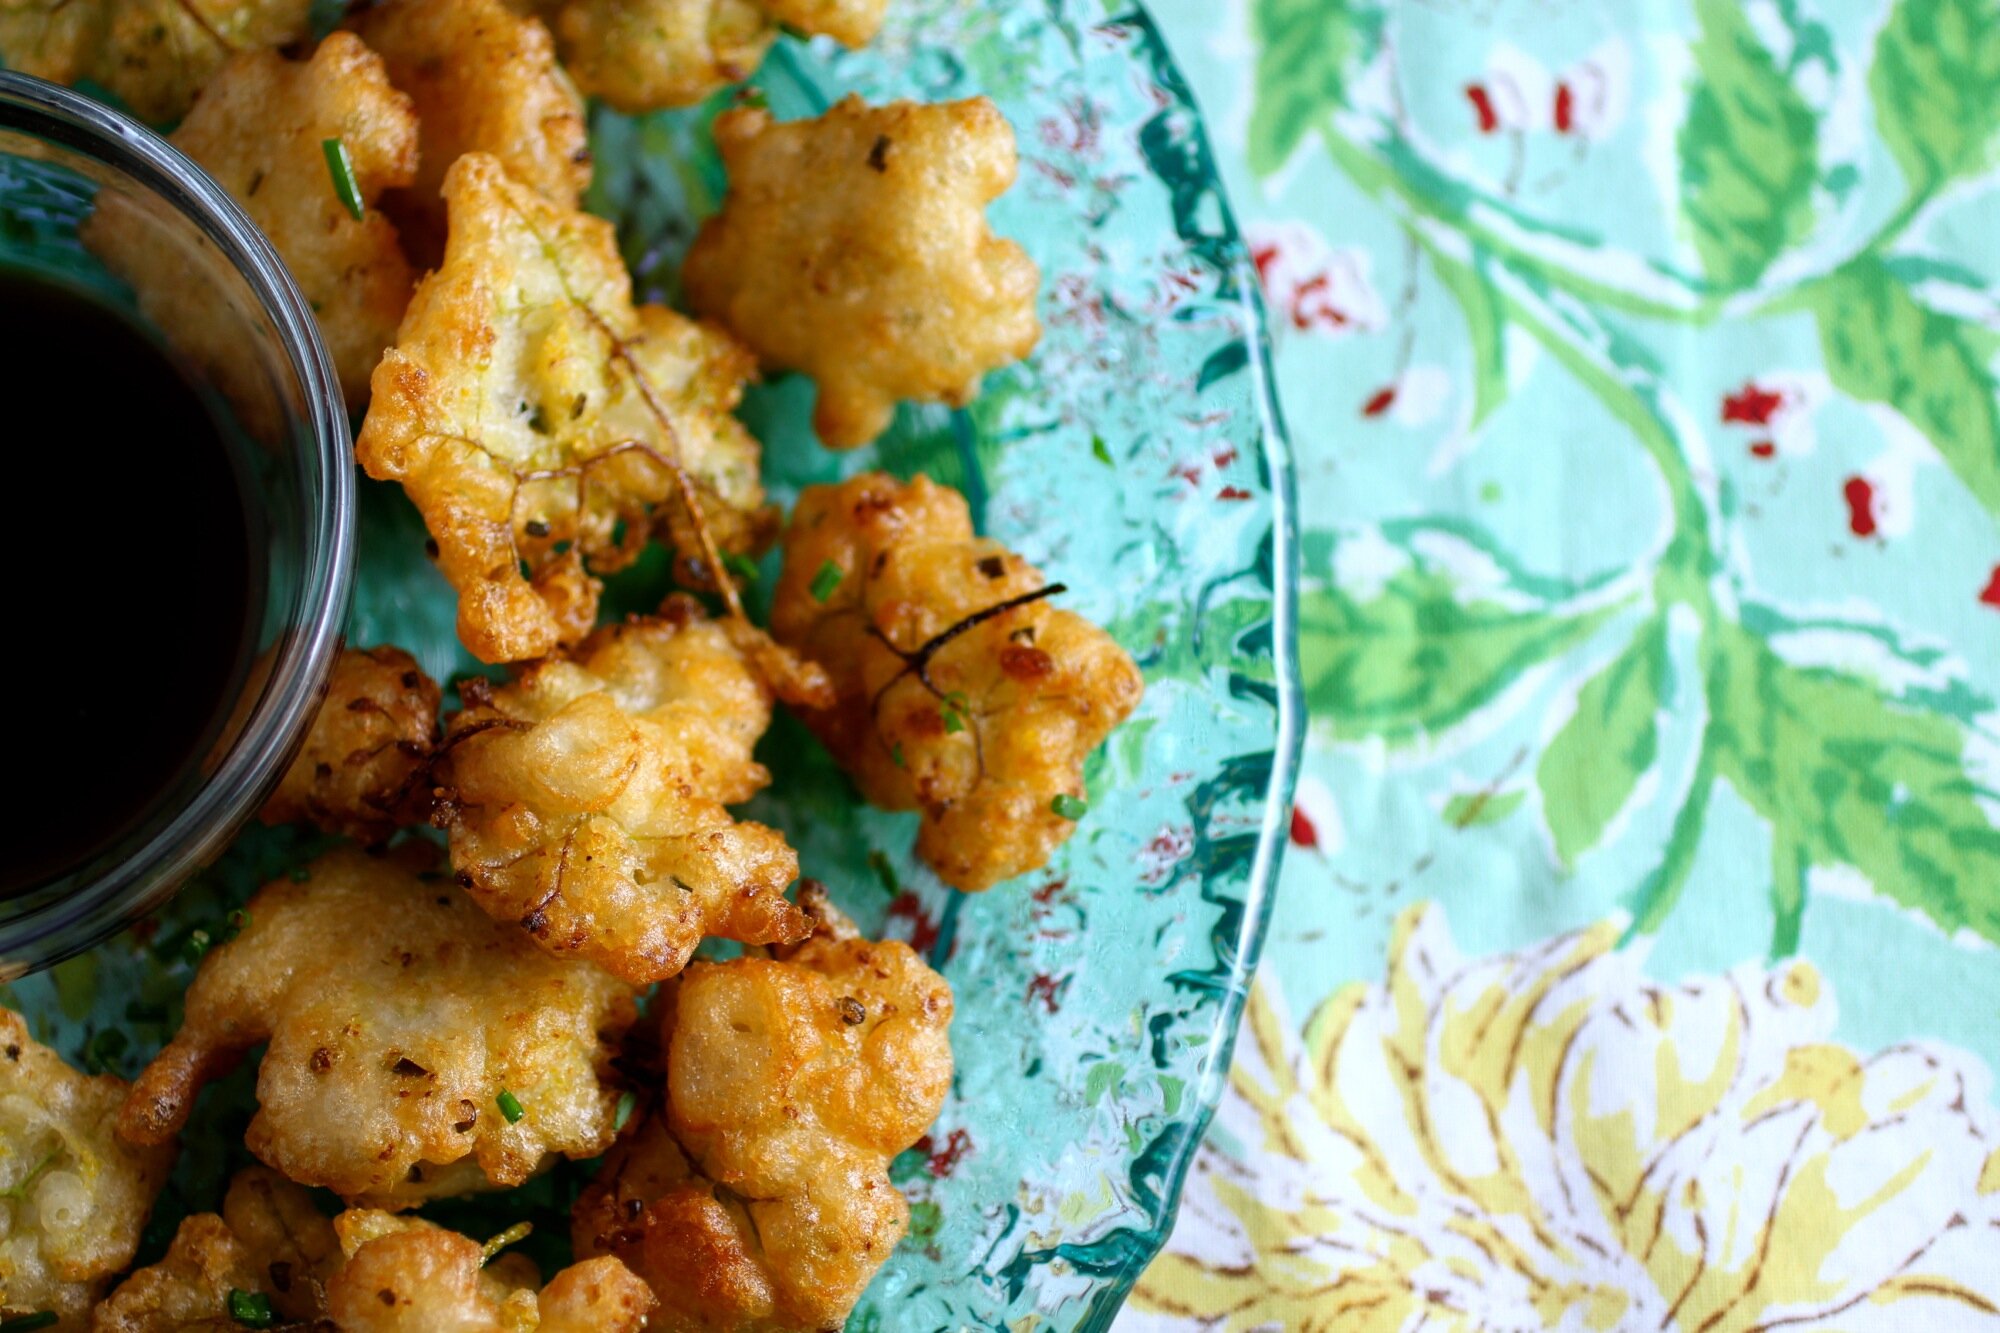
As I've mentioned before, I love elderflower and feel a strong connection to the elder tree (more on the “regal elder” and foraging here). Until recently however, the only things I've ever had made with elderflower have been using a sweet cordial. So when I saw a few recipes for elderflower fritters using the whole flower, I was immediately intrigued and wanted to attempt a savory version. The batter contains lemon zest and chives, because I felt that these would add some zest and complexity without overpowering the floral qualities. I served it with ponzu for a dipping sauce, but honestly, we didn't use it much as the fritters stand best on their own! The below recipe makes about 40-45 small fritters, enough for 4-6.
~10 medium-large elderflower heads, broken up into 40-45 small florets
1 cup all-purpose flour
Pinch yeast (champagne or baker's, I used champagne because I had some leftover)
6-8 fluid ounces apple cider or sparkling water
1/2 tablespoon finely grated lemon zest
1/4 teaspoon sea salt, divided
2 tablespoons diced chives, divided
Grapeseed oil, for frying
Ponzu or aioli for dipping (completely optional)


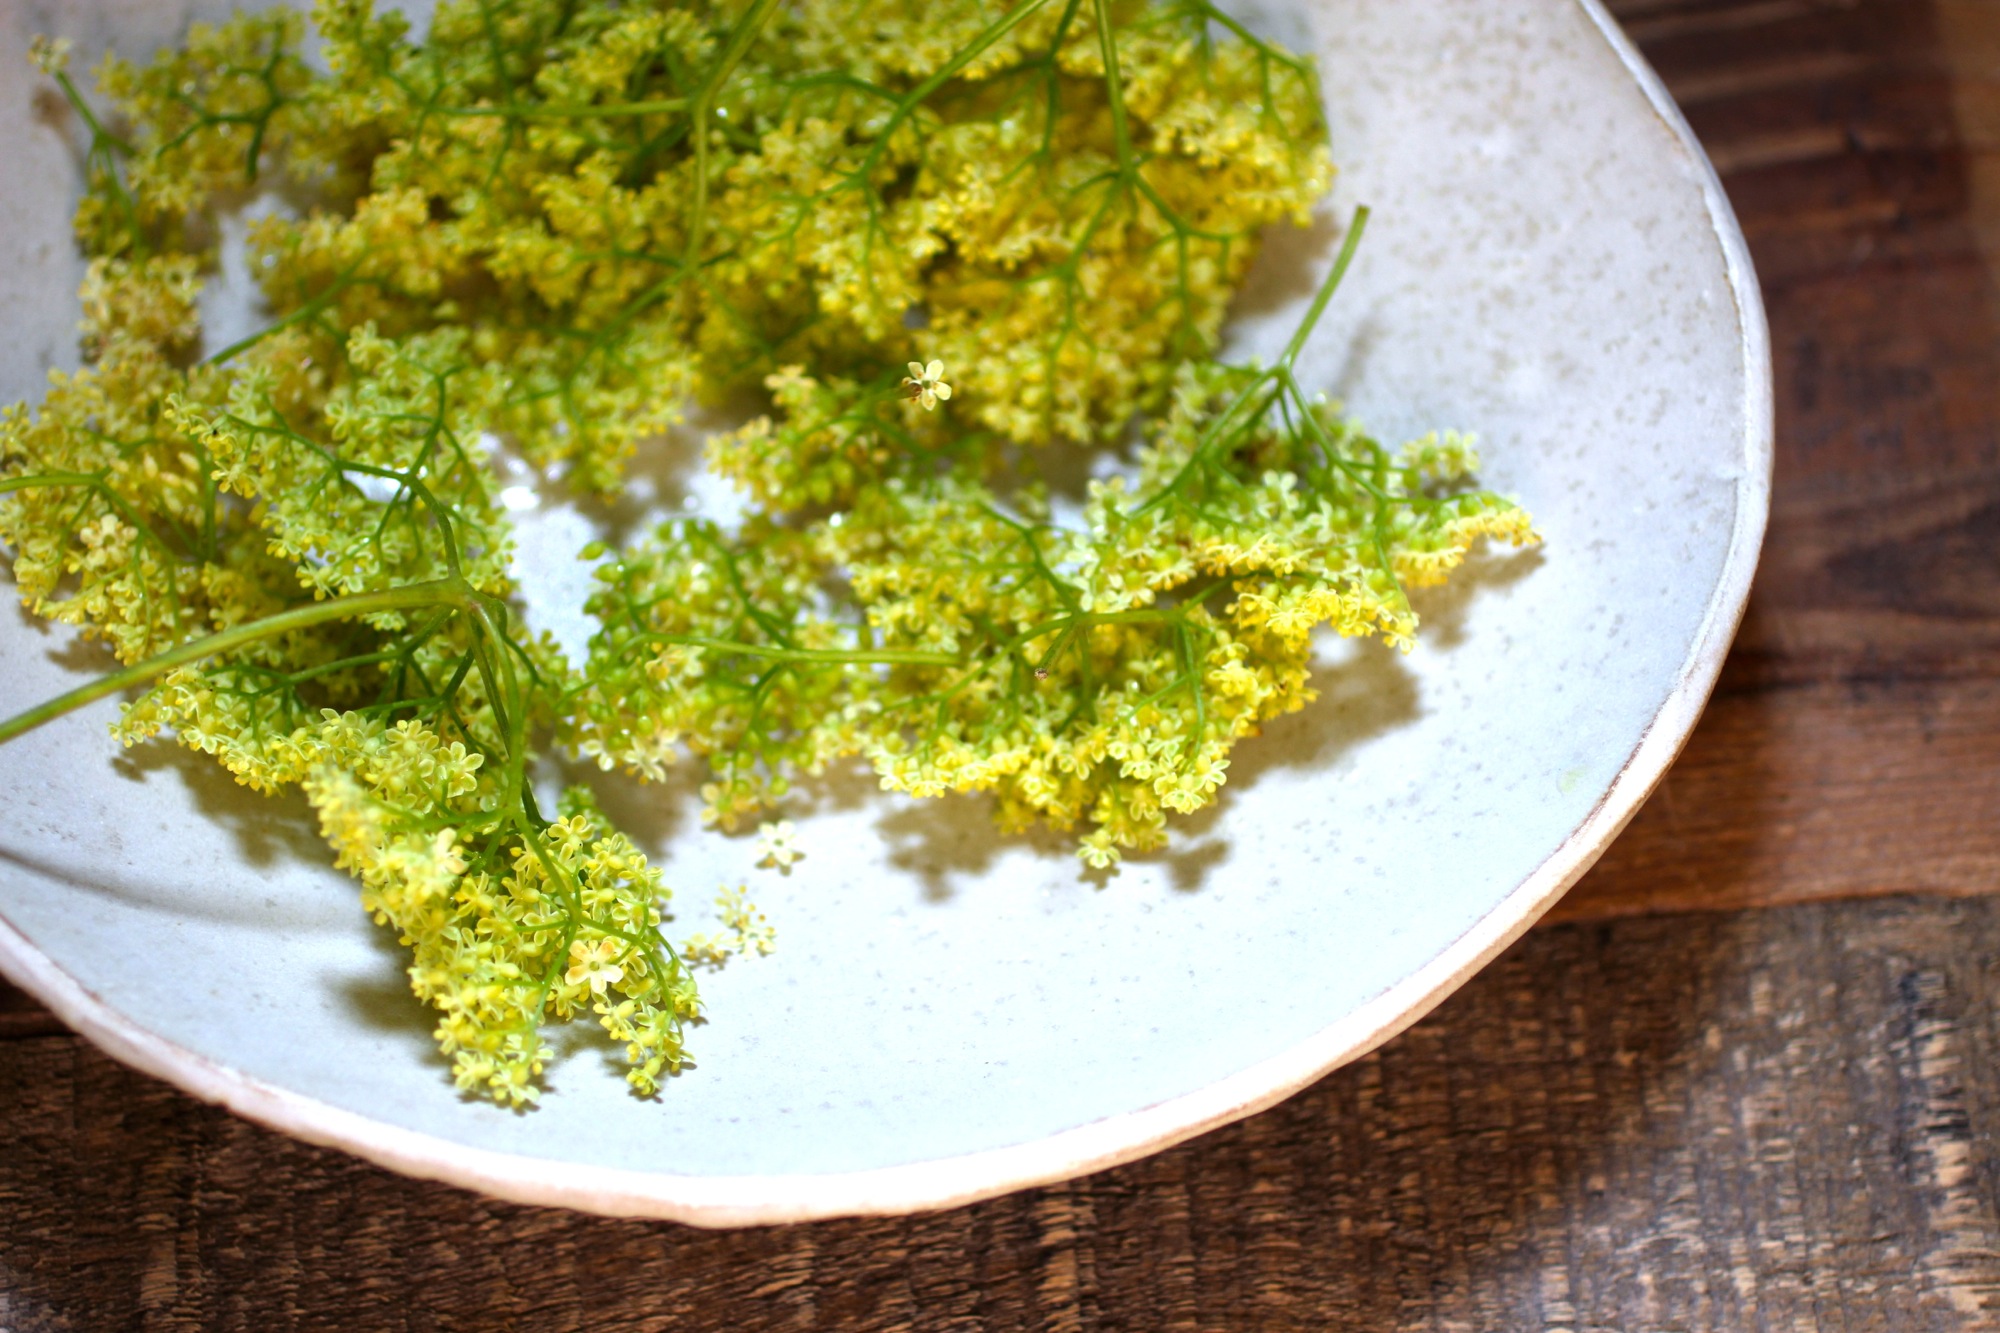
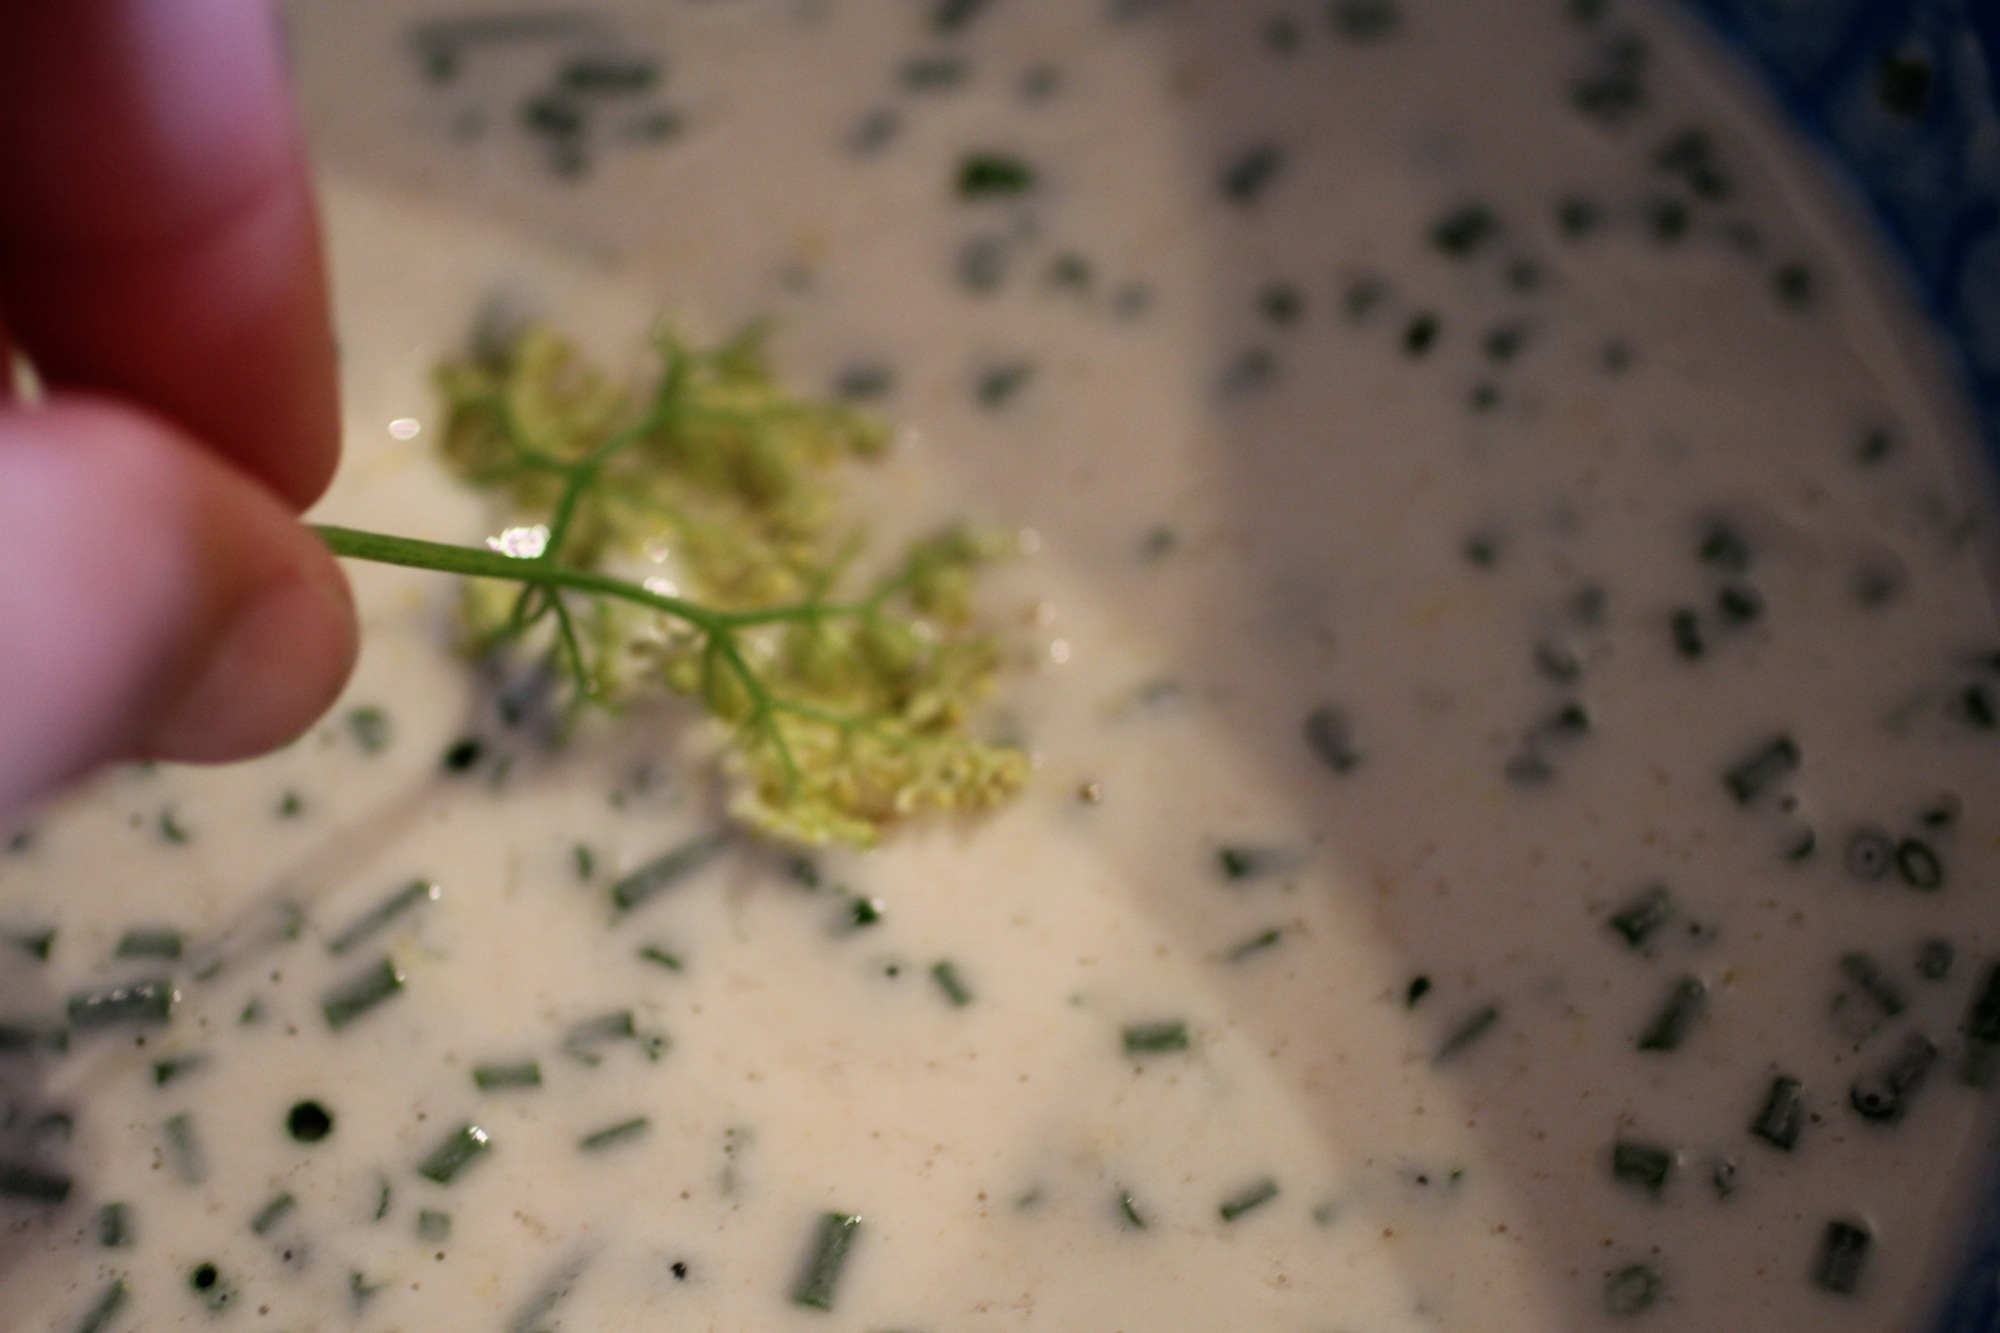

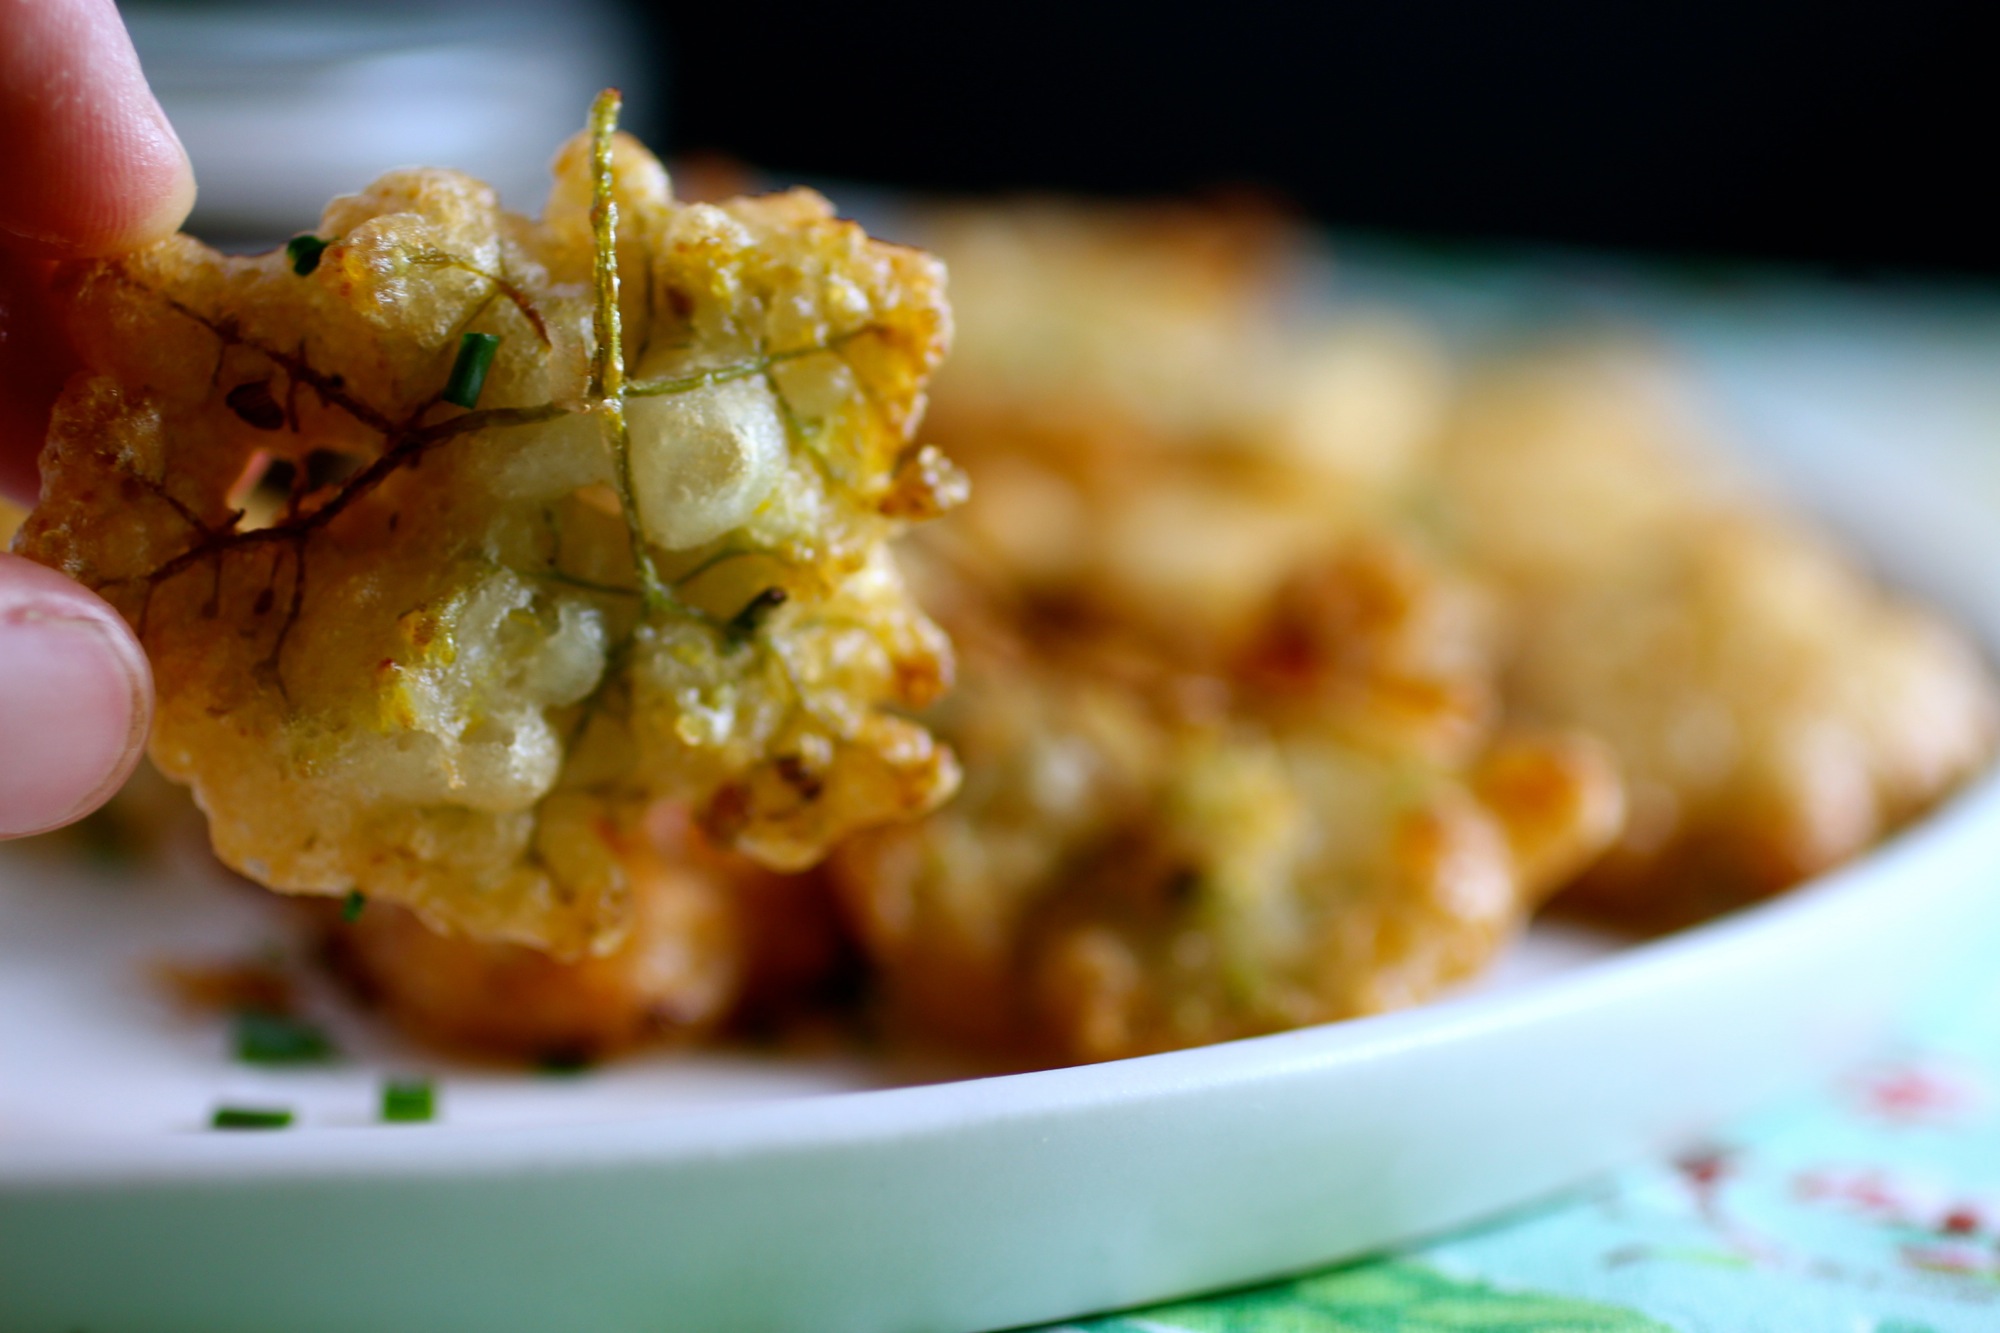
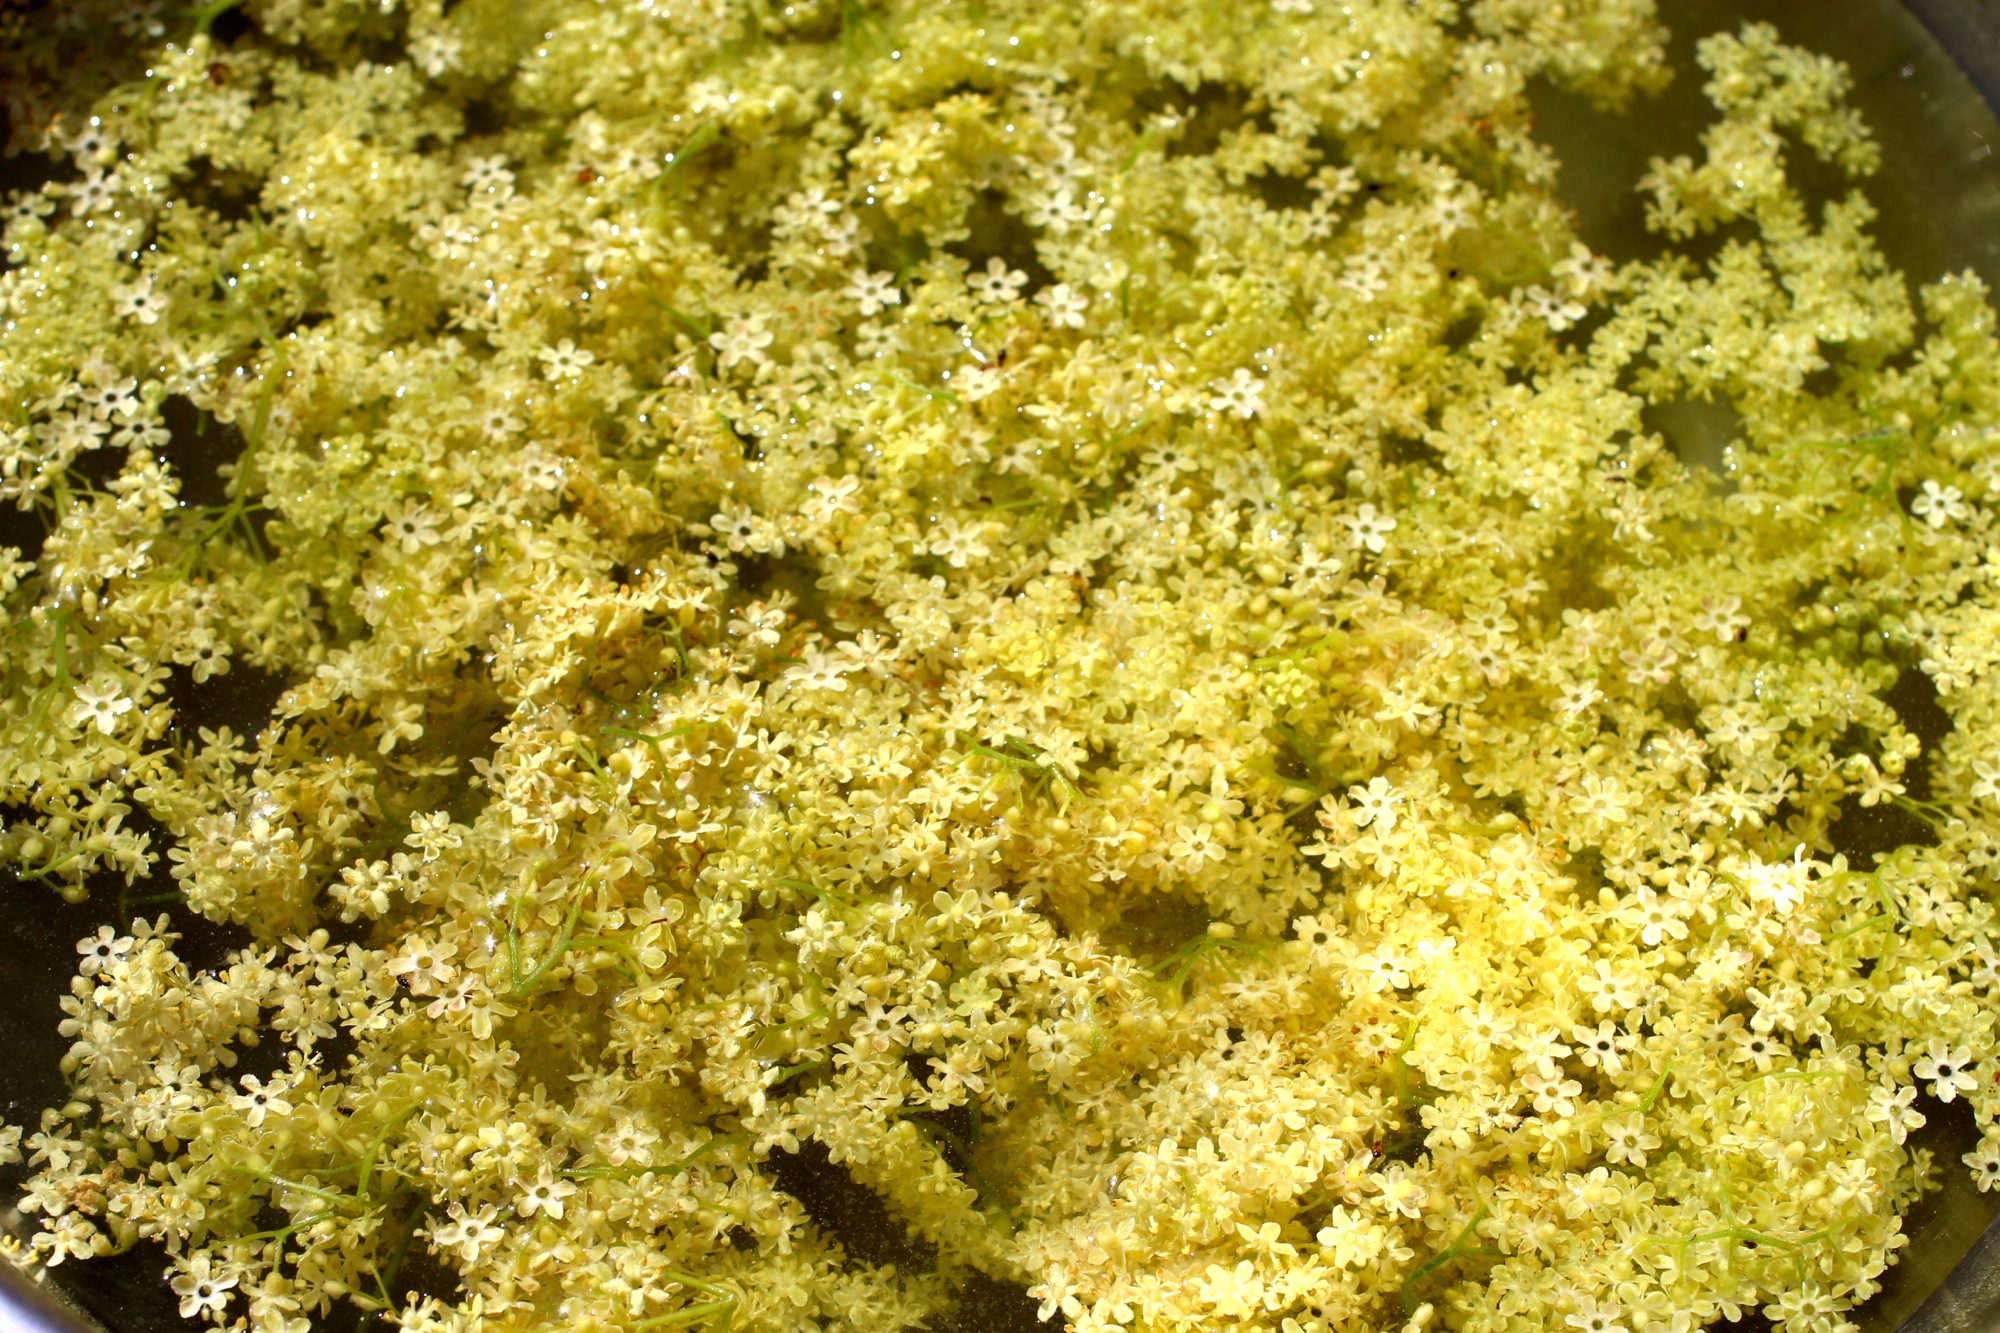
Shake blossoms to remove hitchhiking bugs and dunk into a large bowl of cold water. Remove from water, shake to remove as much water as possible (and probably more bugs!), and pluck smaller clusters (about 1-inch each) from larger clusters, removing as much large stem as possible (there will be some stems still, as that's how the flower clusters stay together). Set aside on a paper towel to dry more.
Whisk flour with yeast, 6 ounces cider, lemon zest, and 1/8 teaspoon salt until combined. Batter should be runny like pancake batter and will start to fluff up from the yeast. If batter is not runny enough, add some more cider then gently whisk in 1-1/2 tablespoon chives.
Pour enough grapeseed oil into a frying pan so that oil is 1/2-inch up the sides of the pan and heat to high.
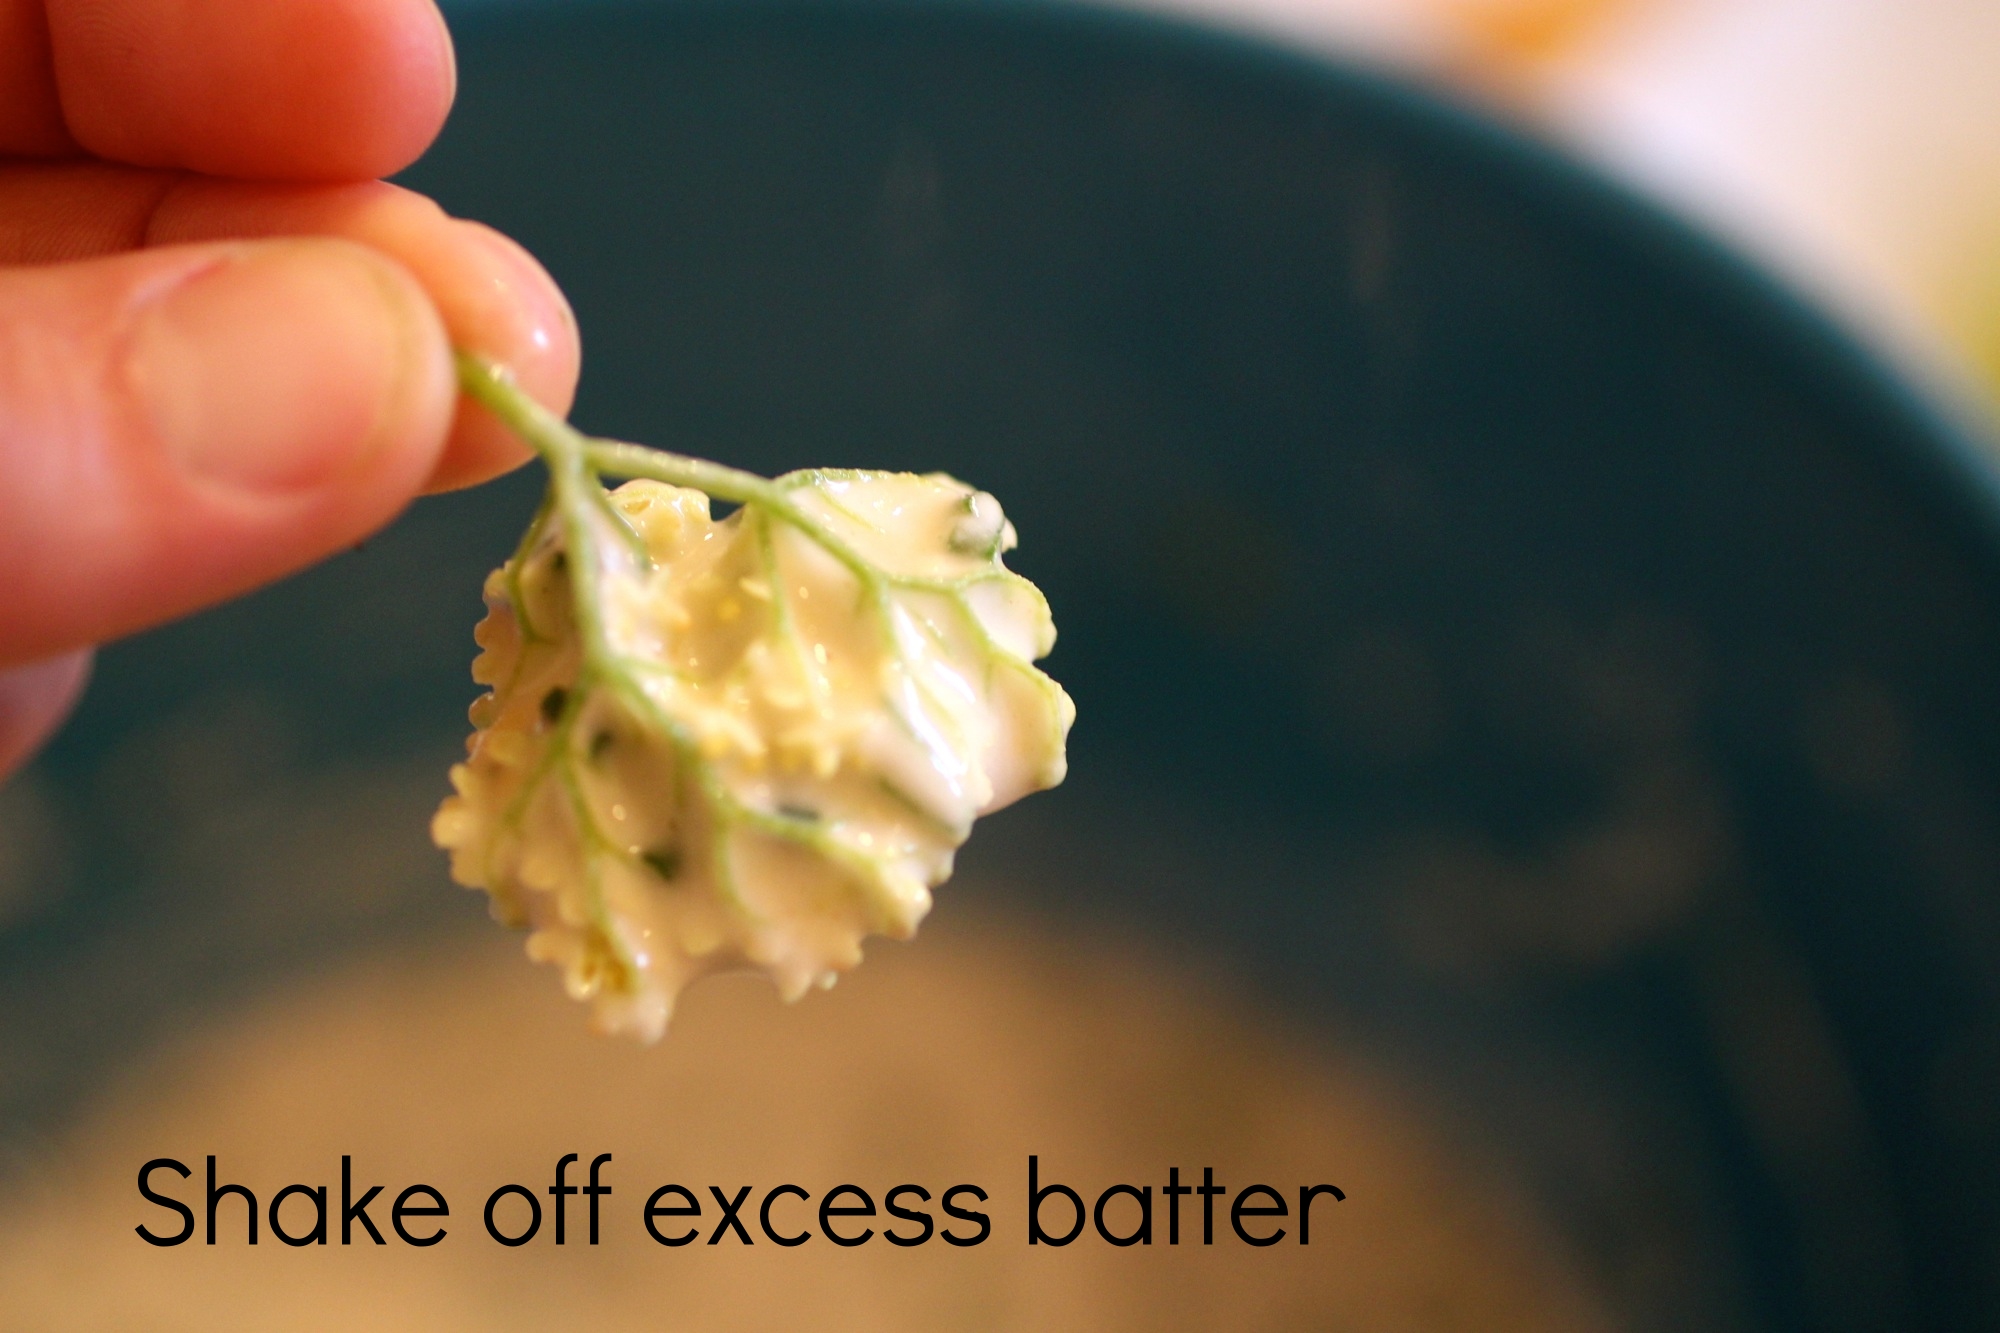
Once oil is hot, dip florets (one at a time) into batter, shake off any large clumps, and fry in oil until golden brown, about 1-2 minutes on the side opposite the stem, then flip and fry another 30 seconds on the stem side.
Remove fritters and place on paper towel, then repeat with florets in batches until all are fried.
Top fritters with dusting of remaining salt and remaining chives. Serve with ponzu or aioli if desired.
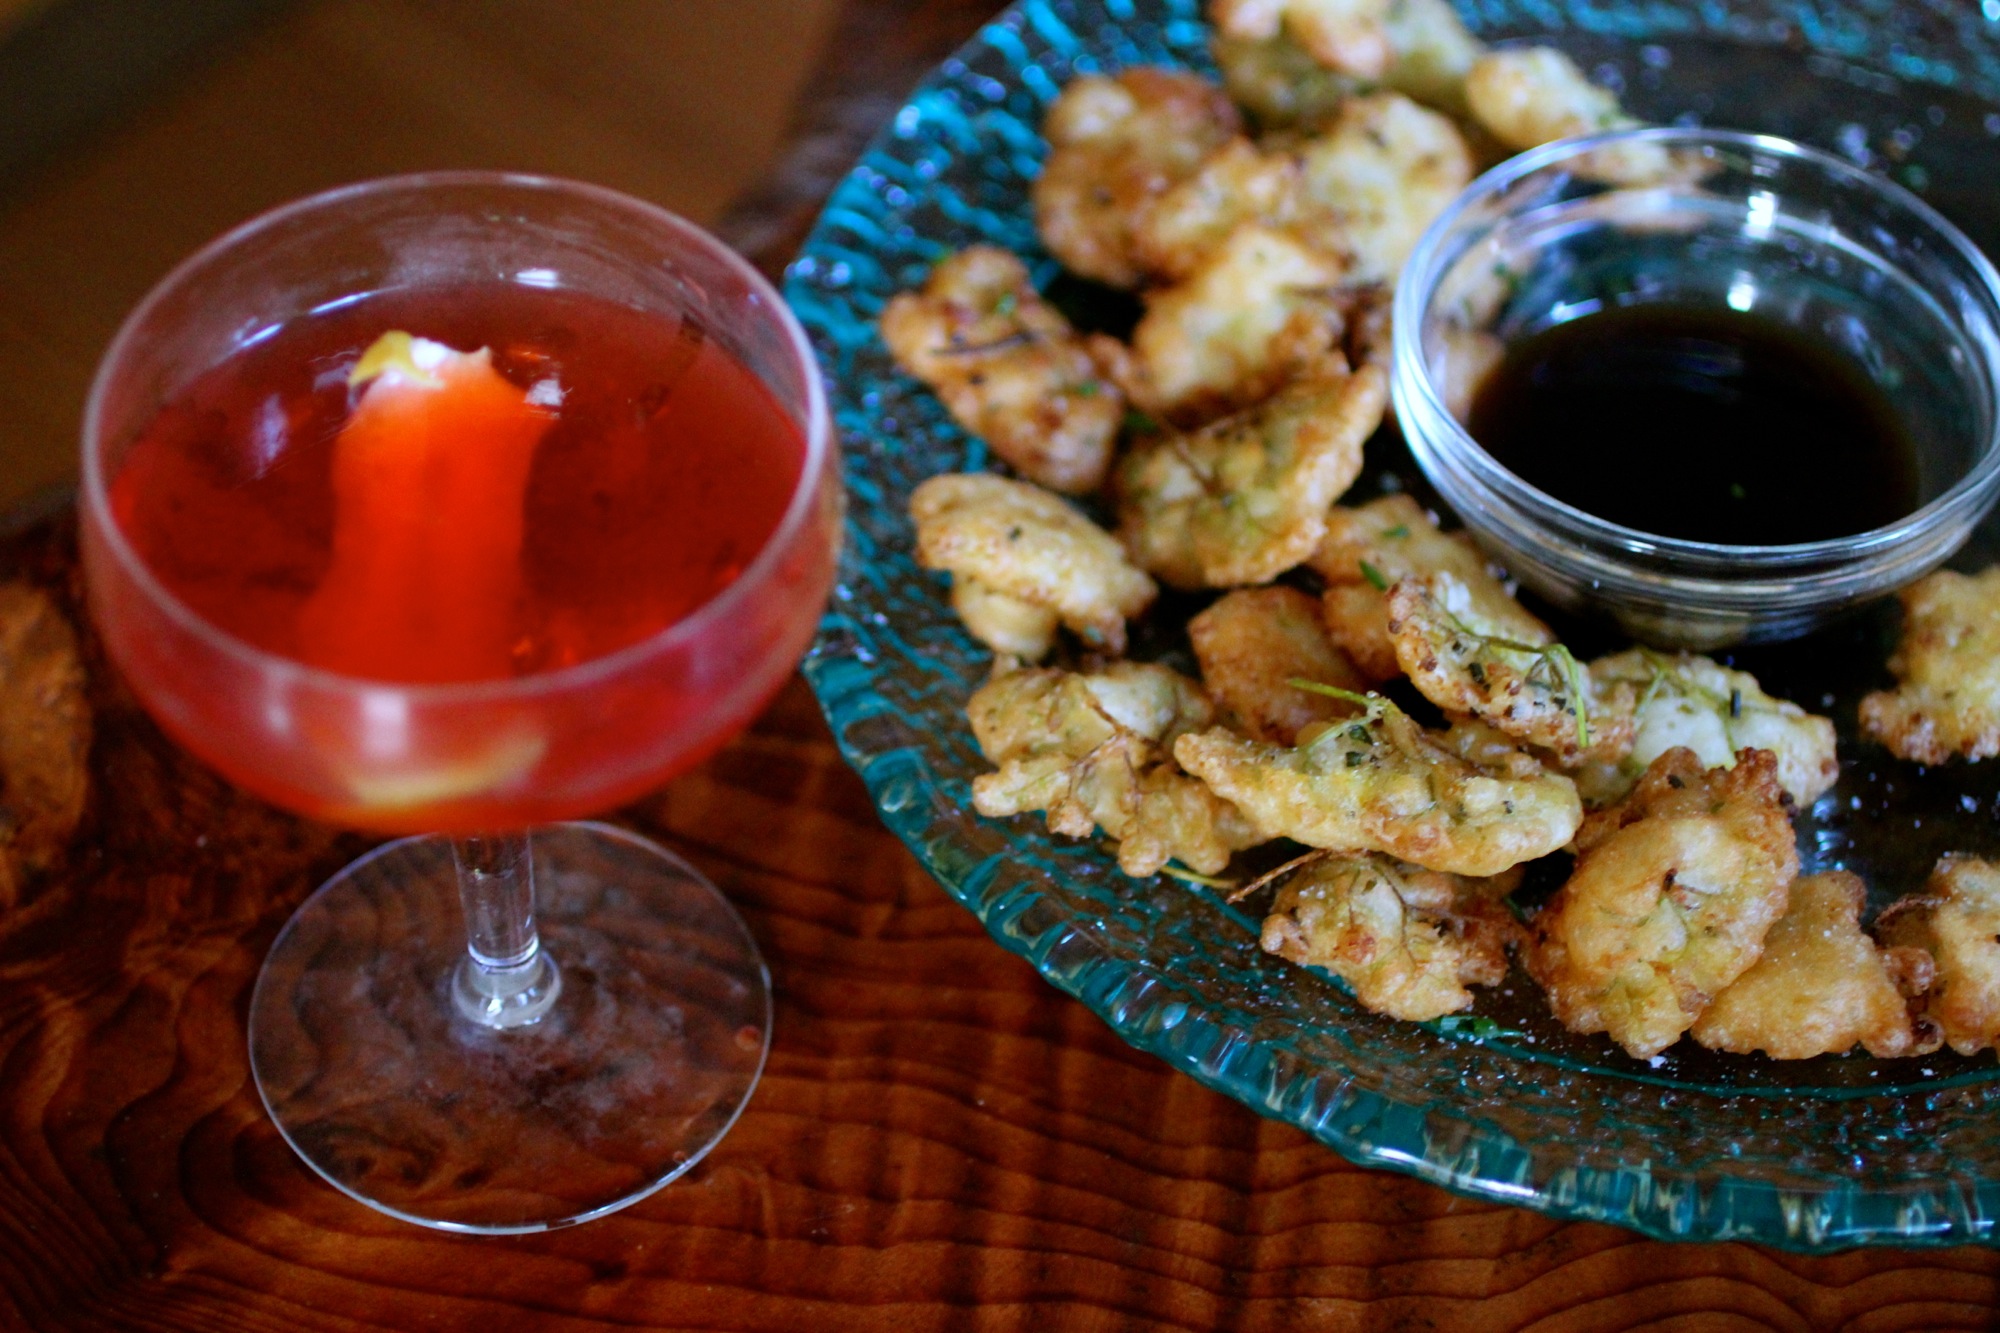
Ponzu not needed, but a cocktail is!
Bay Nut Mole Negro
Foraged bay nuts give the chocolate-coffee flavor you're looking for in a mole.

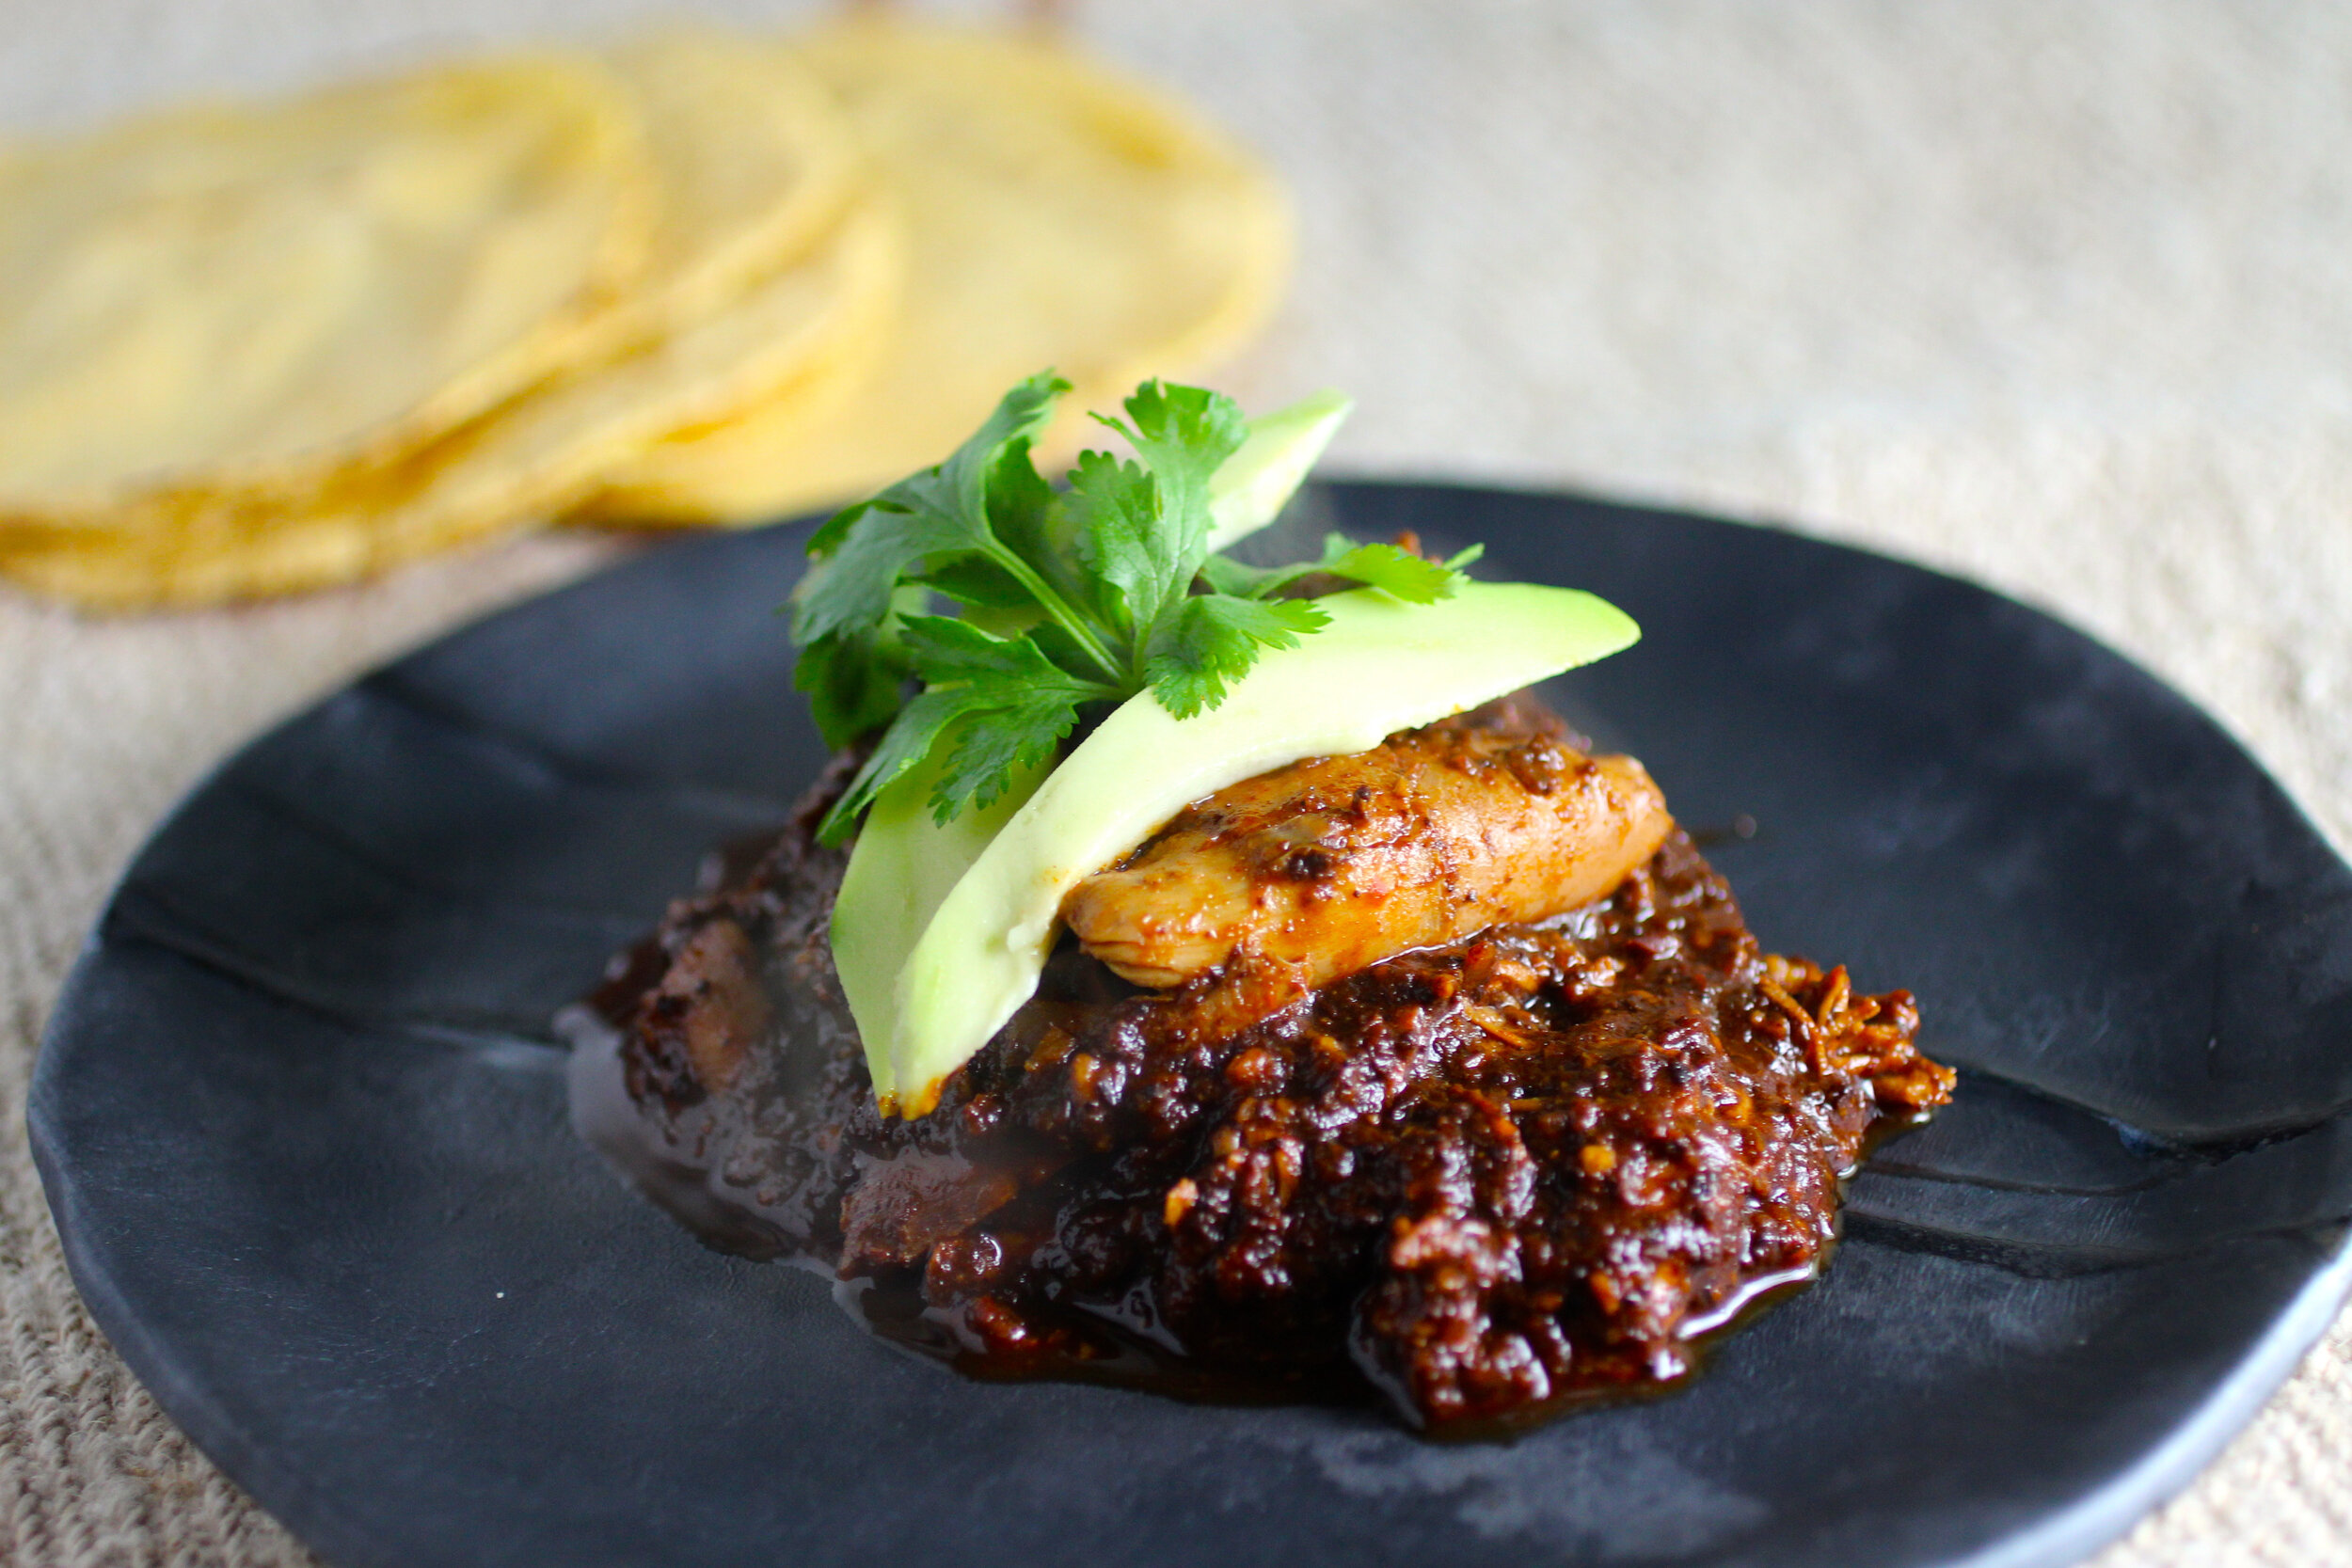
Most mole recipes leave me feeling overwhelmed and in a too-many-ingredients comatose. This one, although it does take about 2 hours to prepare, it a lot more approachable and some of that time is inactive, which means you can spend it on your other side dishes. Yes, this recipe is likely not as complex as others you may find, but even just with two chiles and some other key ingredients, you can create a delicious and robust mole negro.
“As bay nuts do not contain sugar or cinnamon, I added a little of each. If you don’t have bay nuts, replace them with mexican chocolate (such as Ibarra) and skip the brown sugar and cinnamon. ”
Also unique to this mole is that instead of the traditional chocolate, I chose to use bay nuts. Bay nuts are a foraged find from the bay laurel tree (more on bay nuts and foraging here). The bay nut is a member of the avocado family that, when roasted, becomes akin to a combination of chocolate and coffee - ideal for mole. Recipe serves 6.
2.5 pounds skinless chicken thighs and/or legs
~1-2 teaspoons salt
2 tablespoons grapeseed (or other neutral flavored oil), divided
1.5 cups low sodium chicken broth
Juice and zest from 2 blood oranges
2 cinnamon sticks
1 yellow onion, chopped
1/4 cup almonds, chopped
3 large garlic cloves, diced
2 teaspoons cumin seeds
2 teaspoons coriander seeds
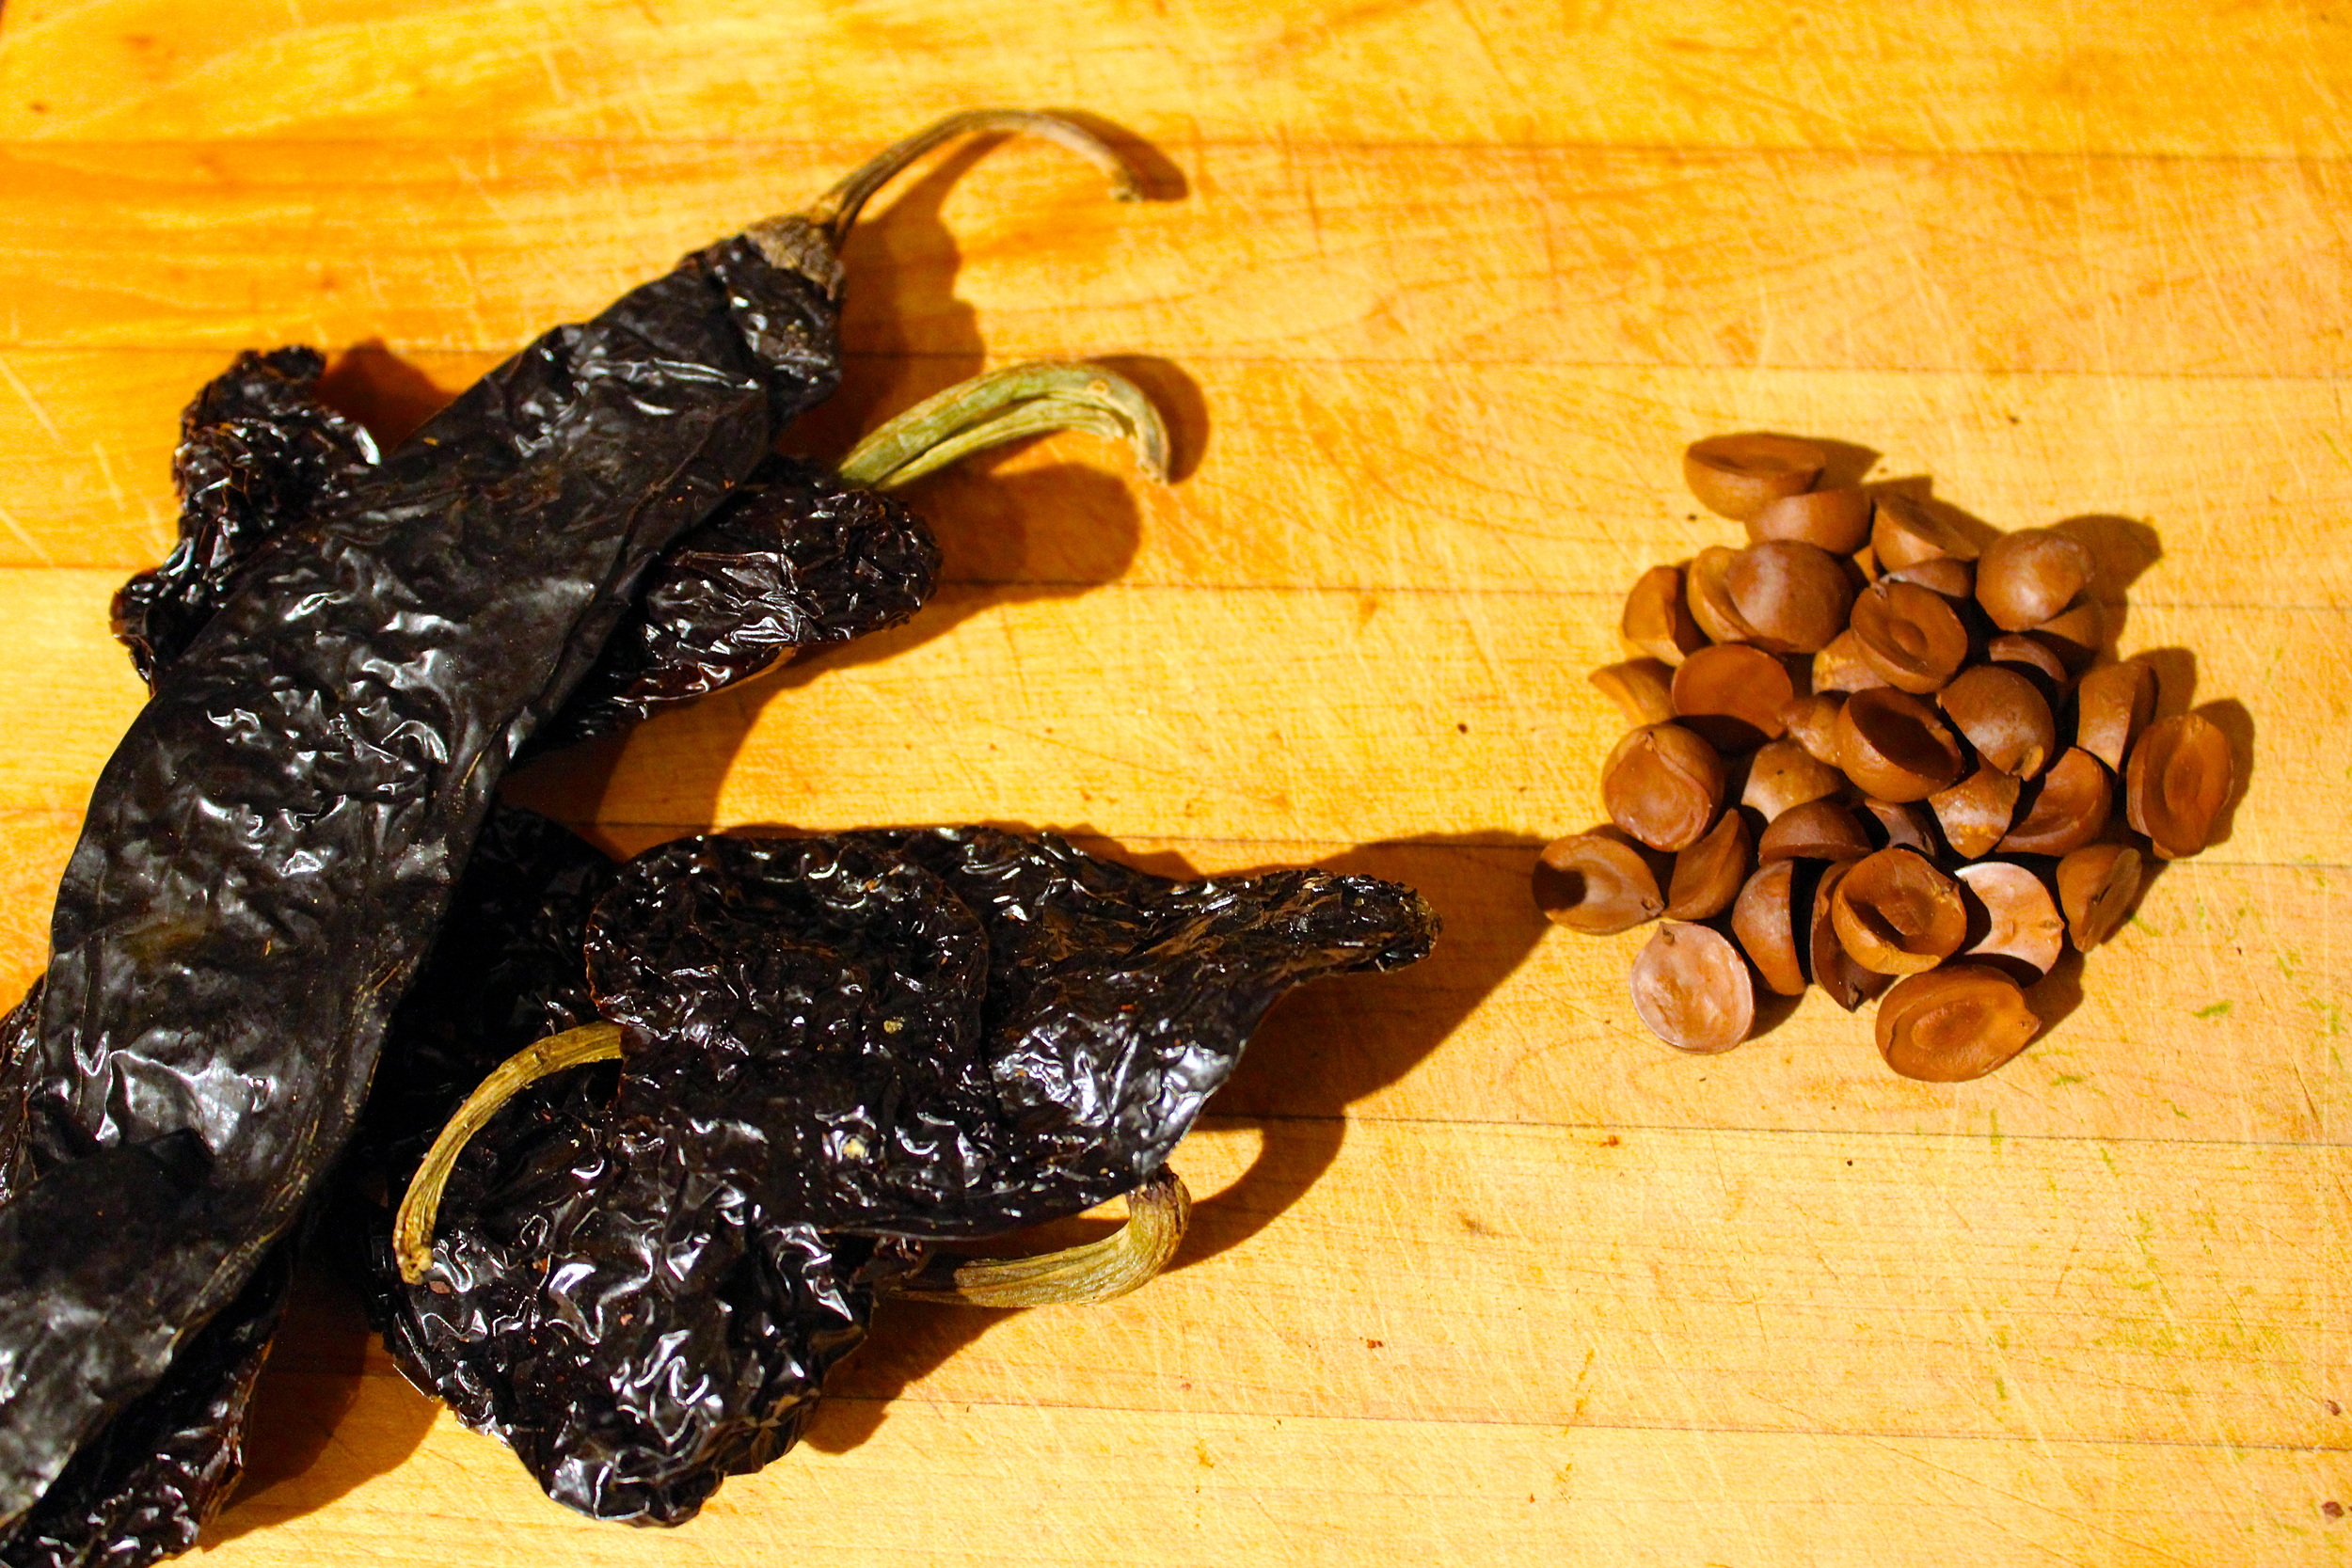
1.5 ounces dried pasilla chiles, stemmed, seeded, and torn into strips
0.5 ounces dried negro chiles, stemmed, seeded, torn into strips
3 prunes, chopped
1 teaspoon dried oregano
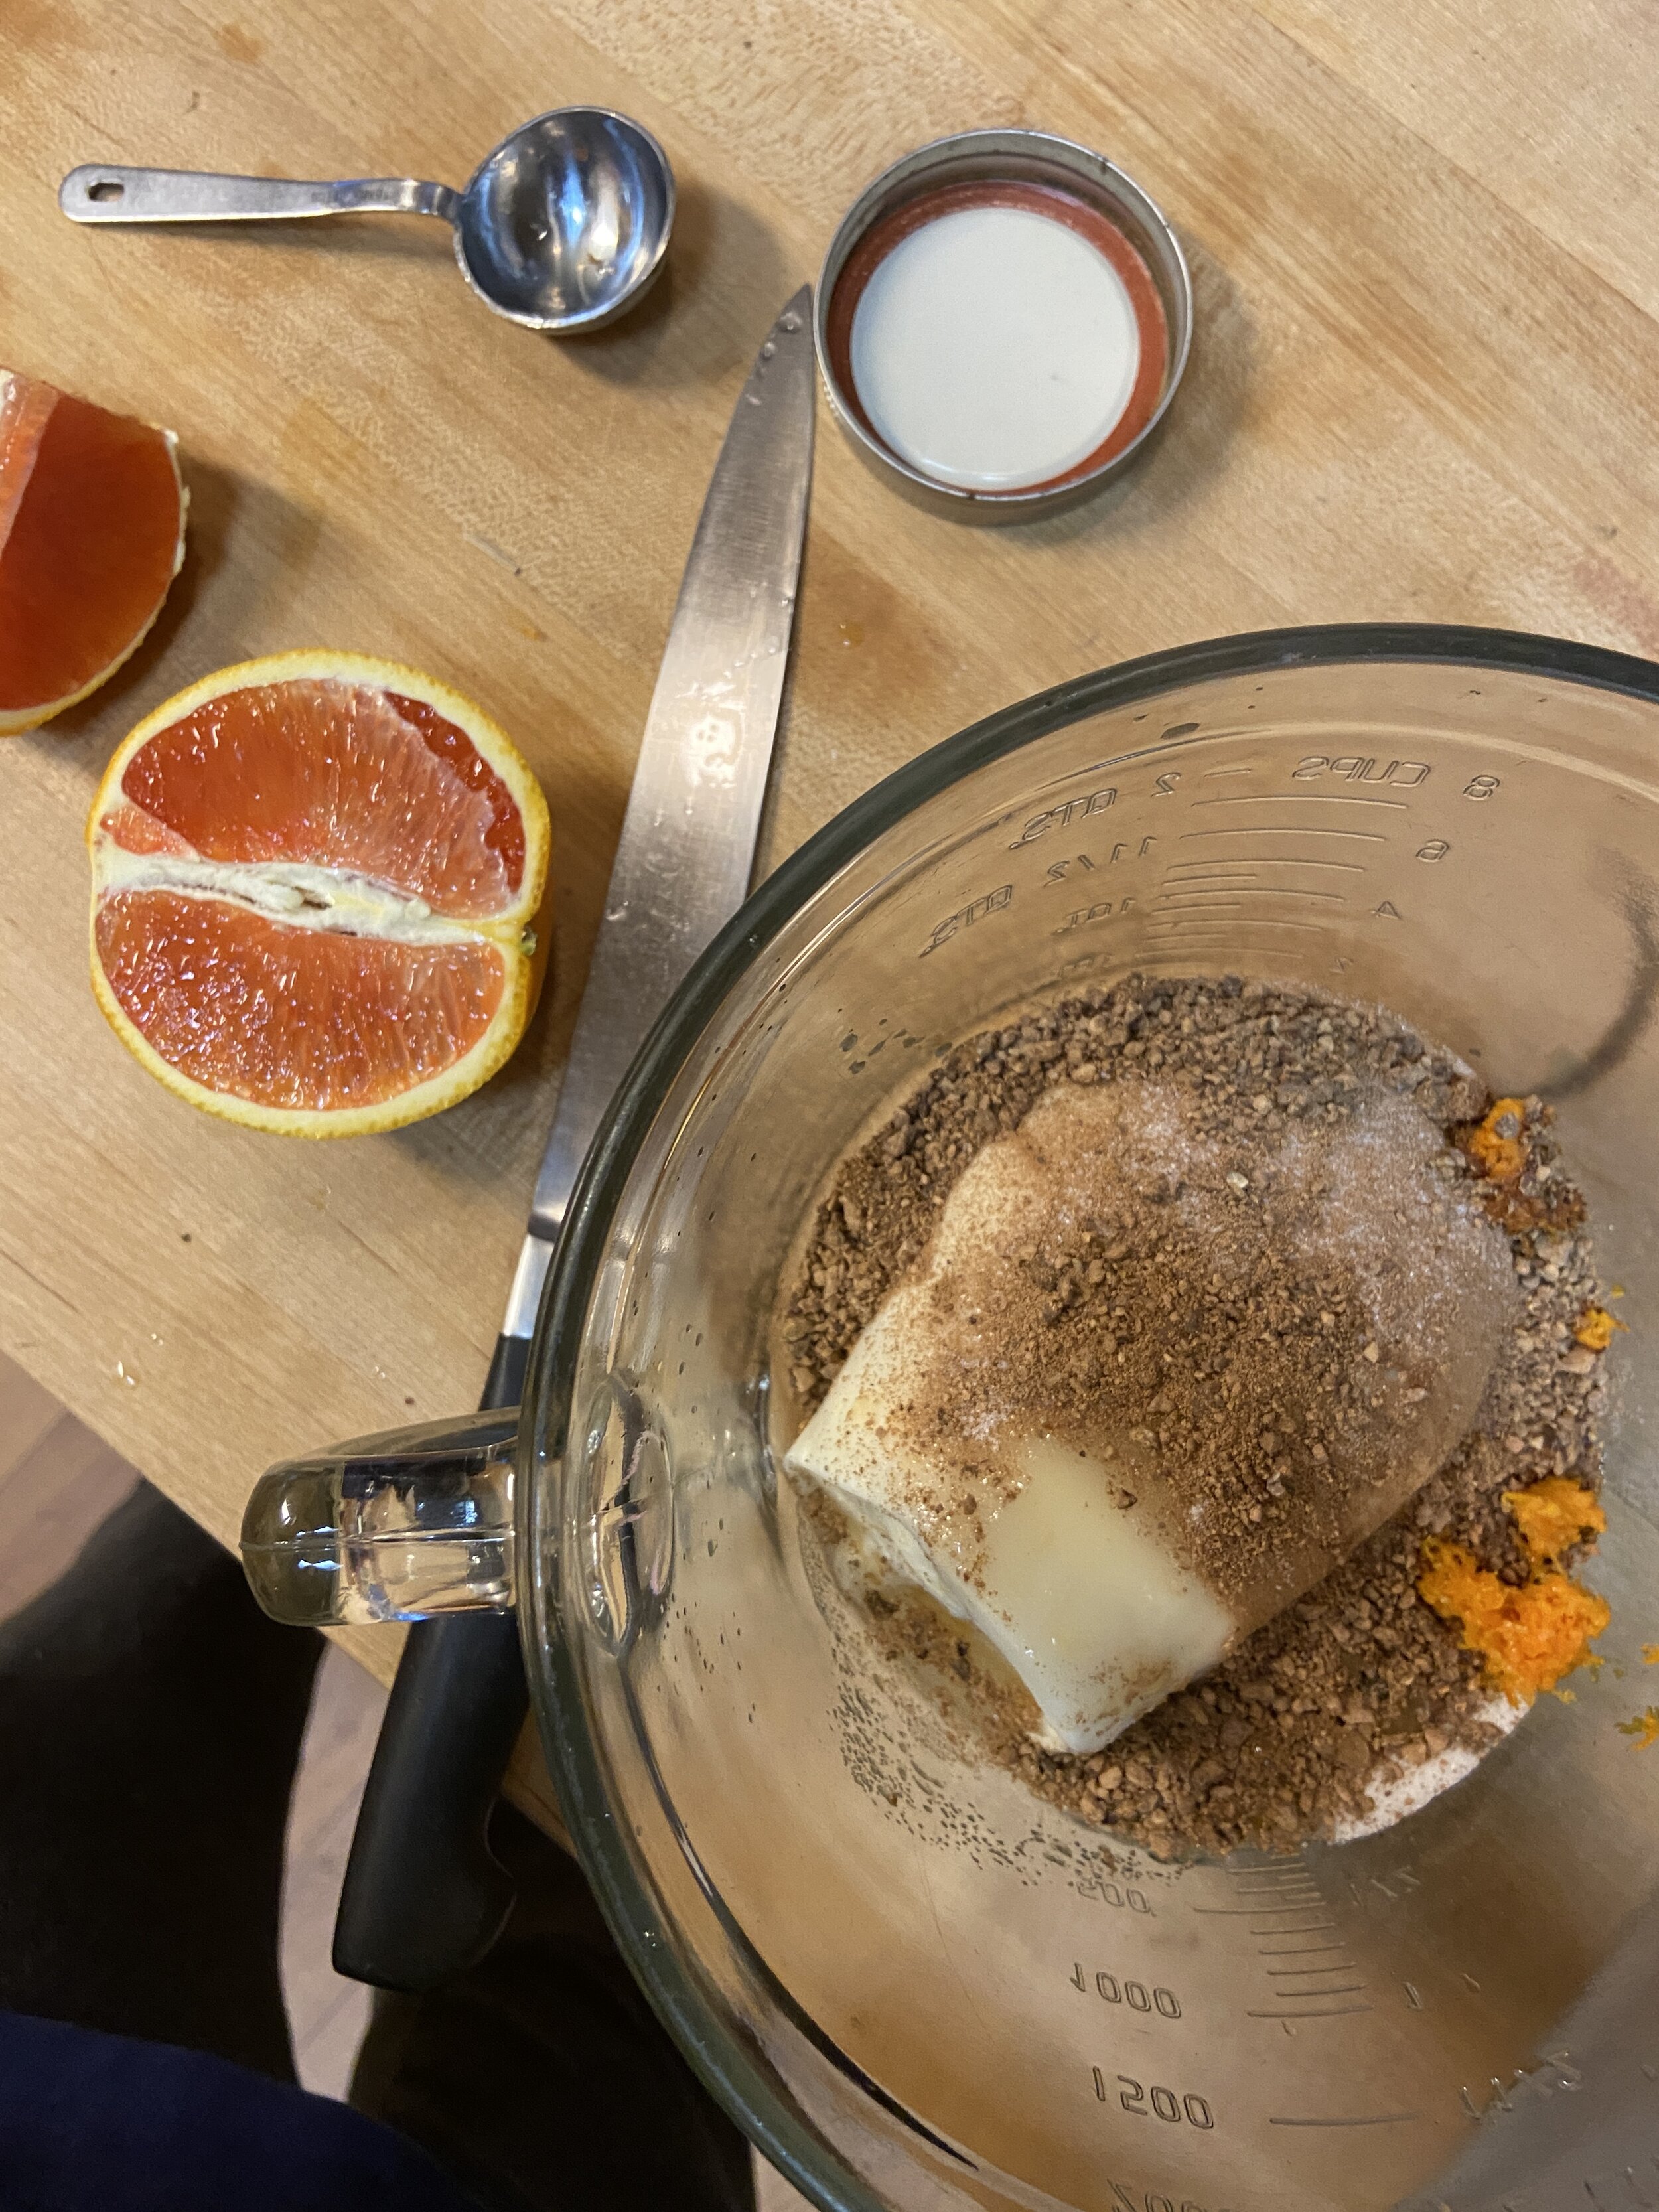
2 ounces roasted bay nuts, chopped (mexican chocolate can be substituted for bay nuts, brown sugar, and cinnamon)
1 tablespoon brown sugar
Chopped fresh cilantro, queso fresco, avocado, and corn tortillas (to serve)
Rub chicken all over with salt. Heat 1 tablespoon oil in large pot (I use my large Le Creuset pot) over medium-high heat. Brown chicken on both sides, about 3 minutes per side.
Add broth, blood orange juice, and cinnamon sticks then bring to a boil. Reduce heat to medium-low; cover and simmer until chicken is tender and just cooked through, about 25 minutes.
Meanwhile, heat remaining 1 tablespoon oil in large saucepan over medium heat. Add onions and garlic and sauté until softened and beginning to caramelize, about 10-12 minutes, stirring occasionally. Add almonds, cumin, coriander, and chiles. Reduce heat to medium-low and cook while stirring until chiles soften, about 4 minutes.
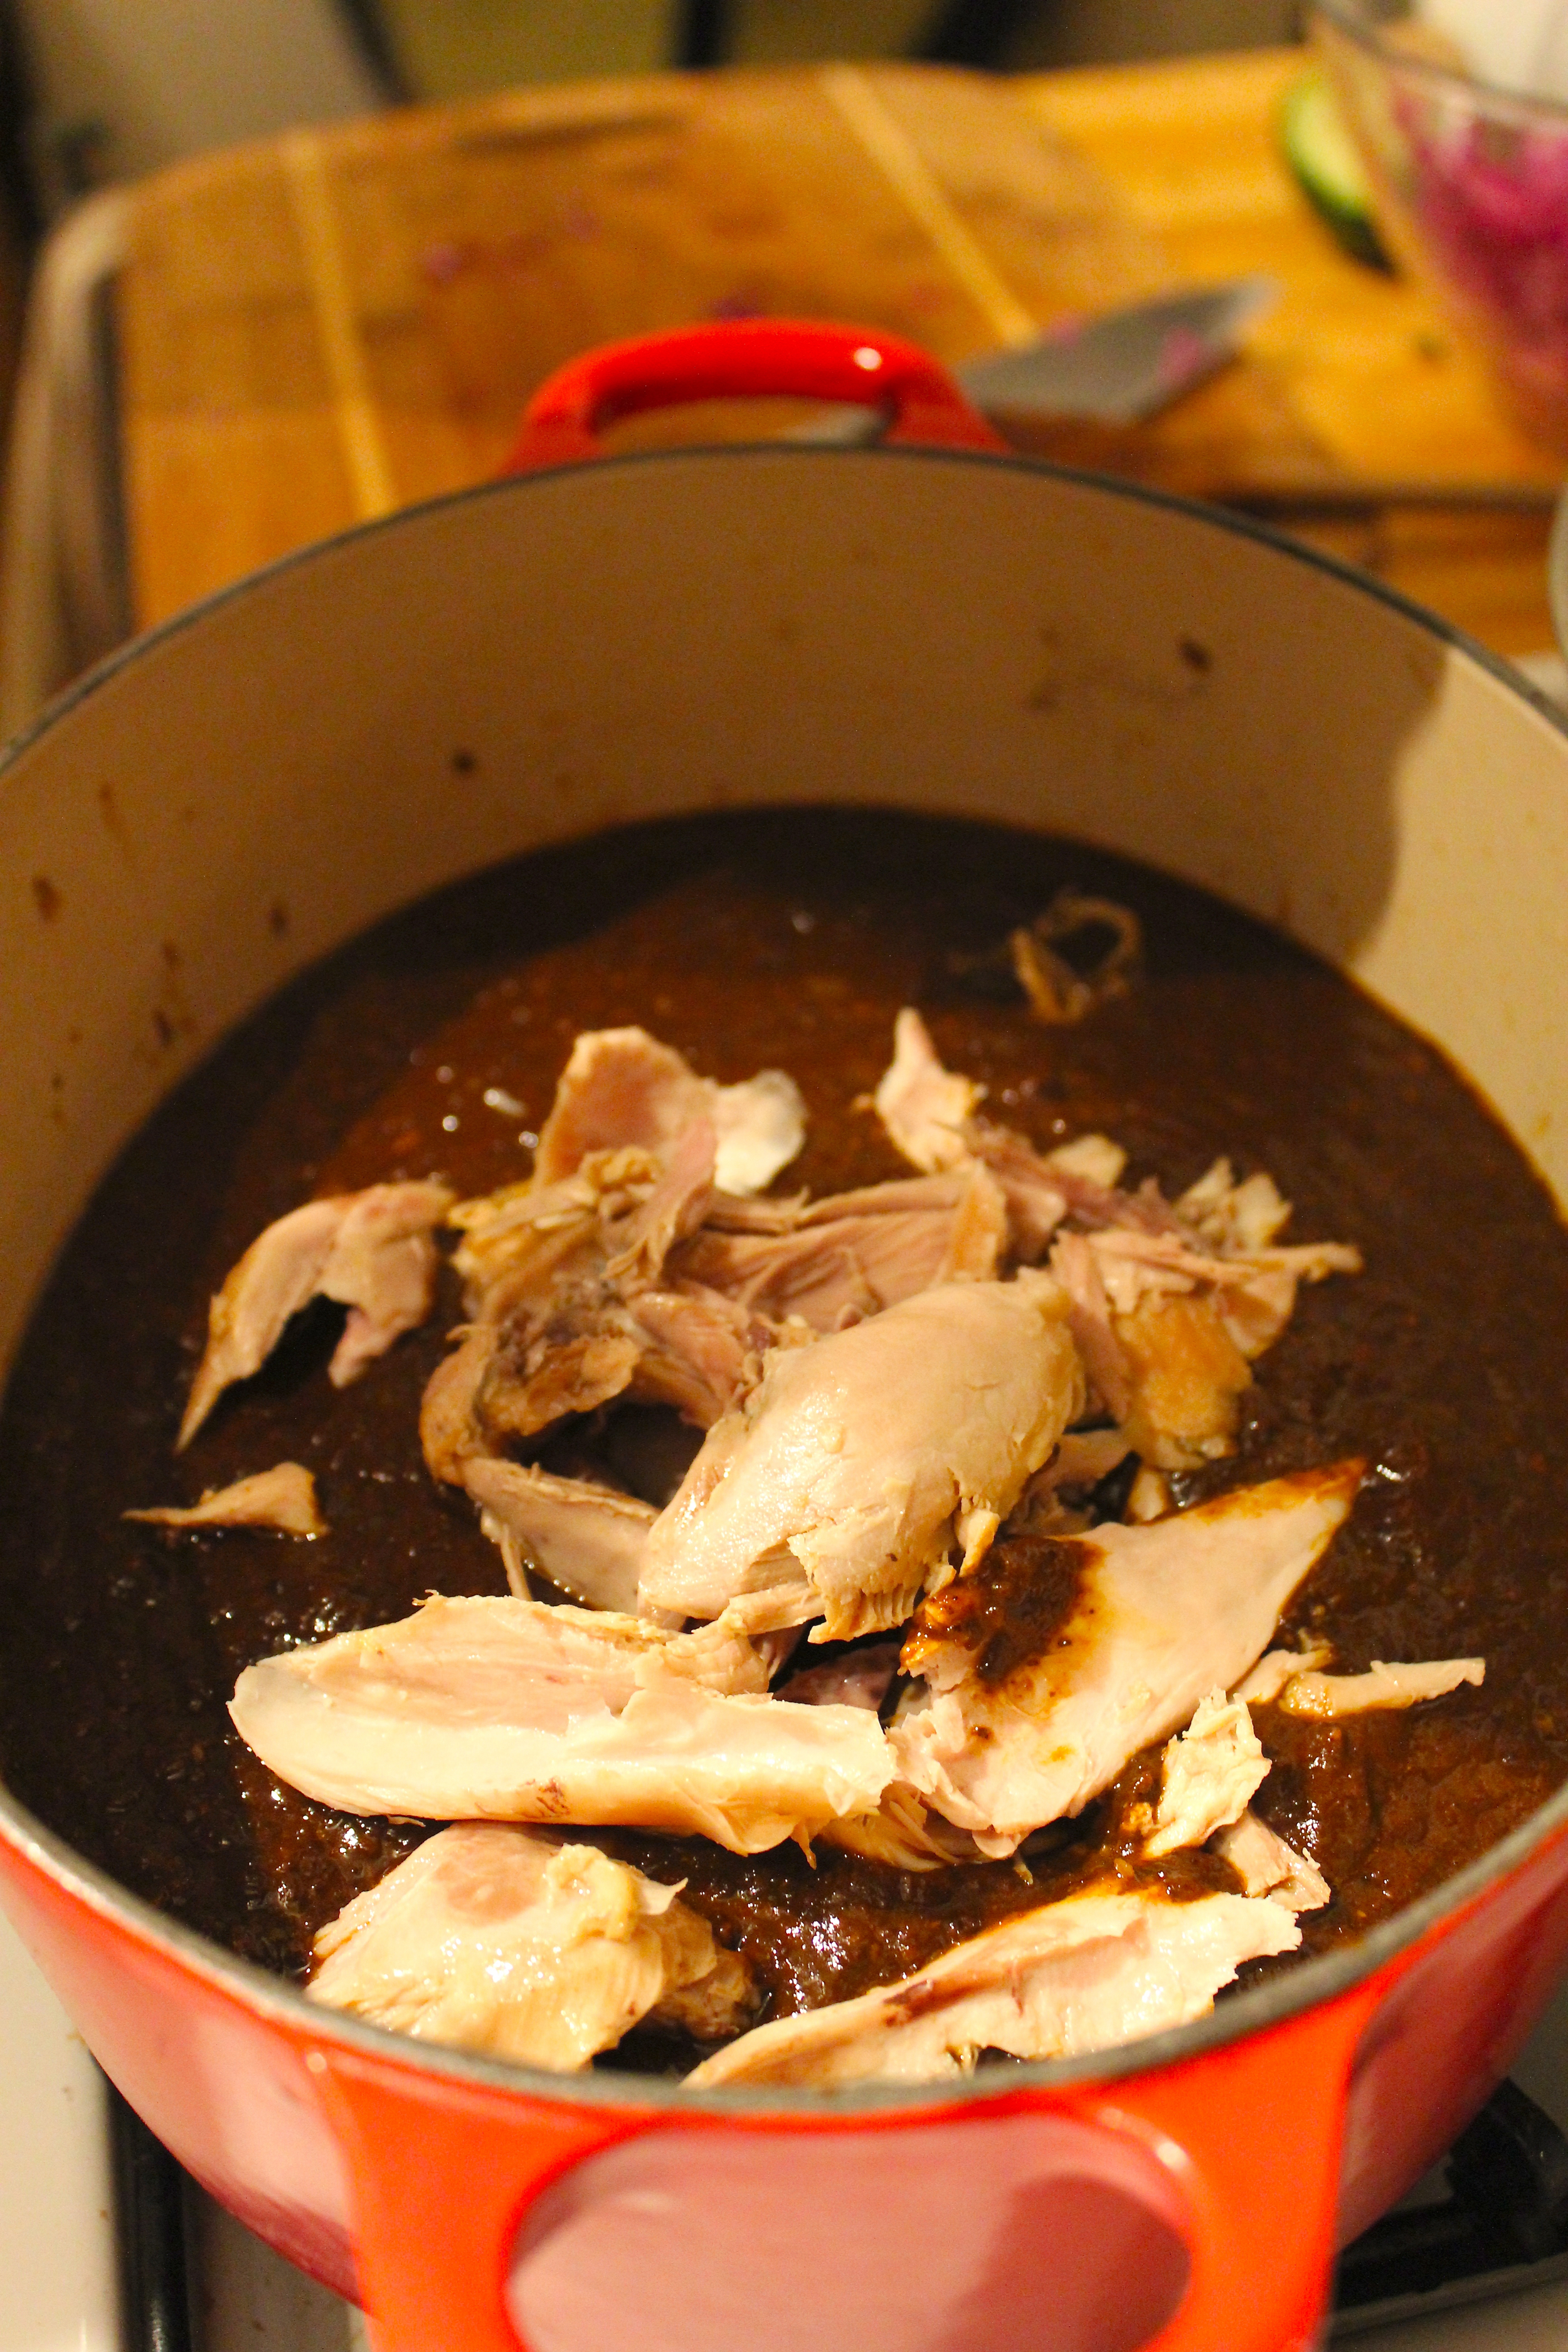
Using tongs, transfer chicken from pot to large bowl. Pour chicken cooking liquid into saucepan with onion-chile mixture (reserve pot). Add blood orange zest, prunes, oregano, bay nuts, and brown sugar to saucepan. Cover and simmer until chiles are very soft, stirring occasionally, about 30 minutes. Remove cinnamon sticks and discard.
Transfer sauce mixture to food processor or blender and purée until smooth; return to reserved pot. Season sauce to taste with salt. Coarsely shred chicken and return to sauce; stir to coat and re-heat chicken.
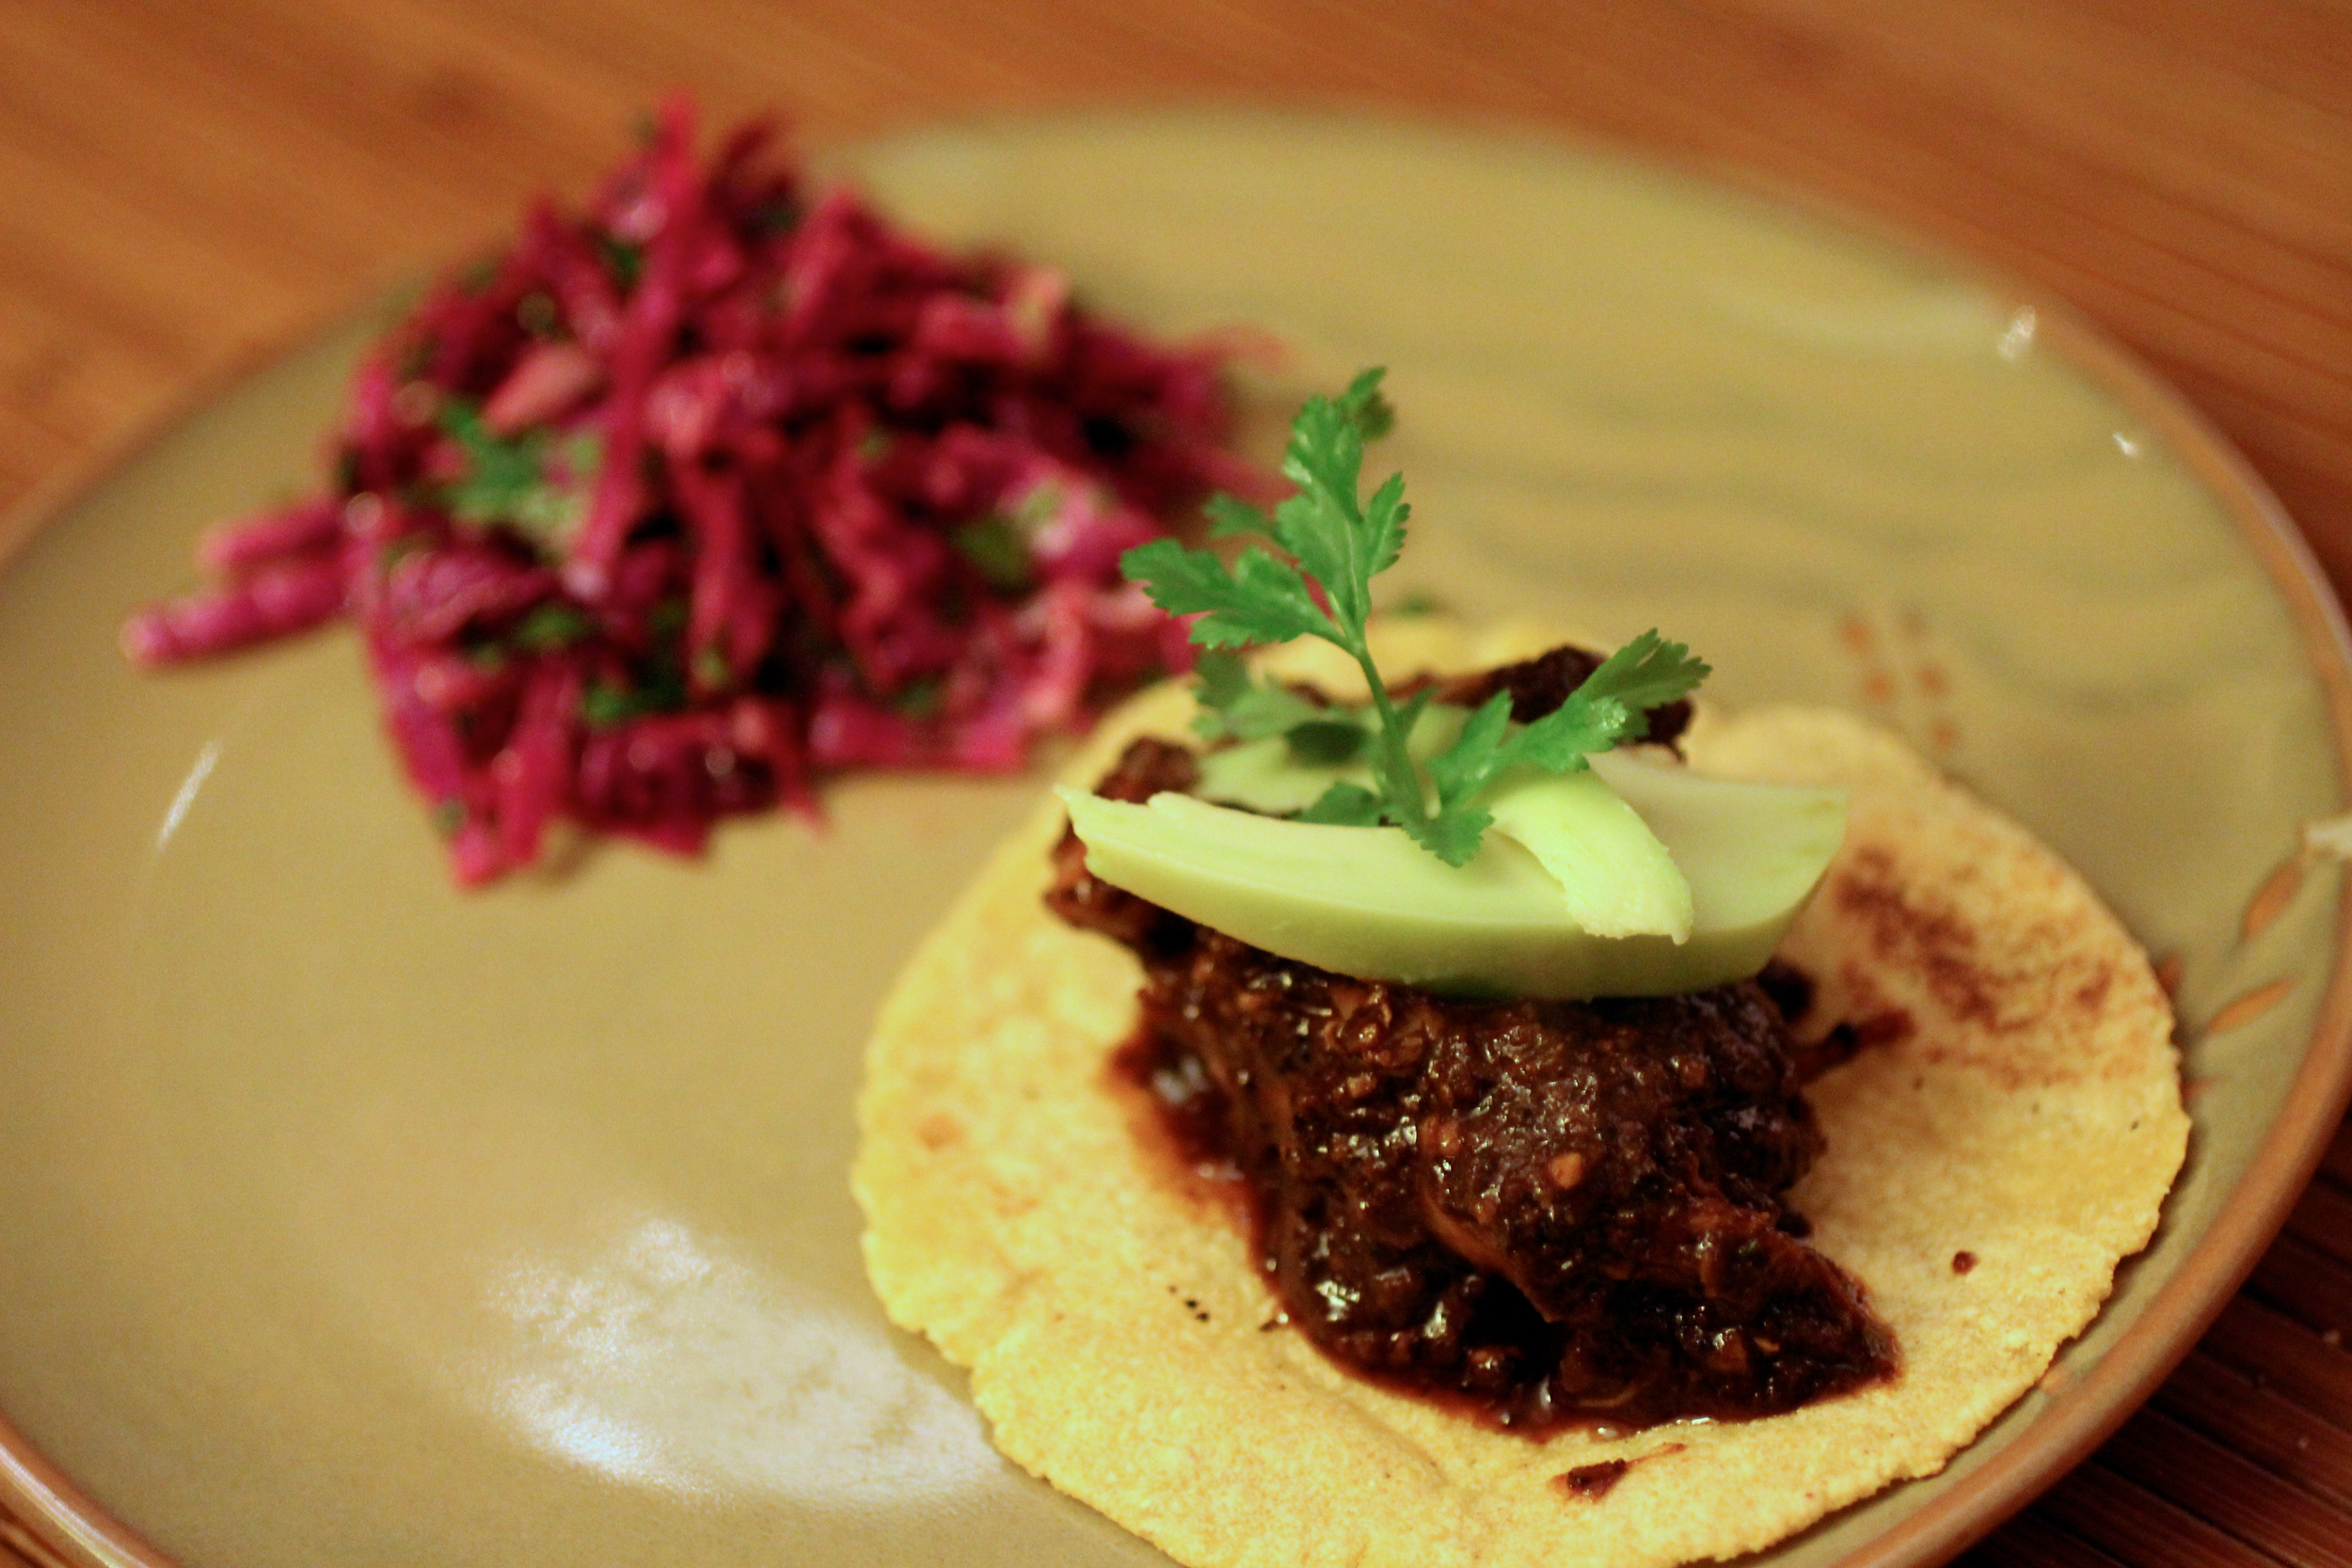
Serve topped with cilantro springs, avocado, corn tortillas, and queso fresco (if desired).
Pair with: Vinegary red cabbage slaw (the vinegar is a great contrast to the dark, rich mole), roasted delicata or butternut squash.

Bay Nut Ricotta Cake
A lovely use of foraged and roasted bay nuts

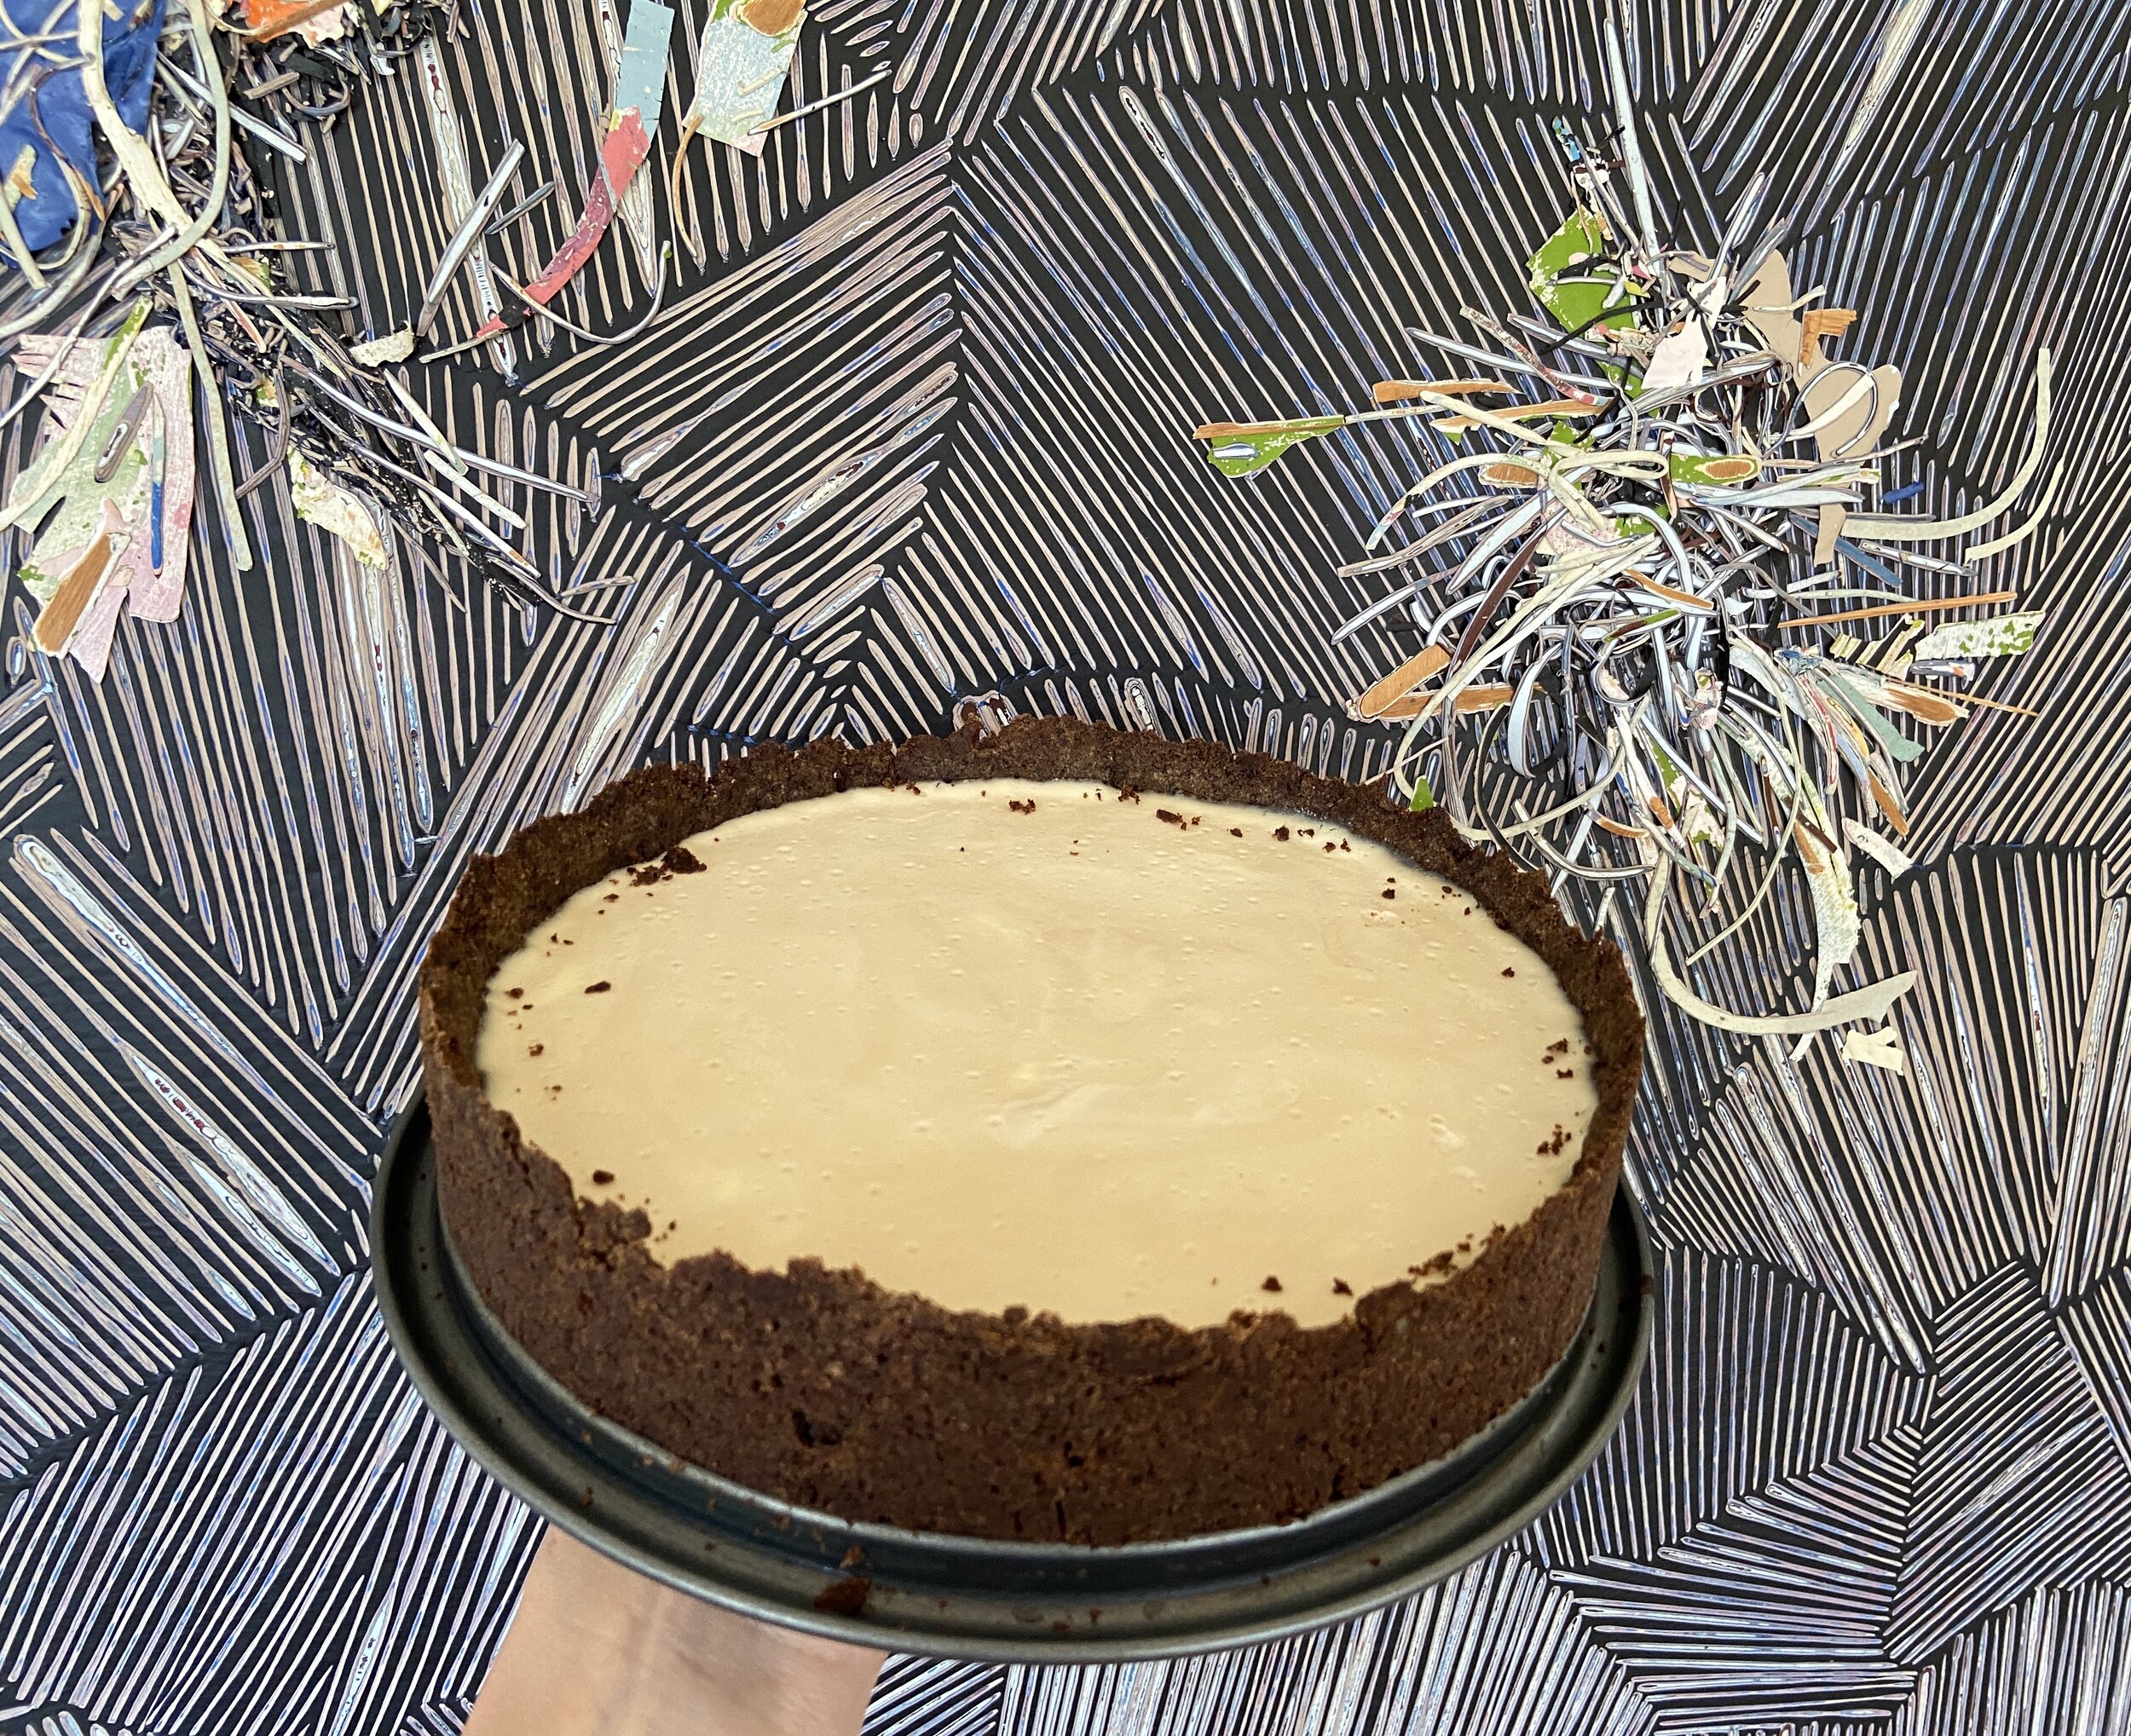
Cake in foreground, my brother’s art in background.
Here’s the deal: everyone likes coffee and chocolate. Okay, so that may not be entirely true, but who are we kidding? I probably don’t want to associate with those individuals anyway.
For those of us with *good* taste, the knowledge that there is a wild edible commonly found on the West Coast (the bay nut - more including foraging info here) that, when roasted, produces a flavor that can be likened to a combination of coffee and (bitter) chocolate is mind blowing. Now think about taking that amazing ingredient and adding it to a ricotta cheesecake - not bad. This brings us to the bay nut ricotta cake.
“A graham cracker crust also works, but doesn’t have the same rustic qualities as buckwheat flour. Buckwheat is also gluten free - make the dessert gluten free by replacing the all purpose flour with a gluten free substitute. An entirely buckwheat crust can work, but is a little too crumbly. ”
Crust Ingredients
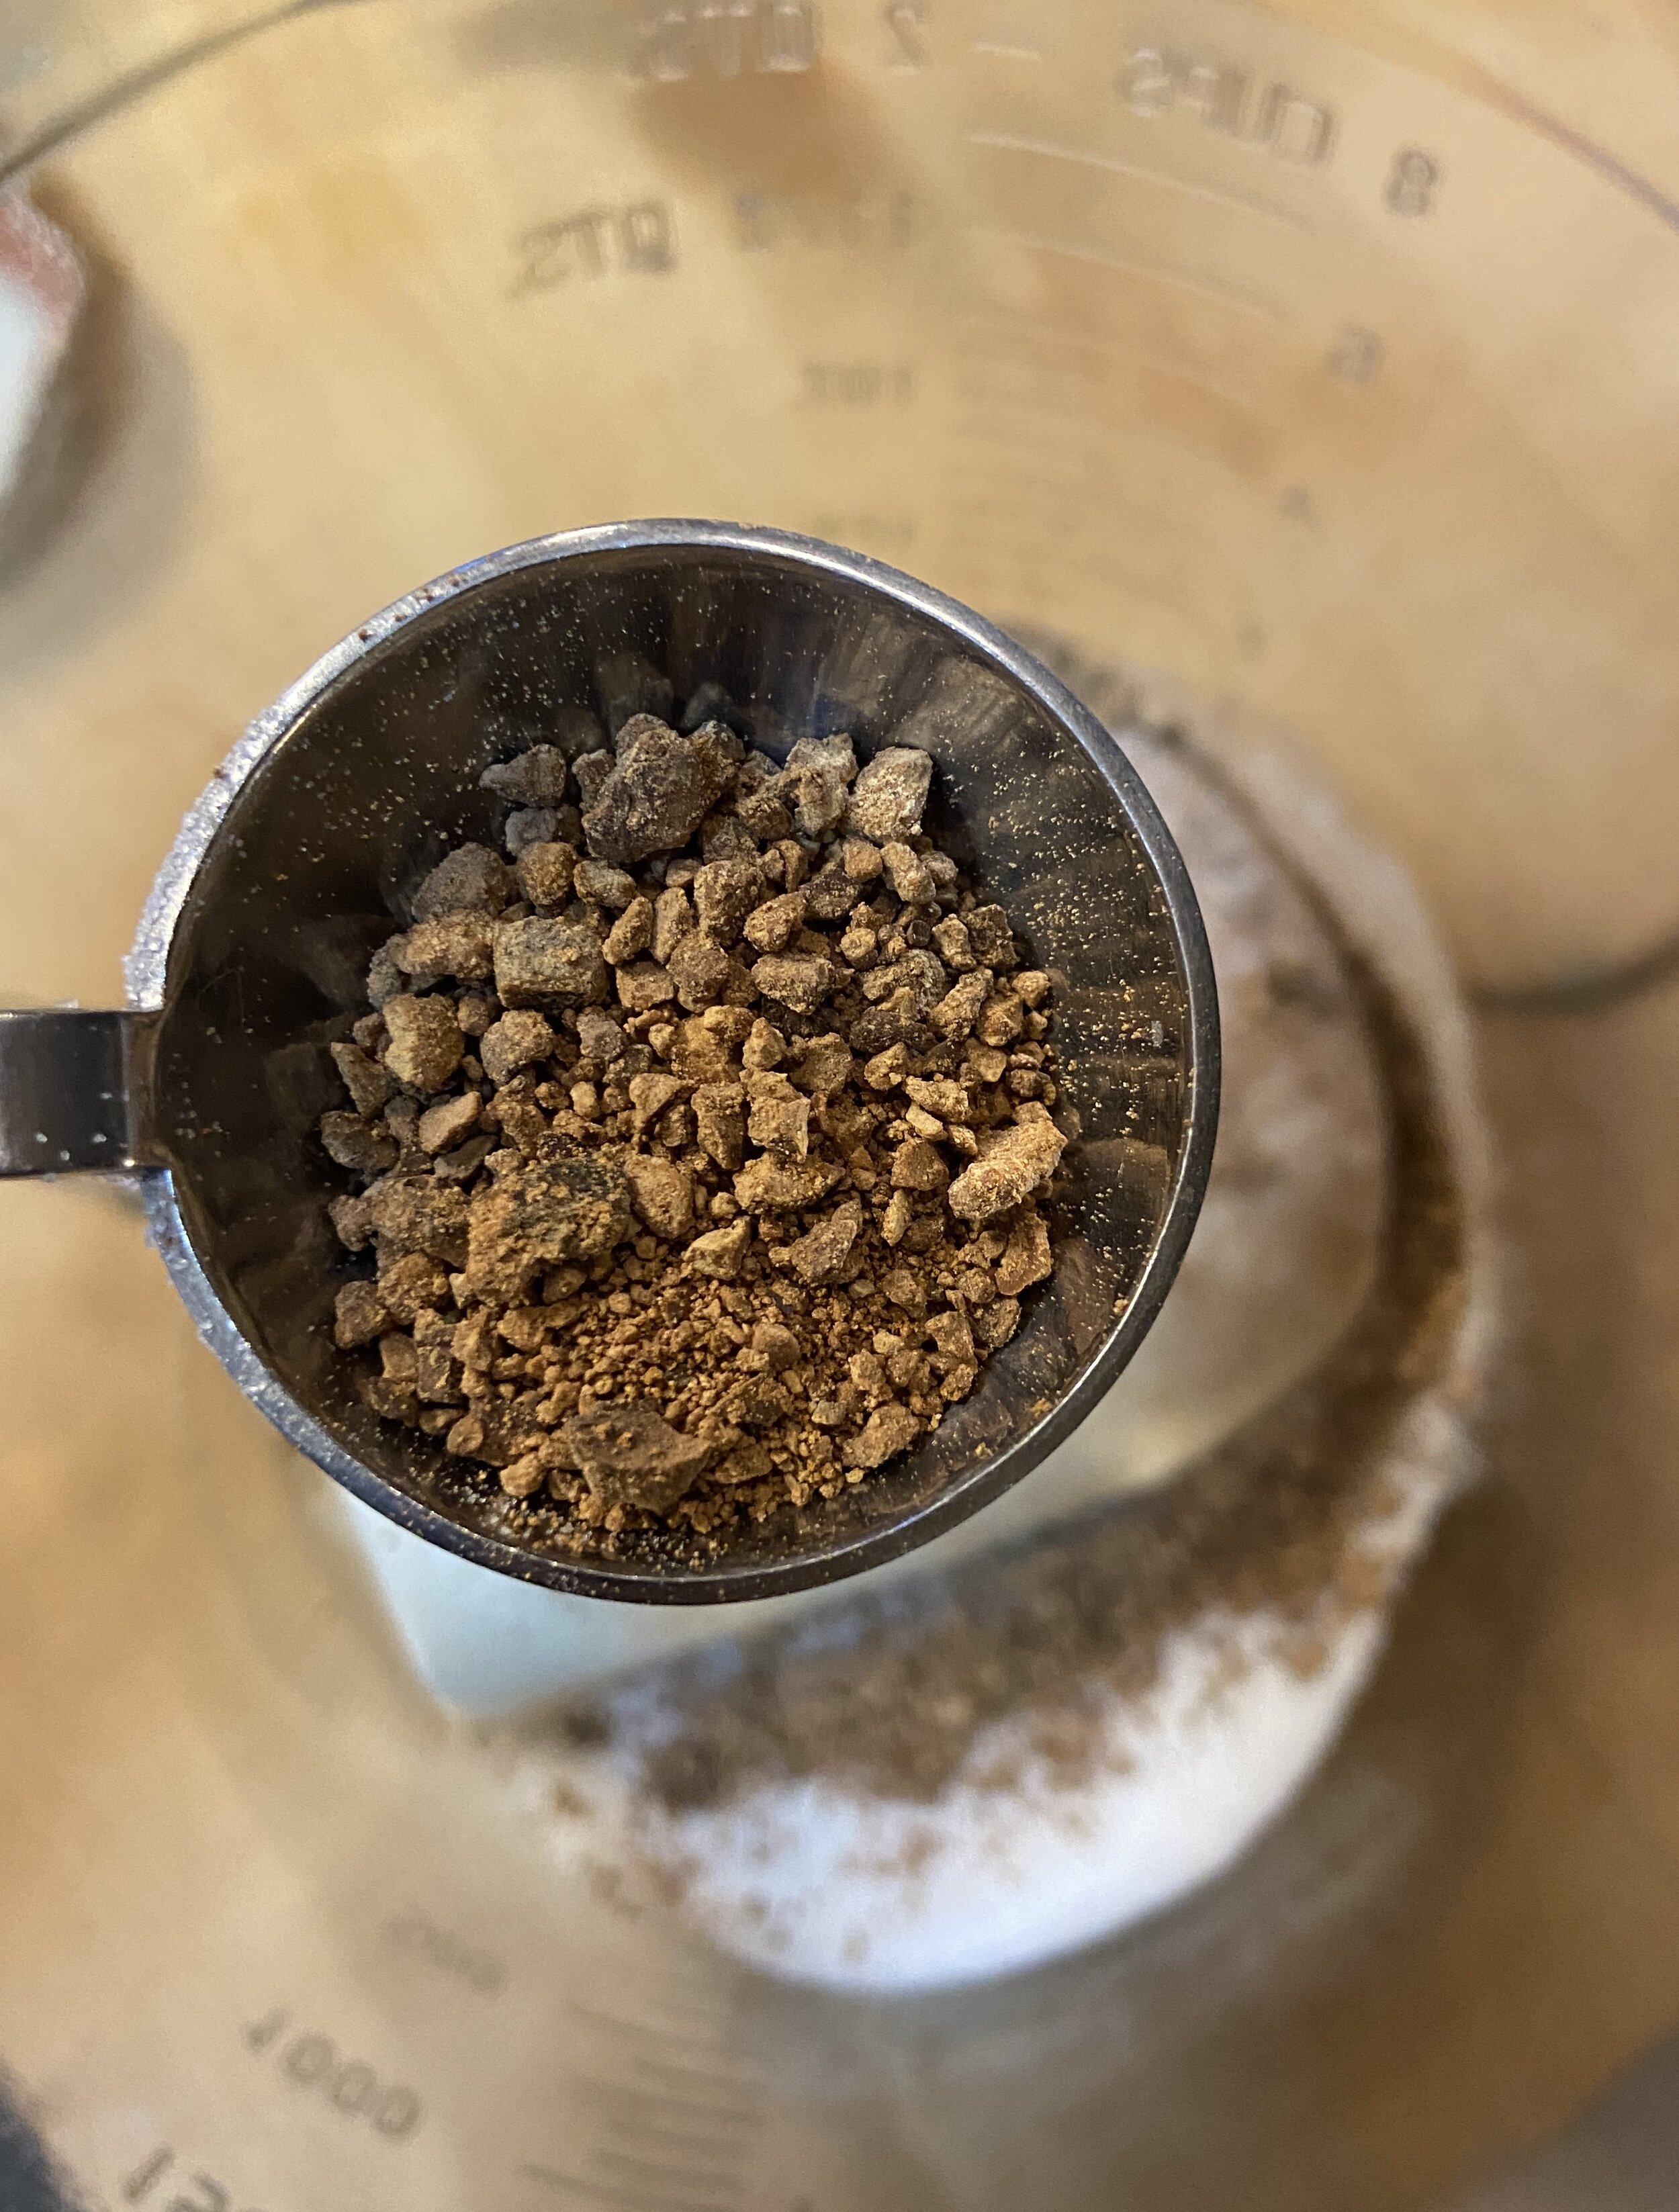
1/4 cup coarsely ground bay nuts - I used a coffee grinder for several pulses. You could also chop with a knife.
1 cup buckwheat or other flour of choice
2 tablespoons all purpose flour
1-2 tablespoons roasted bay nuts, finely ground
1/3 cup granulated sugar
1/4 teaspoon salt
1 tablespoon orange zest
7 tablespoons unsalted butter
1-2 tablespoons cold milk or water
I forgot to add citrus zest to the crust, so I threw it into the ricotta mix, as seen here:)
Filling Ingredients
16 ounces ricotta cheese
1/4 cup granulated sugar
1/4 cup roasted bay nuts, coarsely ground
1 egg, lightly beaten
2 teaspoons juice from an orange (optional)
Topping Ingredients
8 oz. sour cream
2 tablespoons sugar
1 teaspoon vanilla extract
Preheat oven to 350. Mix flours, 1/3 cup sugar, salt, 1-2 tablespoons bay nuts, and zest. Cut in butter, mix until pea-sized crumbs. Add water or milk until dough comes together when pressed, but is not too wet. Press into greased 9” springform pan and bake for 10-15 minutes until browned. Remove from oven and cool.
Blend filling ingredients until thoroughly mixed. Pour onto cooled shell, bake in oven for about 40-50 minutes, until cake is set and jiggles only slightly. You make need to cover with foil if top gets too brown.
Remove from oven and let stand for 15-20 minutes while you mix together the topping ingredients. Spread out topping mixture and put back in the oven for another 10 minutes. Remove and cool until served.
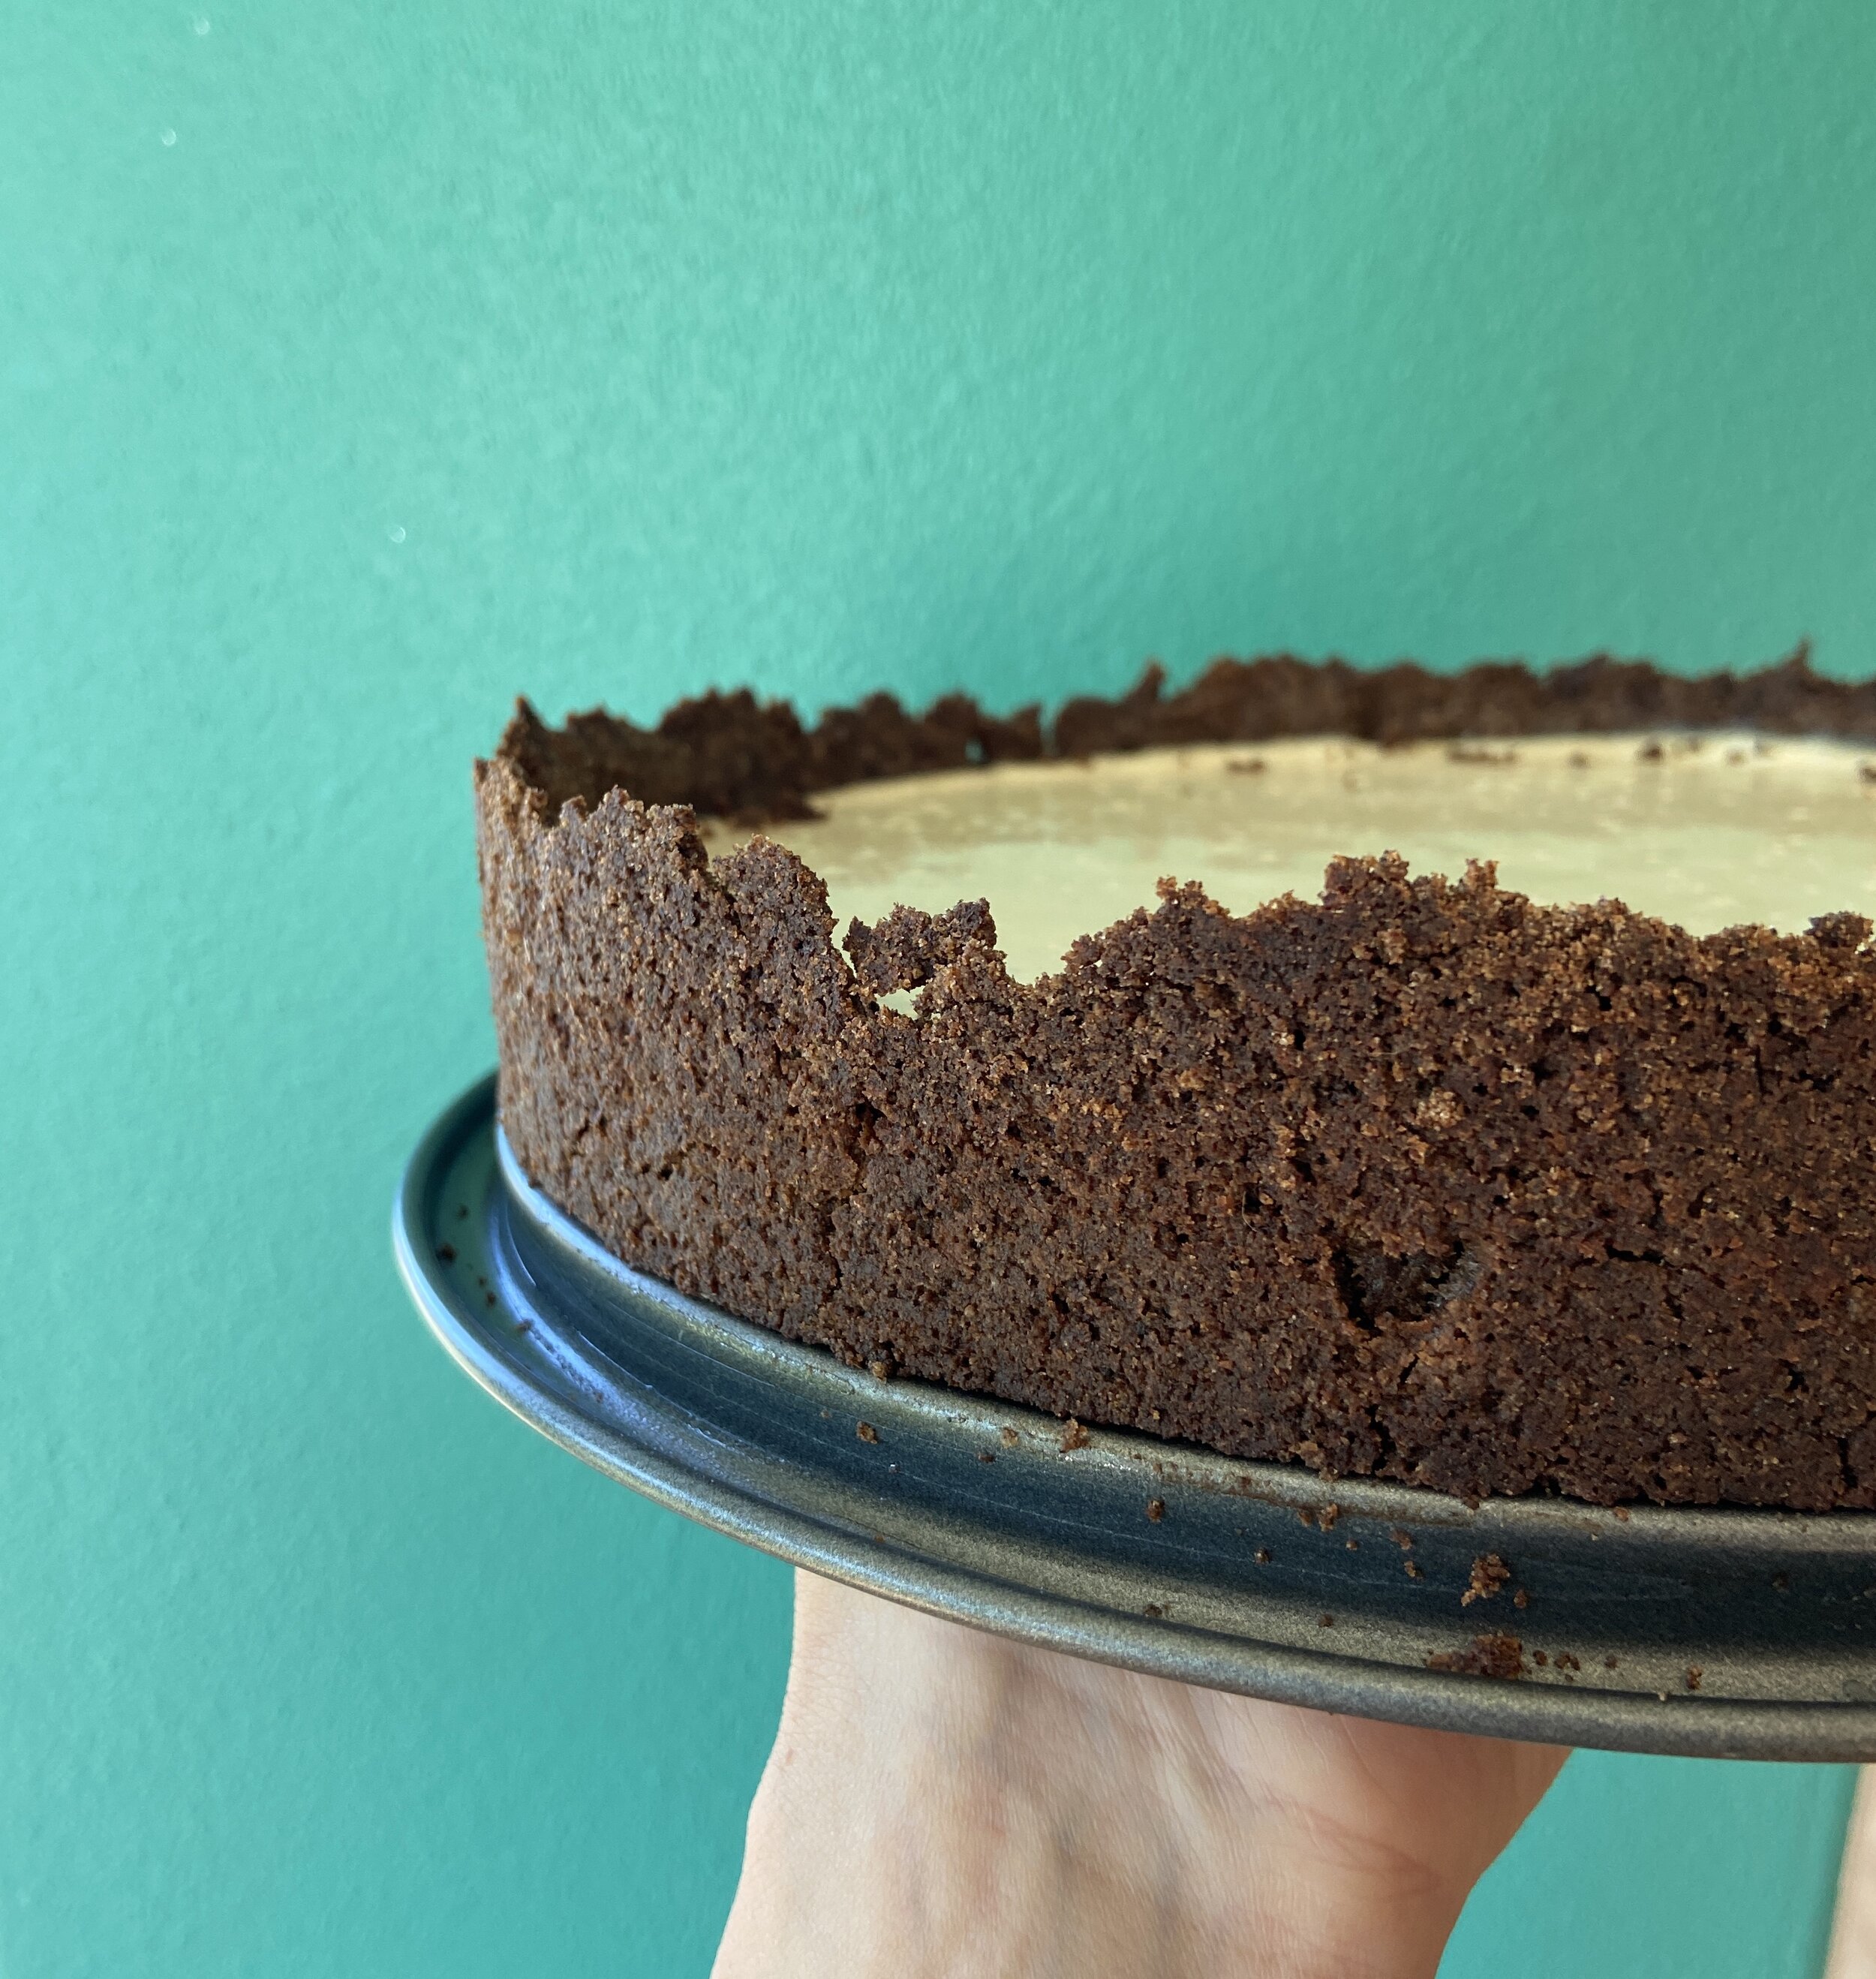
Crust me! I like to smash the crust up higher than the filling will be for a more dramatic rustic look.

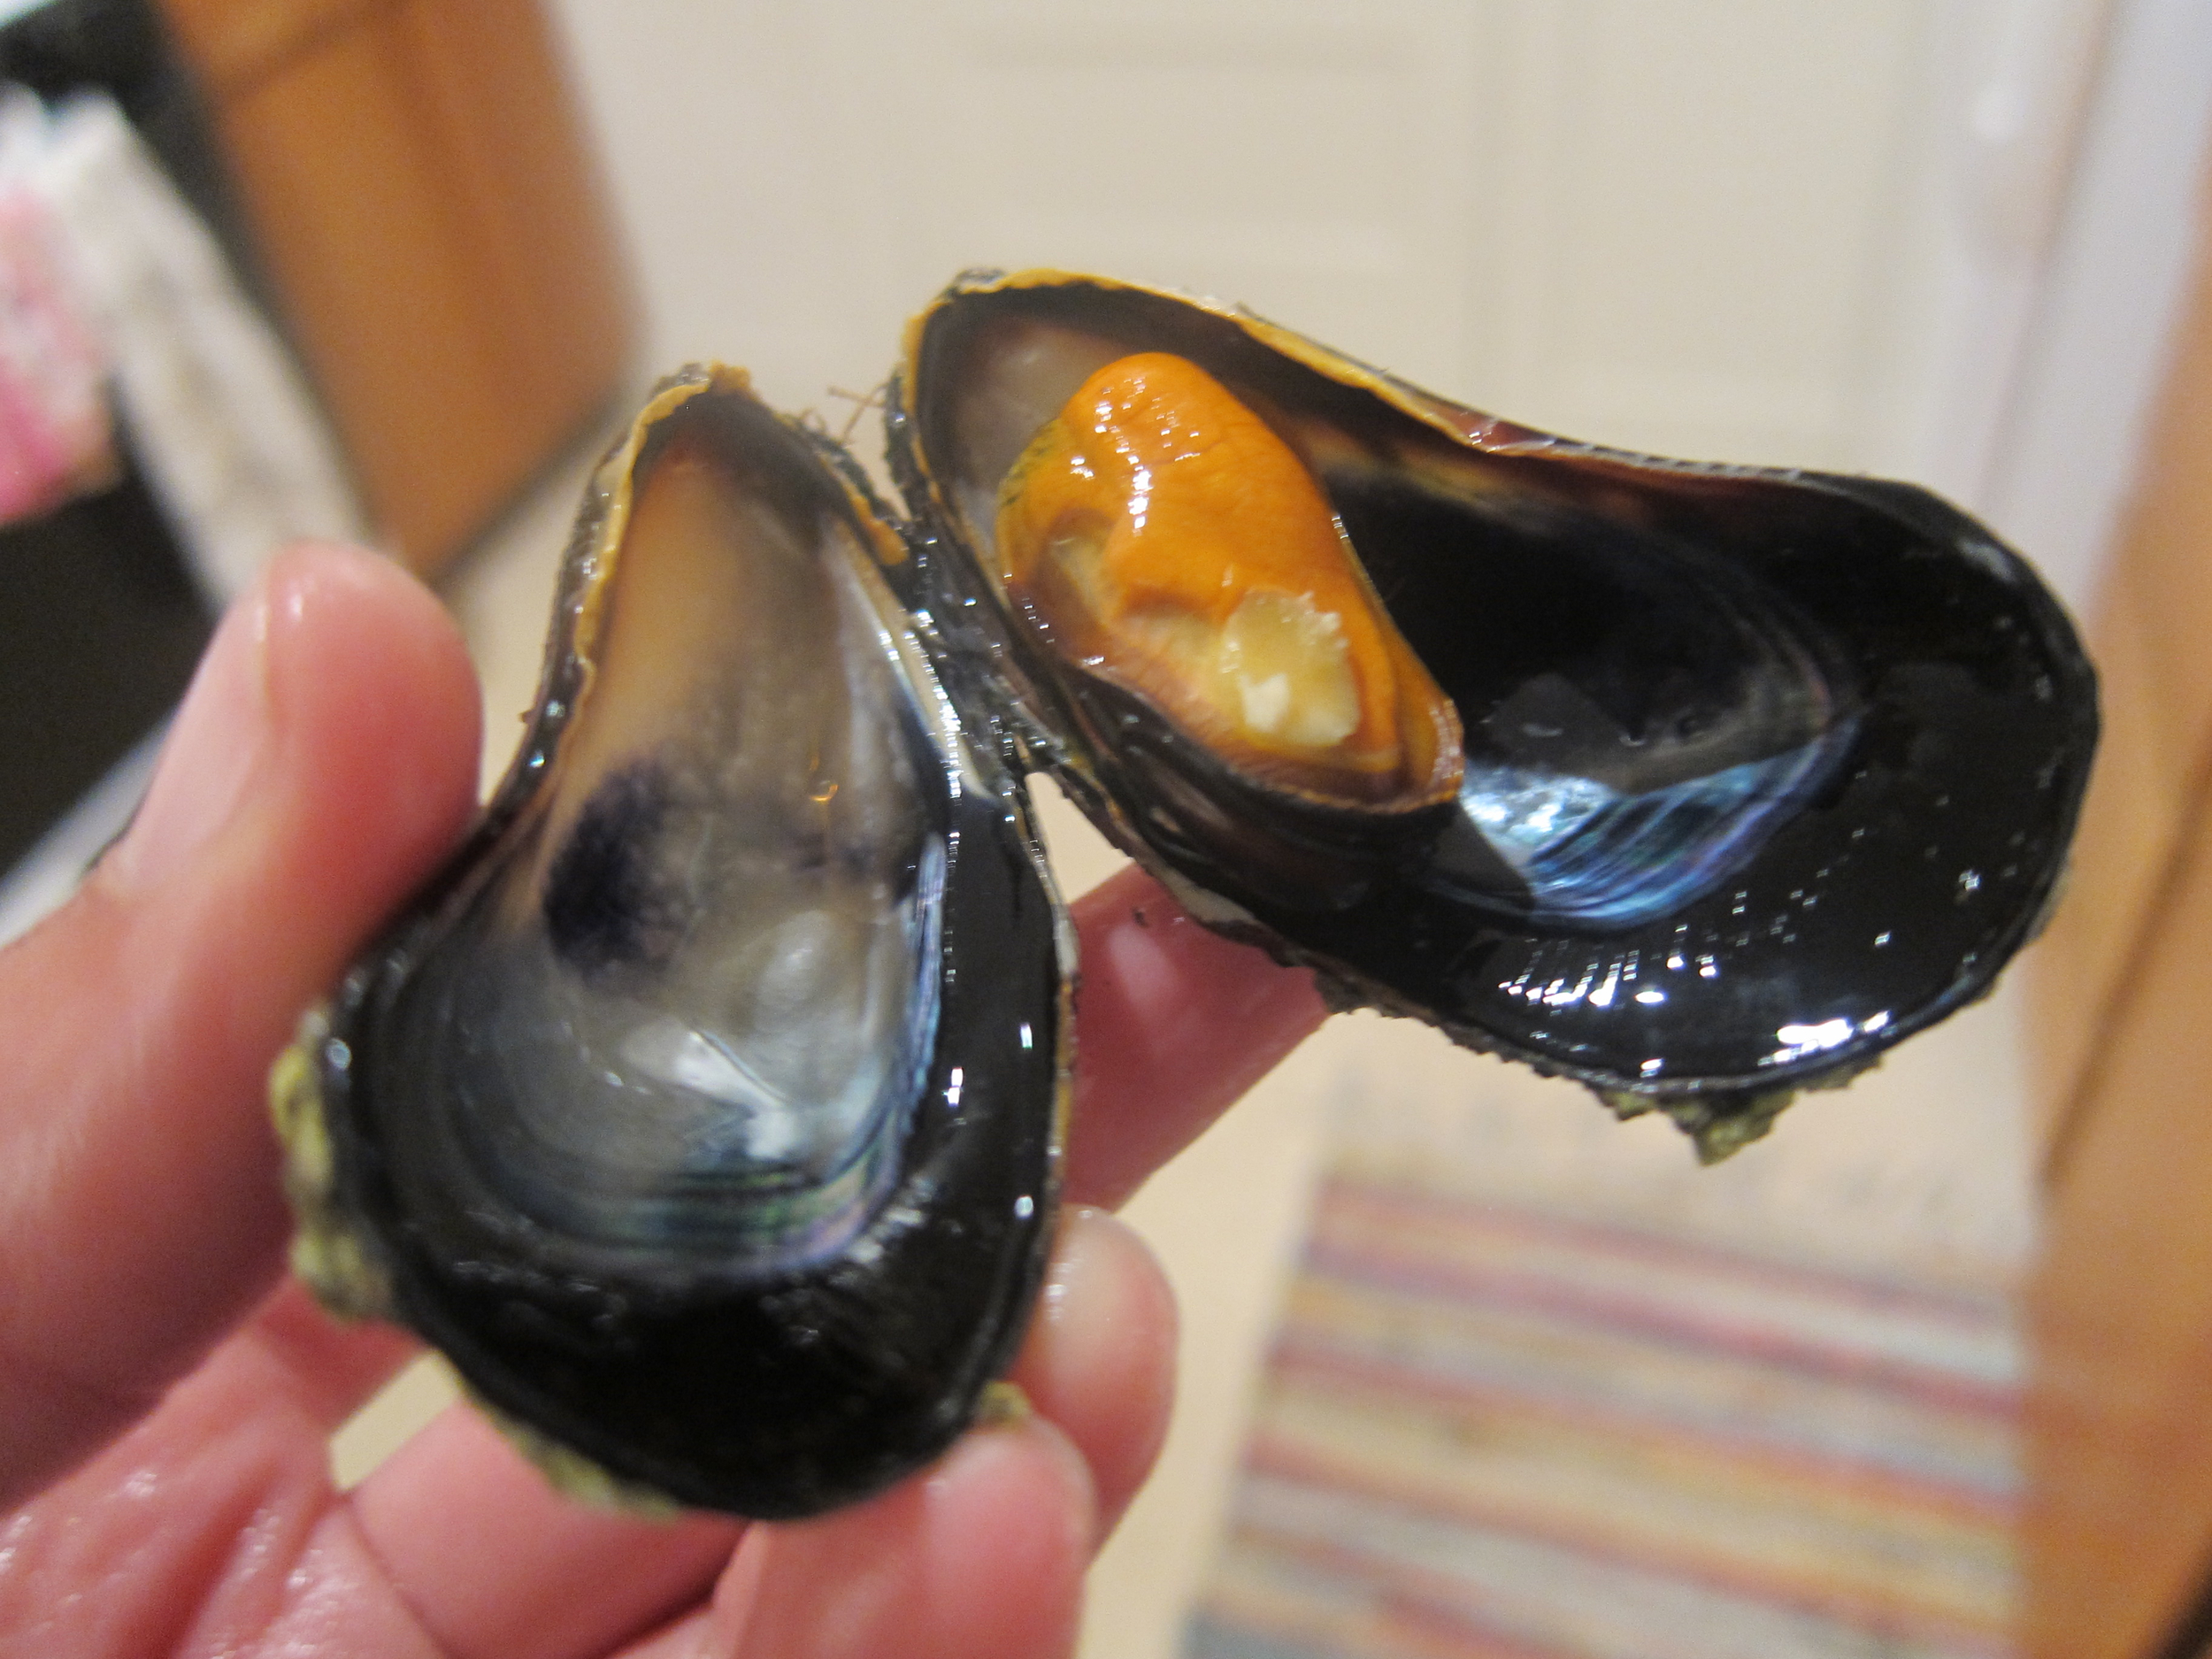
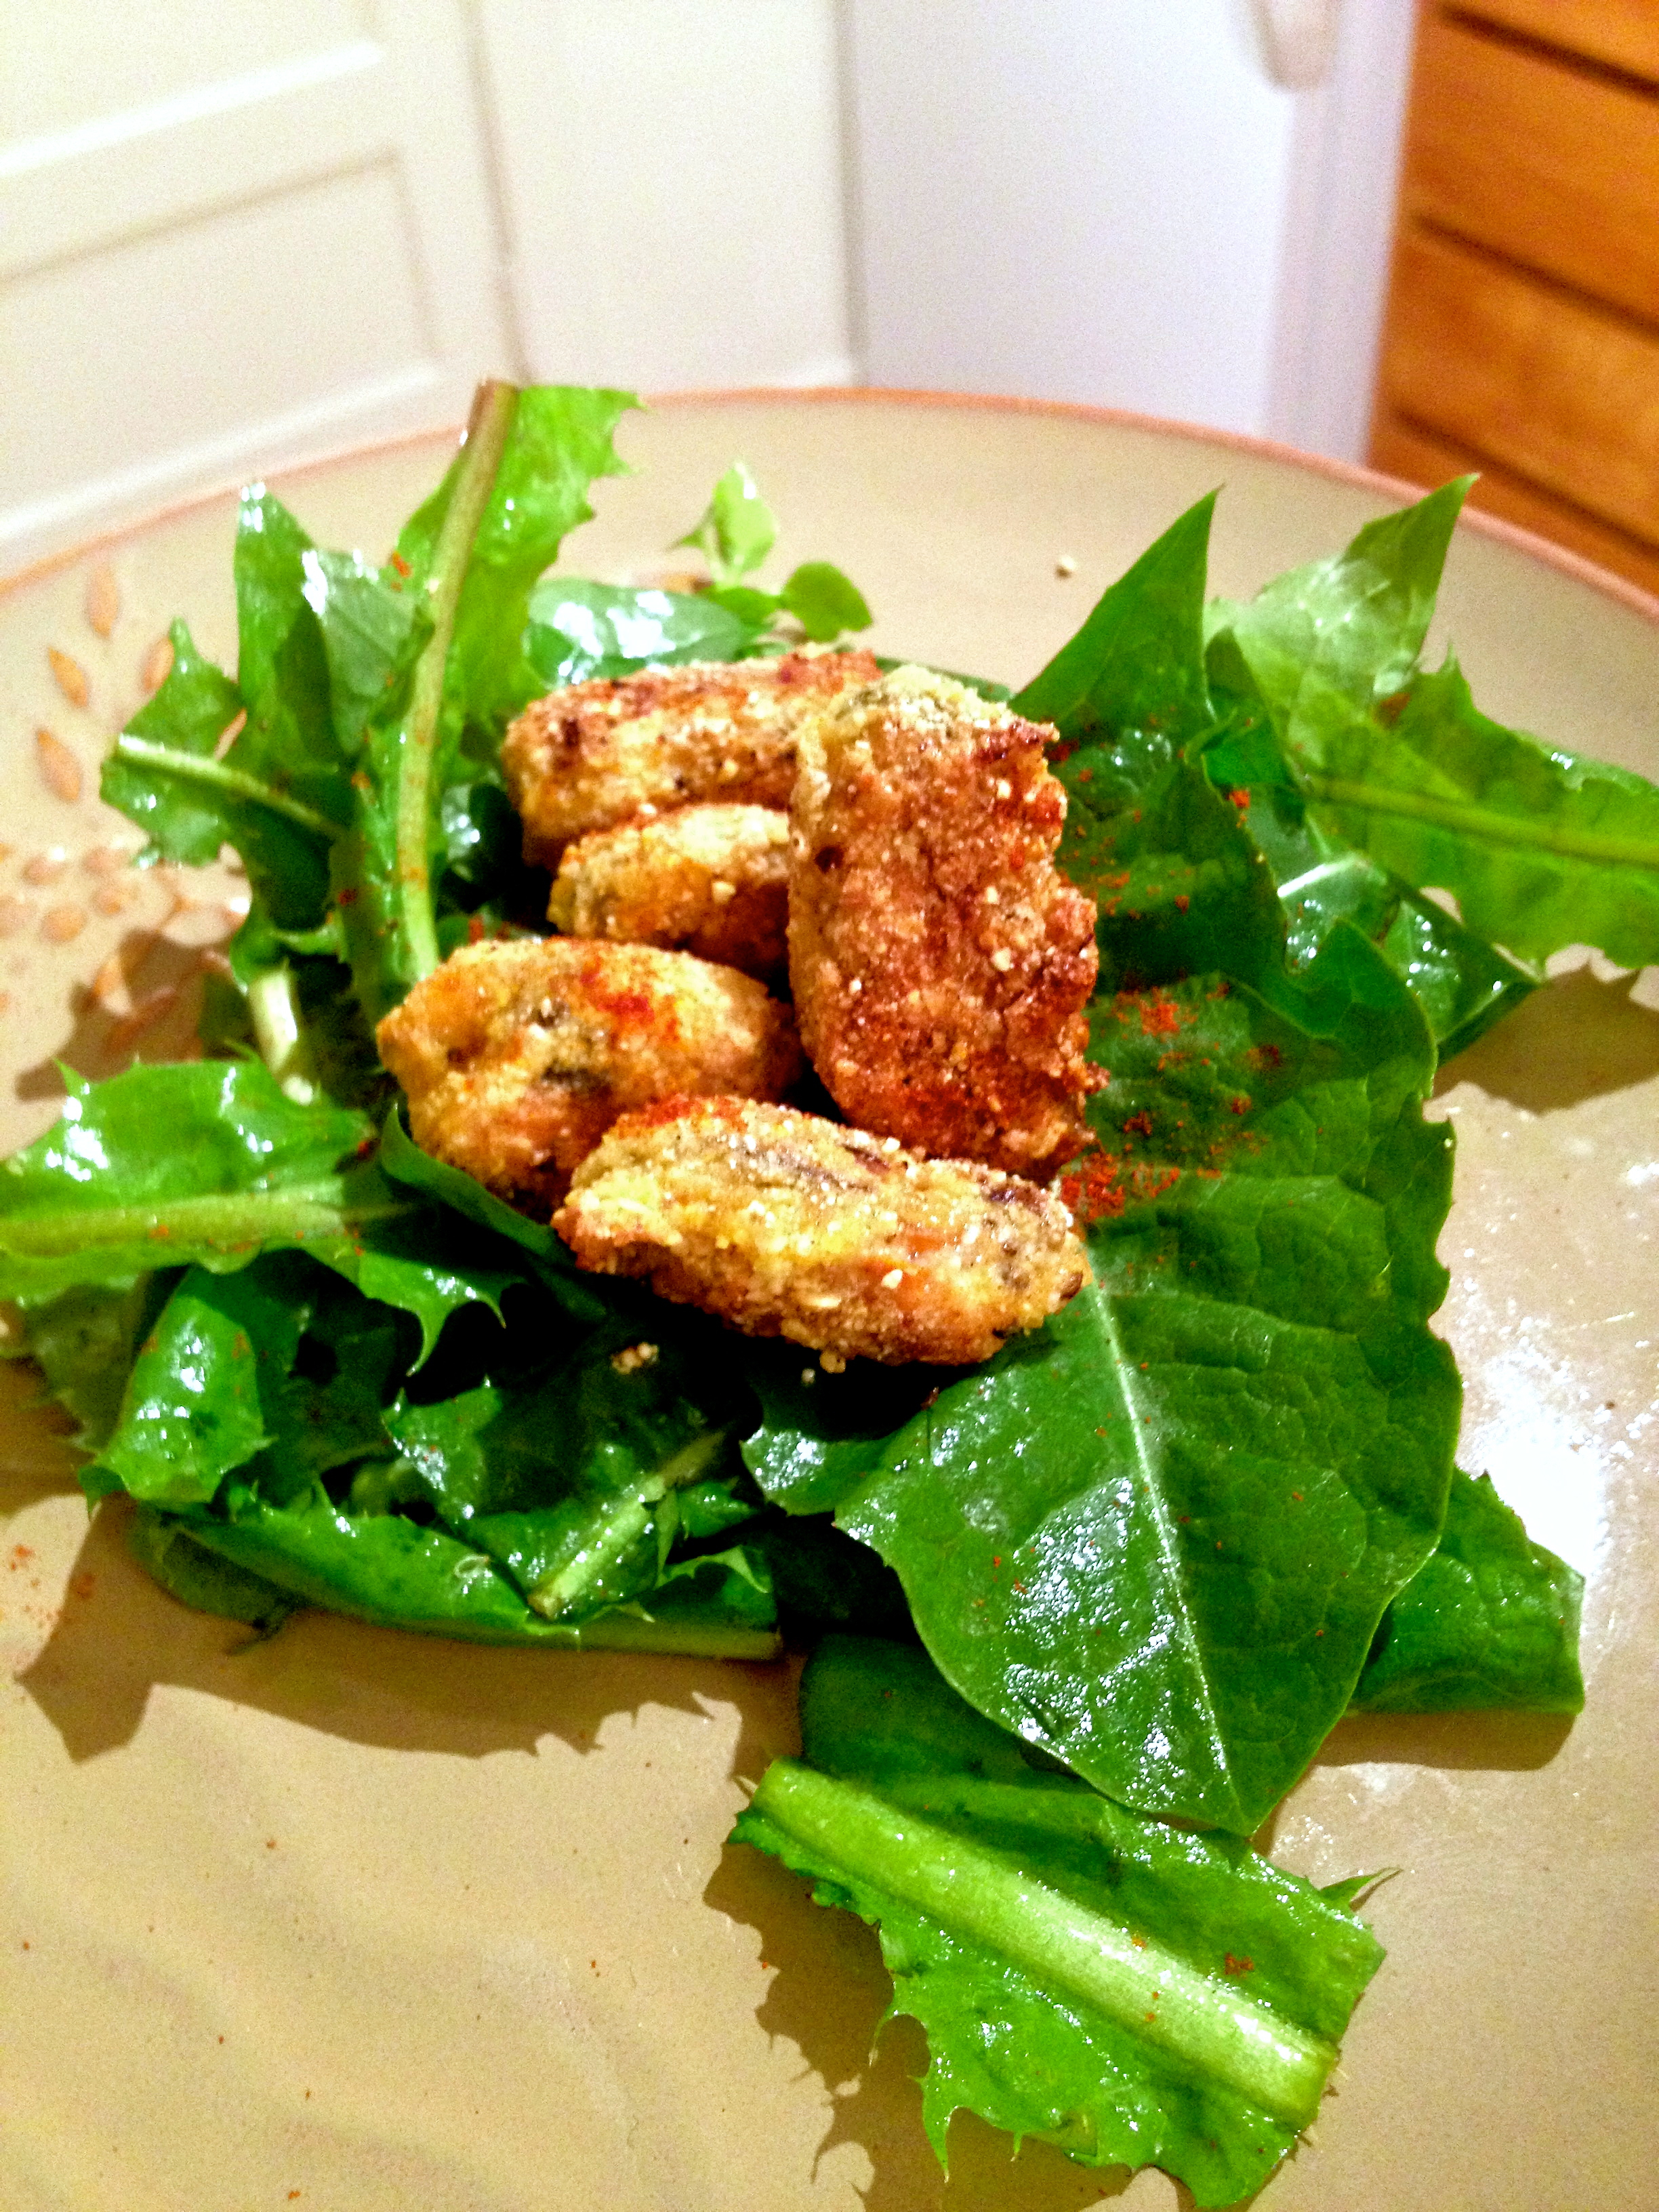
Fried Mussels with Wild Greens
Armageddon shmarmageddon - I've got my mussels.
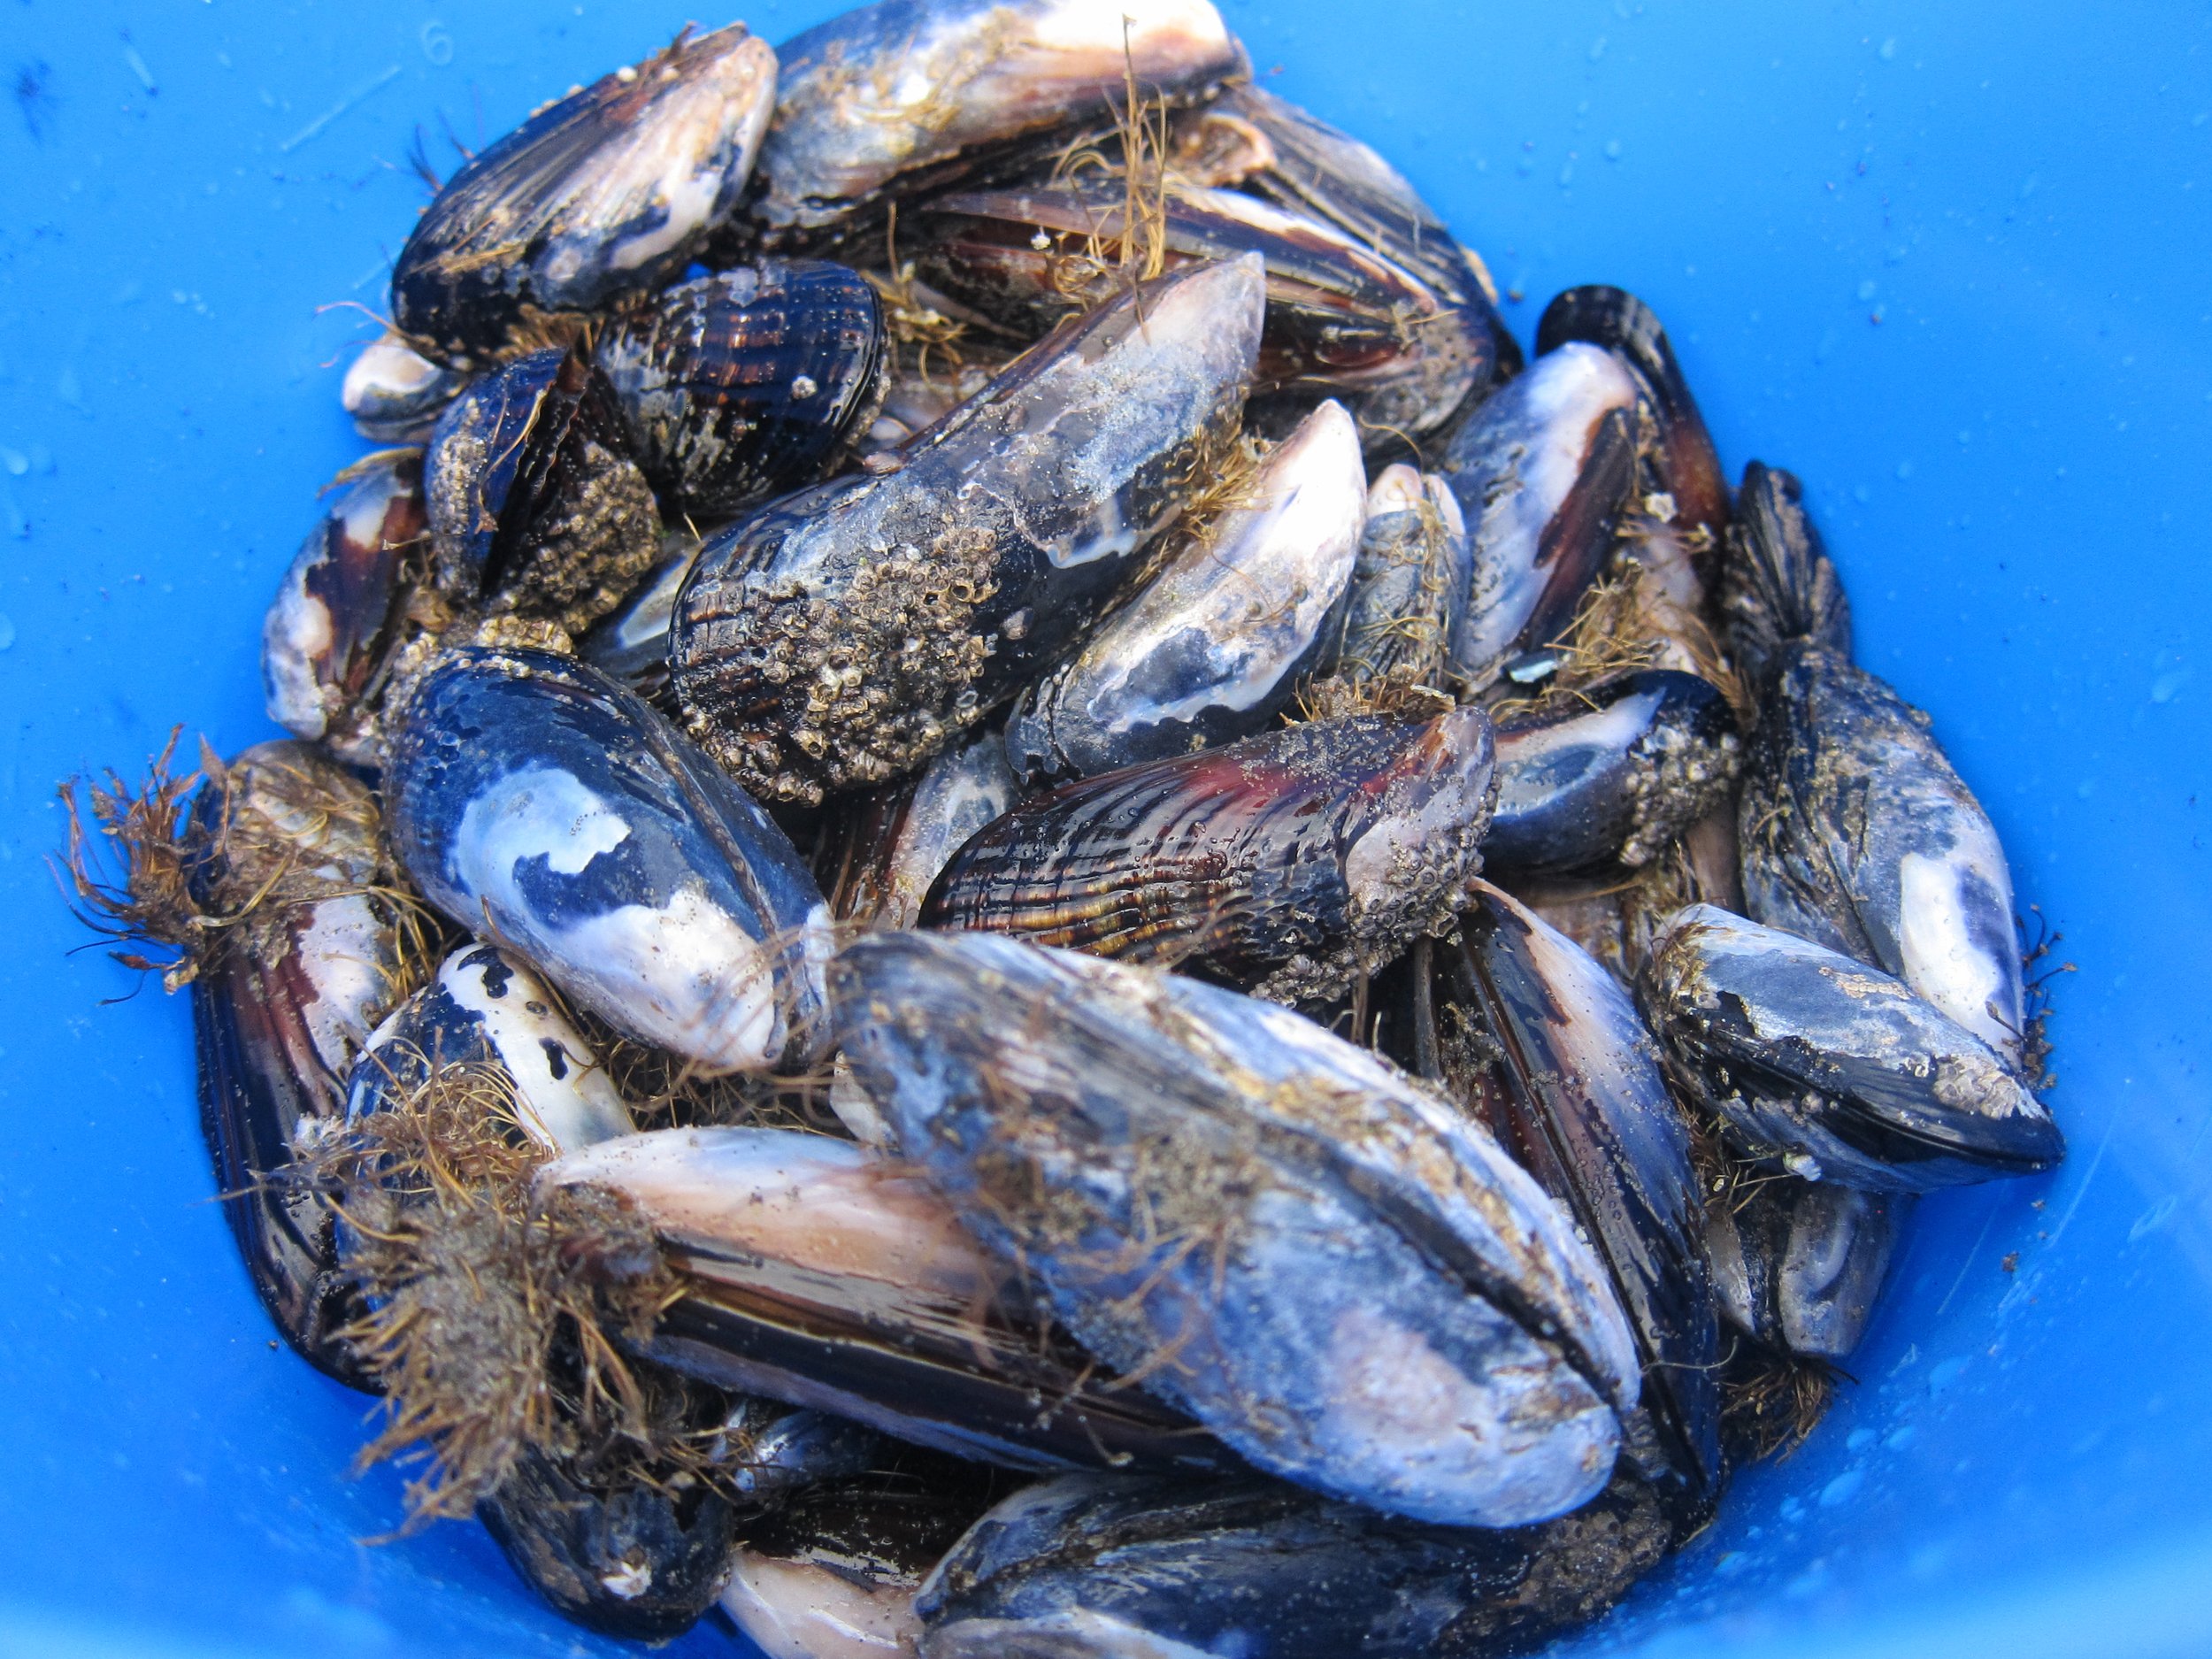
The primary ingredients to this dish are foraged (Baker Beach for mussels and Temescal for greens), so as long as I can rustle up the other ingredients and a burner, I’ll be sitting pretty post-apocalypse. The wild mussels were foragedand thus, quite “rustic” making it virtually impossible to clean them thoroughly and necessitating cooking and taking them out of the shell before consuming, so I decided to fry them. The below recipe serves 3-4 as an appetizer.
1 pound fresh mussels, rinsed and scrubbed as best you can
1 cup cornmeal, medium grind
1/2 teaspoon paprika
1 egg, beaten
1/2 teaspoon salt
2 tablespoons high heat oil, such as grapeseed or coconut
1 lemon wedge (can use a slice from dressing, below)
Foraged greens, such as dandelion and sow thistle tossed with lemon-olive oil dressing (Combination of juice from 1/2 lemon, 1 tablespoon olive oil, and 1/2 teaspoon of mustard for 1 cup greens) - I like a lot of greens, but whatever is best for your preference of fried mussel:green ratio
Boil mussels in a large pot of water (rolling boil) for about 7 minutes, or until mussels open. remove mussels from shell, drain any excess water, and set aside. Discard any mussels that do not open.
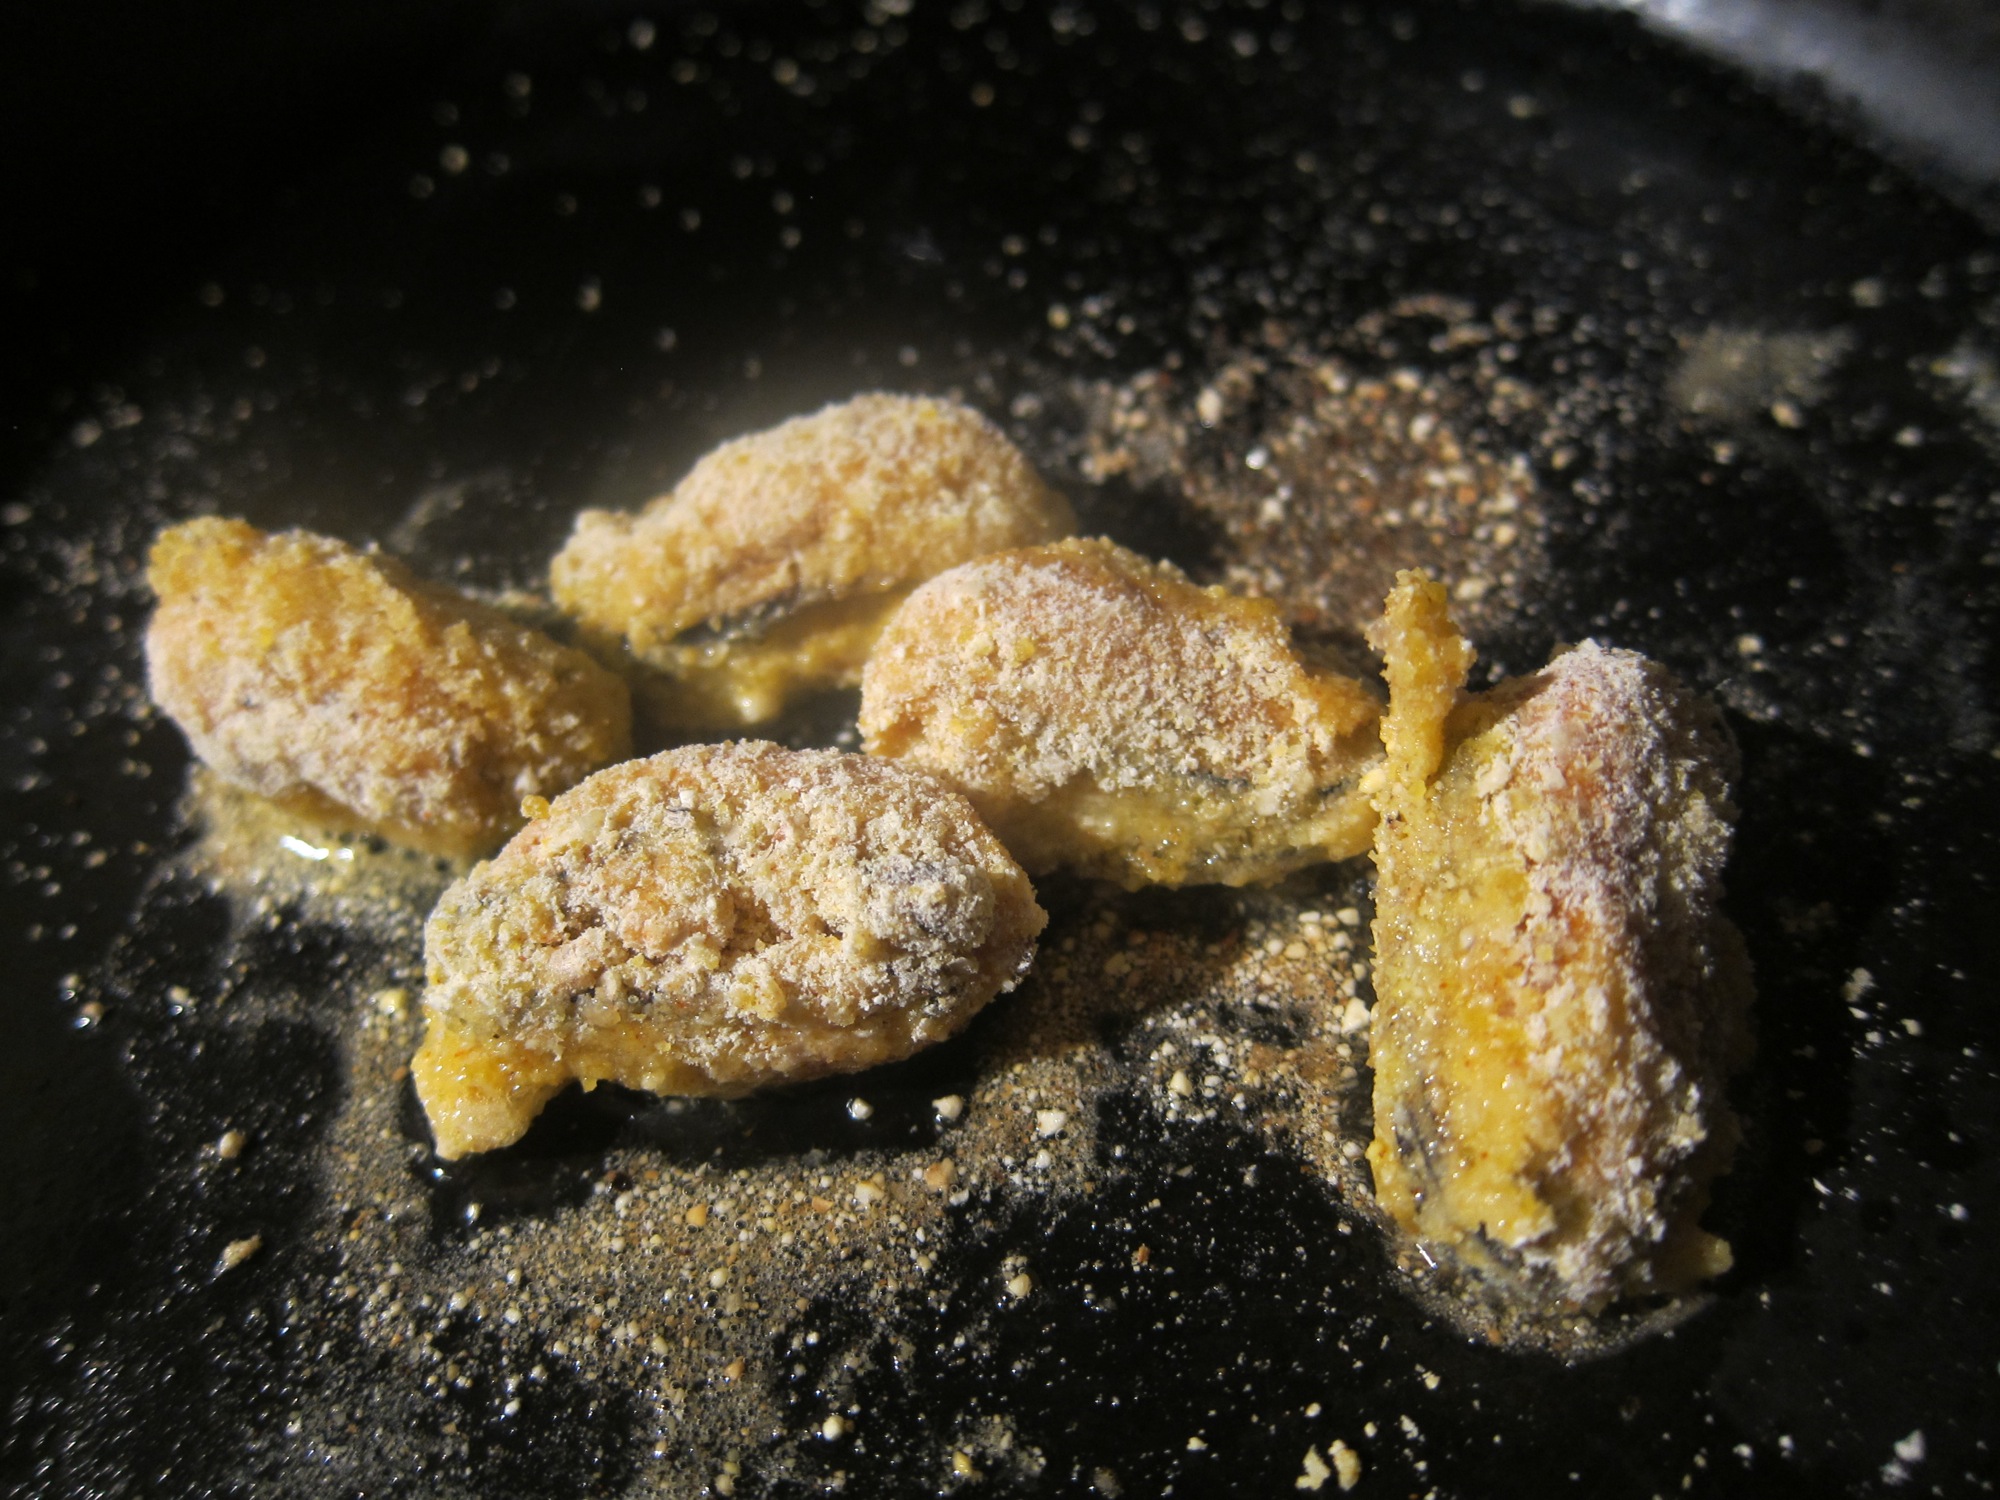
Meanwhile, mix cornmeal with paprika and salt on a plate. Dip mussels in beaten egg a few at a time, then toss in cornmeal mixture to coat.
Heat oil on medium-high. Once oil is hot, add mussels and brown on each side, about 3-5 minutes total. Remove from oil, place atop wild greens tossed with dressing, drizzle with squeeze of lemon, and sprinkle with paprika.
Serve with aioli, if desired.

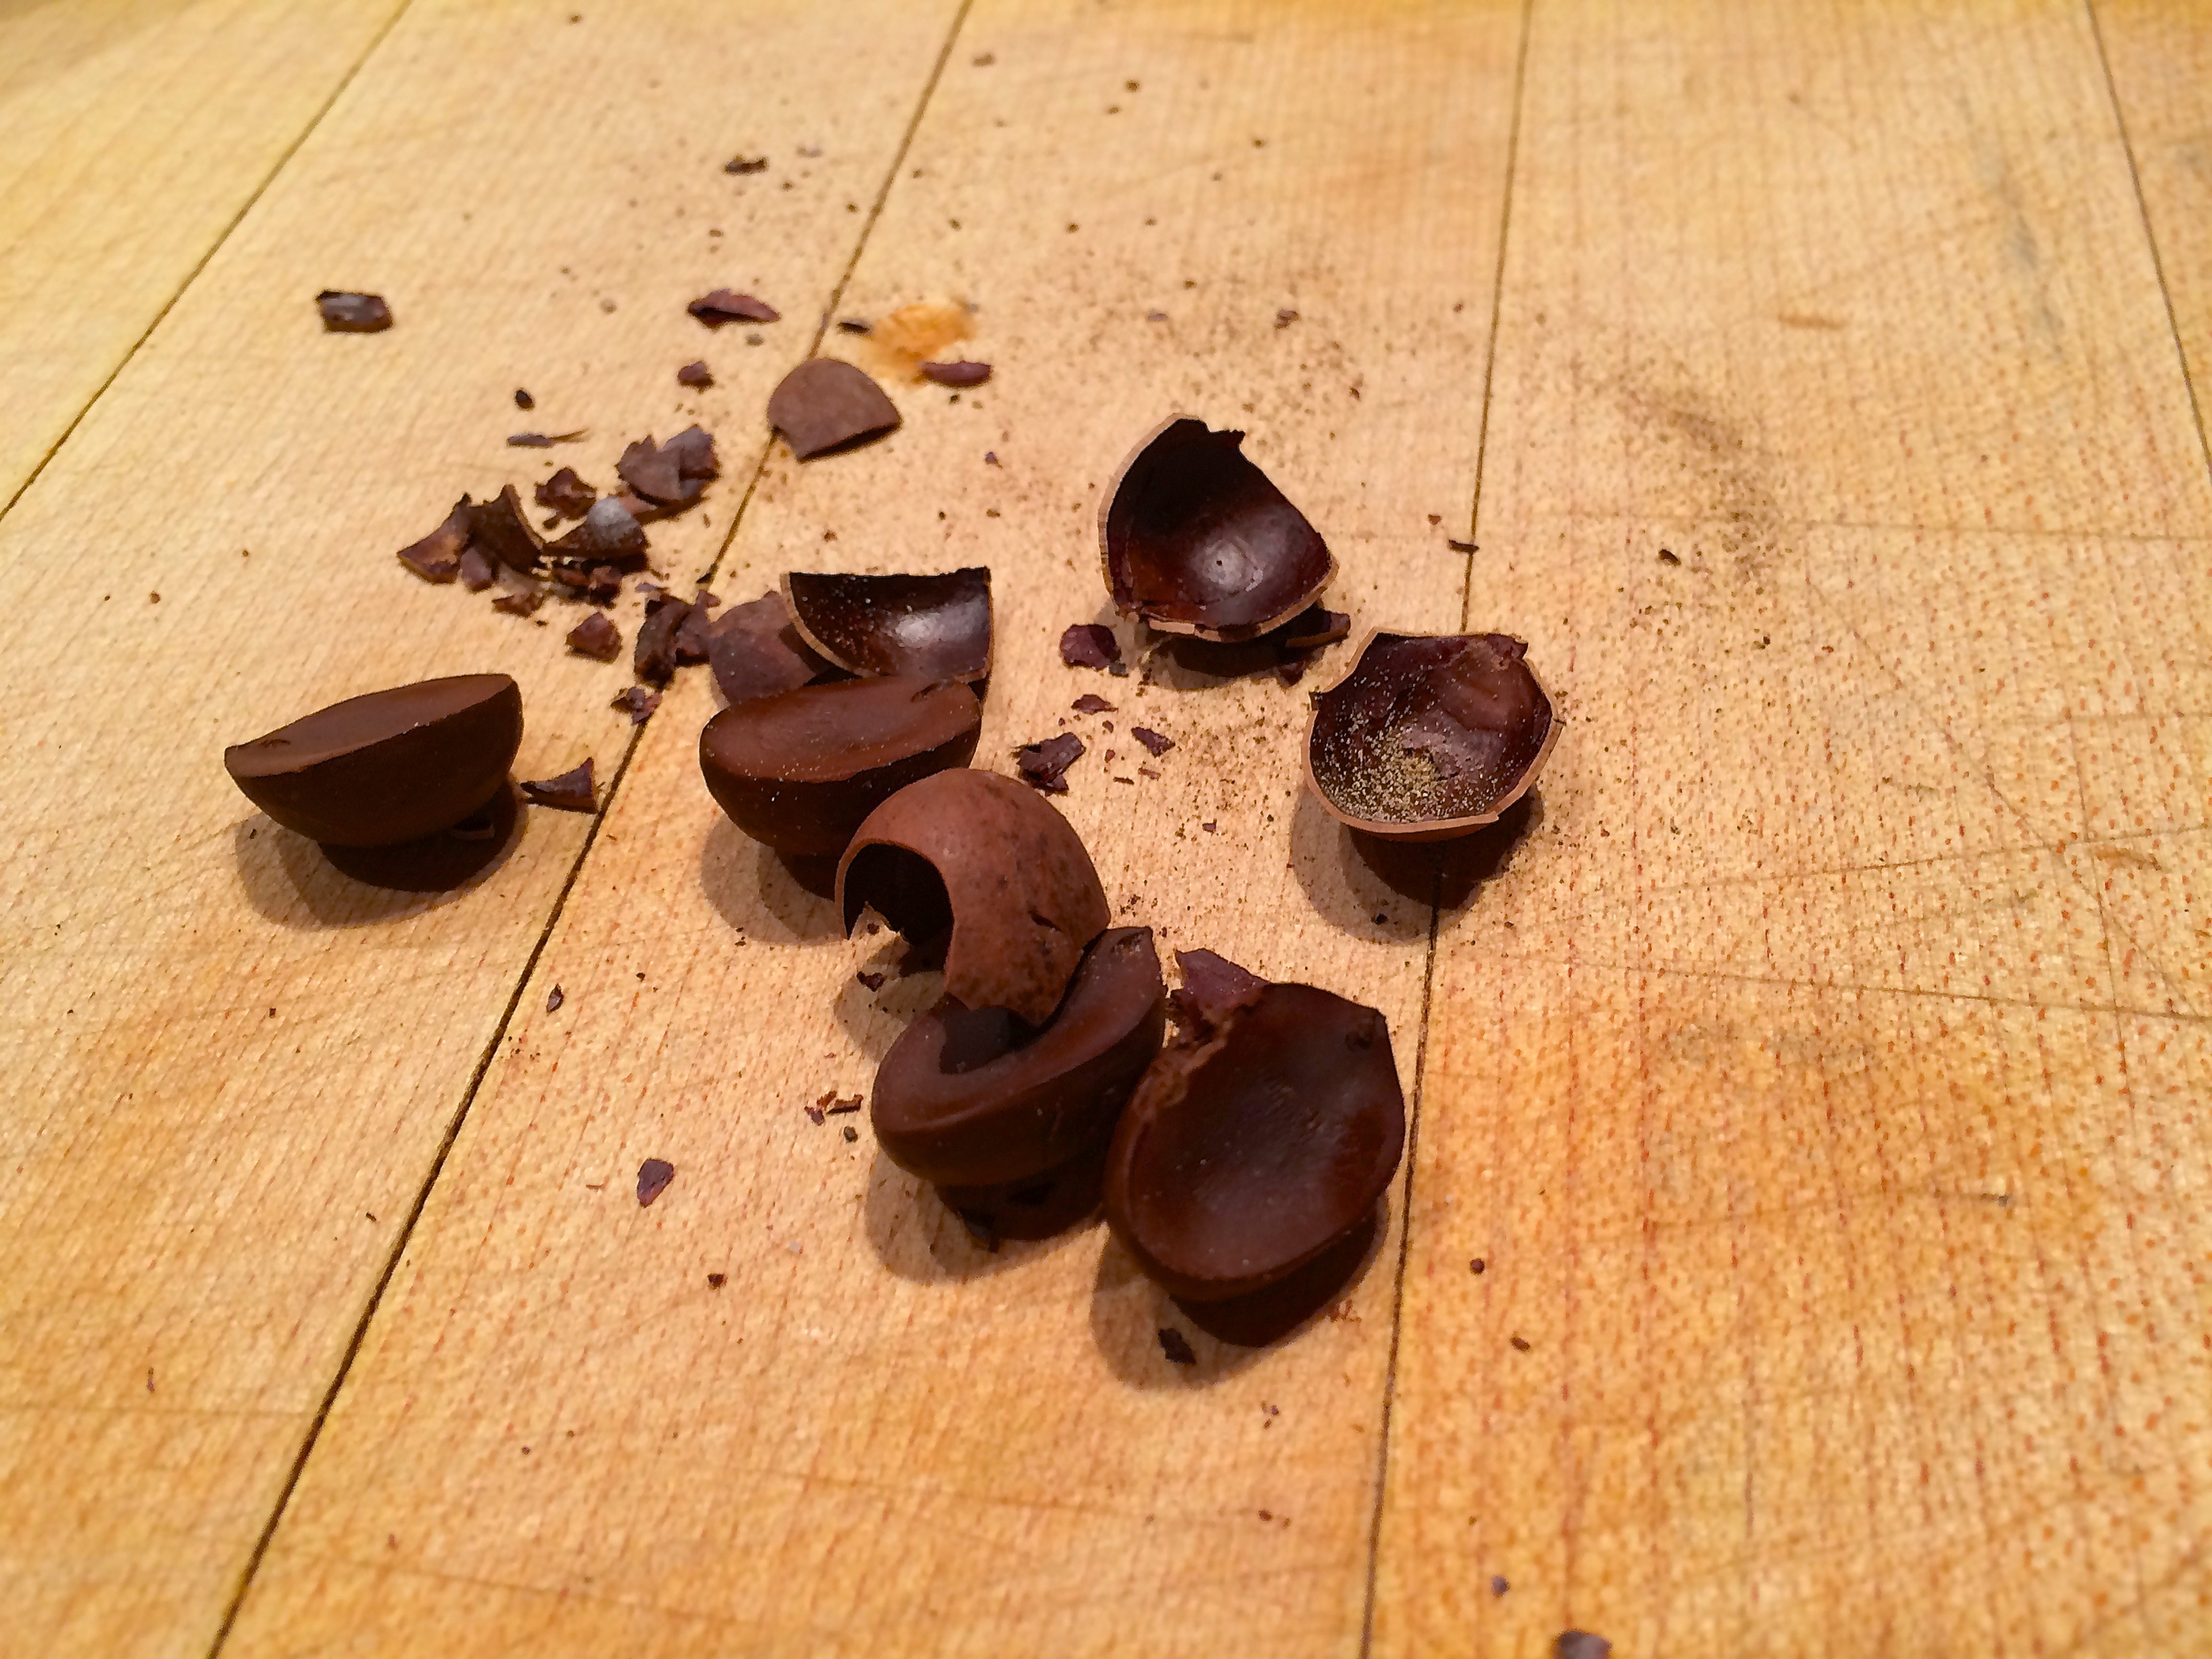
Bay Nuts
The cacao-coffee bean of foraged finds.

Here’s the deal: everyone likes coffee and chocolate. Okay, so that may not be entirely true, but who are we kidding? I probably don’t want to associate with those individuals anyway.
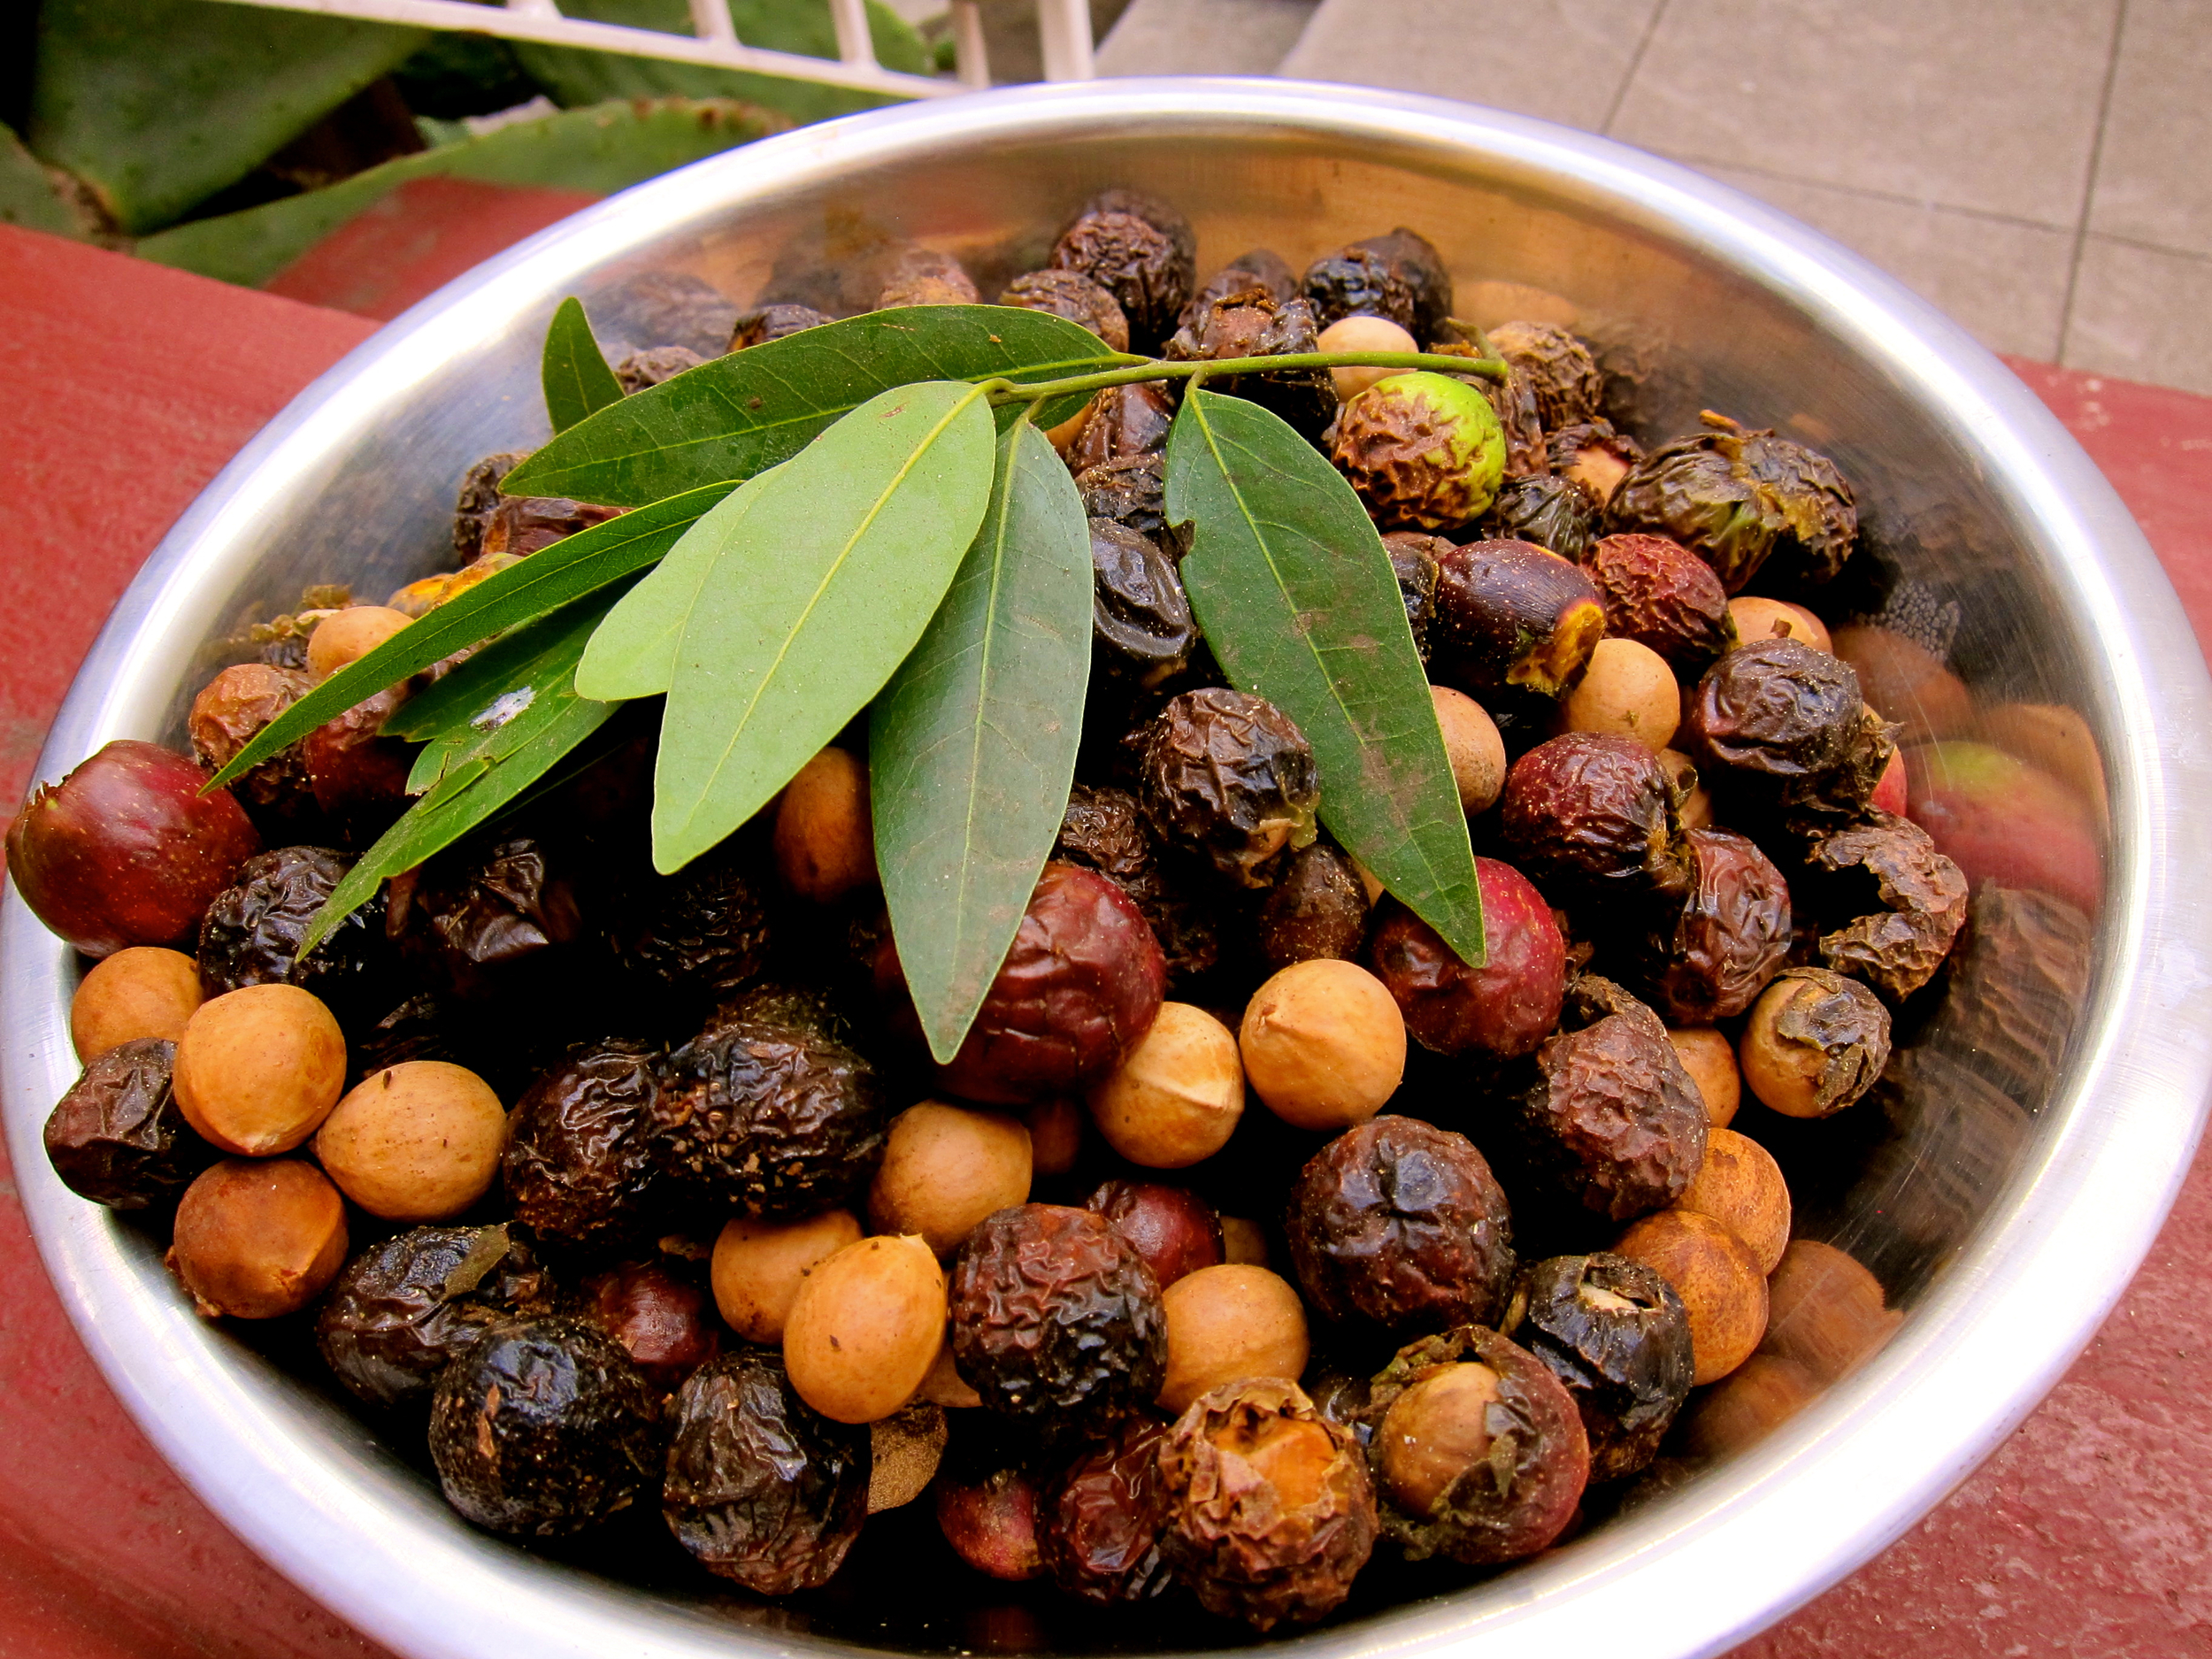
For those of us with *good* taste, the knowledge that there is a local edible easily foraged that, when roasted, produces a flavor that can be likened to a combination of coffee and (bitter) chocolate is mind blowing.
Where to find them: From the West Coast/California bay laurel tree, Umbellularia californica. This may sound obvious, but the bay tree does not always have nuts - the nuts appear from October - December, or even as early as September in Central California or when it's an especially hot year. Also, some years are better than others and some produce only a small amount of nuts - just because you don't find nuts on a tree one year doesn't mean they won't be there the next!
The bay tree leaves can (and should? why buy?) be used as you would use bay leaves purchased from the grocery store, but are very strong, with a ratio of 3:1 (tree bay leaf: store bought bay leaf).
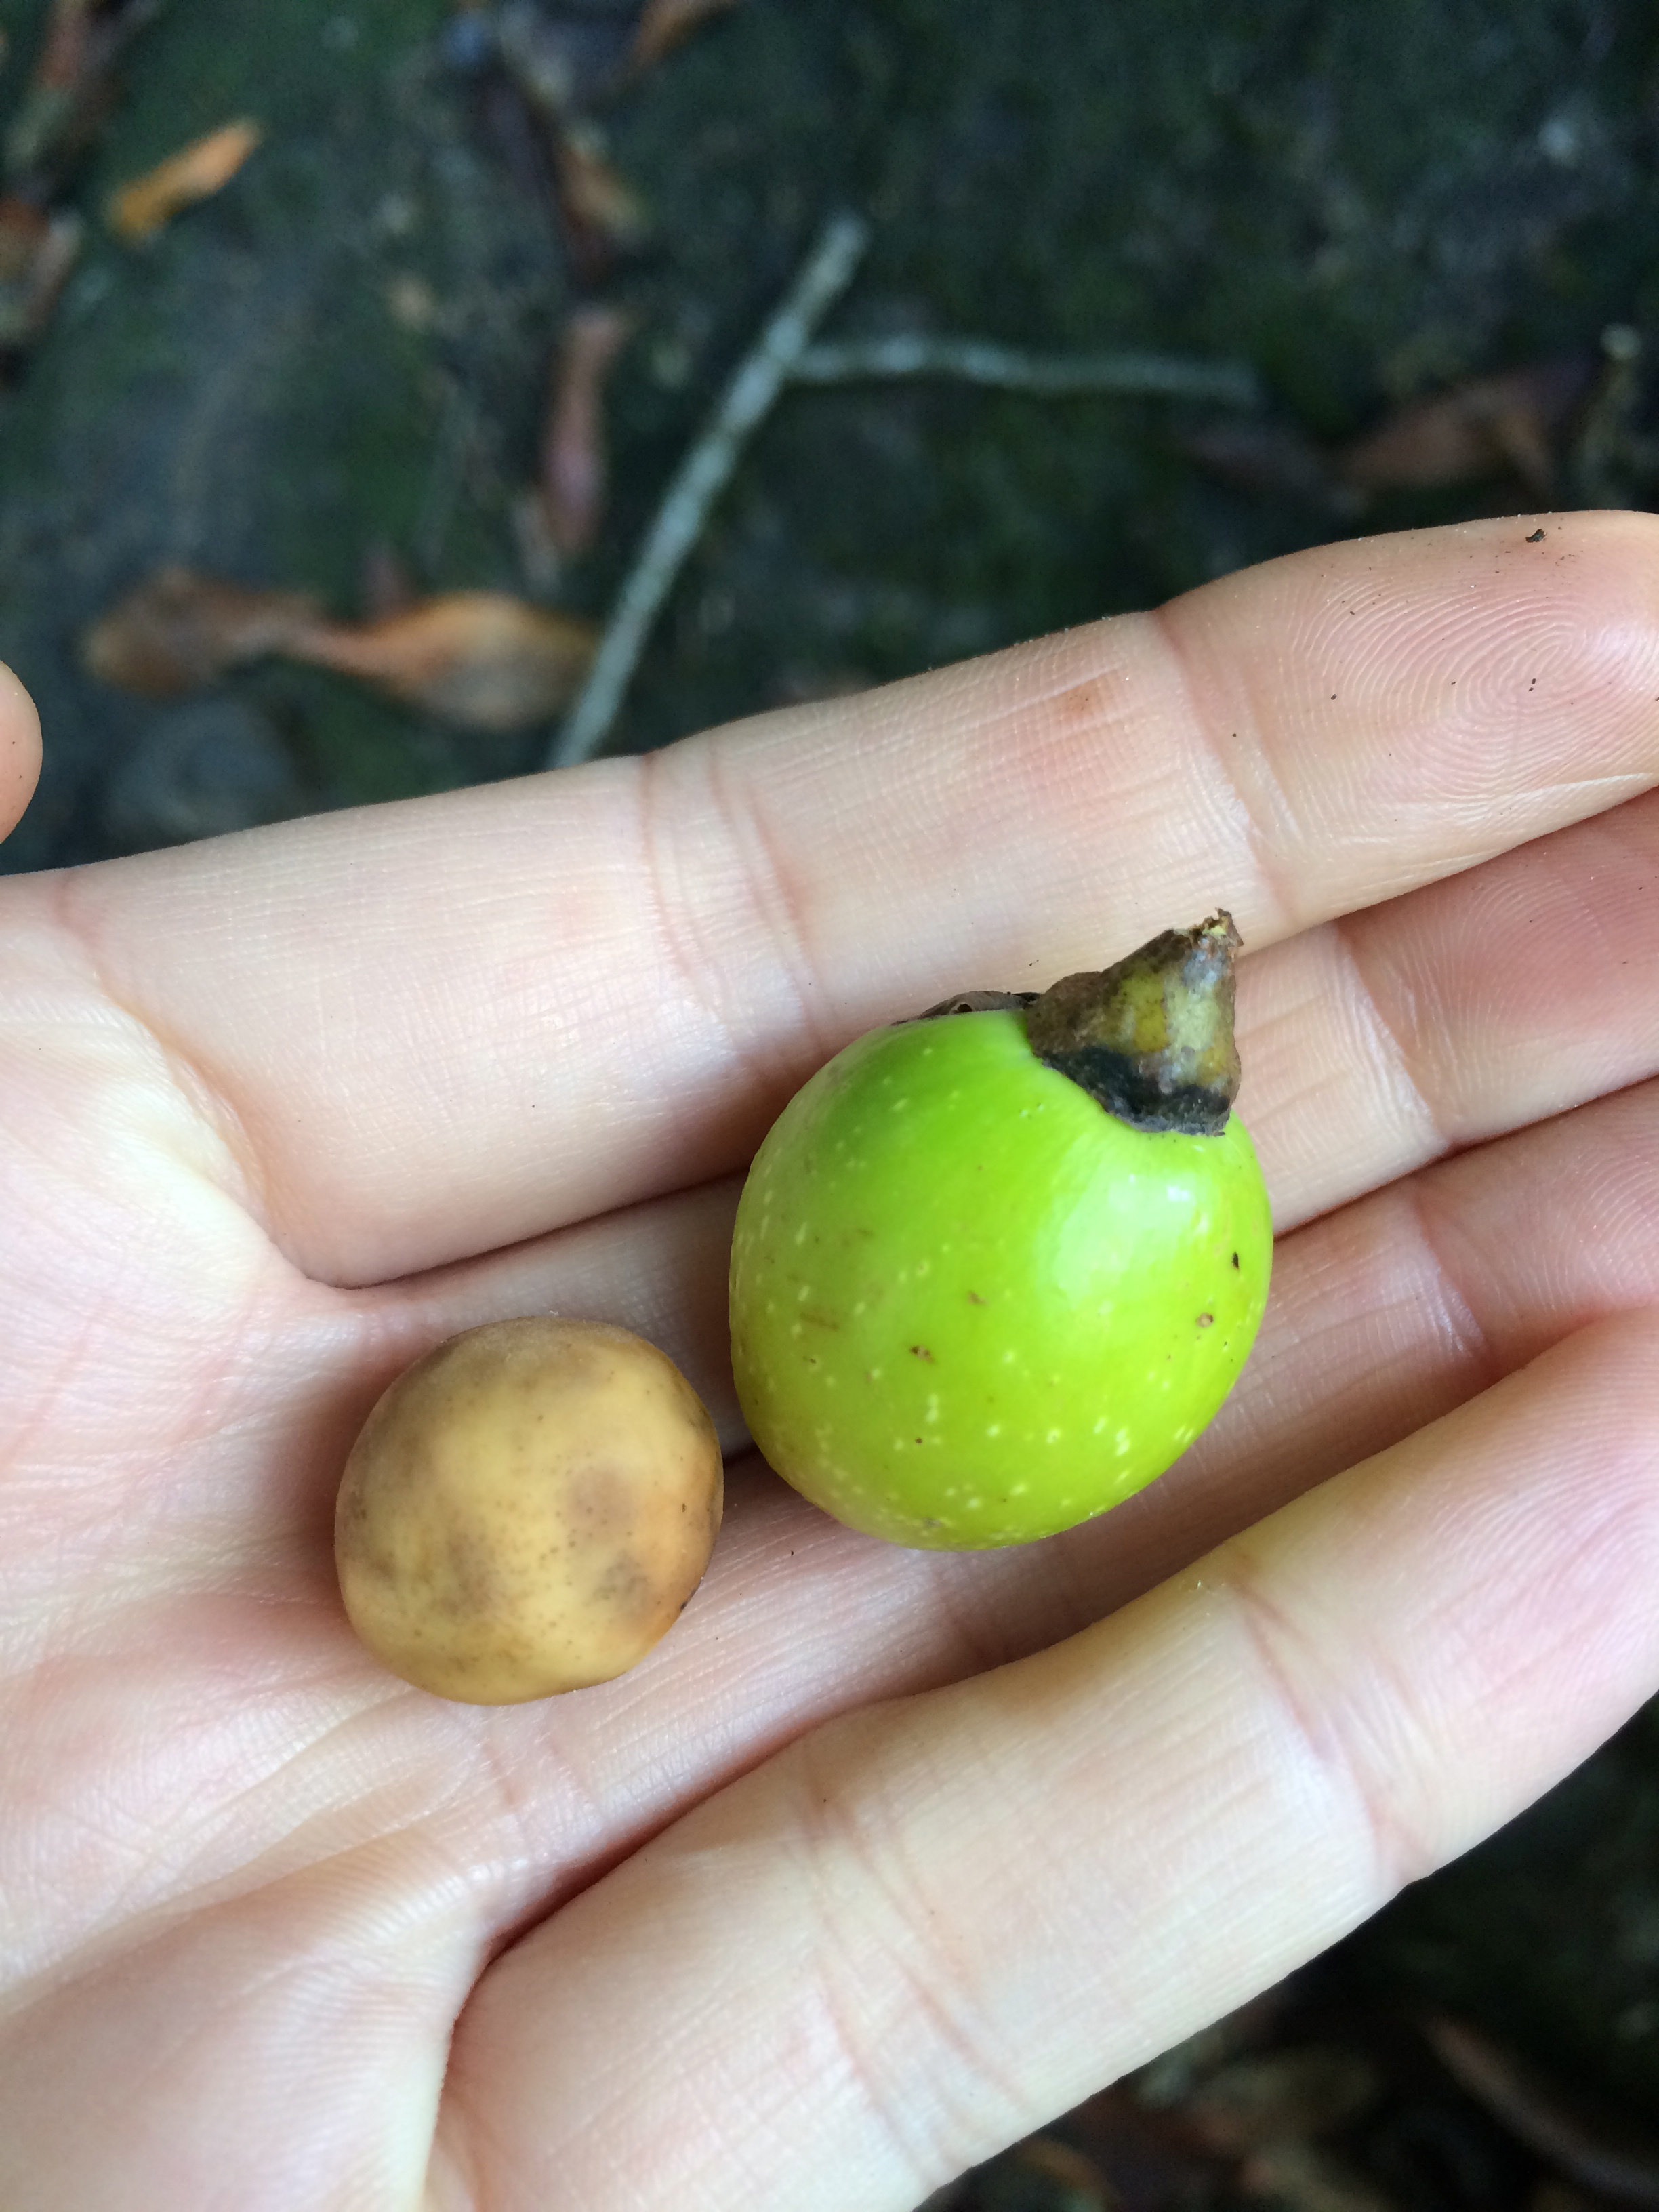

The nut itself is a close relative of the avocado (Lauraceae family) and it looks like an avocado pit with a thin layer of flesh. The flesh goes from a bright green (unripe) to purple (ripe) and is technically edible, but rots very quickly. You'll know it's rotten when the outside is a goopy, gross, mess “this-will-make-you-sick” texture. The real treat is when you roast the nut itself on the inside of the flesh. Before roasting, or if not roasted properly, the nut is extremely bitter and astringent, similar to acorns and olives before they are cured. You will NOT want to eat the nut before roasting.
To roast the nut:
Peel off that goopy exterior. Sometimes you can find the nuts by their lonesome, in which case, score! Less to do. Sometimes, you peel them and they look fine. Othertimes, you peel them and they look gross/moldy - throw these ones out.
Wash the nuts - remove any excess goop.
Dry the nuts. I have seen directions indicating that the nuts need to be dried then stored for 1-2 years, but I don't have the patience for that and in my experience it just takes a few weeks in the dry climate of the Bay Area to remove the moisture. To dry, lay them out to open air until the water evaporates then store in paper bags or other breathable containers (an open bowl or jar) in the dark.
Roast the nuts on a baking sheet in a single layer at 350 degrees F. This usually takes about 1 to 1.5 hours, but you’ll know they’re done when the insides look brown/black (some will crack open to reveal this). Some recipes call for 450 degrees F for 45 minutes - I previously said that either way works, but have heard that 450 makes them too toasty too fast. Up to you, but I would check them every 20 minutes or so.
Crack open the shells with a nut cracker (teeth also work, but everyone cringes when I do that) and eat the nuts as you choose. They have a slightly bitter taste, but for those that like super dark chocolate, it’s delicious. Note that bay nuts possess a mildly stimulating effect, similar to caffeine.
Suggested uses (so far, I’m still experimenting):
One their own (haven’t made them covered in chocolate yet, but I’m sure this would be decadent and plan to do so). Pairing with whiskey is awesome.
Bay nut mole - substitute chocolate for bay nuts. Don’t look back.
Bay nut ricotta cheesecake - I have done this twice now and the recipe is lovely.
Bay nut brittle
Bay nut hot cocoa?
Bay nut chocolate bars - working with the Culinary Institute to make this happen, but I know that Madre Chocolate has done it in the past!

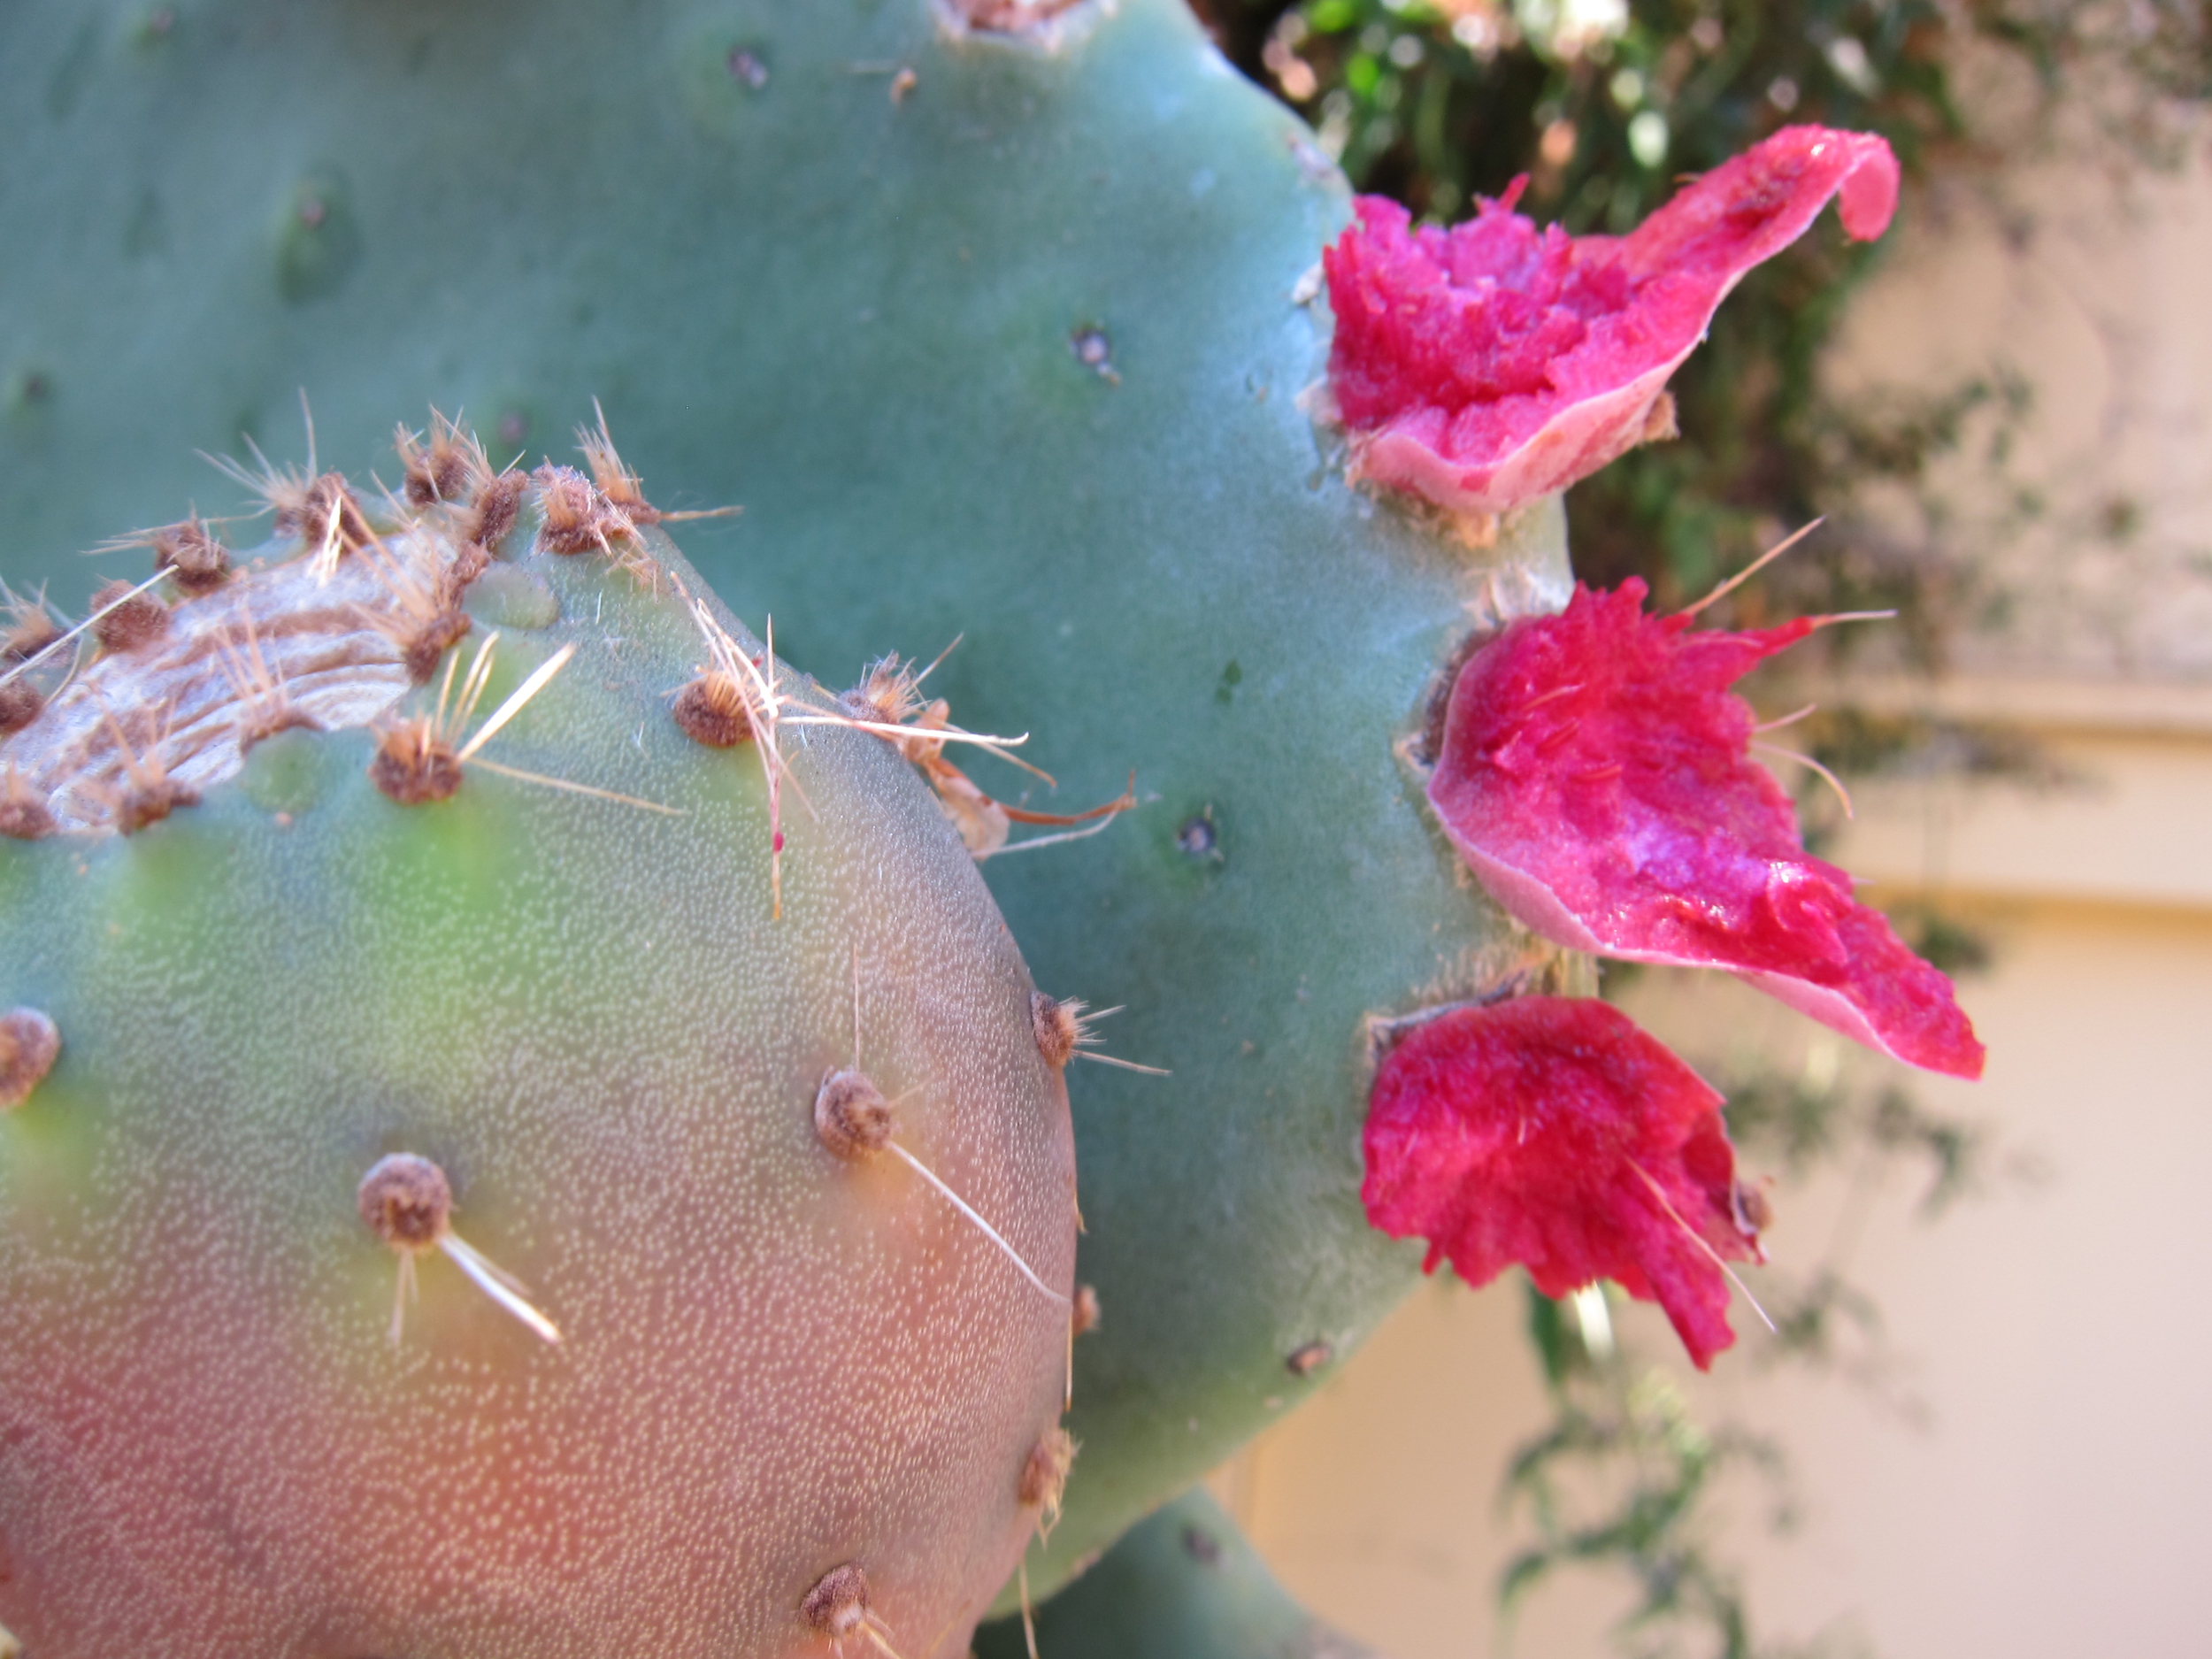
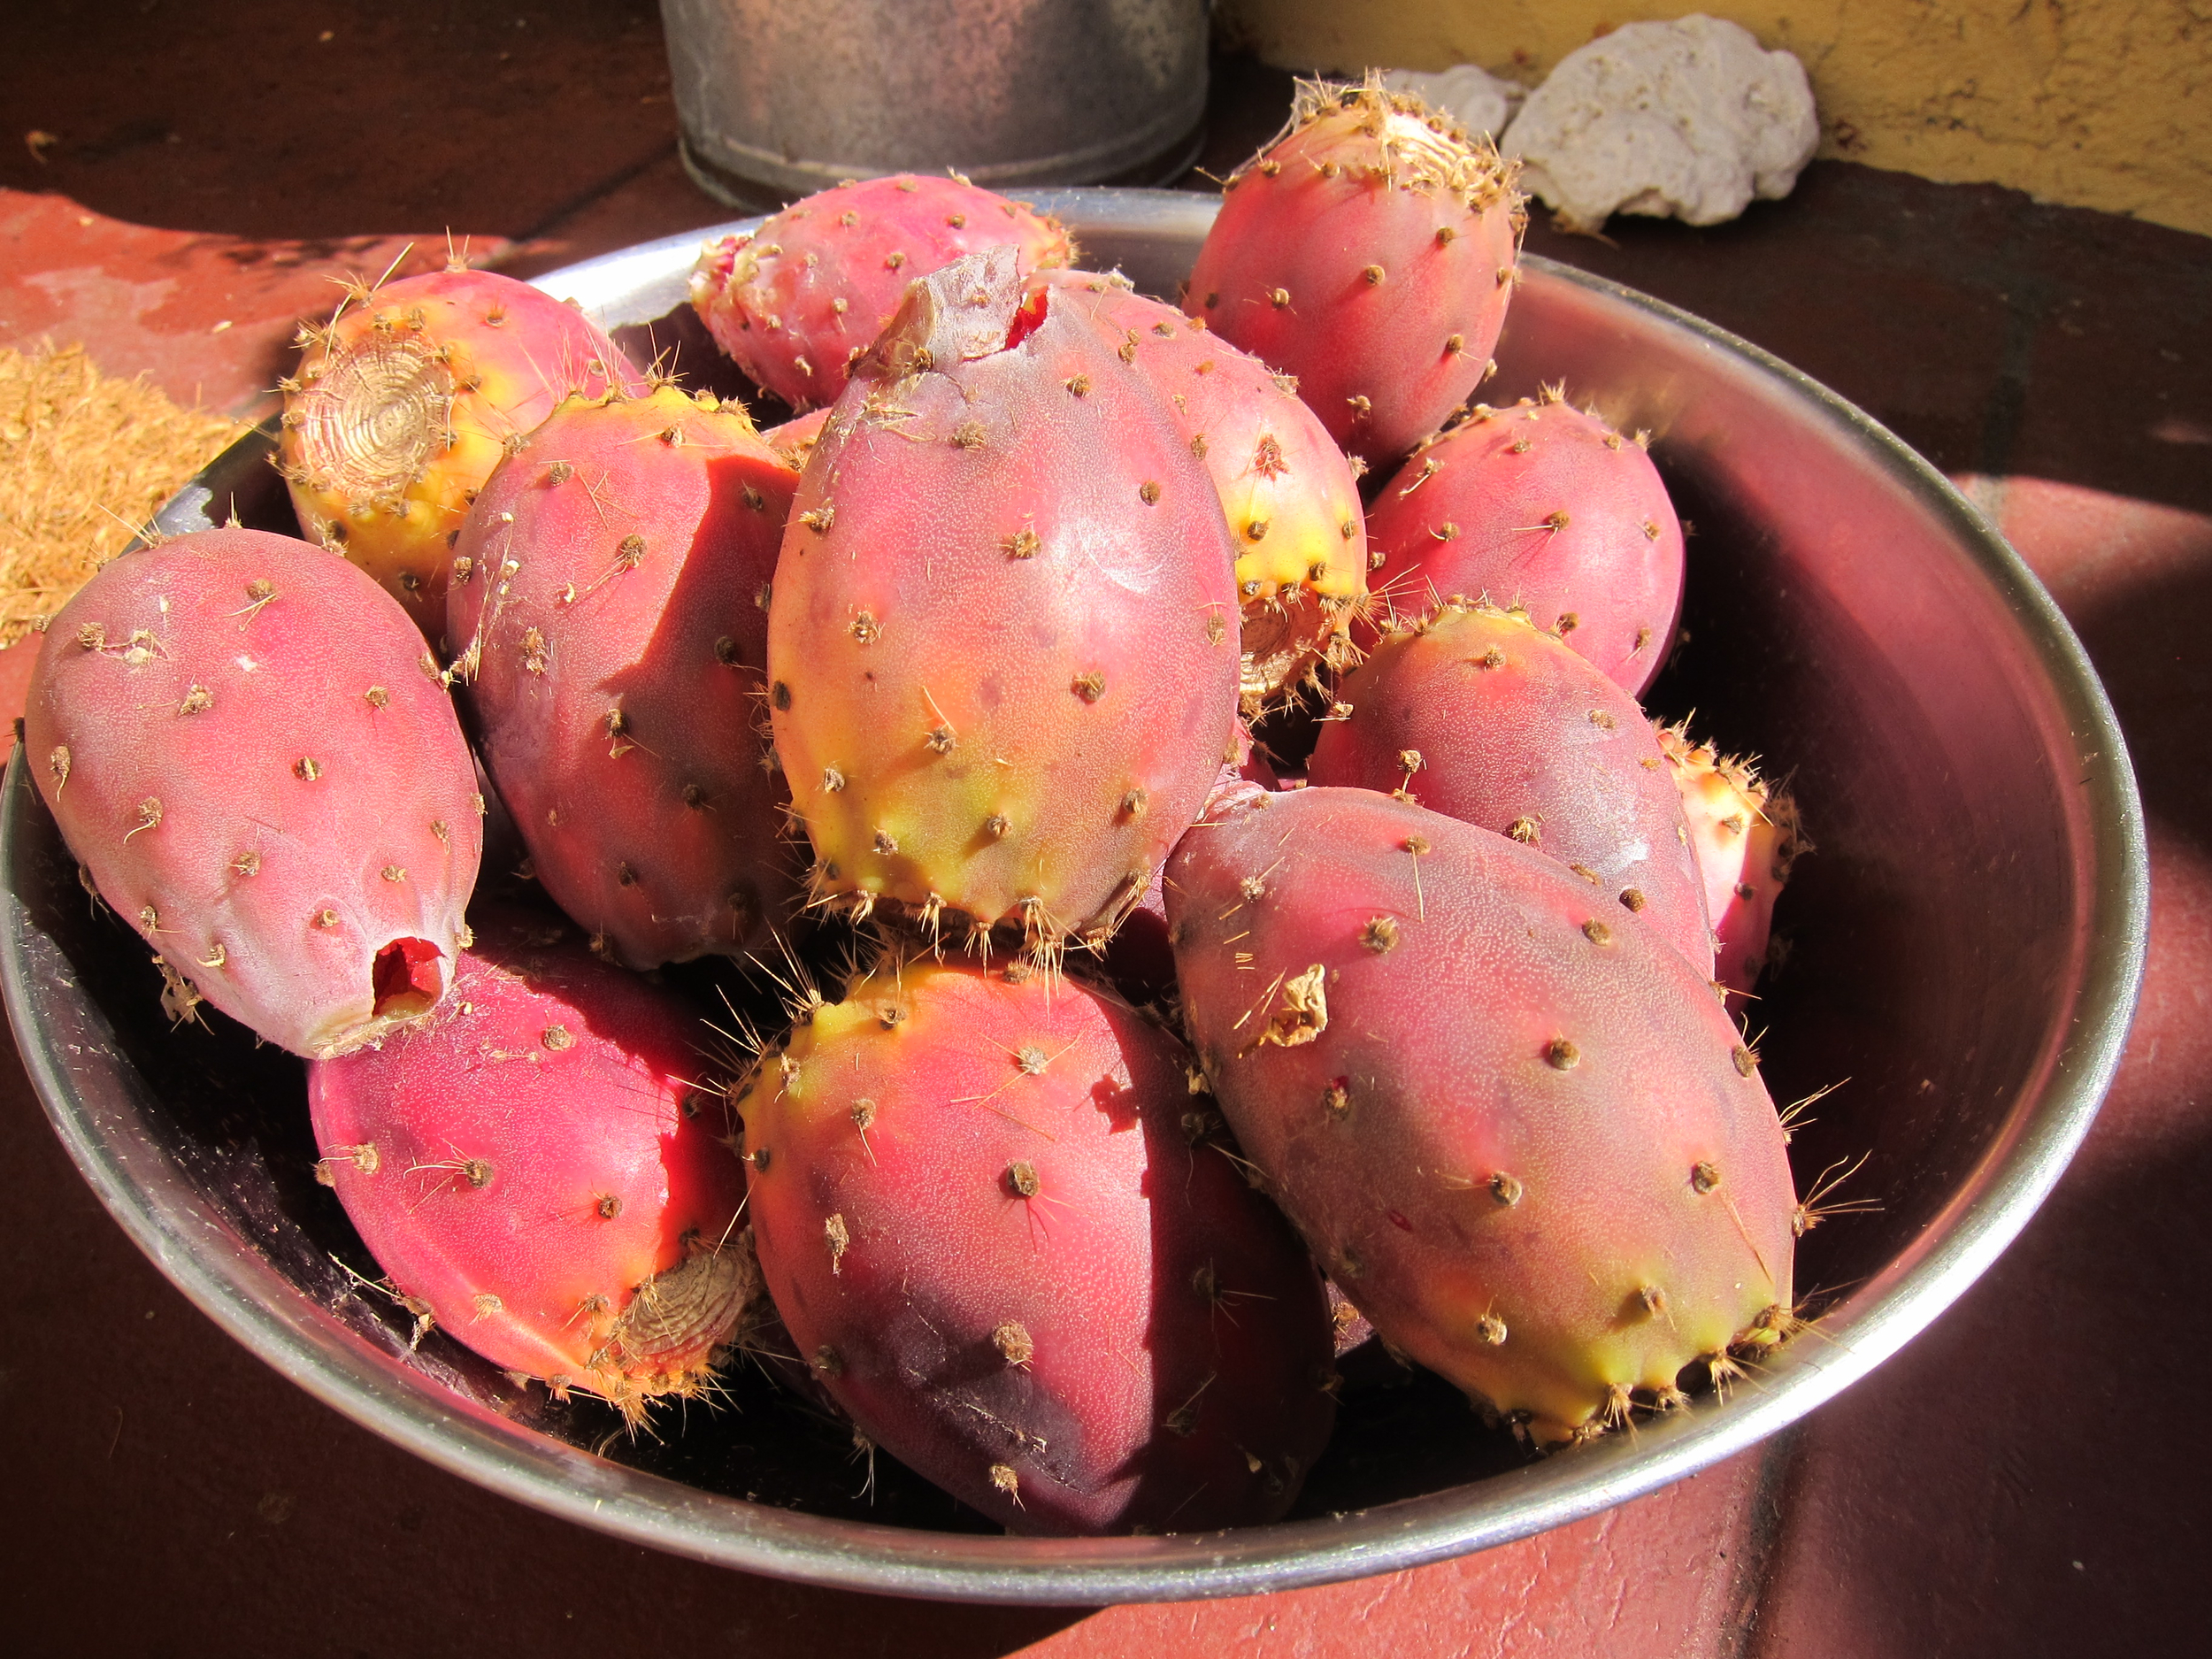
Prickly Pear Harvest and Processing
A few easier ways to take on the prickliest of pears.

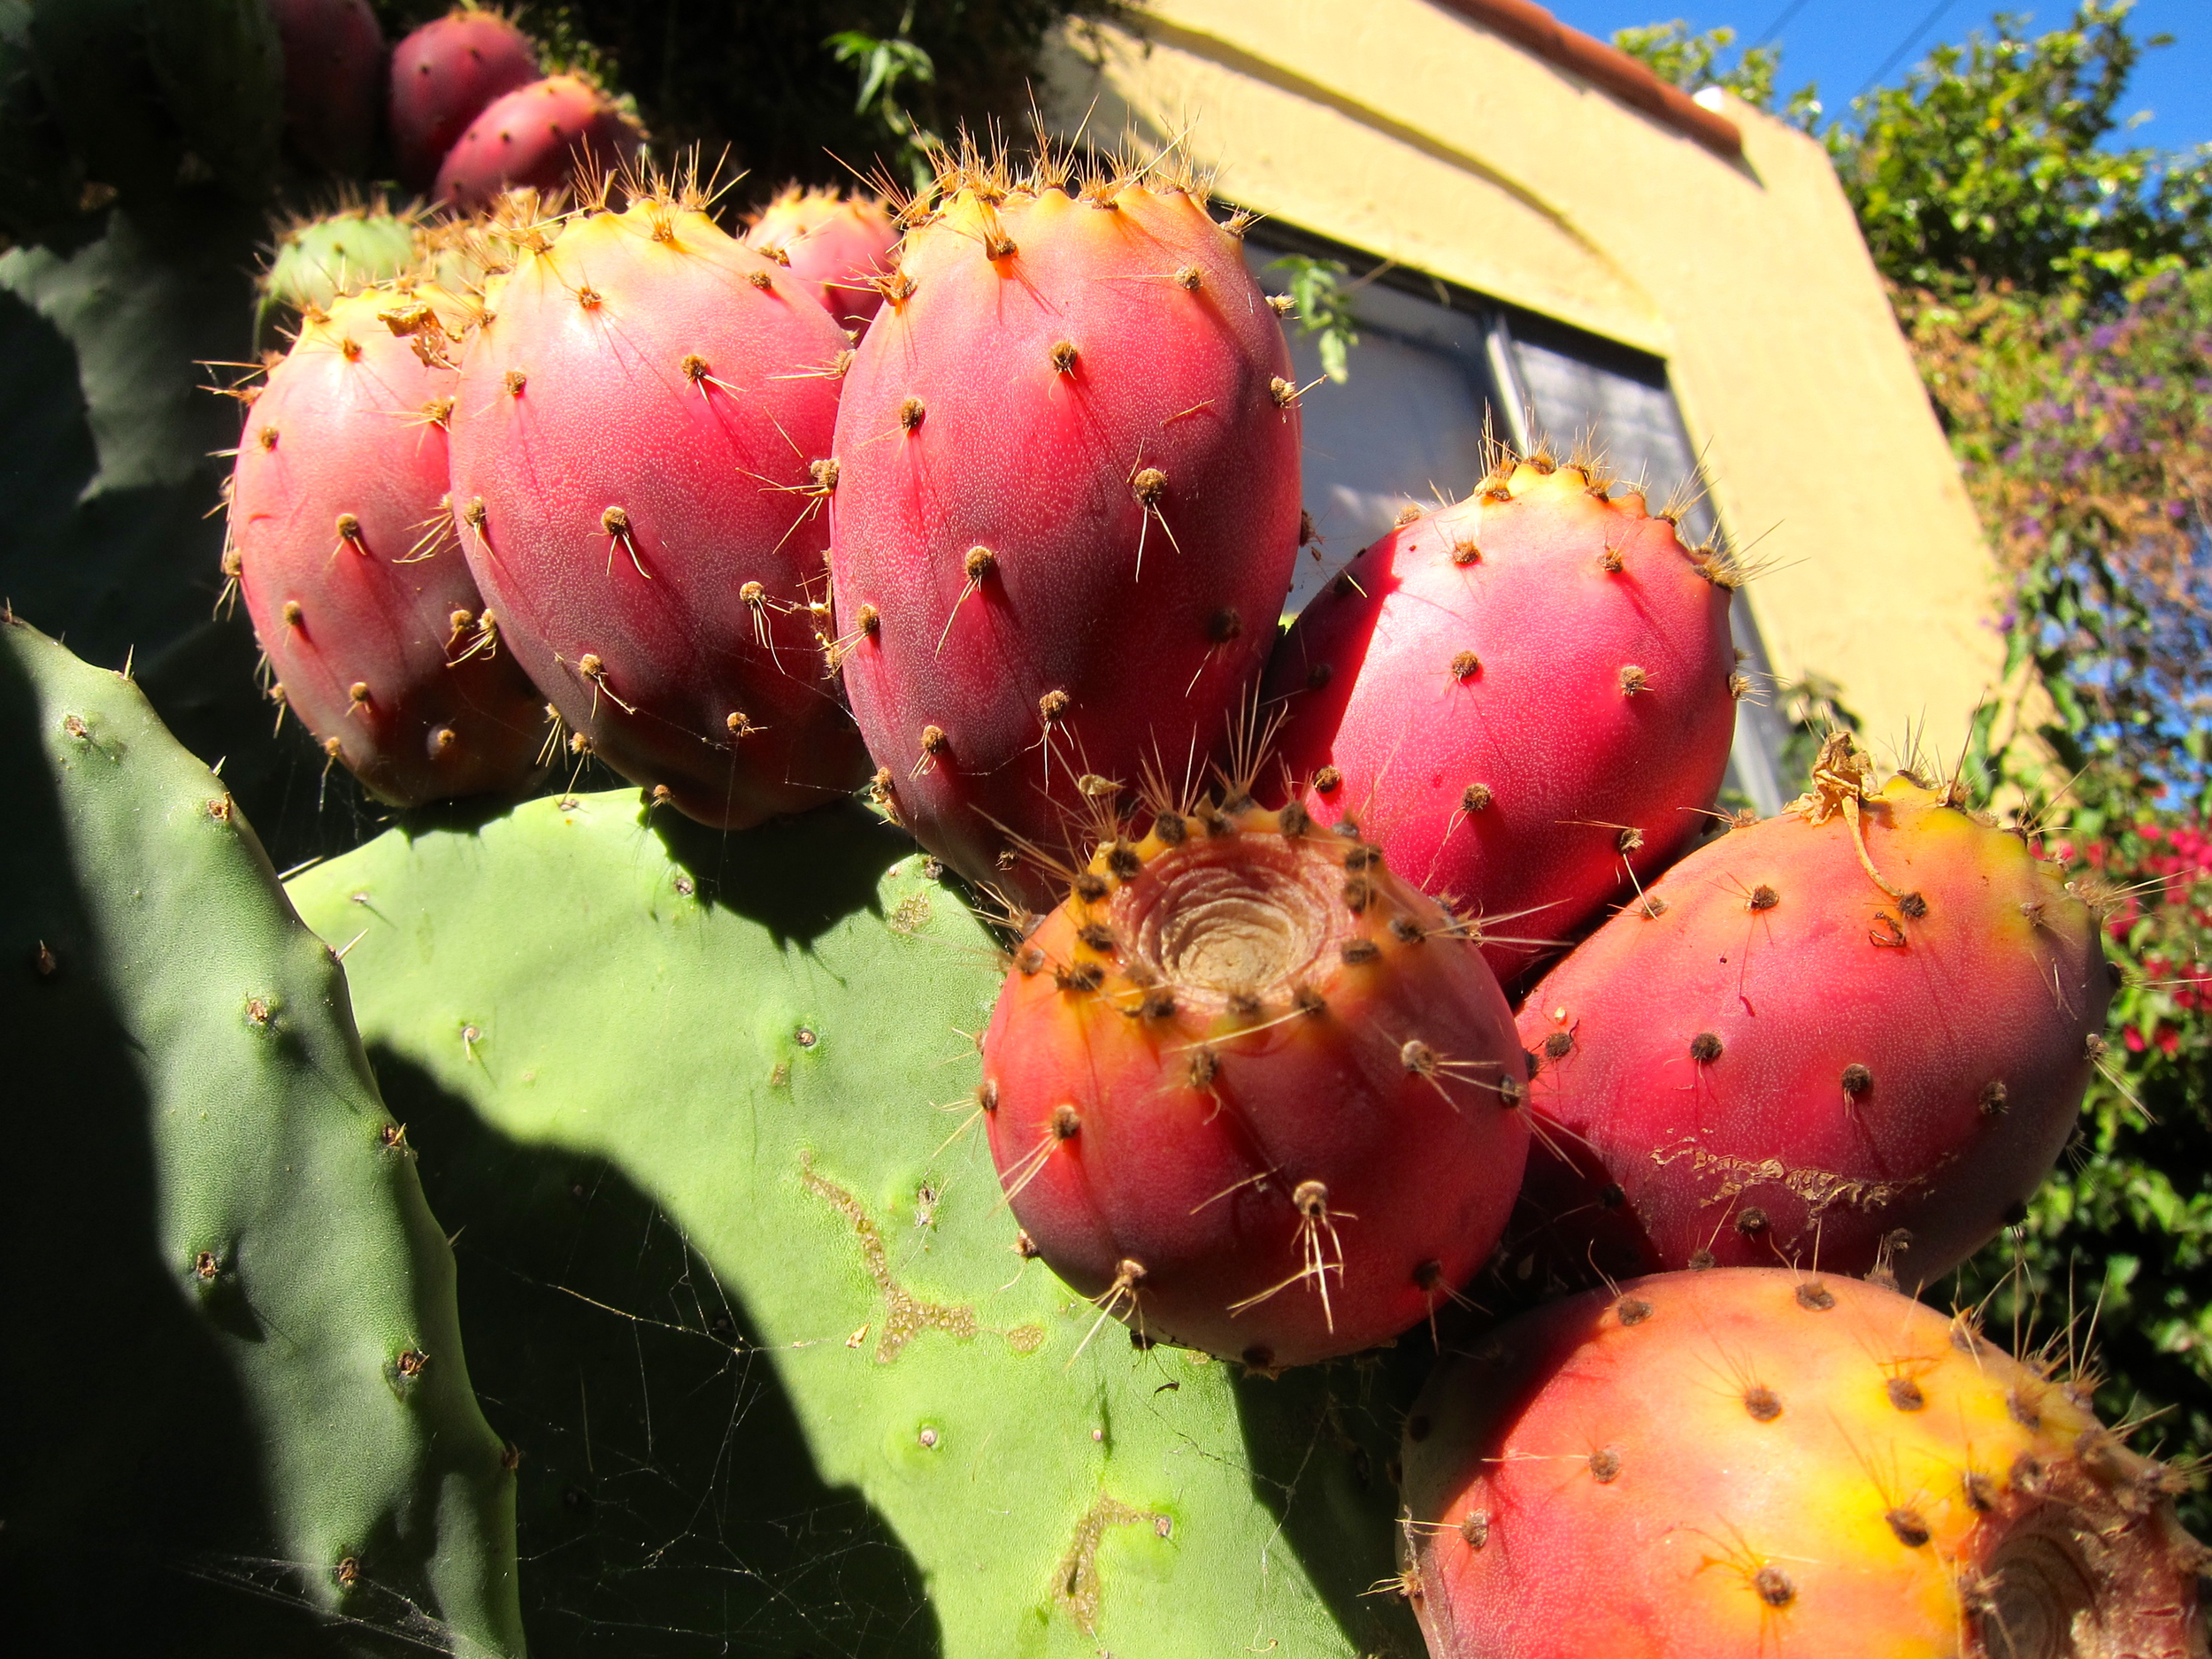
By now one would think I should be a master prickly pear parer, but alas - I still acquire many little spikes in my hands and in other peculiar places (for example, I once found a few on my tongue over a week after processing) when I pick and process the fruit, just less than before.
The cactus plant in front of my cottage is such a large and active producer of prickly pear fruit (also known to Spanish-speakers as "tuna") that I’ve found during the late summer and fall, prickly pear harvesting and processing can be a part-time job. Luckily, I have some skills from my time in Arizona and have a few fine-tuned processes allowing for maximum production in minimal time with as few pricklies in fingers as possible.
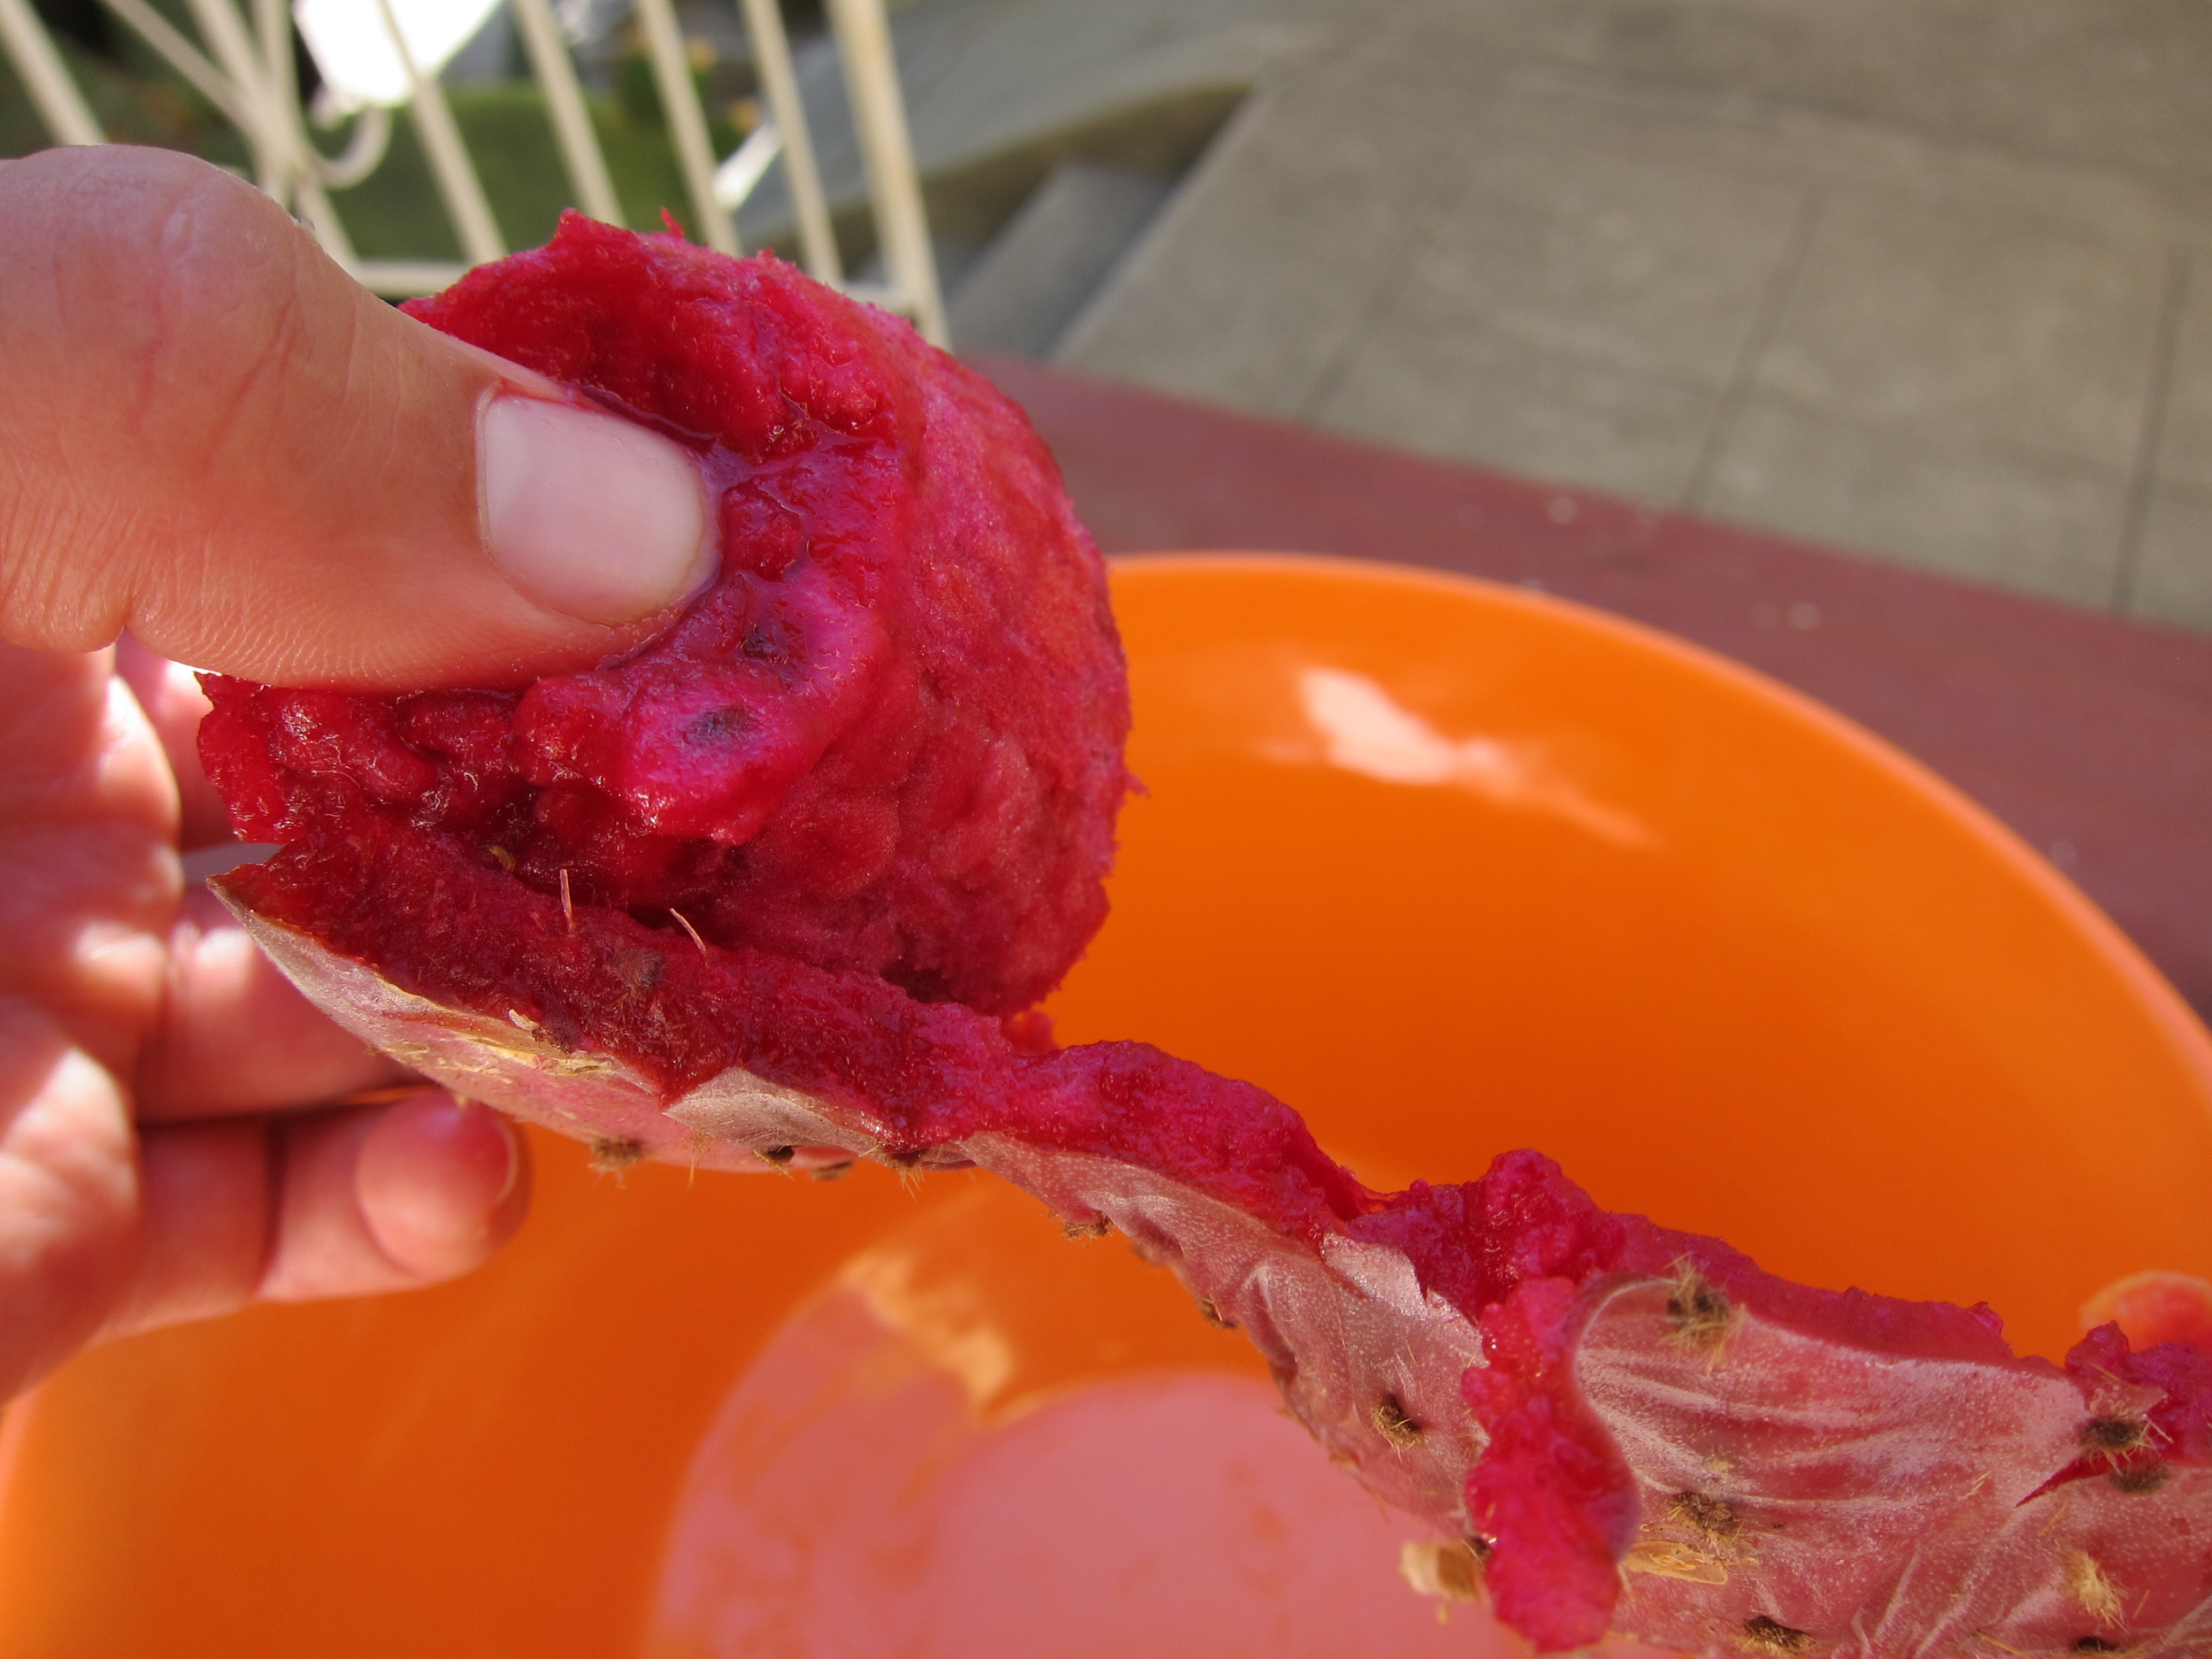
Process 1: If you want to keep the whole fruit intact for smoothies and other recipes requiring the flesh. Note that this process is more difficult, but uses as much of the fruit as possible, preserving fiber and other beneficial nutrients found in the flesh. However, when you use the whole fruit there are black seeds that are very hard and difficult to remove or pulverize. I don't mind these seeds, but I've found that others do.
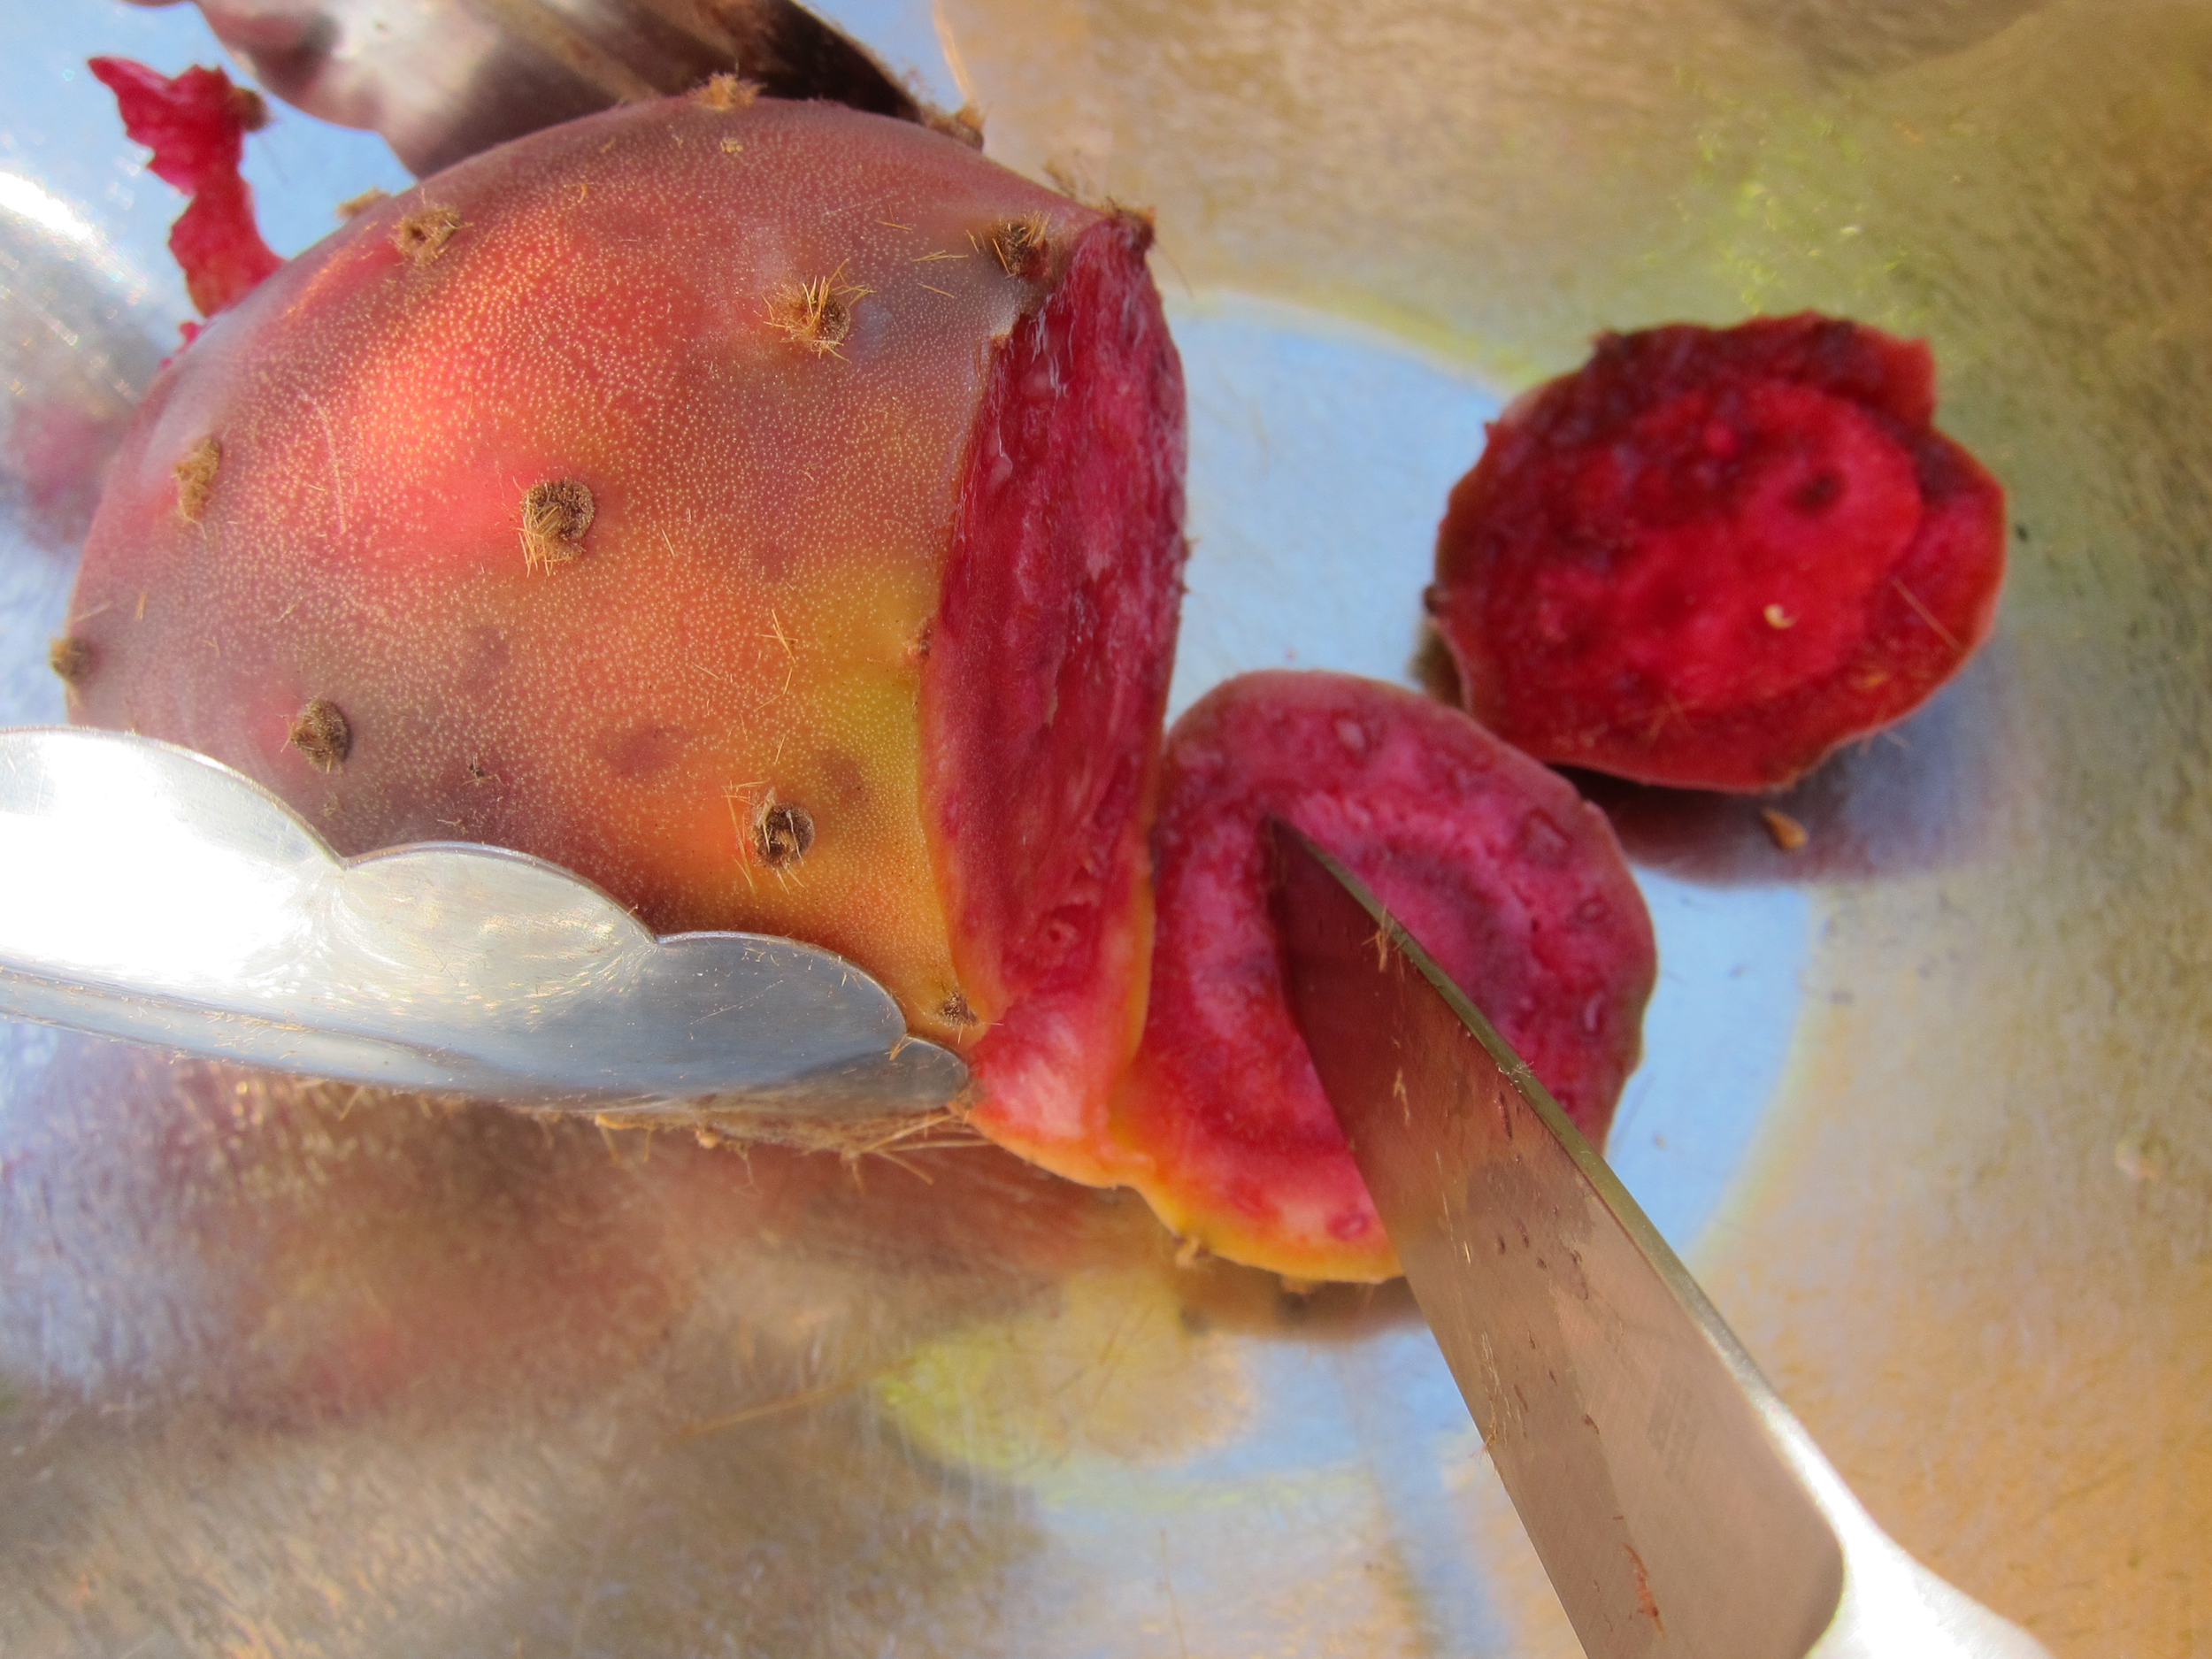
Step 1. Pluck the pears using tongs -in fact, use tongs throughout this whole operation wherever possible. Be very careful which way the wind is blowing - obviously, try to avoid standing downwind and close your eyes if you see danger.
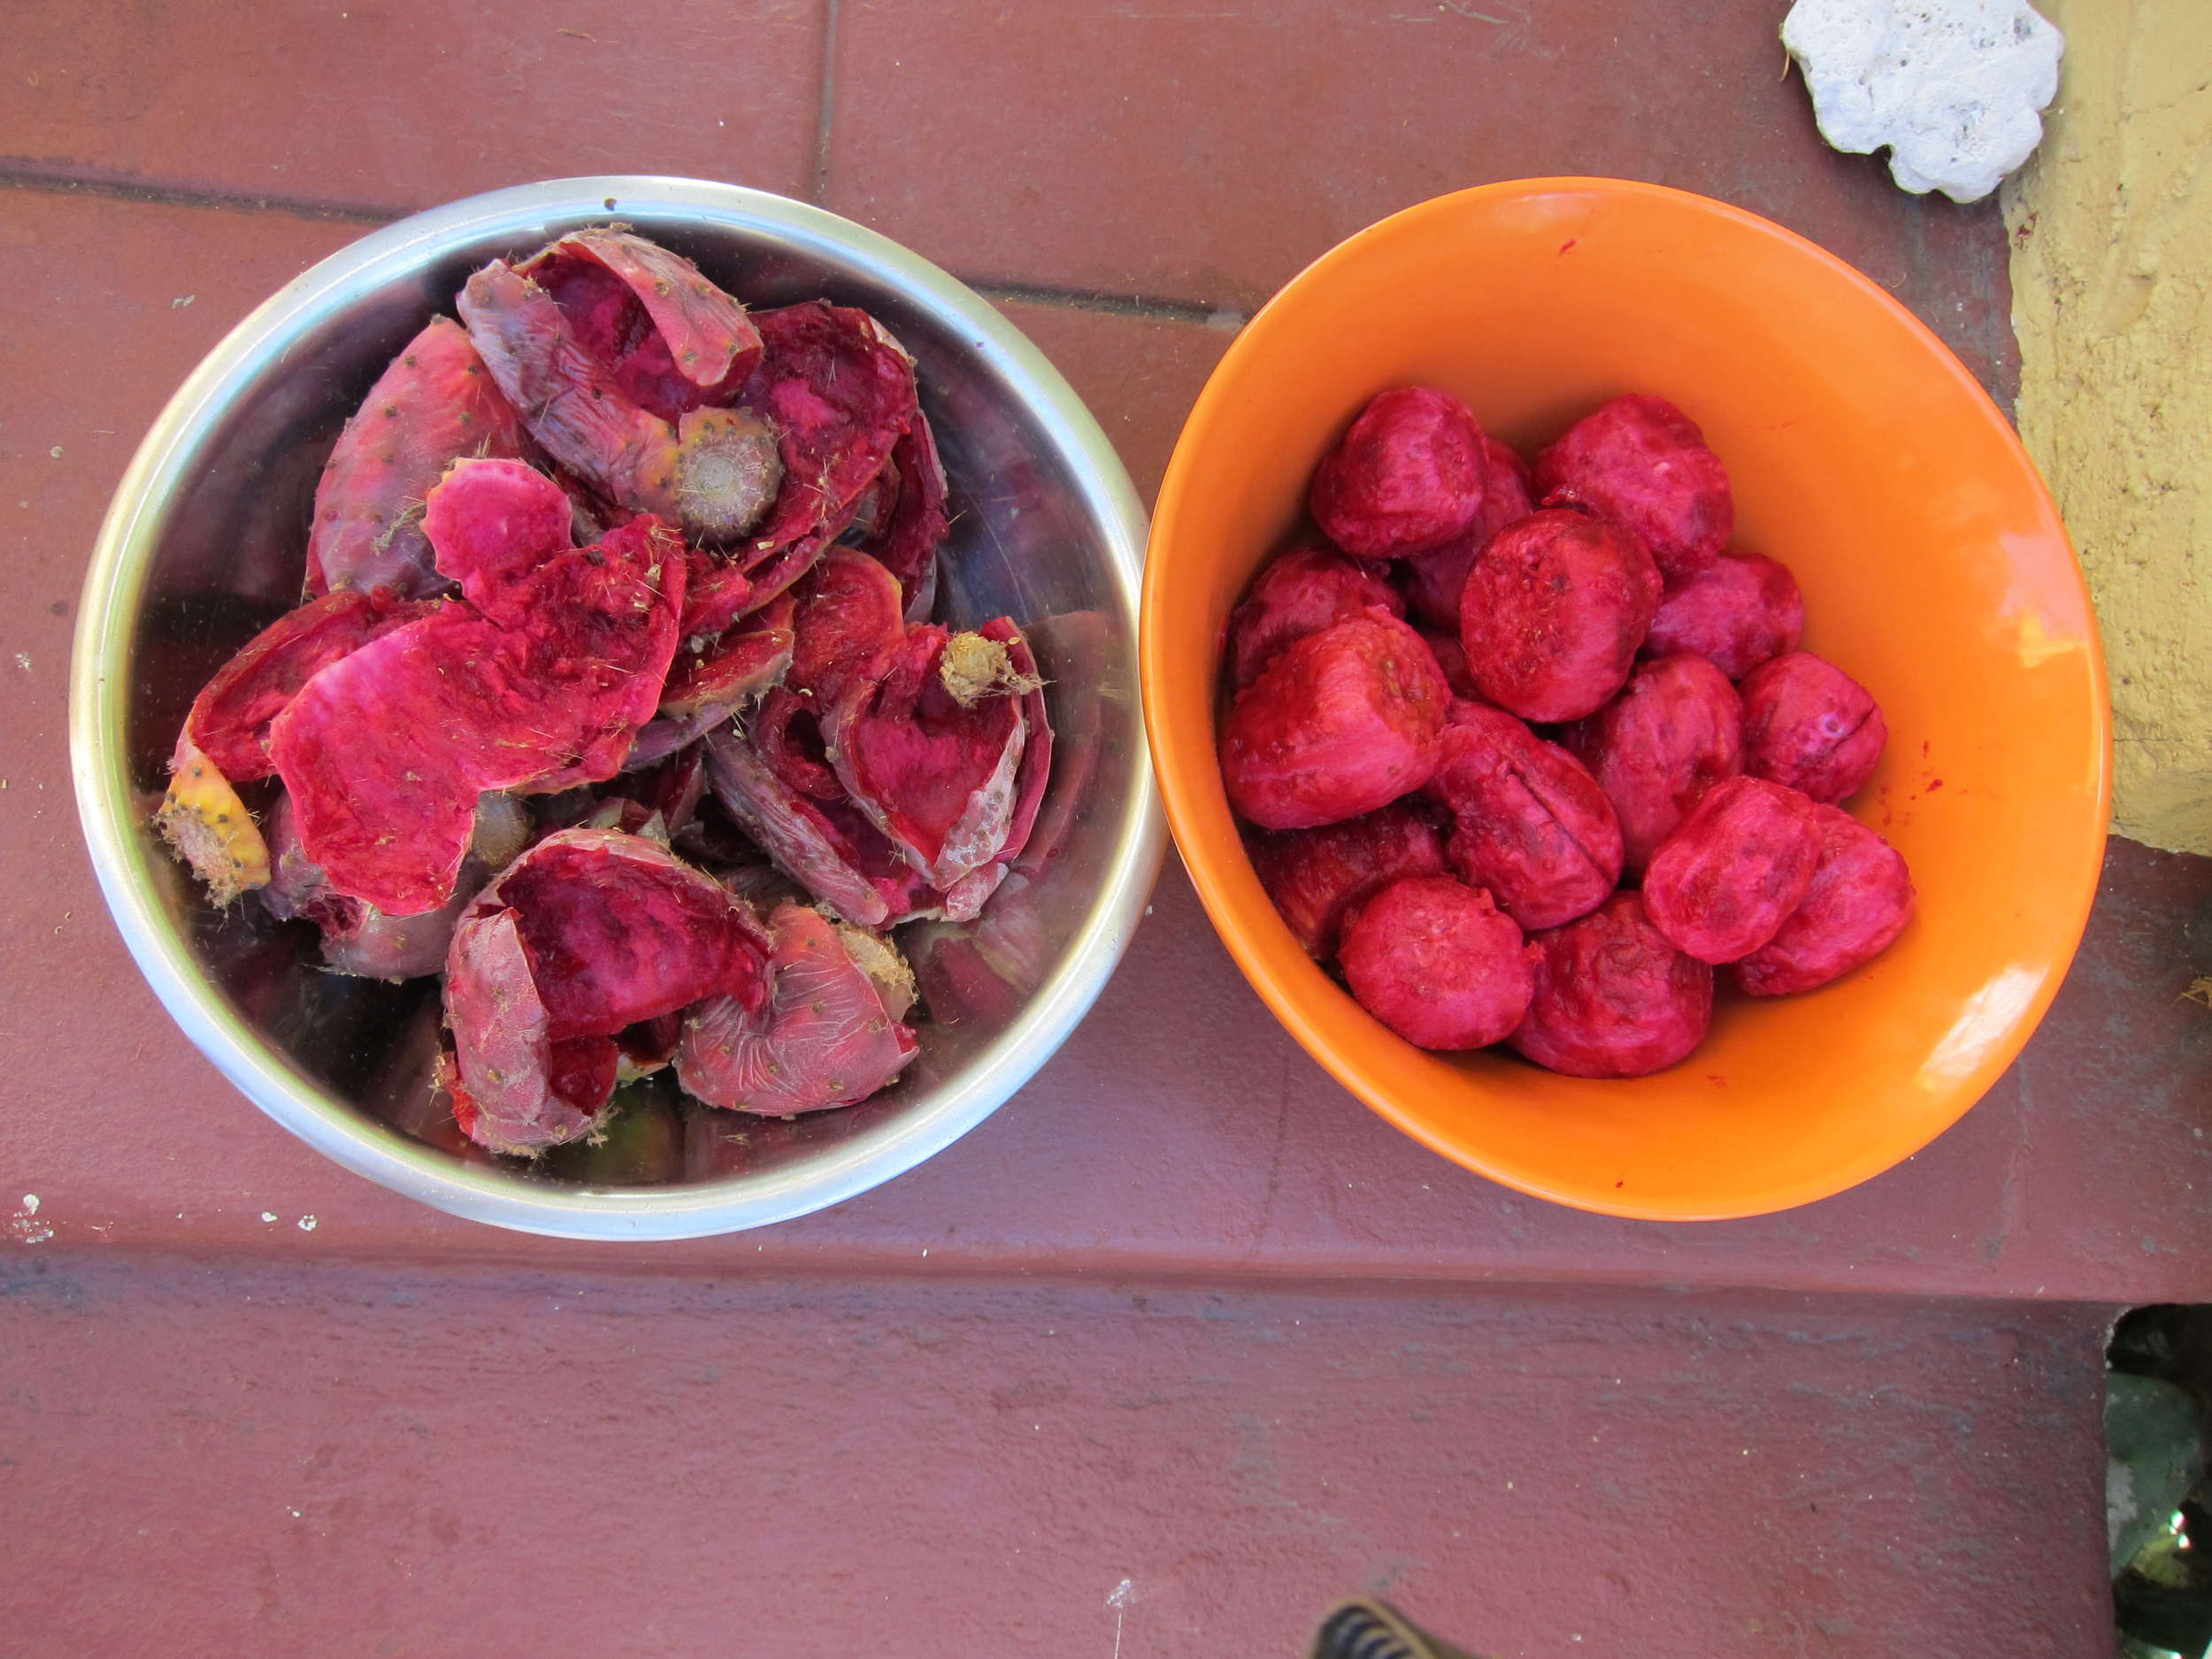
Step 2. Set up your operation - place pears in a big bowl and get ready to peel them. I like to have 3 bowls for this - 1 for the unpeeled pairs, one “working bowl” where you slice them, and one for peels.
Step 3. Cut off each end of the pear.
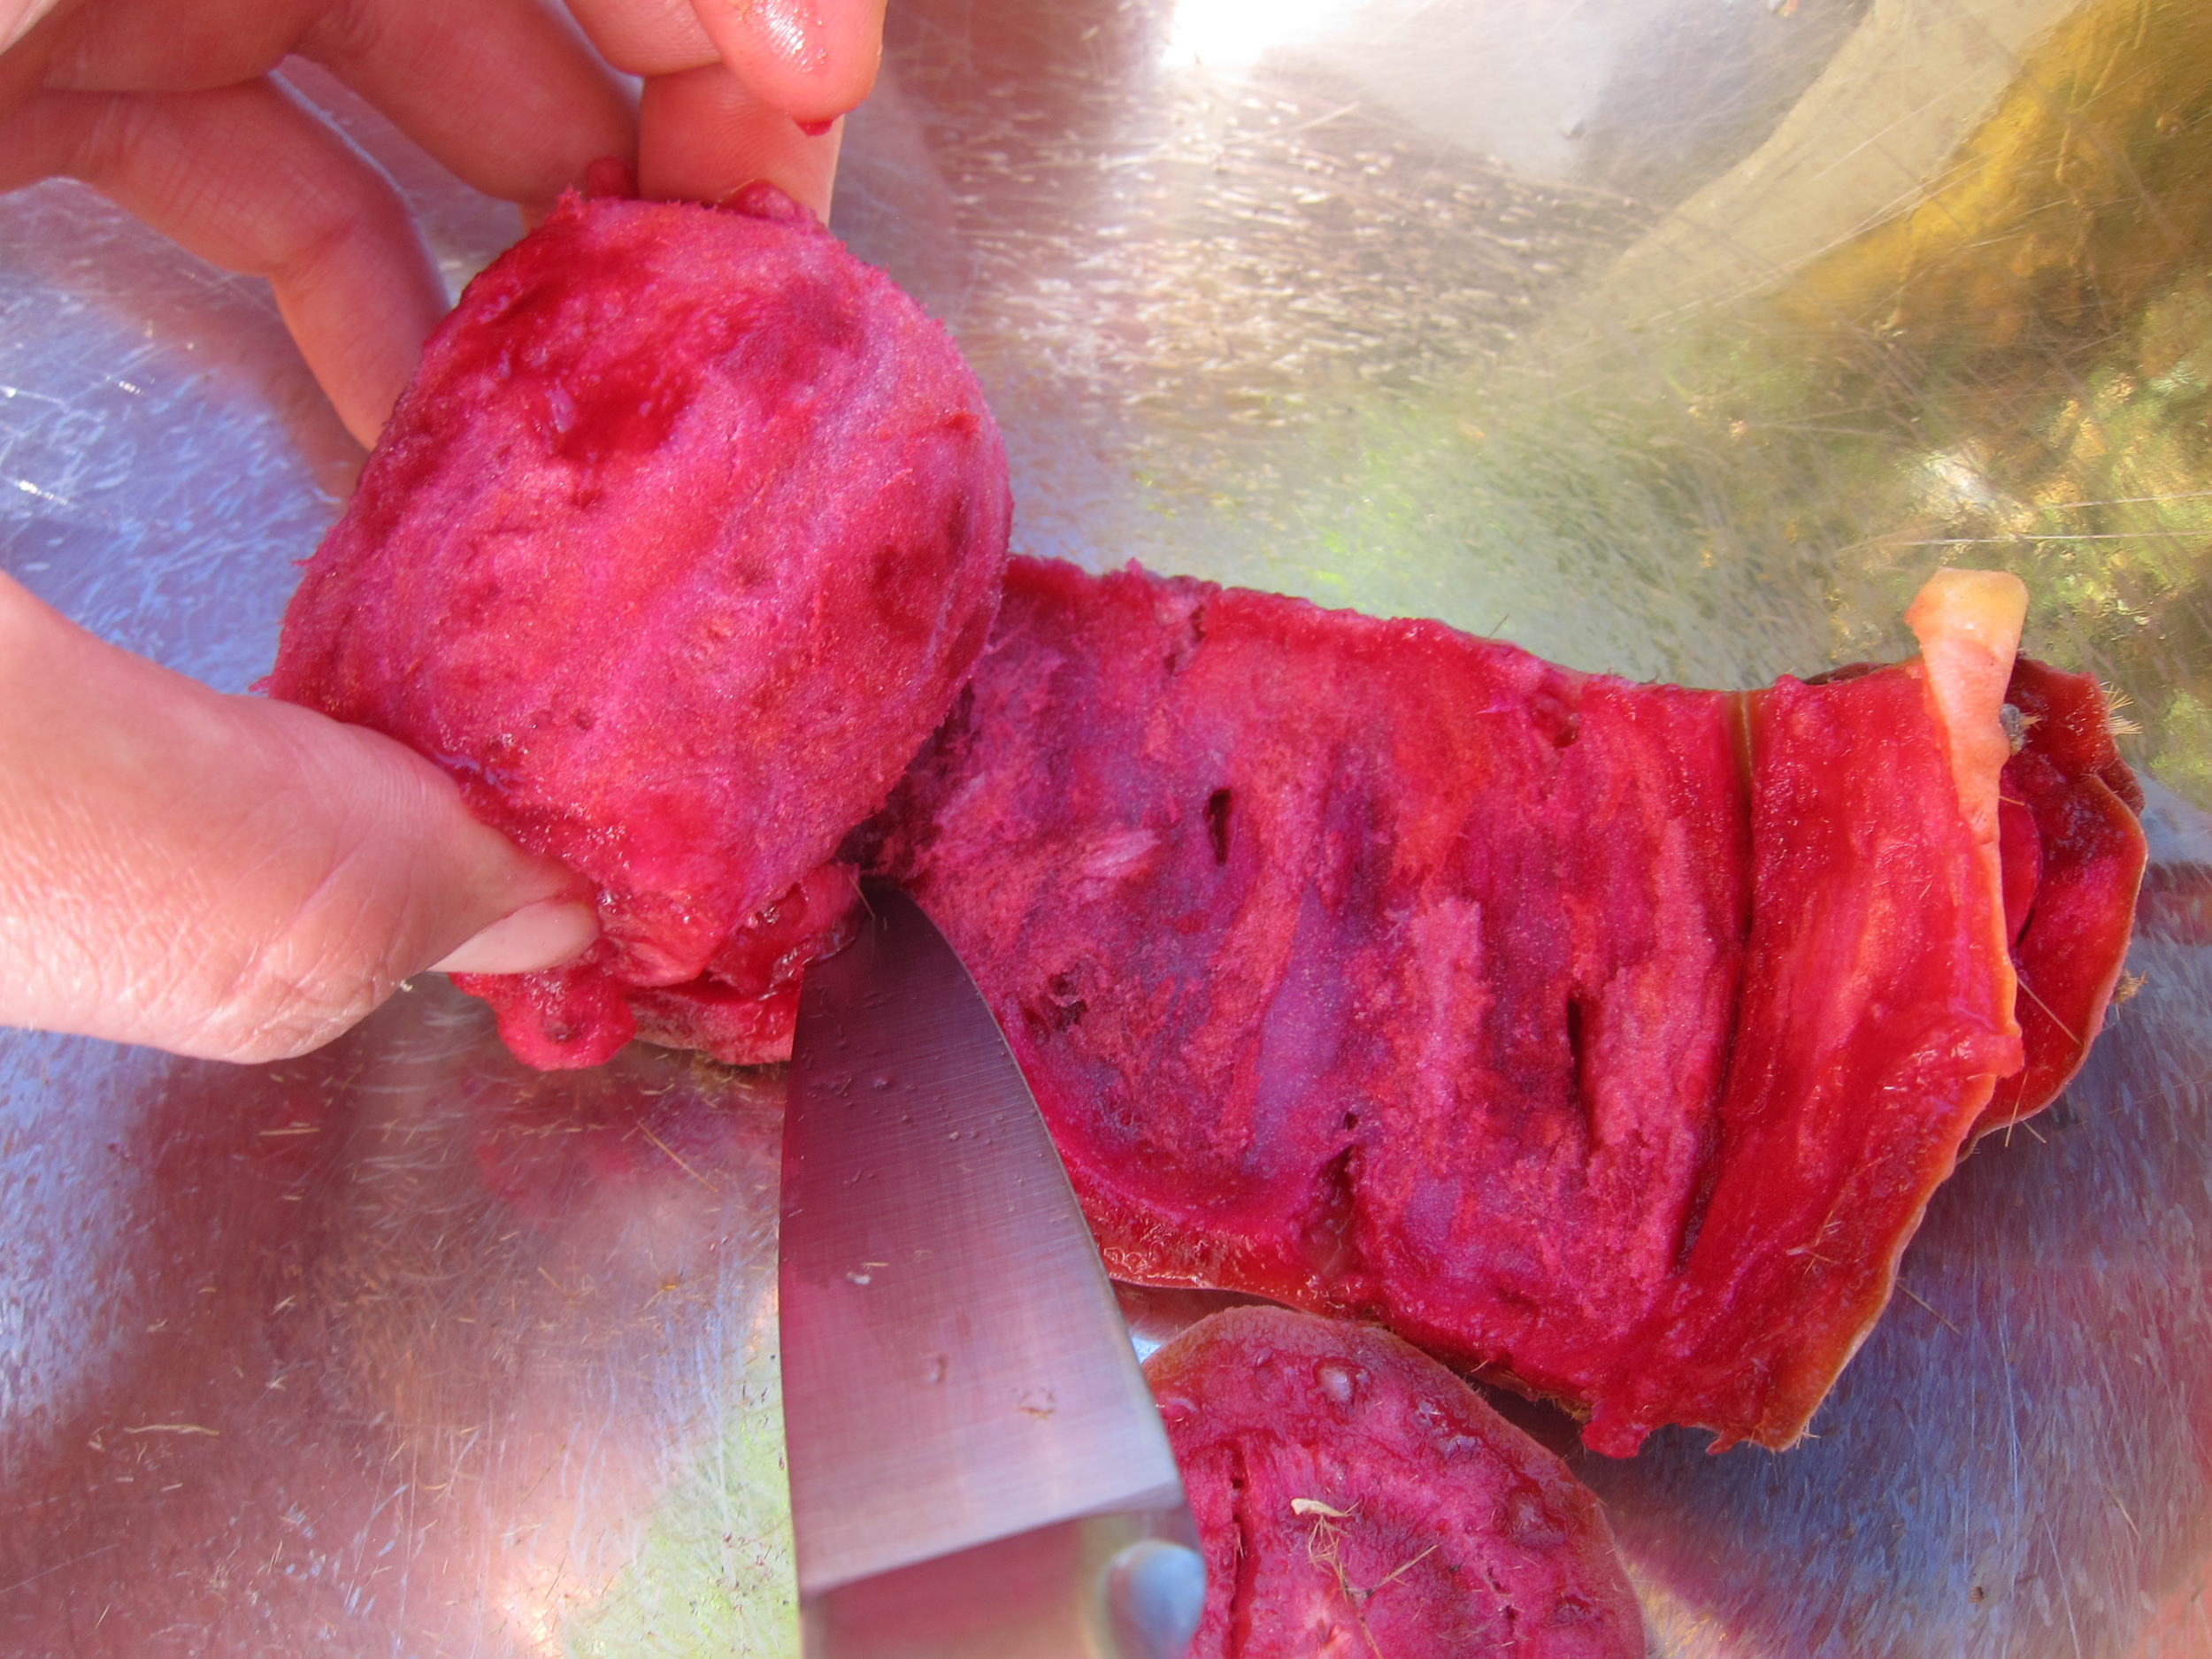
Step 4. Make a slice down the middle and scoop out the fruit. This is a pretty cool step because the fruit comes away from the skin quite naturally. Toss skin in one bowl and fruit in another. This loses some of the fruit on the edge of the skin, but there’s really no other way unless you want to get stickers everywhere.
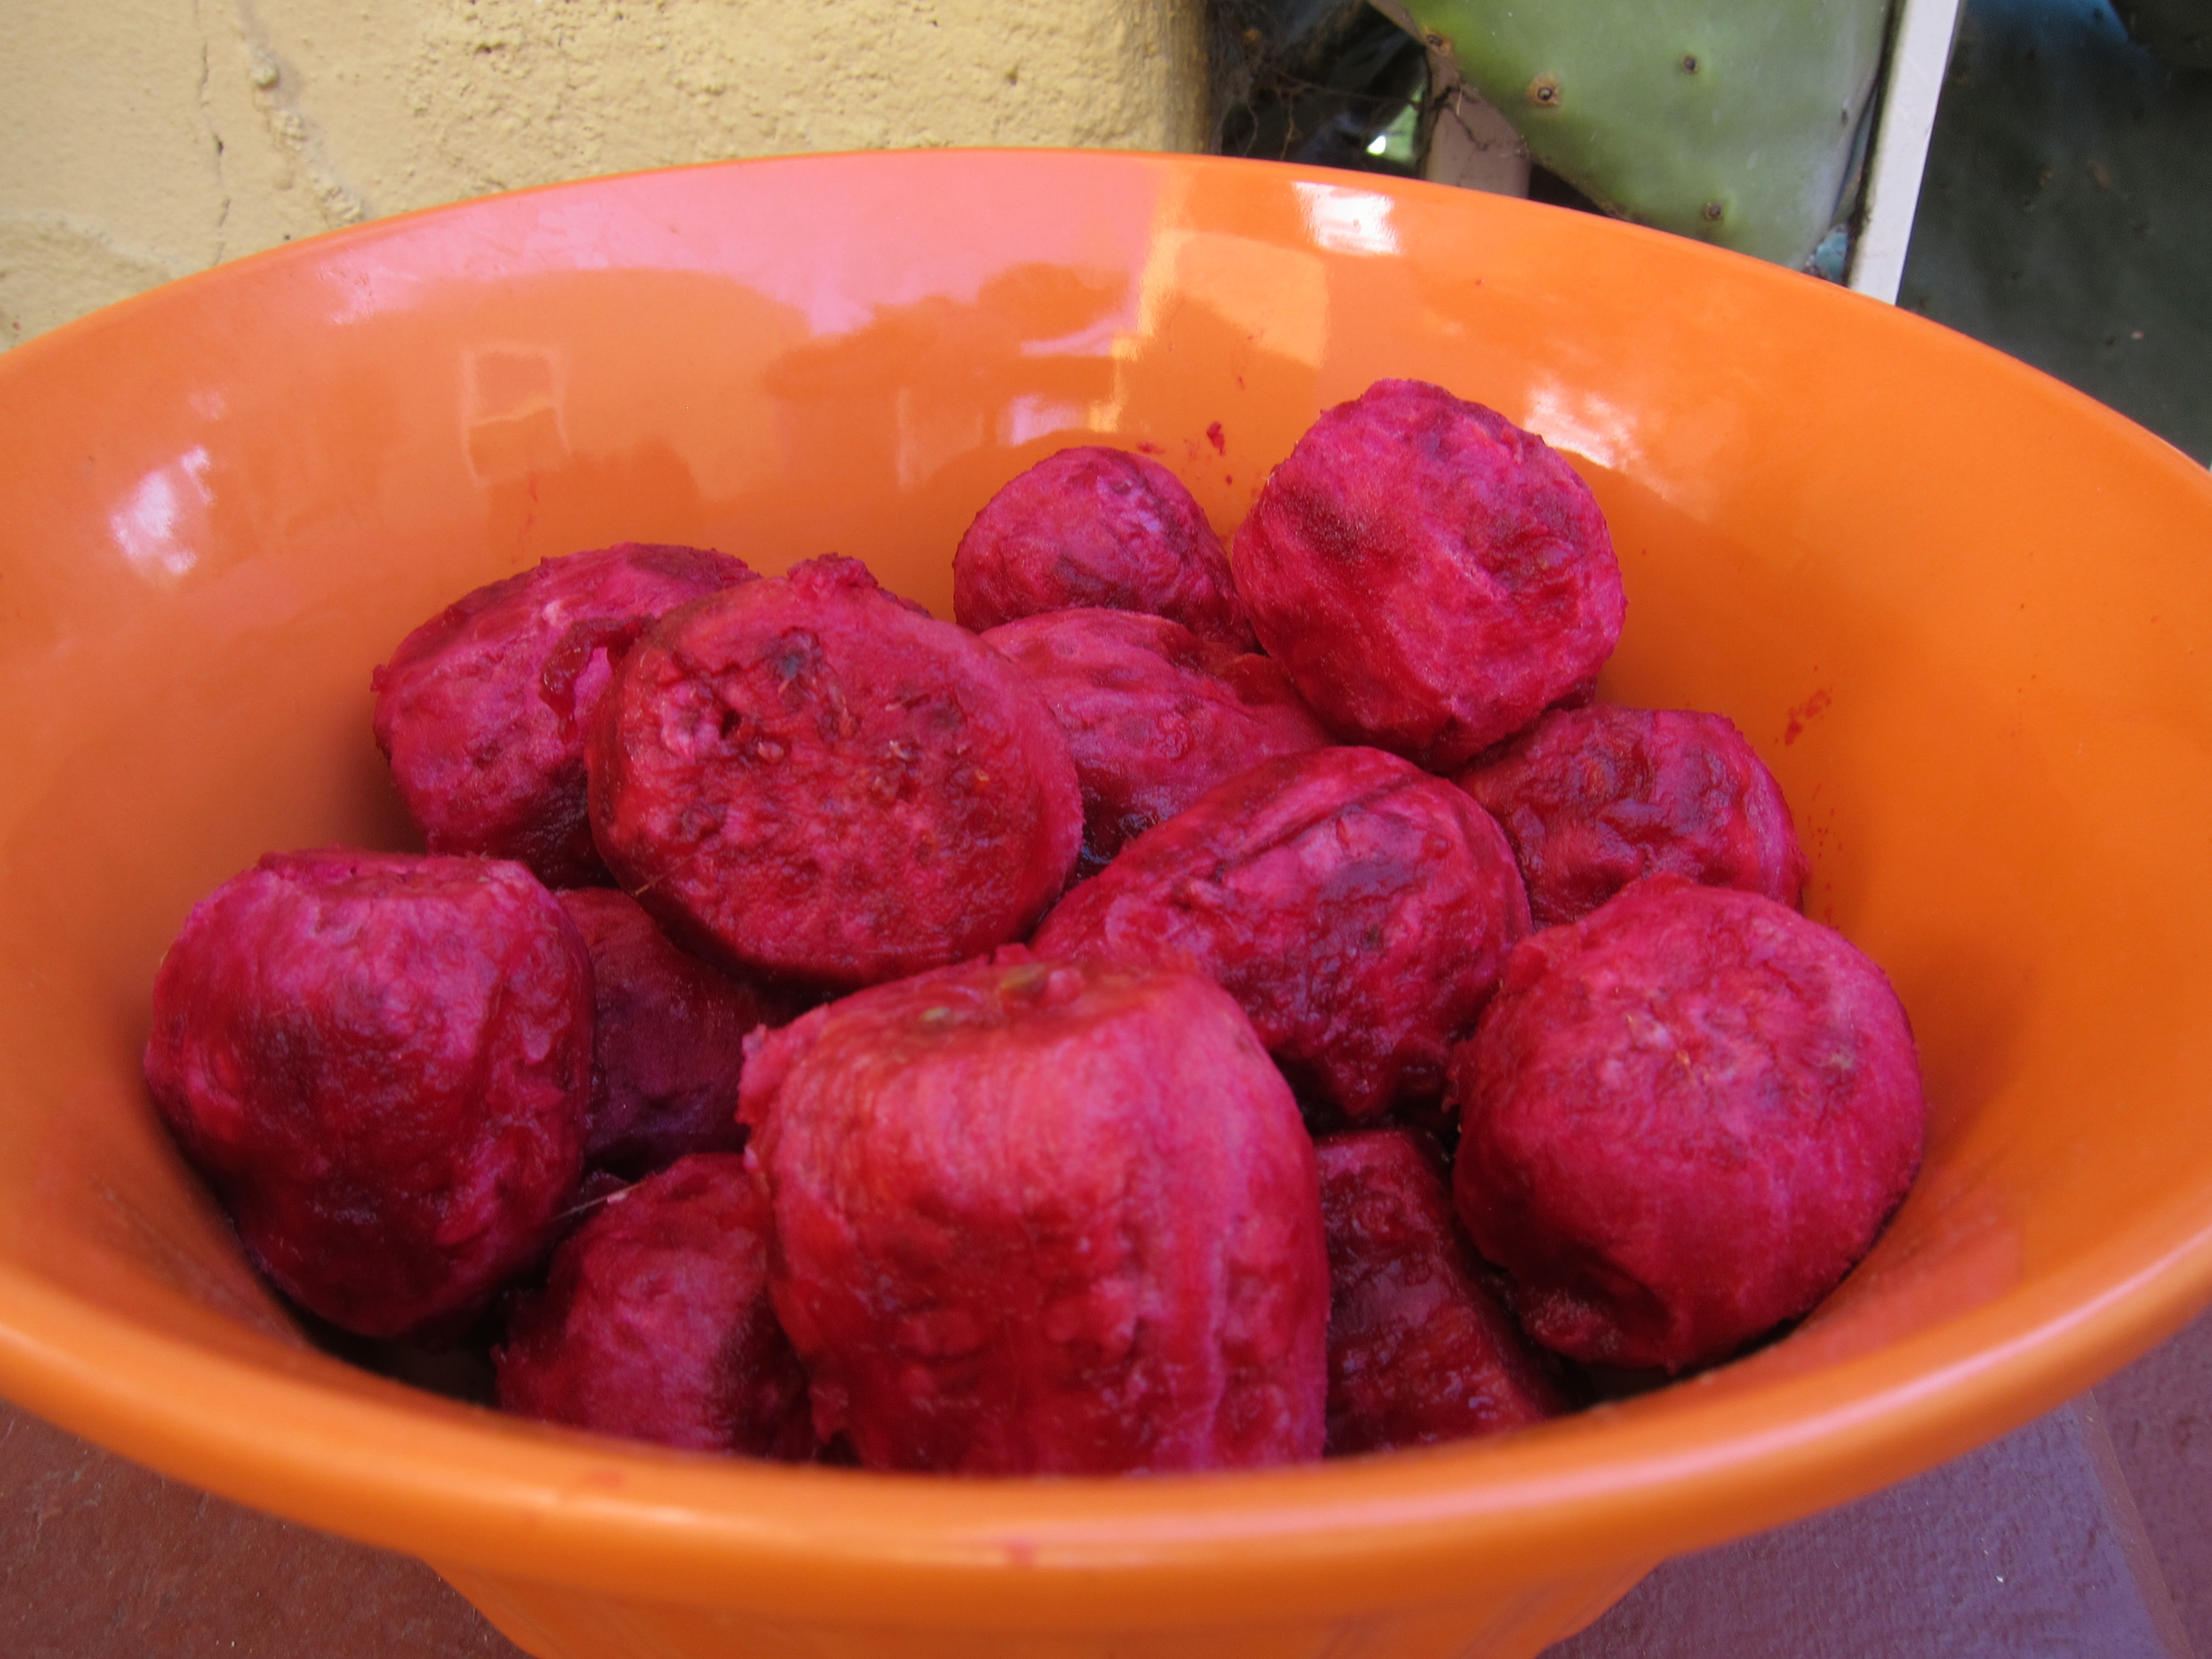
Step 5. Consume or freeze for later use.
Process 2: If you just want to use the juice. Note that it is not incredibly efficient and the flesh is discarded. However, I've started doing this process more often than not because of how productive my cactus plant is and for the following benefits: This process is way easier, less time consuming, and you'll have fewer spines (if any) in your hands at the end of it.
Step 1: Pluck the pears using tongs and put them into large ziplock bags. Again, be very careful which way the wind is blowing - obviously, try to avoid standing downwind and close your eyes if you see danger.
Step 2: Freeze the fruit overnight or for up to 1 year.
Step 3: Pour frozen fruit from bag into a colander and rinse. Place colander over a large pot or bowl and put something heavy on top of the fruit (I use a very large mason jar filled with water).
Step 4: Wait for 1-2 days (depends on temperature) as the juices come out of fruit, through the colander and into the bowl. You can press down on the heavy object and slice open the fruit as needed to encourage this process.
Step 5: Once as much juice is out of the fruit as possible, strain juice through a fine mesh colander or cheesecloth (to remove any remaining spines) and discard pulp.
Step 6: Use juice immediately, refrigerate for up to a month, or freeze for up to a year.
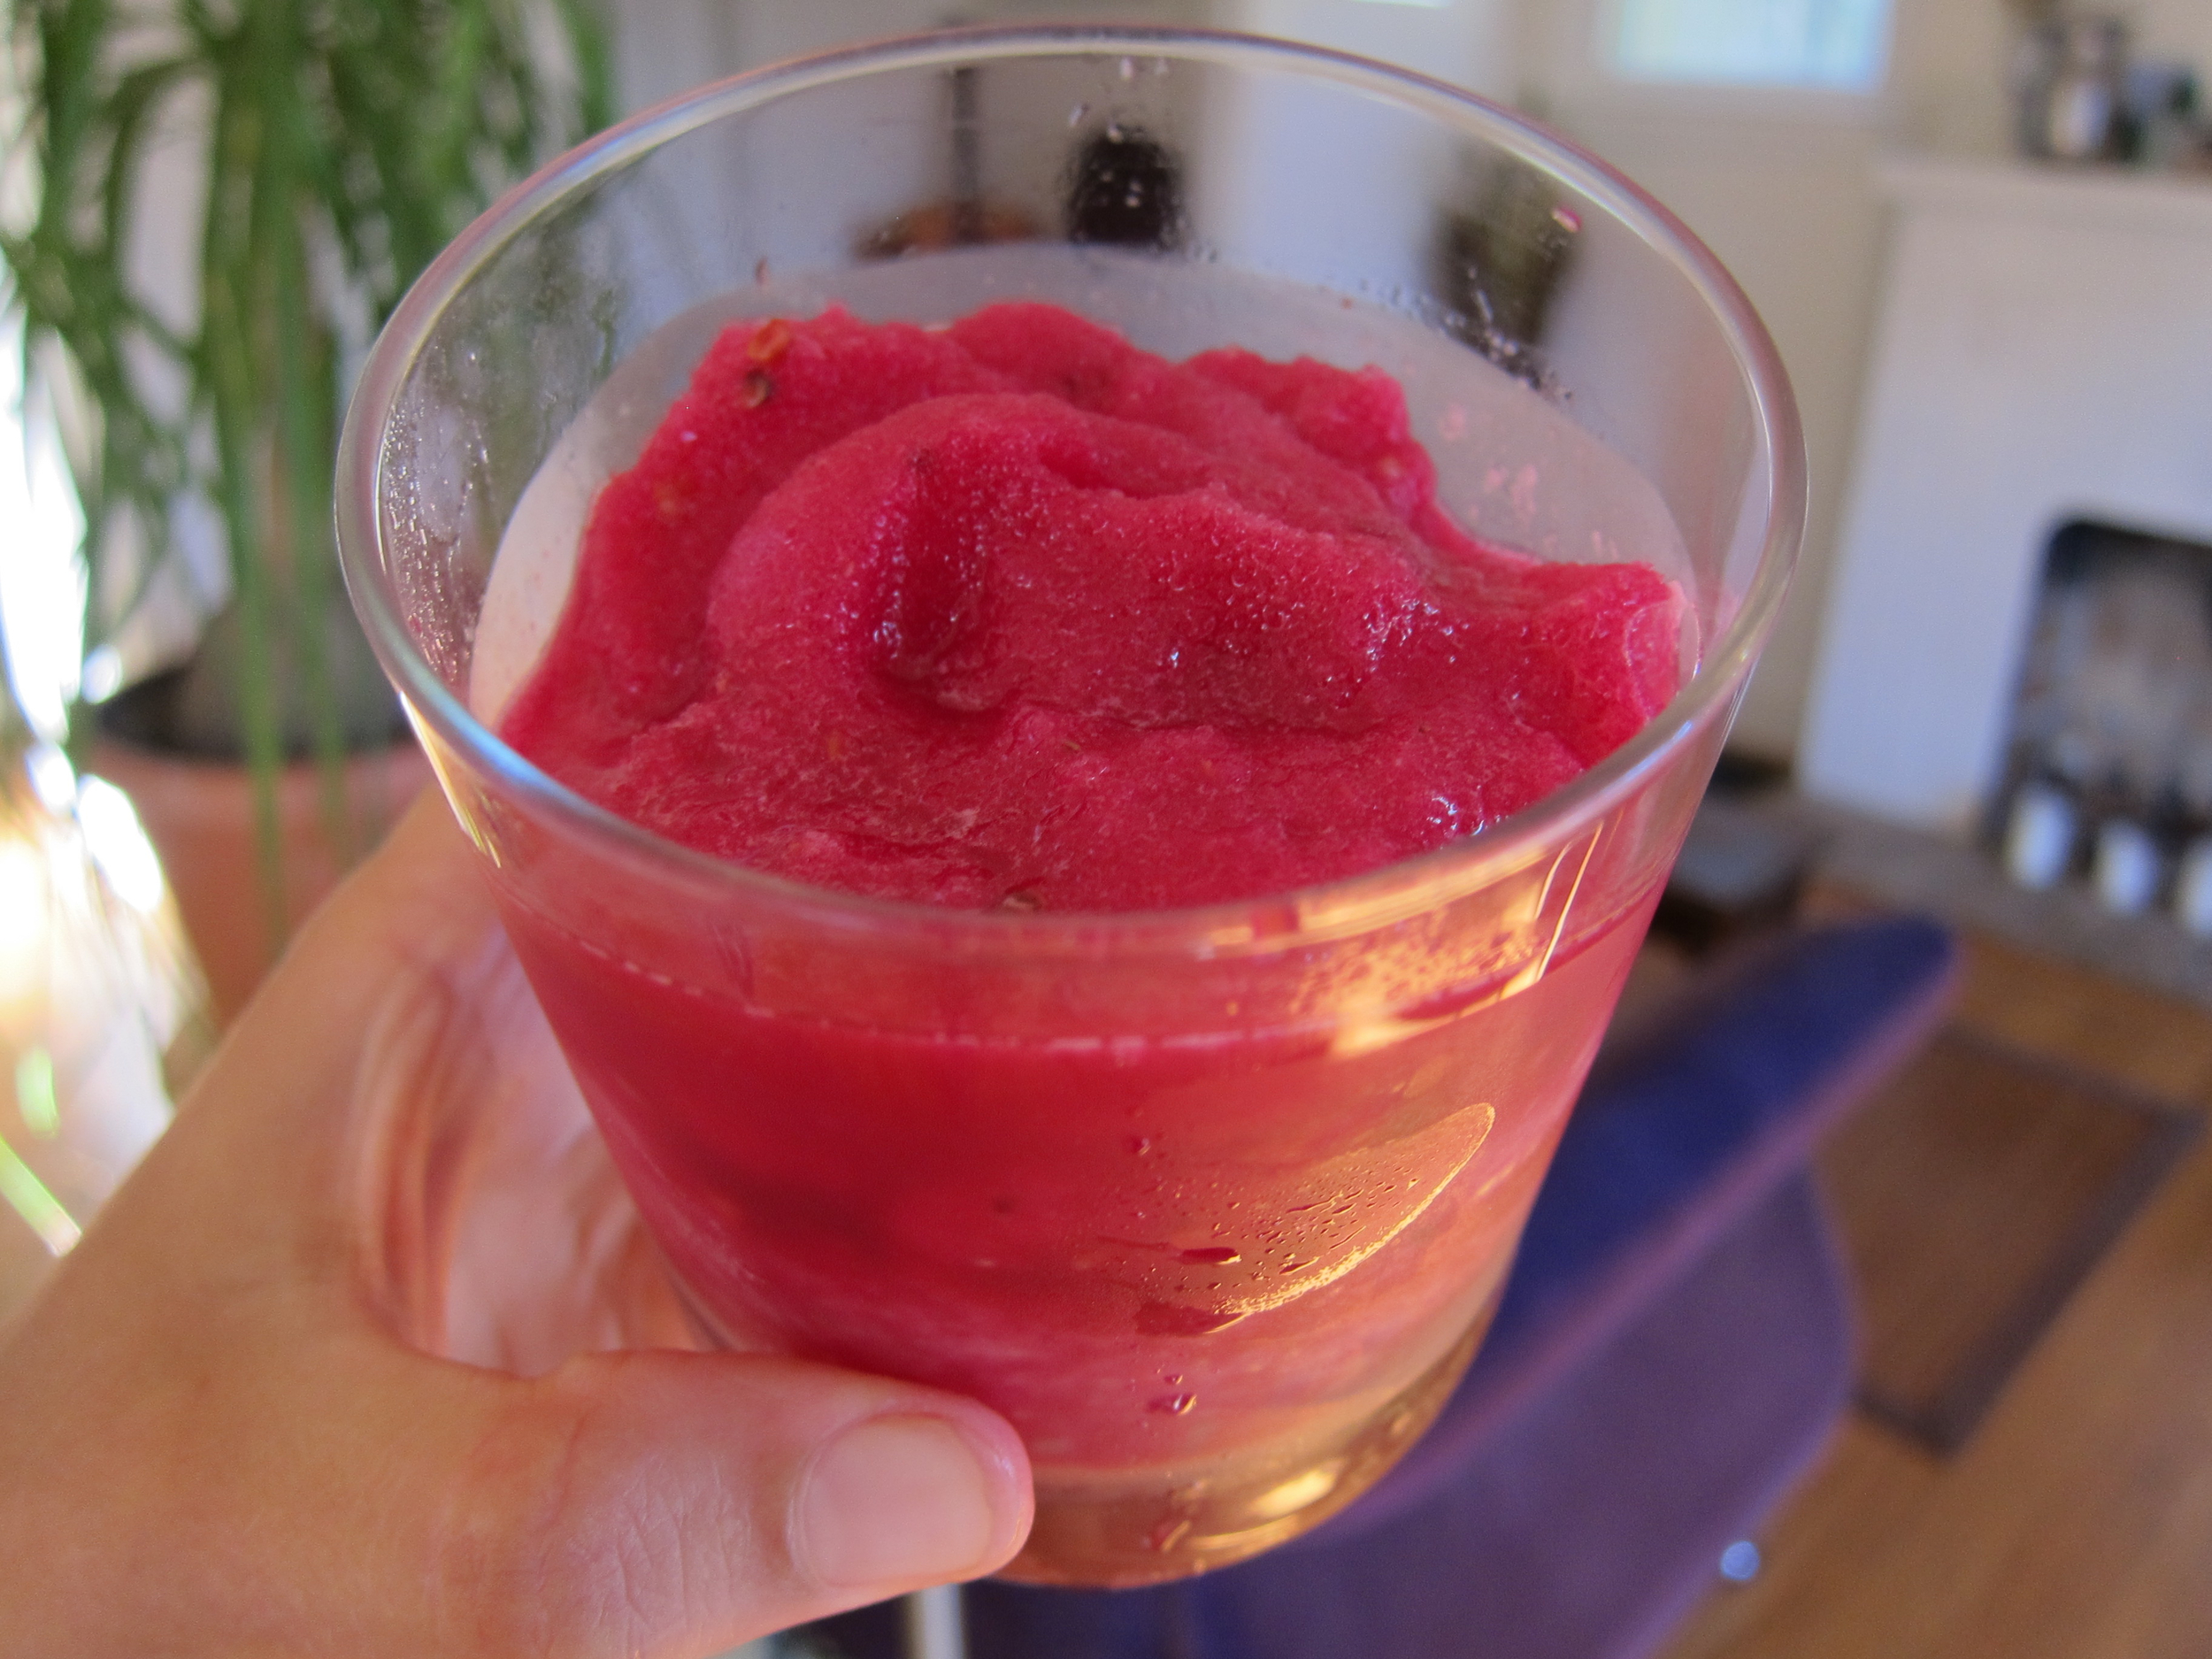
Prickly pear granita: Blend frozen pears with ice and lime. Add black pepper or cayenne for an optional spicky kick.
Prickly pear recipe suggestions: Prickly pear margarita, prickly pear manhattan, prickly pear granita, prickly pear cheesecake, prickly pear chutney/jam, prickly pear sorbet.

First Course
An exciting collaboration between a Nordic inspired porridge pop up and art.

If you know me, you know that I love porridge. During my time in Copenhagen, I was inspired by the restaurant Grød, where porridge was is not a pasty gruel that you eat just to be able to slog through your day (though grød does mean gruel in Danish), but rather a cozy bowl of deliciousness. With ingredients like heirloom rye, pea shoots, fermented rhubarb, toasted hazelnuts, and wild greens, I had a hunch that porridge could be a hit in many U.S. cities. Porridge is the epitome of hygge food, a danish word that means something along the lines of "beyond cozy" and is pronounced something along the lines of "hoo-gah". The concept of hygge has been popularized over the last year (it was shortlisted on the Oxford English dictionary's word of the year in 2016), but several years ago I returned with a new appreciation for hygge and all that goes with it, including porridge and, of course, candles. We may be approaching the first day of spring, but the weather is still ripe for hygge and, really, hygge (and porridge) can be embraced in any season if done right!

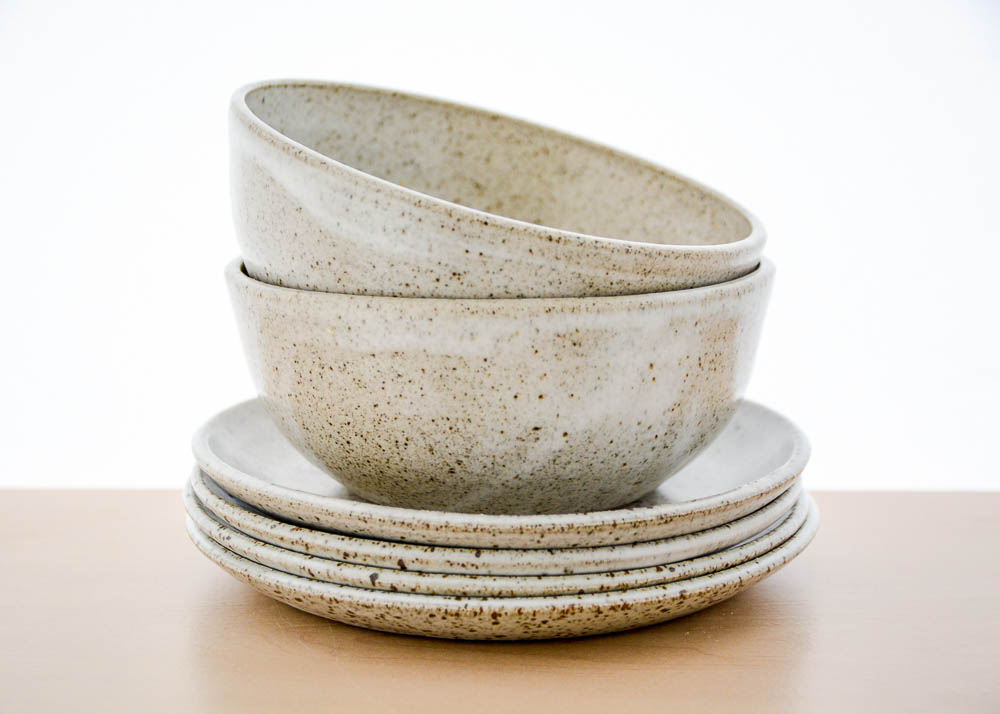
Gorgeous Koik Ceramics bowl that is similar to the one you'll take home at this event.
Since this danish epiphany, the porridge shop idea has been just a fun daydream until a few months ago when I finally put on a porridge pop up at Pizzaiolo restaurant in Oakland. I'm hoping to put on a few more at Pizzaiolo (so grateful to them for letting me crash their wonderful and cozy restaurant!), but meanwhile, I'm trying out a new concept. A few badass women maker friends and I are putting together First Course - a pop up featuring not only delicious porridge, but also limited edition art - including a hand-thrown bowl by my friend Sarah Koik (that you both eat out of and get to take home). This eat-your-porridge-keep-your-bowl idea has been a fantasy of mine, so I am ecstatic to see it come to fruition!
Other participating makers include beeswax candles made by amazing artist (and dear friend) Lauren DiCioccio, custom brass cast spoons by jeweler Christy Natsumi, and a set of cloth napkins/tea-towels hand embroidered by Nadia Lachance.
To reserve your spot at First Course, visit Sarah Owen Studios. Here's the porridge menu, just in case you need a bit more culinary enticement. Most produce is sourced from Top Leaf Farms, an urban farm less than 2 miles from the event, or it is foraged by yours truly, and millet was grown locally by Farmer Mai.
Millet and chicken tamari: Seared radish, crackling, and wood sorrel sauce.
Buckwheat, wild greens, and goat gouda: Soft-cooked egg, crispy shallots, and pea shoots.
Heirloom mixed-grain and rhubarb-apple crisp: Cardamom, yogurt, molasses, and bay nut.
I'll be sure to post a few recipes later on, but meanwhile get your tickets and see you there!
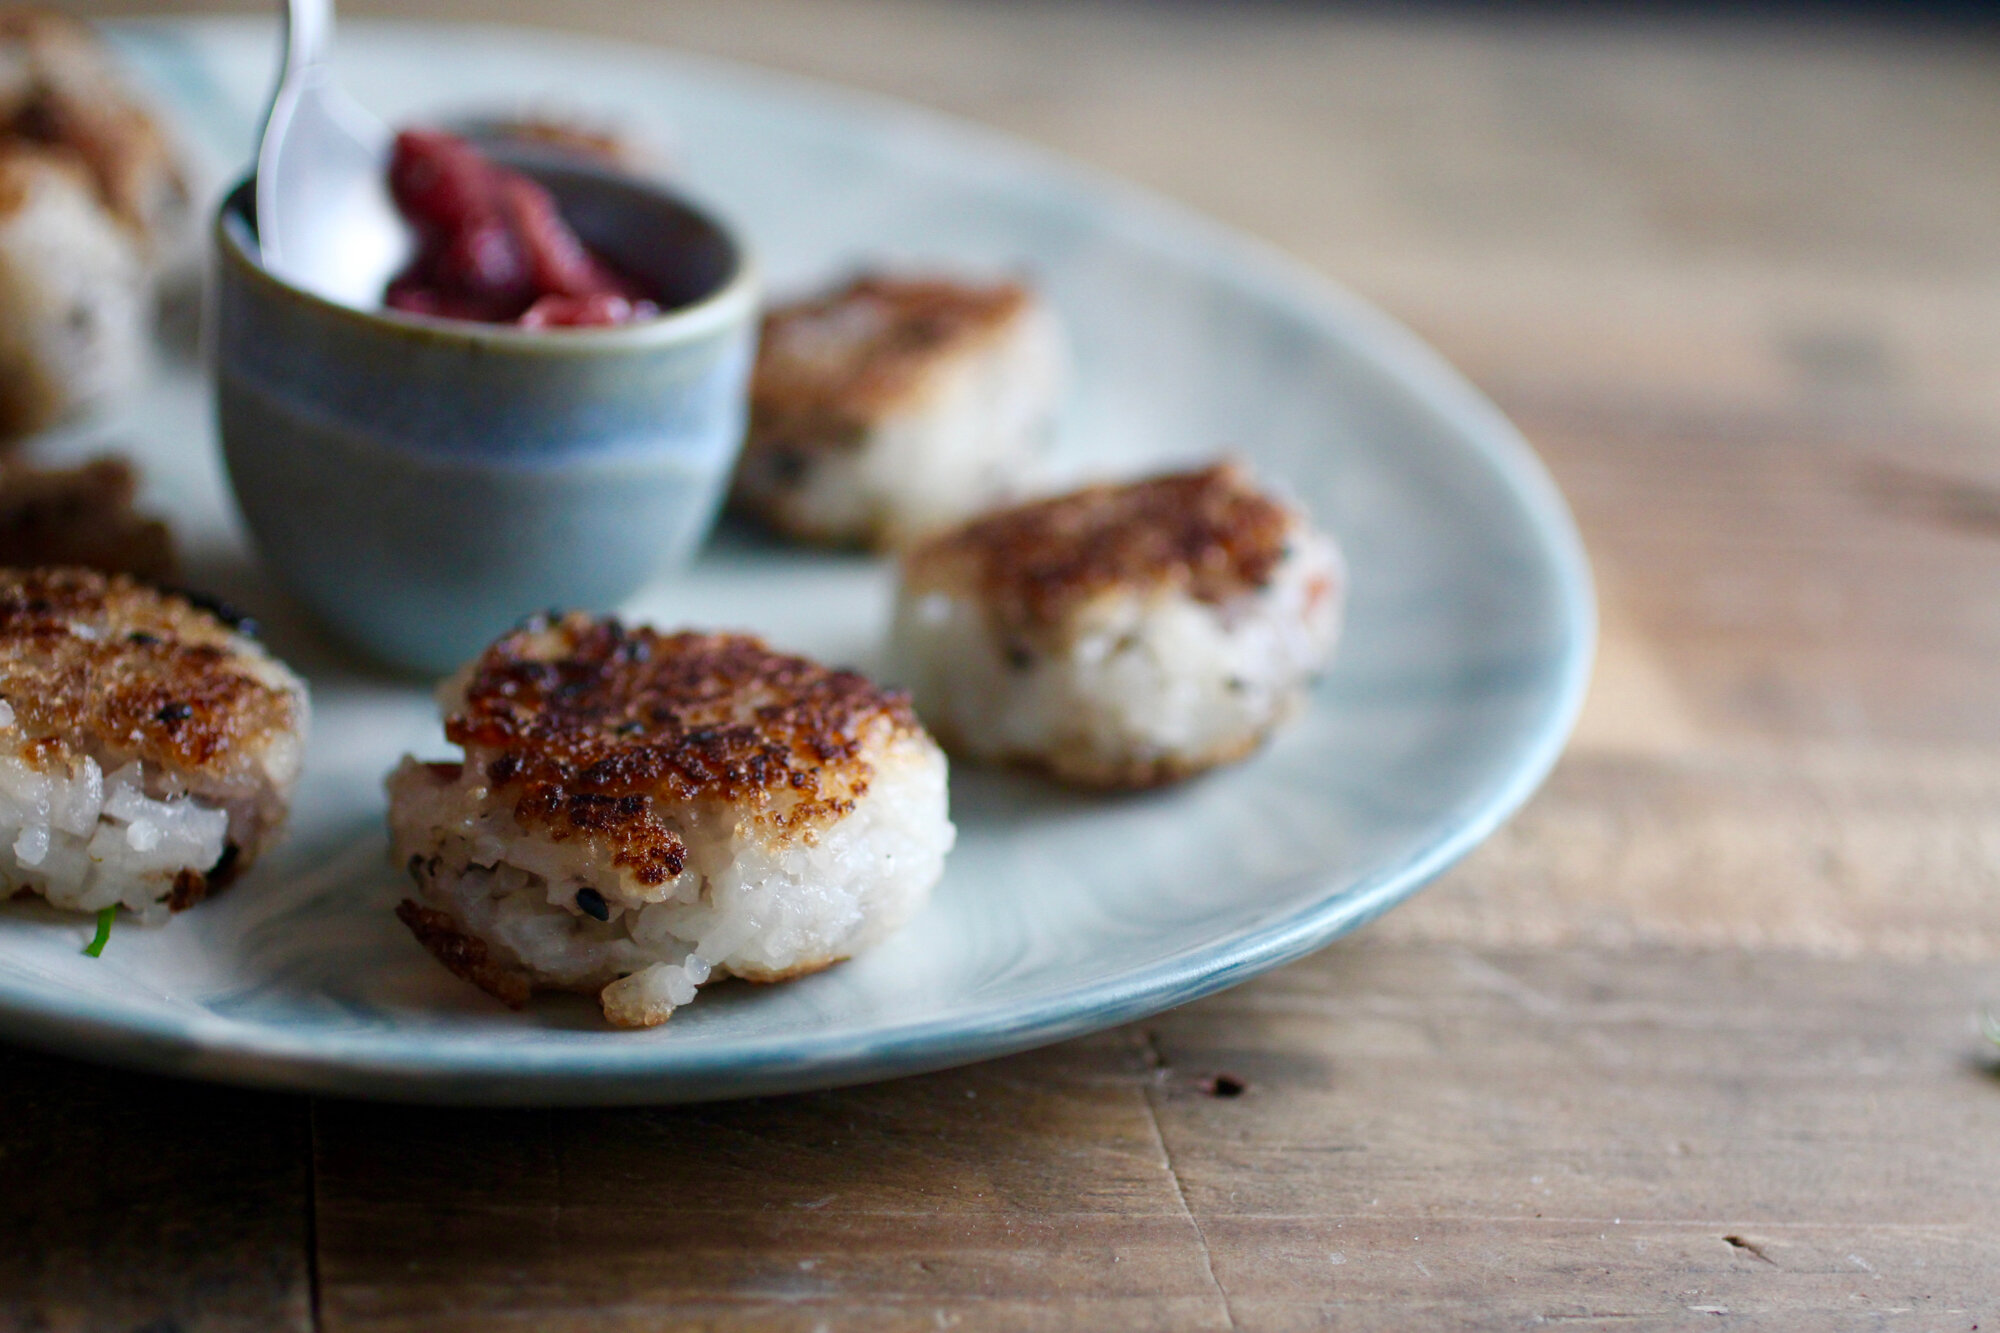
Seared onigiri (Japanese rice balls) with pickled plum

The beginnings of umeboshi made from wild California plums.
Last year I was diligent enough to get my hands on some wild plums and turn them into a California-inspired version of umeboshi, the umami-rich pickled plum condiment from Japan. You can find more about umeboshi and how I made it here, but the most important piece of information in this blog post is that as a result of my making umeboshi, I might be invited on an - I kid you not - Japanese game show. "Who Wants to Come to Japan" is a show that essentially, sends people who are interested in a particular aspect of Japanese culture and have never been to Japan and films their experience. They came across my umeboshi post and reached out to me about being a contestant. Naturally, I jumped at this opportunity. I have never been to Japan and have always wanted to go to explore Japanese foodways and the culture in general. Given it's a Japanese game show, there's definitely a high probability of ridiculousness and, although I may be the brunt of the ridicule, YOLO amiright?
Sometimes you need a little extra umeboshi paste.
So - to honor this momentous occasion (they're visiting tomorrow!) I decided to finally get around to posting my method for umeboshi onigiri, or rice balls stuffed with umeboshi paste - a delicious way to use up leftover rice! I like to sear my onigiri (technically yaki-onigiri), kind in the same vein as aracini, if you've ever had the Italian fried rice ball appetizer, but pan-seared instead of fried.
This recipe, in combination with other umeboshi dishes including asparagus with wild onion and umami and simply a corn-butter-umeboshi sauté, are so good that I am almost out of my umeboshi supply and sadly, didn't get around to pickling any this year. I guess I'll just have to savor what I have left!
The below recipe makes about 8 small onigiri and can be expanded as needed.
2 cups cooked short-grained rice (preferably sticky rice), cooled* - great way to use up your leftovers! Especially delicious is using leftover coconut rice either from a restaurant or made at home (cook rice with half water/half coconut milk).
1-2 teaspoons sesame seeds or furikake flakes (Japanese seasoning mix)
Sea salt
4 pickled plums (umeboshi), pitted and diced or smashed into a paste
Grapeseed oil, for searing
Soy or tamari sauce, optional (above photo was plain onigiri with umeboshi paste on the side)
In medium bowl, stir sesame seeds or furikake flakes into sticky rice to combine.
Wet hands lightly with water then spread a pinch of salt across your palms. Scoop 2 tablespoons of rice mixture from bowl and gently squeeze into ball. Flatten ball then form a well in the center. Add about 1/2 teaspoon umeboshi paste to well, then fold edges of rice over paste to cover.
Gently squeeze into ball then flatten again. Continue process with more rice and umeboshi until rice is gone.
Lightly oil a cast iron pan and heat on medium-high. Once oil is hot, add onigiri and sear until lightly brown, about 1-2 minutes on each side.
Serve with optional soy or tamari sauce (though you probably won't need it!)
*If rice isn't originally sticky and/or not sticky enough, you can make it "stickier" (technically, to be sticky rice, it must be a certain variety of rice that's high in a certain time of pasty starch) by heating pre-cooked rice on medium-low with 1-2 tablespoons water for about 5 minutes or until sticky, stirring occasionally. Here's a recipe for sticky rice, but I just cook rice as I always do then make it stickier after with this method.
Classic Elderflower Cordial & Elderflower berry birthday cake
Bring the spring to any beverage or dessert.

Any search for the culinary uses of elderflower will pull up elderflower cordial. By cooking the flower head in what is essentially a diluted simple syrup, you can pretty easily preserve its fragrance for future use. Which is great, because elderflower is an amazing, special plant that deserves to be savored. The most common way to enjoy elderflower cordial is by using it in cocktails (gin, elderflower, and lemon, is a tasty simple classic) or adding a bit to sparkling wine or even sparkling water for a nice kid-friendly afternoon refreshment. I also love drizzling elderflower cordial over any dessert for a quick and easy way to make that dessert oh-so-special (such as for my huckleberry-elderflower birthday cake below).
Elderflower cordial: Makes about 1 liter.
20 medium elderflower heads (about 2-3'' across)
Grated zest of 2 lemons
Juice of 2 lemons
4 cups water
3.5 cups sugar
Note: Some recipes call for citric acid (about 1 teaspoon for this batch), which helps the cordial keep for longer.
Infusing water with elderflower essence.
Inspect the elderflower heads carefully and remove any insects. Remove flowers from most of stems (especially the large ones), wash by quickly submerging in cold water, and drain. Place the flower heads in a large bowl together with the lemon zest.
Bring water to the boil and pour over the elderflowers and citrus zest. Cover and leave overnight to infuse.
Strain the liquid through cheesecloth and pour into a saucepan. Add the sugar and the lemon juice. Heat gently to dissolve the sugar, then bring to a simmer and cook for 2-3 minutes.
Use a funnel to pour the hot syrup into sterilized bottles and seal with a sterilized cap or cork. Bottles can be sterilized by washing with soapy water then plunging into boiling water for 5 minutes and allowing to air dry.
Allow to cool then store in the refrigerator or freezer. Cordial will keep in the fridge for 2 weeks and in the freezer for 1 year. I like to freeze the cordial in smaller batches so I can use it as needed.
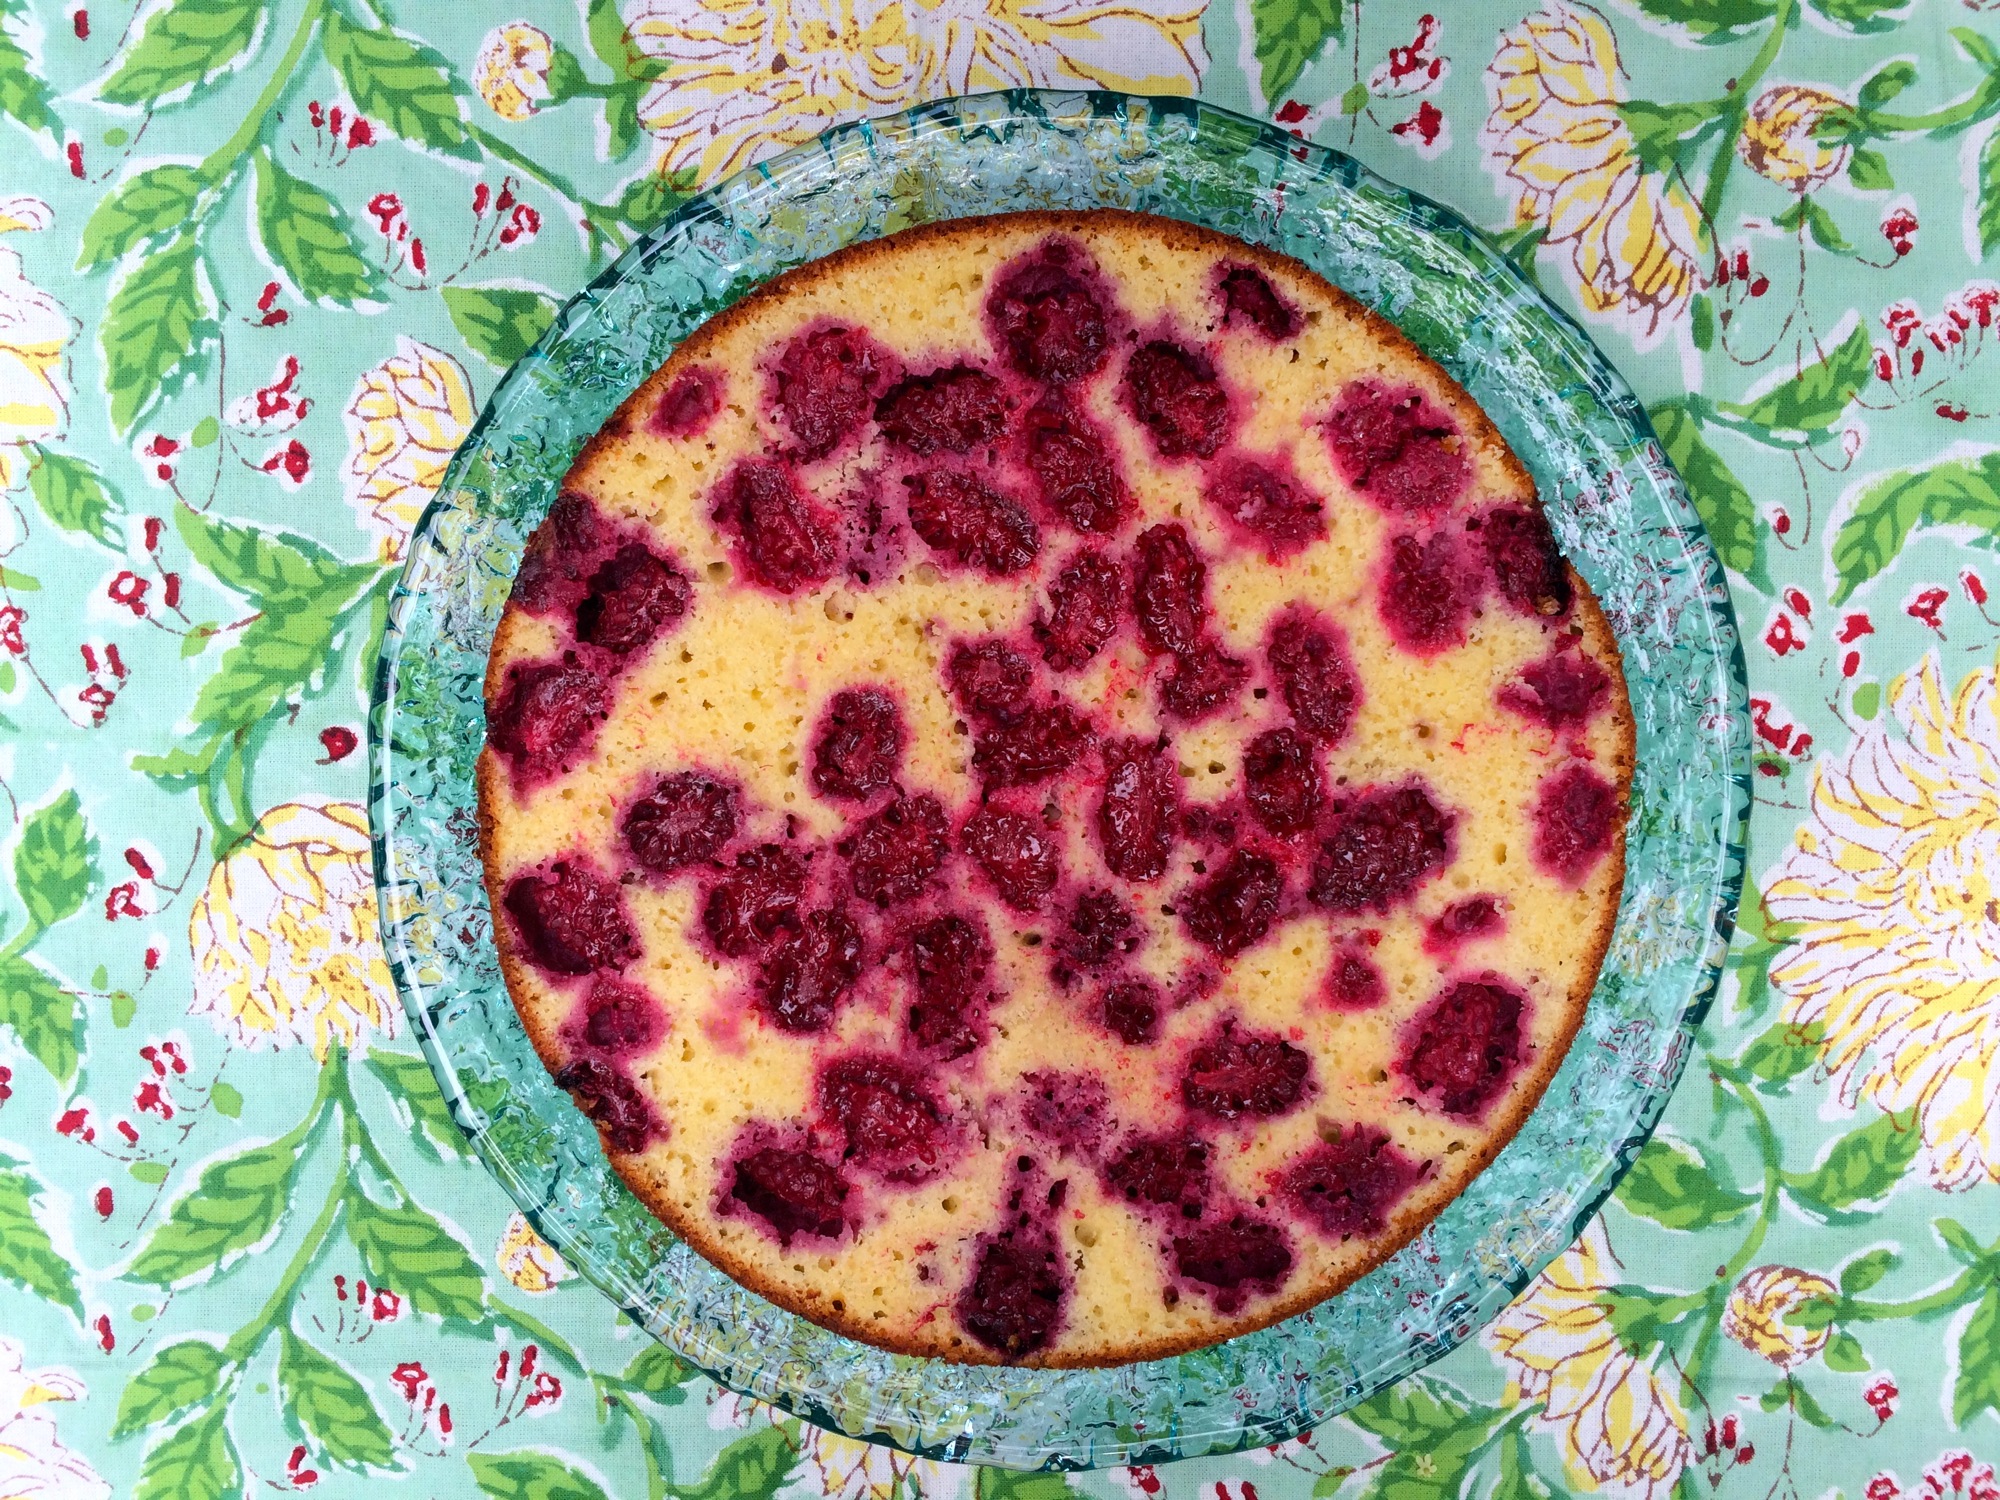
Elderflower-Mulberry Birthday Cake: Serves 12.
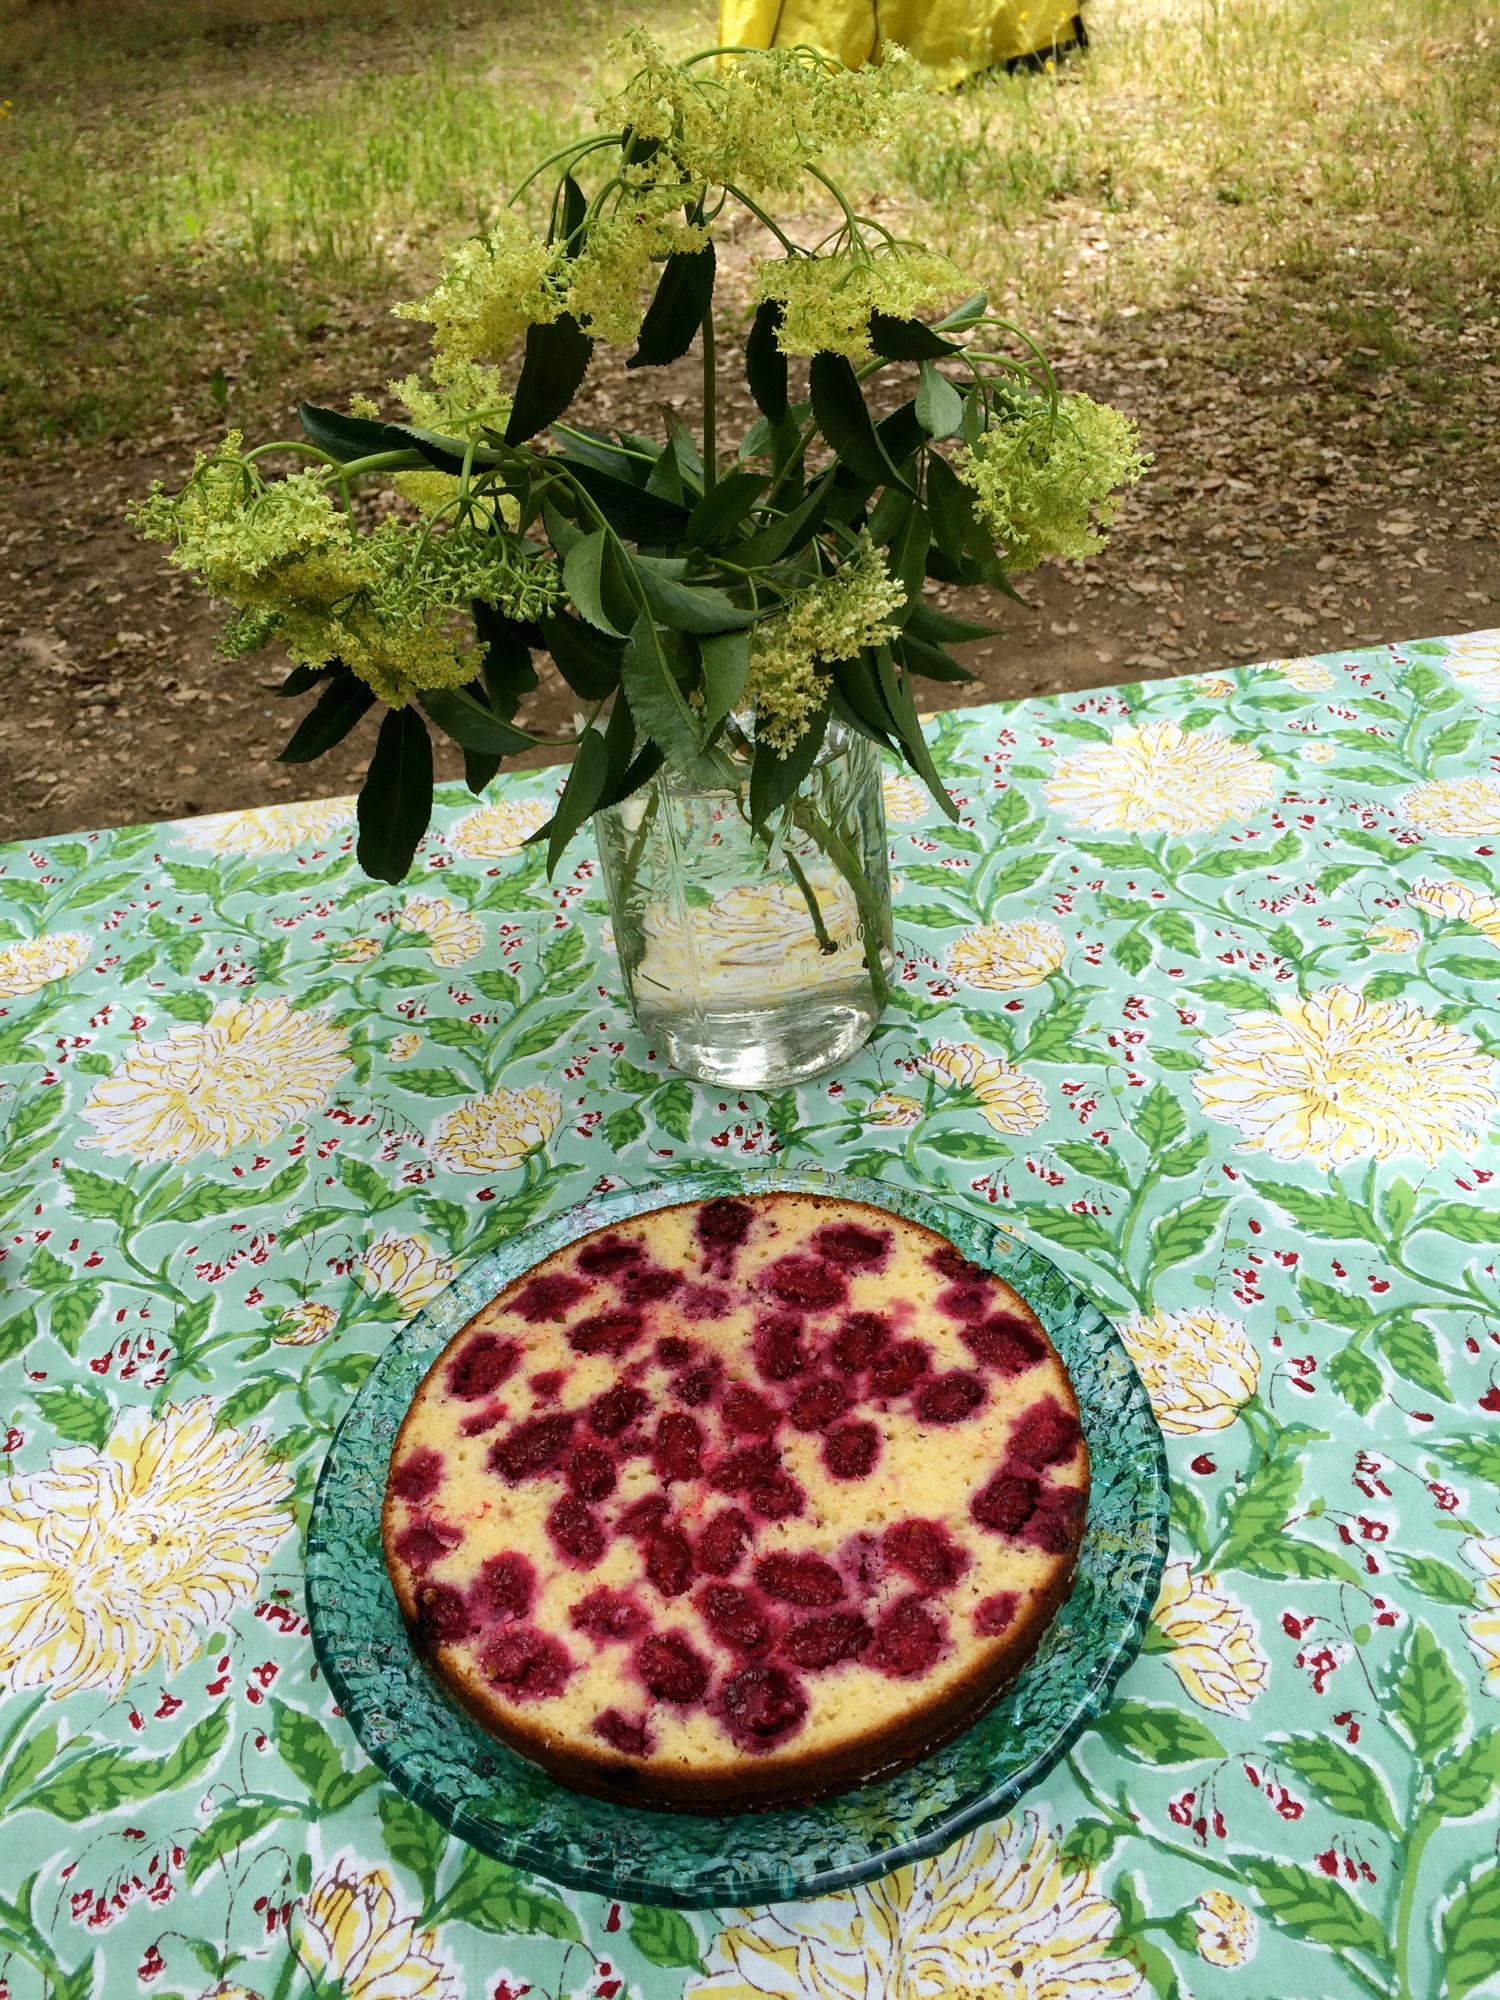
Bottom half of the cake has been drizzled with cordial and is about to be spread with tart whipped cream.
For my birthday last weekend, I had an inkling to make a cake infused with elderflower cordial, but had a hard time deciding exactly what else to include - apricots and almonds? loquats and honey? lemon and poppyseed? Spring is a fun time to daydream about desserts! While walking through my surprisingly abundant neighborhood however, I was lucky enough to stumble upon some mulberries, which helped to complete my vision. My birthday party was a campout and the cake held up nicely for several hours, even though I was impatient and made the tart whipped cream earlier than necessary:) My photos do not show the final spread of whipped cream on the top, as it was too dark for photos when I added this piece.
1/2 cup plus 5 tablespoons unsalted butter, room temperature
3/4 cup plus 2 tablespoons granulated sugar
4 eggs
2 tablespoons yogurt
3 tablespoons plus up to 3/4 cup elderflower cordial
1 cup all-purpose flour
1/2 cup almond meal
2 teaspoons baking powder
3/4 teaspoons salt
2 cups fresh mulberries, washed and dried
3/4 cup whipping cream
1/2 cup crème fraîche
1/2 teaspoon vanilla extract
Grease a 9-inch springform pan and preheat the oven to 350 degrees F.
Cream the butter and 3/4 cup sugar in a mixer until they’re light and fluffy. Beat in the eggs one at a time then incorporate the yogurt and 3 tablespoons of the elderflower cordial.
In a separate bowl, mix together the flour, almond meal, baking powder, and salt and slowly whisk this into the wet mixture in 3 batches. Once its fully incorporated, pour half of the batter into the greased springform pan, then spread mulberries evenly over the top, followed by remaining batter and bake for 1 hour. Cake is done when a toothpick comes out clean. Remove from oven and allow to cool.
While cake is baking, beat whipping cream until almost stiff, continue beating as you add in 2 tablespoons sugar and vanilla and then lightly whisk in crème fraîche.
The gorgeous mulberry layer is revealed!
Once cake has cooled, cut in half to make two layers using a large serrated knife. You should be cutting right through the berry layer and at this point, you will be able to see all of the beautiful mulberries hiding inside.
Drizzle up to 1/4 cup of elderflower over the bottom layer and top with half of the tart whipped cream, followed by the other half of the cake. Drizzle up to another 1/4 cup of elderflower (for both of these, it depends on how sweet/moist/elderflowery you want the cake) and spread the other half of the whipped cream over the top. Top with a sprinkling of fresh elderflowers if you have them and drizzle each piece of cake with a little more elderflower cordial before eating.

This version is before the addition of the final tart whipped cream layer.

The Regal Elderflower
A fragrant pagan declaration of summer.

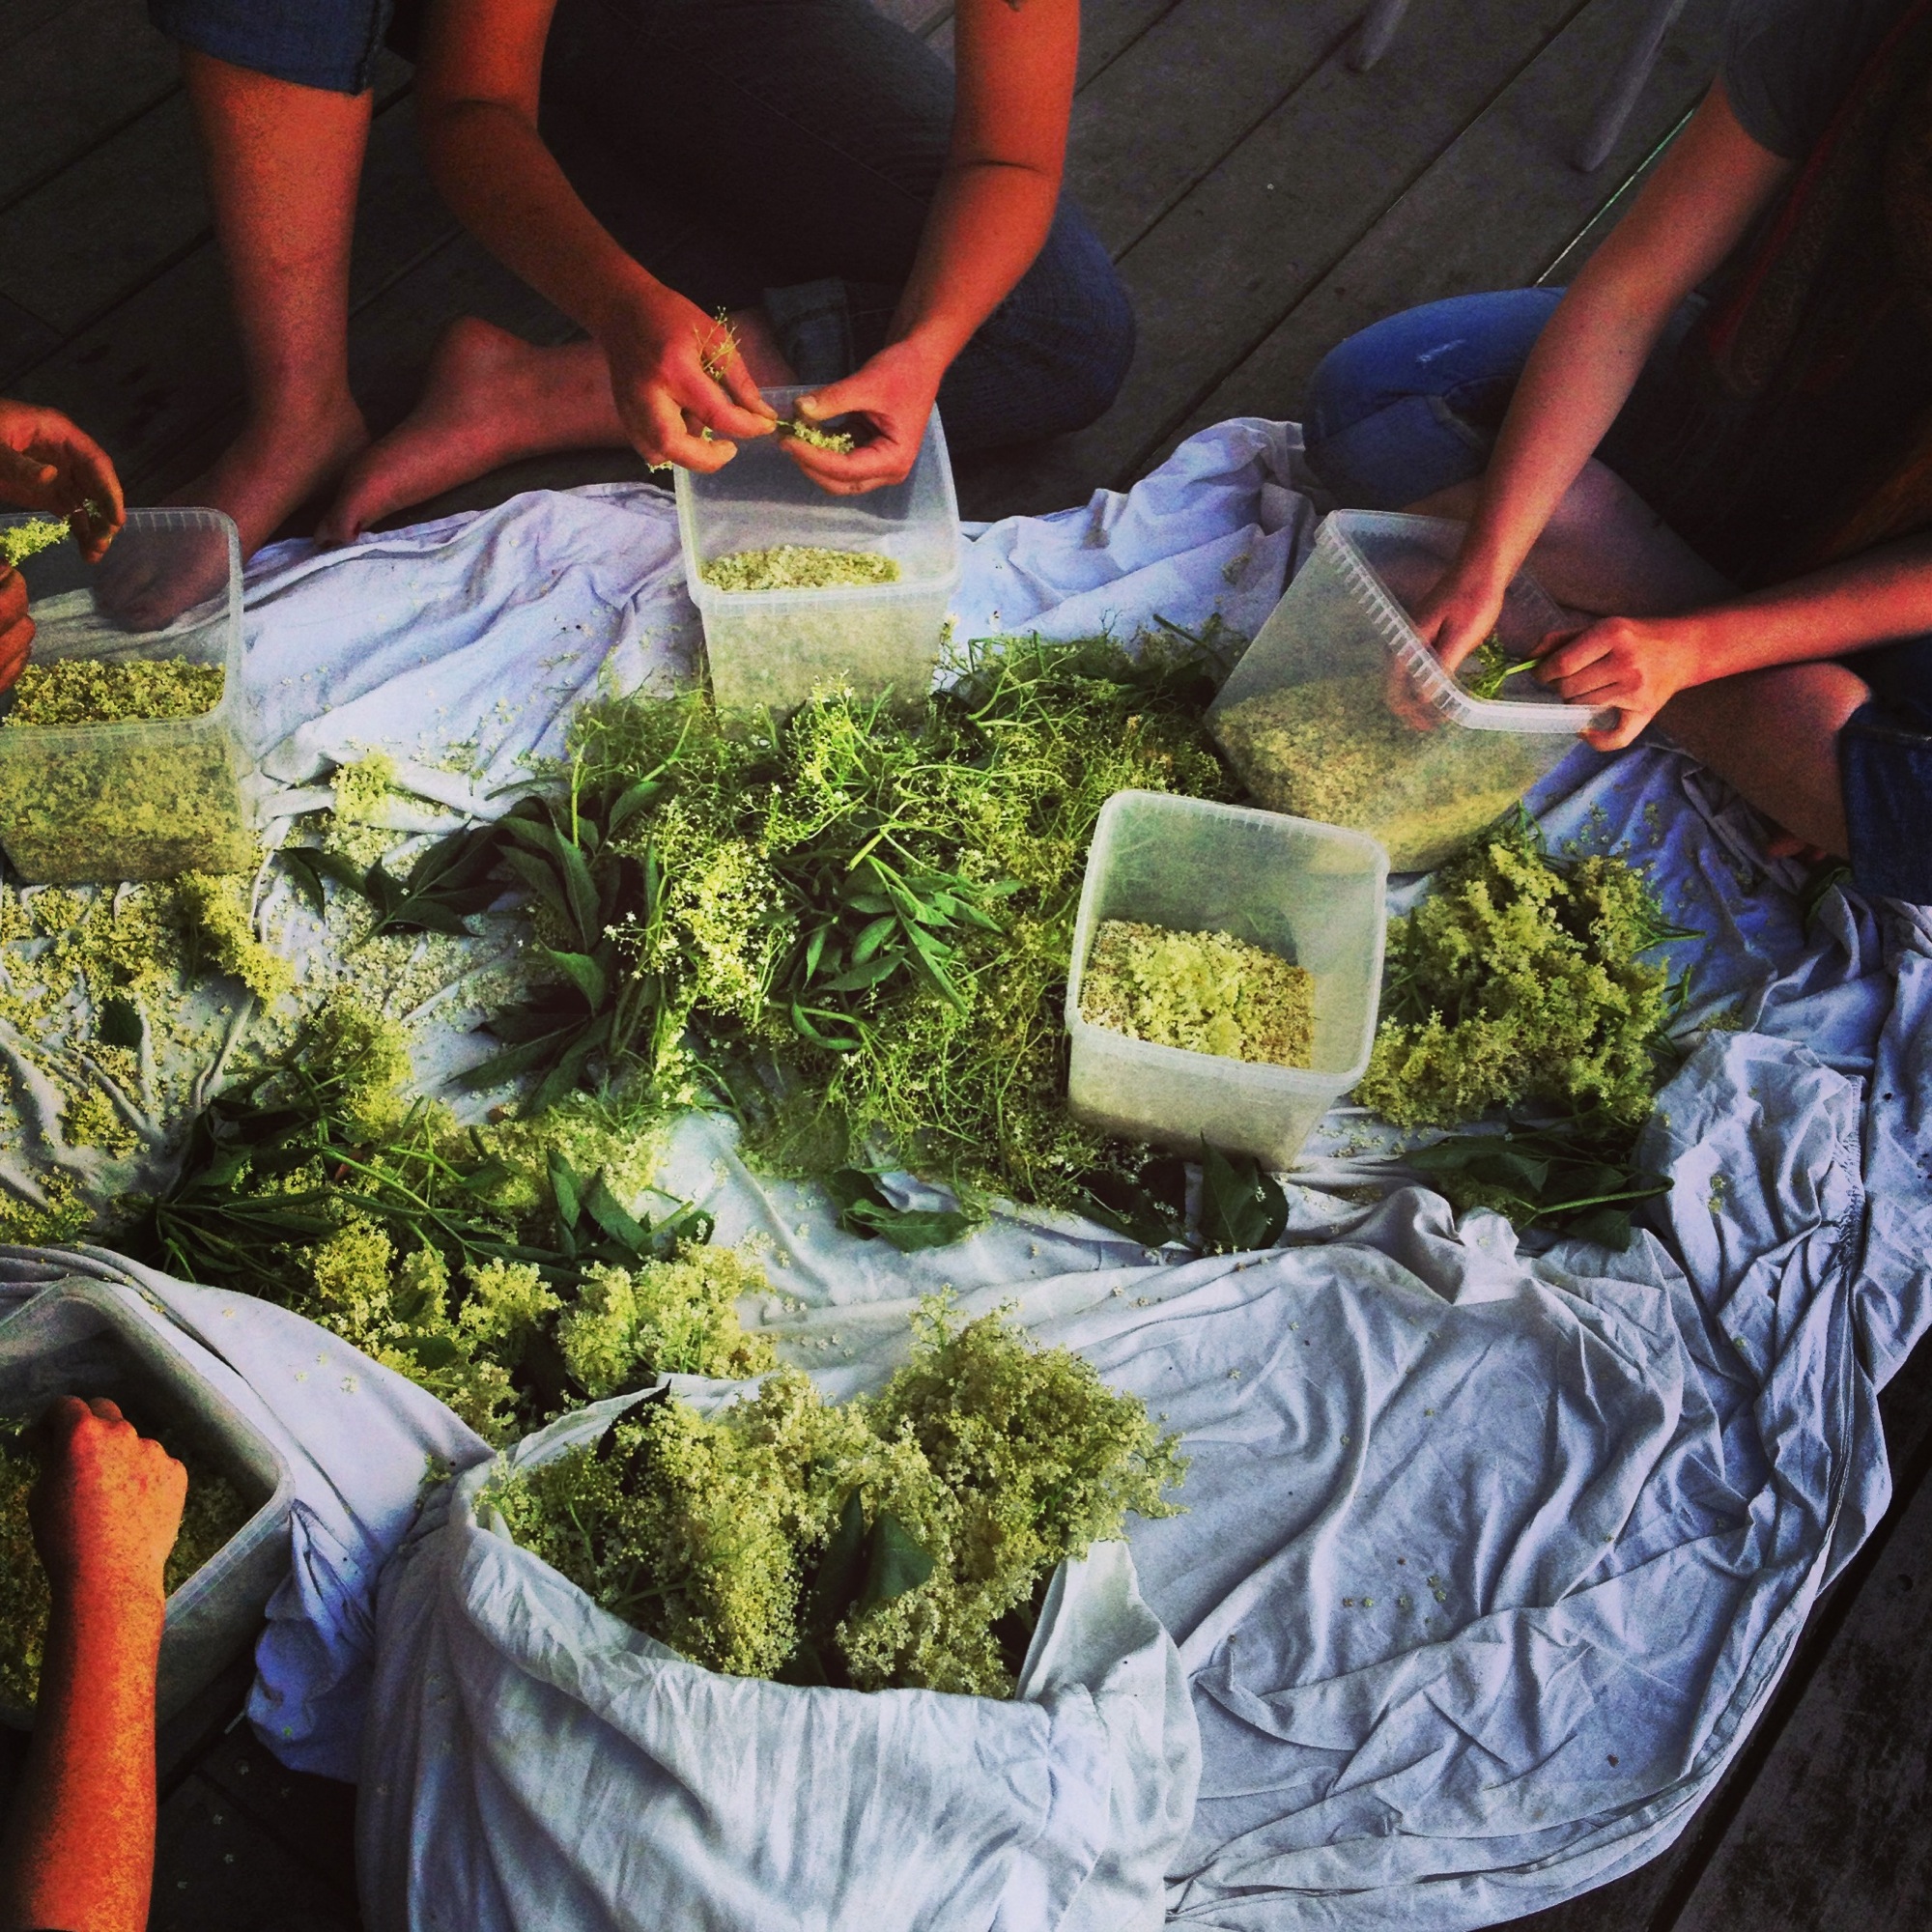
Processing elderflower for fermented cordial with the Nordic Food Lab crew. We were all covered in pollen after this flower-plucking session! Species of elder likely Sambucus nigra.
There's something truly special about the elder, or Sambucus, plant and I've always felt a special connection to it. Not only does it proclaim to the world that summer is approaching and provide culinary and medicinal benefits, but it also somehow manages to be both utterly wild and elegantly refined at the same time. The plant is likely called "elder" because it is so old that you can find varieties of it around the world. It's no surprise then that so many cultures have different symbolisms and uses attached to Sambucus including (but definitely not limited to) the below.
Symbolism
Shakespeare: Grief (the "stinking elder"), yet also beloved
Pagan: Superstitions around cutting it back or burning it (will cause bad luck)
Danish: The elder Mother or "vegetation goddess" lives in the tree (HyldeMoer) - you need to ask her permission before cutting it.
Sicilians: Kill serpents and drive away robbers
Serbians: Good luck if used during the wedding ceremony
England: Hold in pocket to ward off lightning, cross above animals to ward off evil
Supposed Medicinal Uses (Note: I have not looked into the scientific evidence supporting any of the below, but rather wanted to show the breadth of supposed medicinal uses)
Bark: Purgative, emetic, diuretic, asthma (not consumed anymore due to toxins)
Leaves: Bruises/sprains, wound healing, expectorant, diuretic (not consumed anymore due to toxins)
Flowers: Tea for swollen sinuses, colds, flu, diabetes, constipation, rheumatism, influenza, relaxant, complexion, blood purification
Berries: Hot wine for influenza, asthma, juice for antiviral/antibacterial
Food
Flowers: Cordial (St.Germain is an elderflower liqueur), desserts, jelly, shrub, fritters
Berries: Cordial, wine, syrup, desserts, jelly, etc.
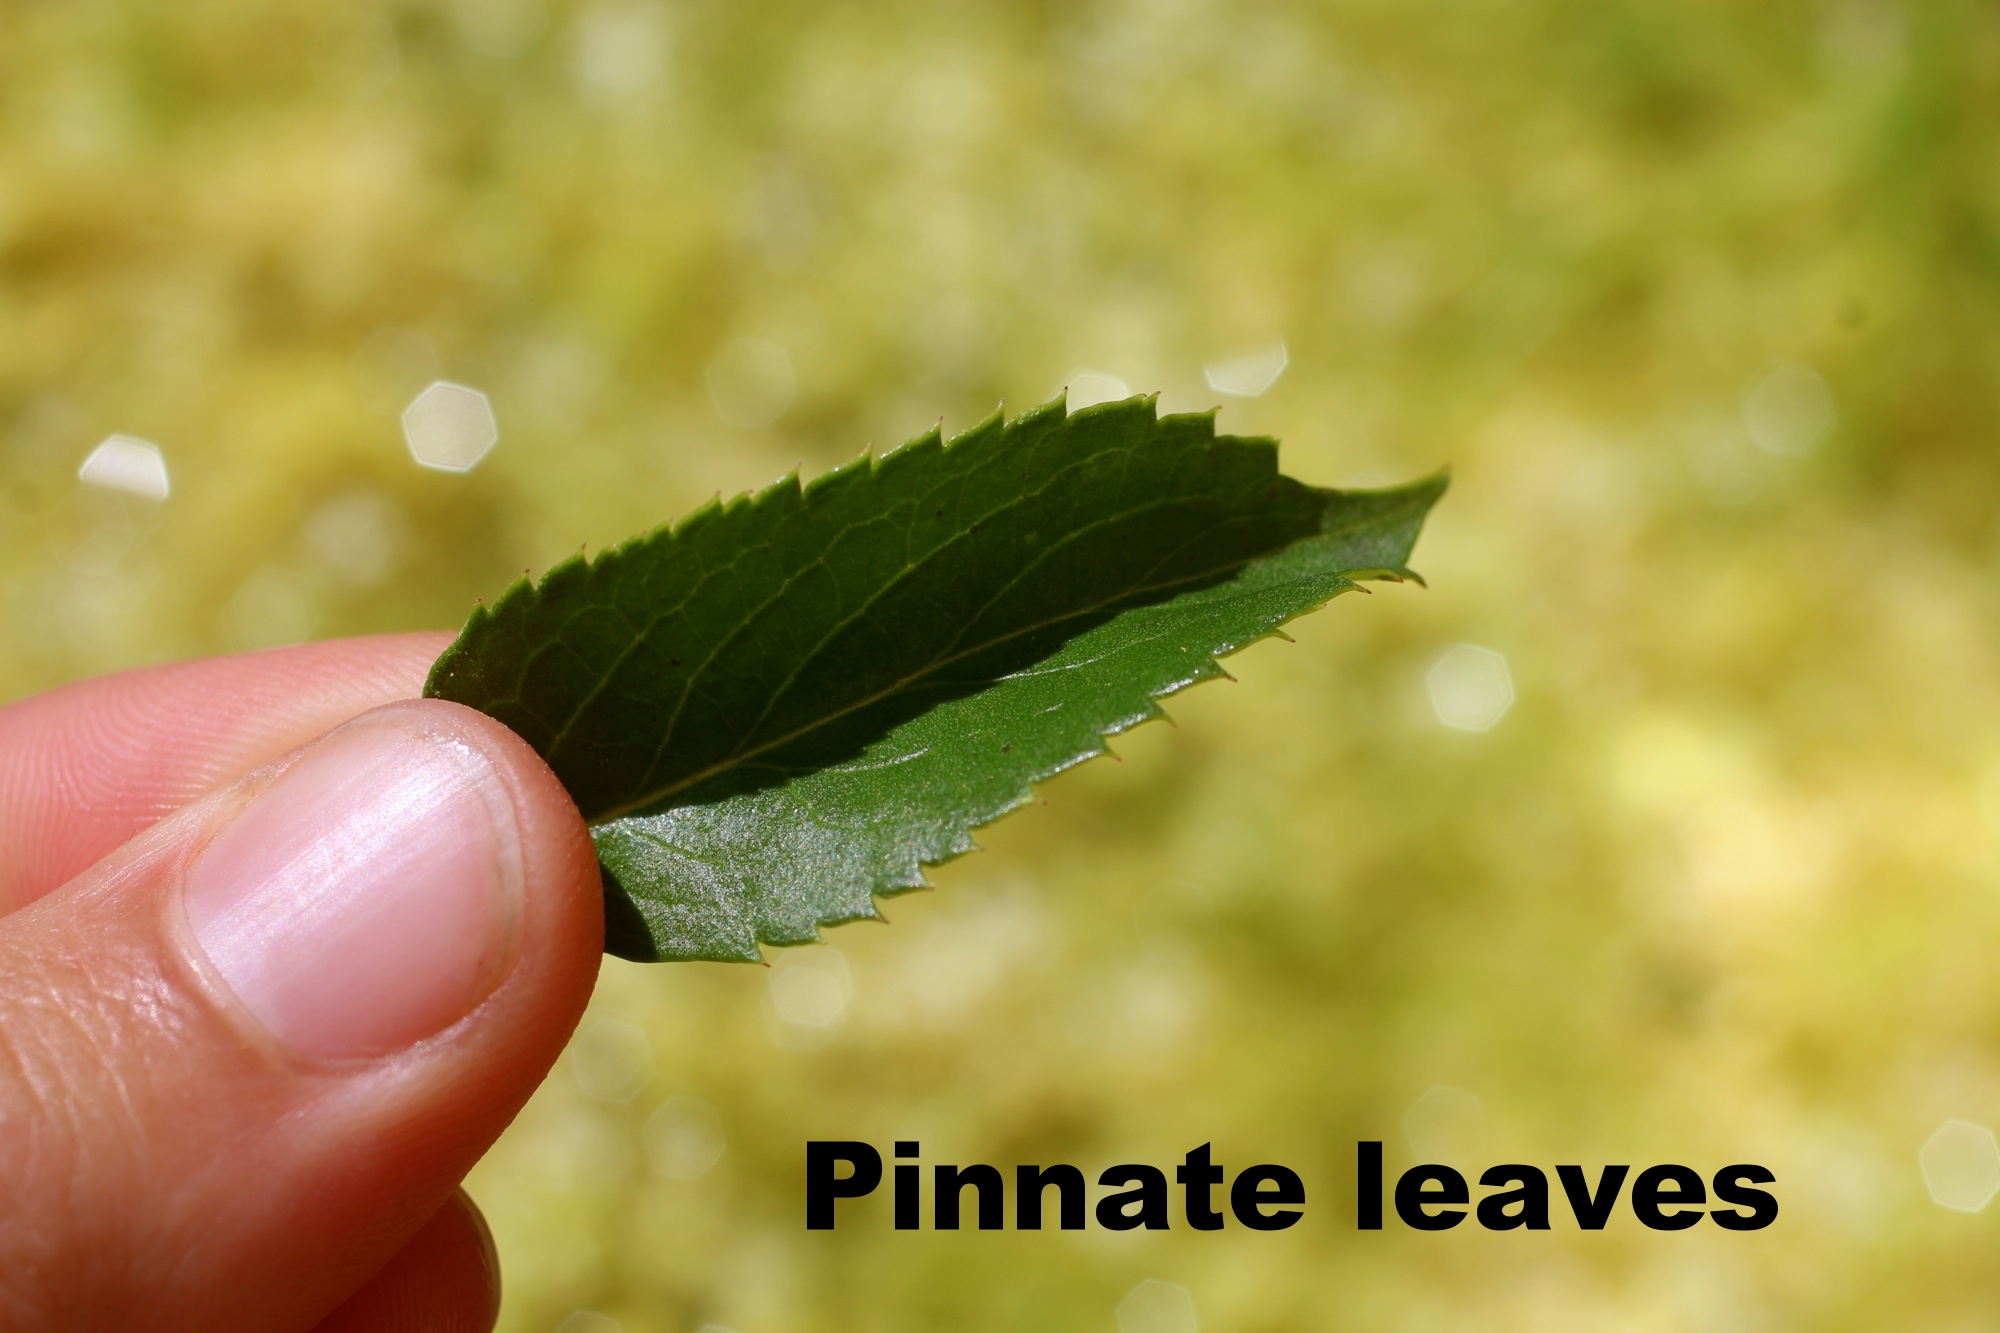
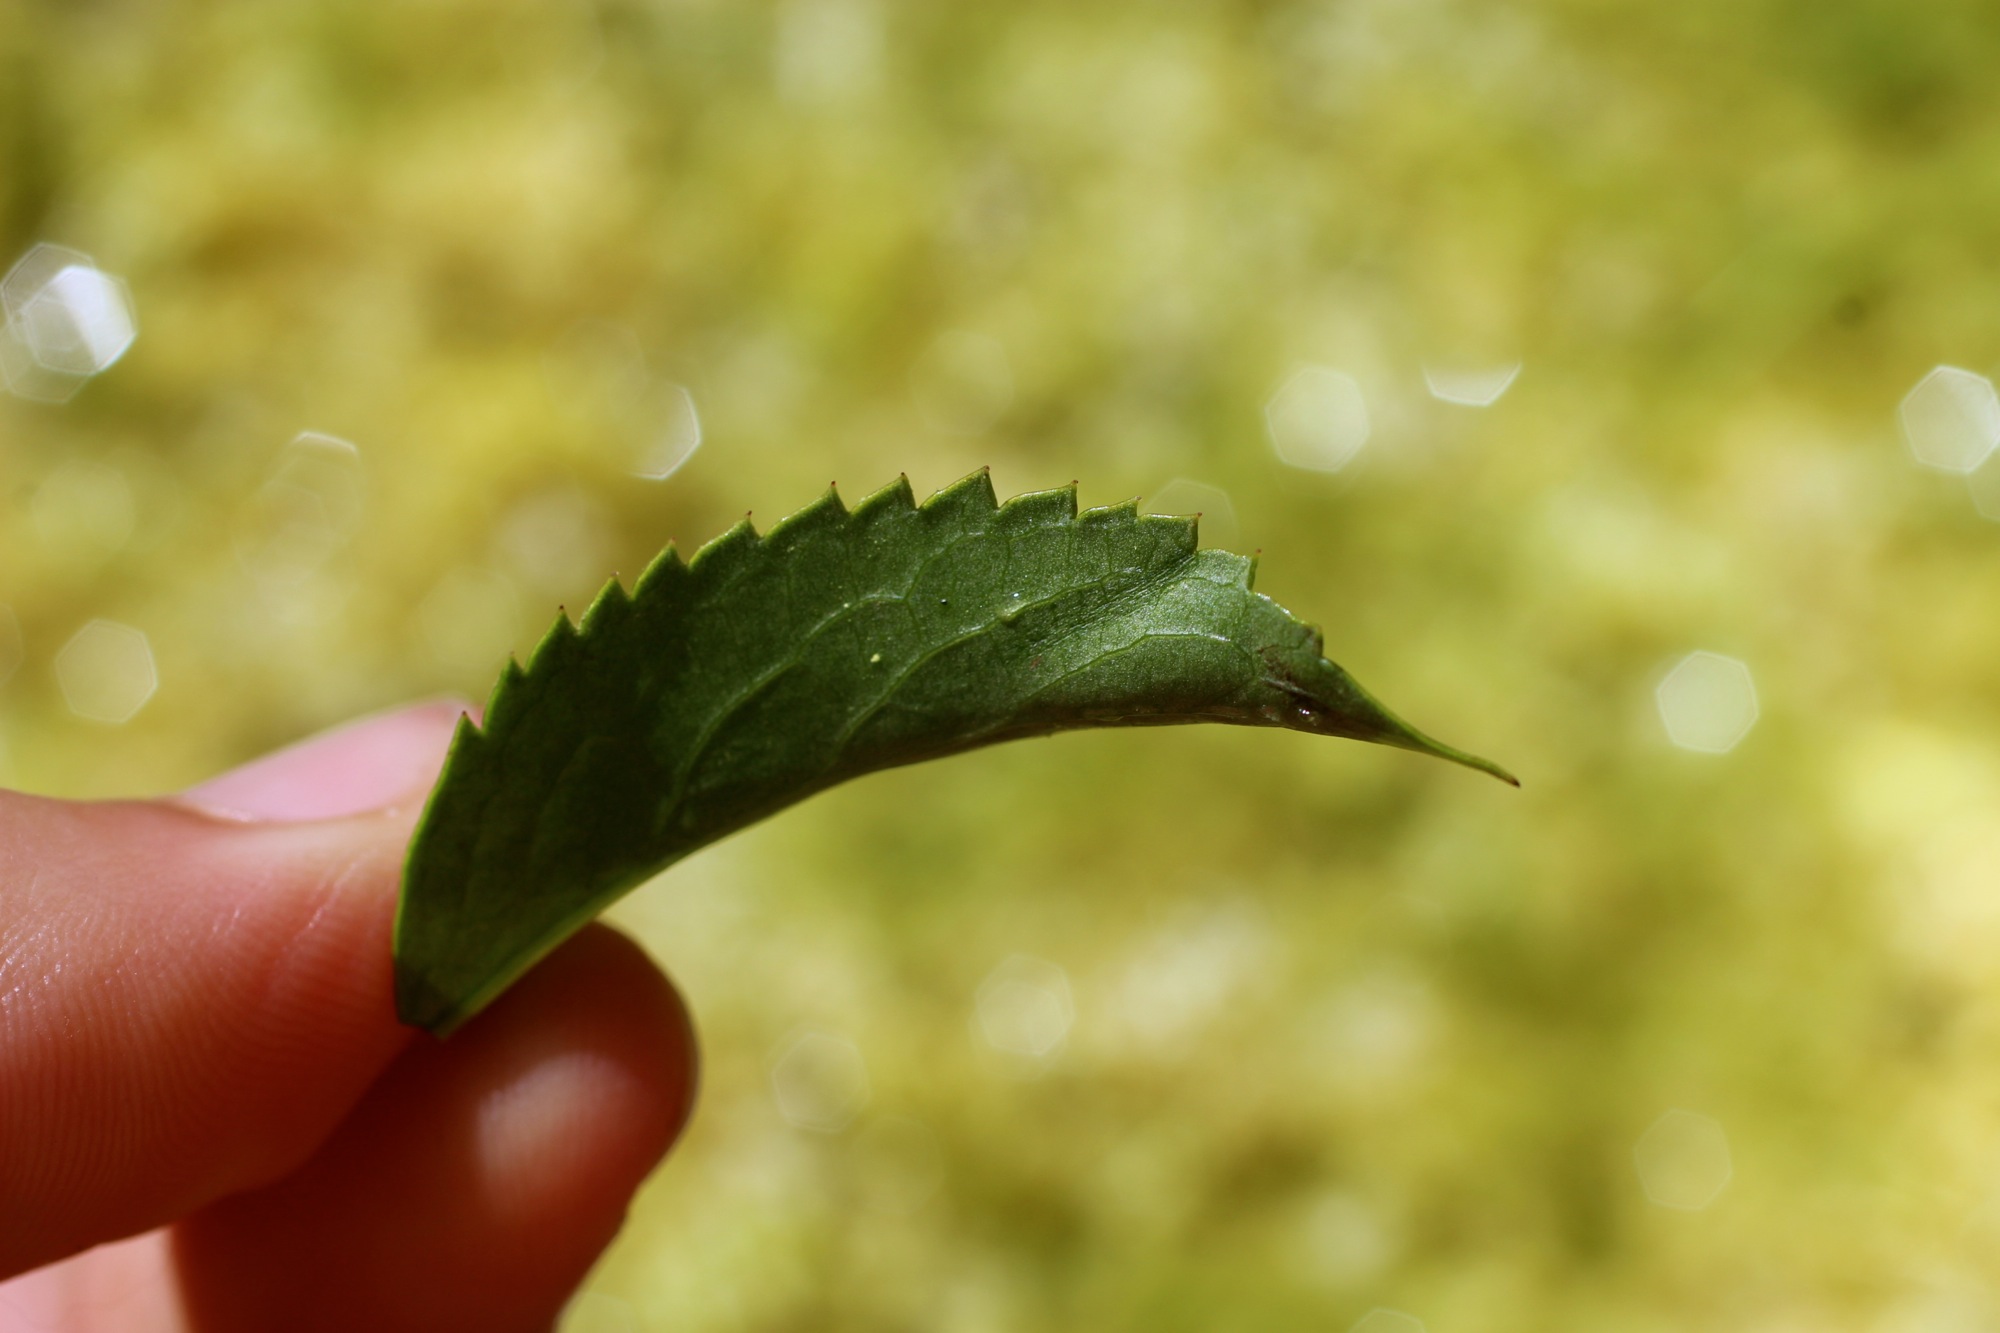
The elder tree can grow up to 25 feet tall and has reddish bark and pinnate leaves opposite of each other. The tiny star-shaped flowers, which bloom in May/June, are a yellowish white/cream color and grow in clusters. The elder plant that you will find in Northern California (and most of the Western United States) is Sambucus cerulea, also known as blue elder for it's dark blue berries. The berries can be found later in the summer, are a bluish/black often with a whitish powder sheen and also grow in large clusters.
ELDERFLOWER AND ELDERBERRIES MUST BE PROCESSED BEFORE CONSUMING. Don't just go around grabbing handfuls and consuming them raw like you would blackberries! However, the berries may be fine in small amounts and both berries and flowers are definitely safe after cooking or drying. When using the flowers, such as in this elderflower chive fritter recipe, it's best to remove as much of the stem as possible, but some stem is fine if cooked.
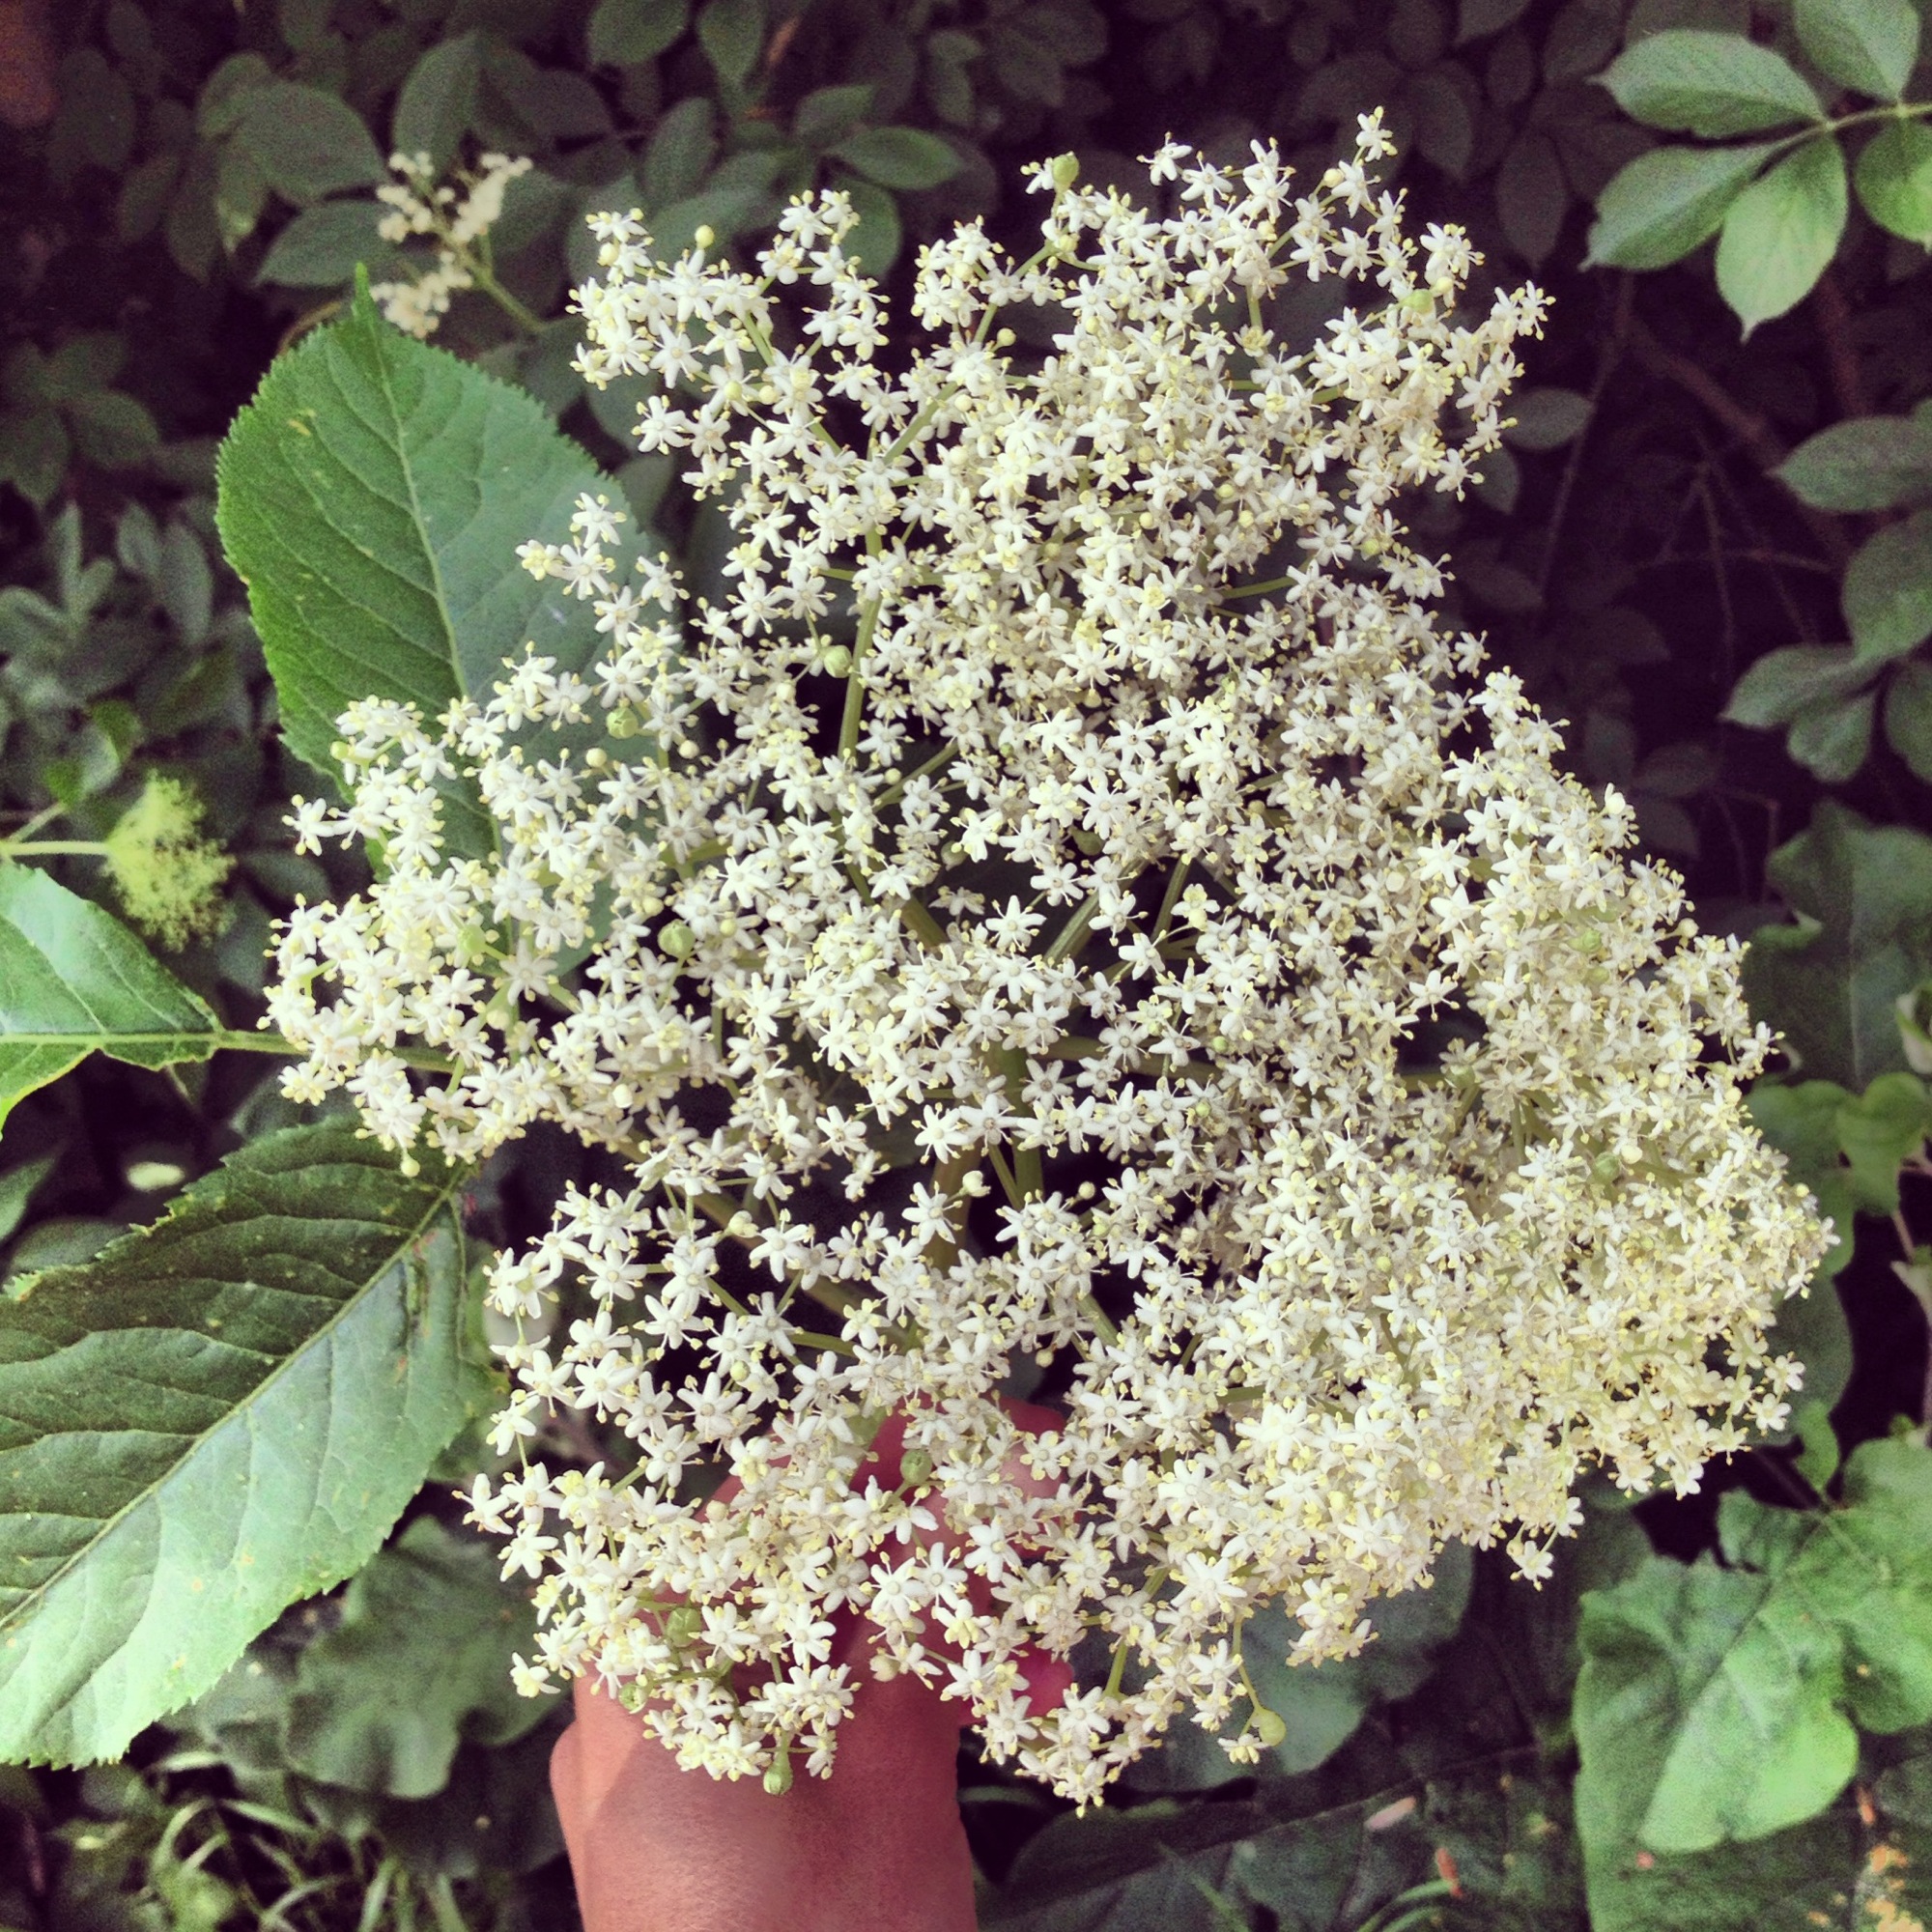
Notice tiny star-shaped flowers. This Sambucus nigra from Europe has larger clusters and whiter flowers than the Sambucus cerula of California.
My first experience with elderflower (other than St.Germain) was during my stint as a visiting researcher at the Nordic Food Lab in Denmark. We spent a morning riding all over Copenhagen to forage huge clusters of elderflowers and stuffing them into sacks before plucking the flowers to be used in a fermented cordial. I still fondly remember being covered in pollen afterward while enjoying a well-deserved chocolate rye roll. Denmark is really a magical place and elderflowers unsurprisingly about there. The elderflowers you find in Denmark are most likely to be Sambucus nigra rather than the Sambucus cerulea that is found in California and are a bit larger and whiter, but both have the same beautiful fragrance and uses. As I left Denmark before the berries came out and just recently found a spot for elder in California, I have yet to experiment with the berries, but am greatly looking forward to doing so this summer!

Yellower, yet still star-shaped, flowers of the Sambucus cerula foraged from Tilden Park in Berkeley, CA.

Fennel, Fennel Everywhere
Abundant sweet anise flavor.

“Note: we’re currently gathering samples in the most industrial soils we can find to measure potential toxins - if the plant tissues from these soils haven’t accumulated toxins, pretty much any urban soil will be safe. More on that later! ”
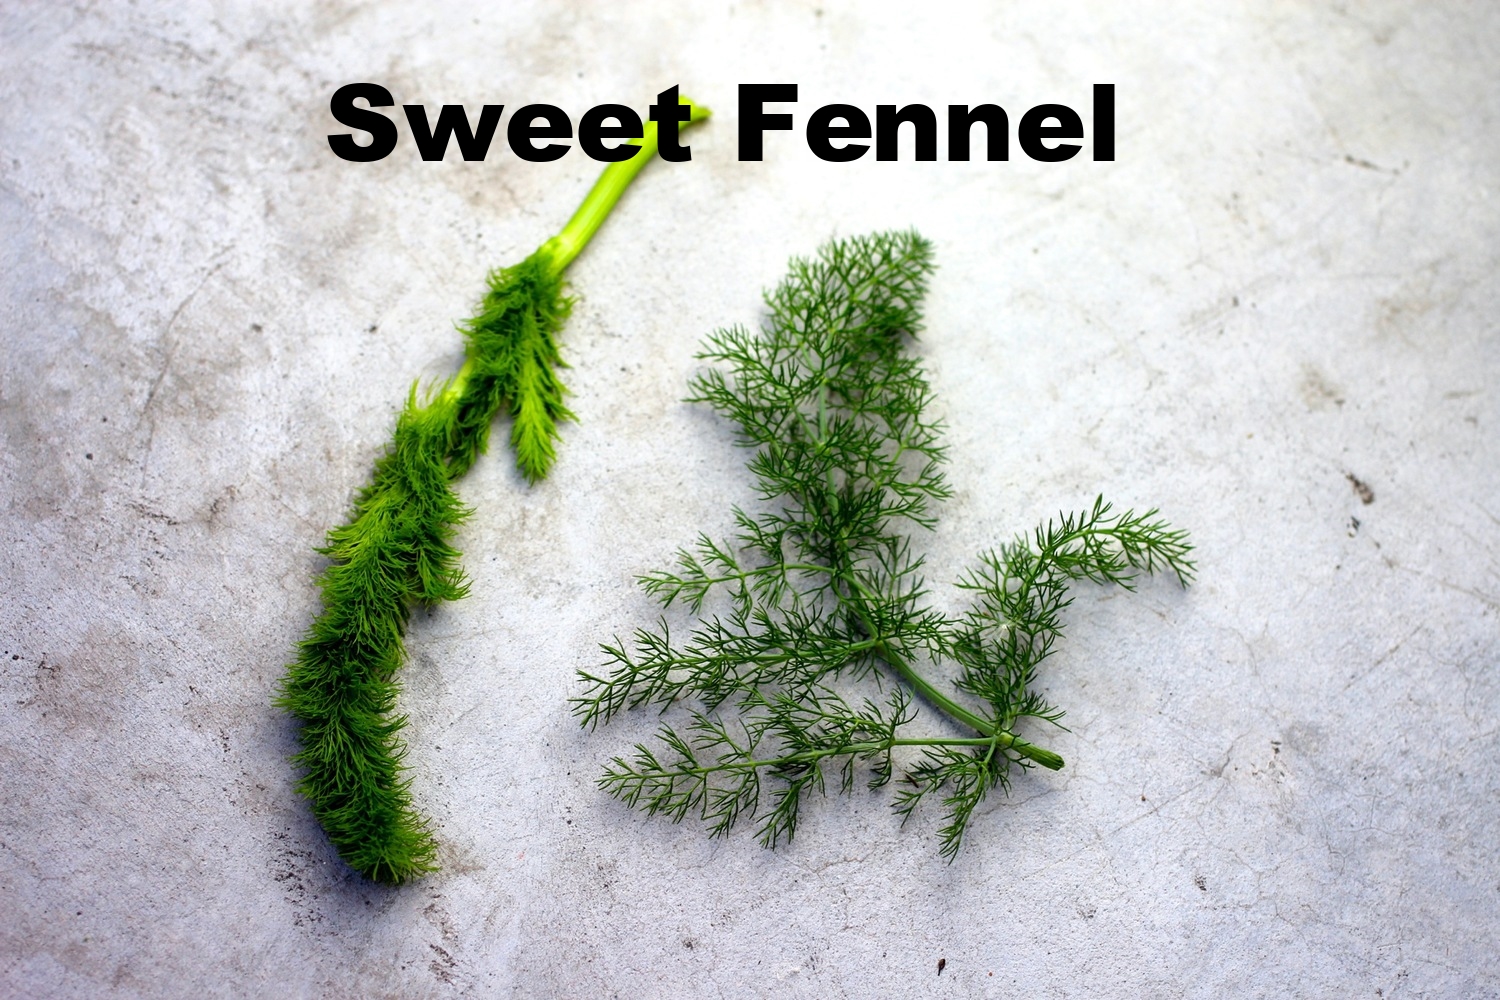
Whether you've been looking for it or not, you likely come across wild fennel, or Foeniculum vulgare, quitefrequently. On a recent sample gathering in West Oakland, I was once again struck by just how rampantly wild fennel grows. Asphalt, cement, roadsides, or parking lots, wild fennel survives and thrives everywhere.
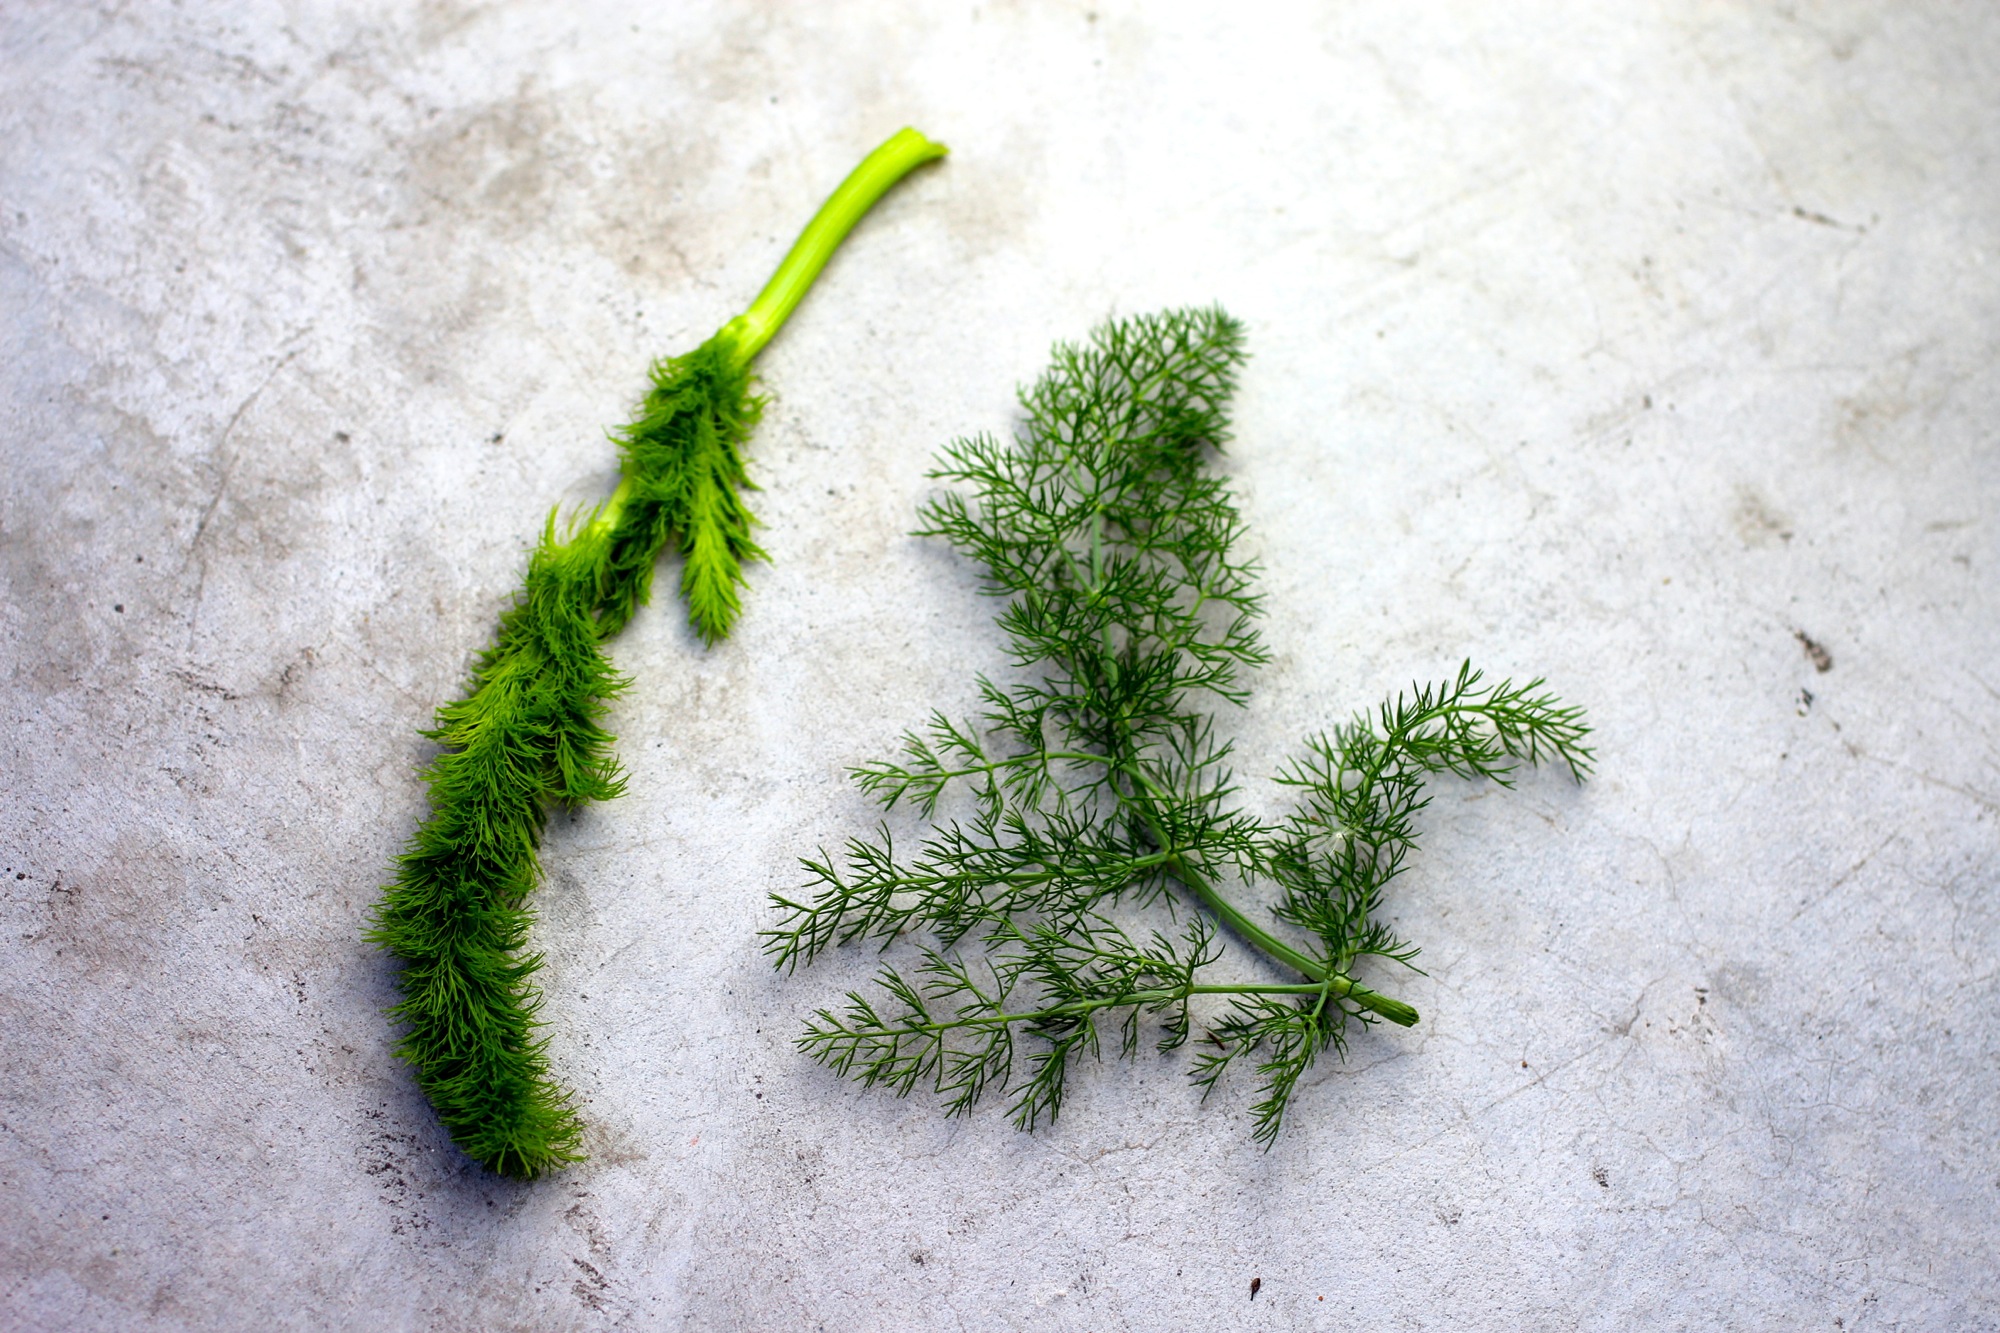
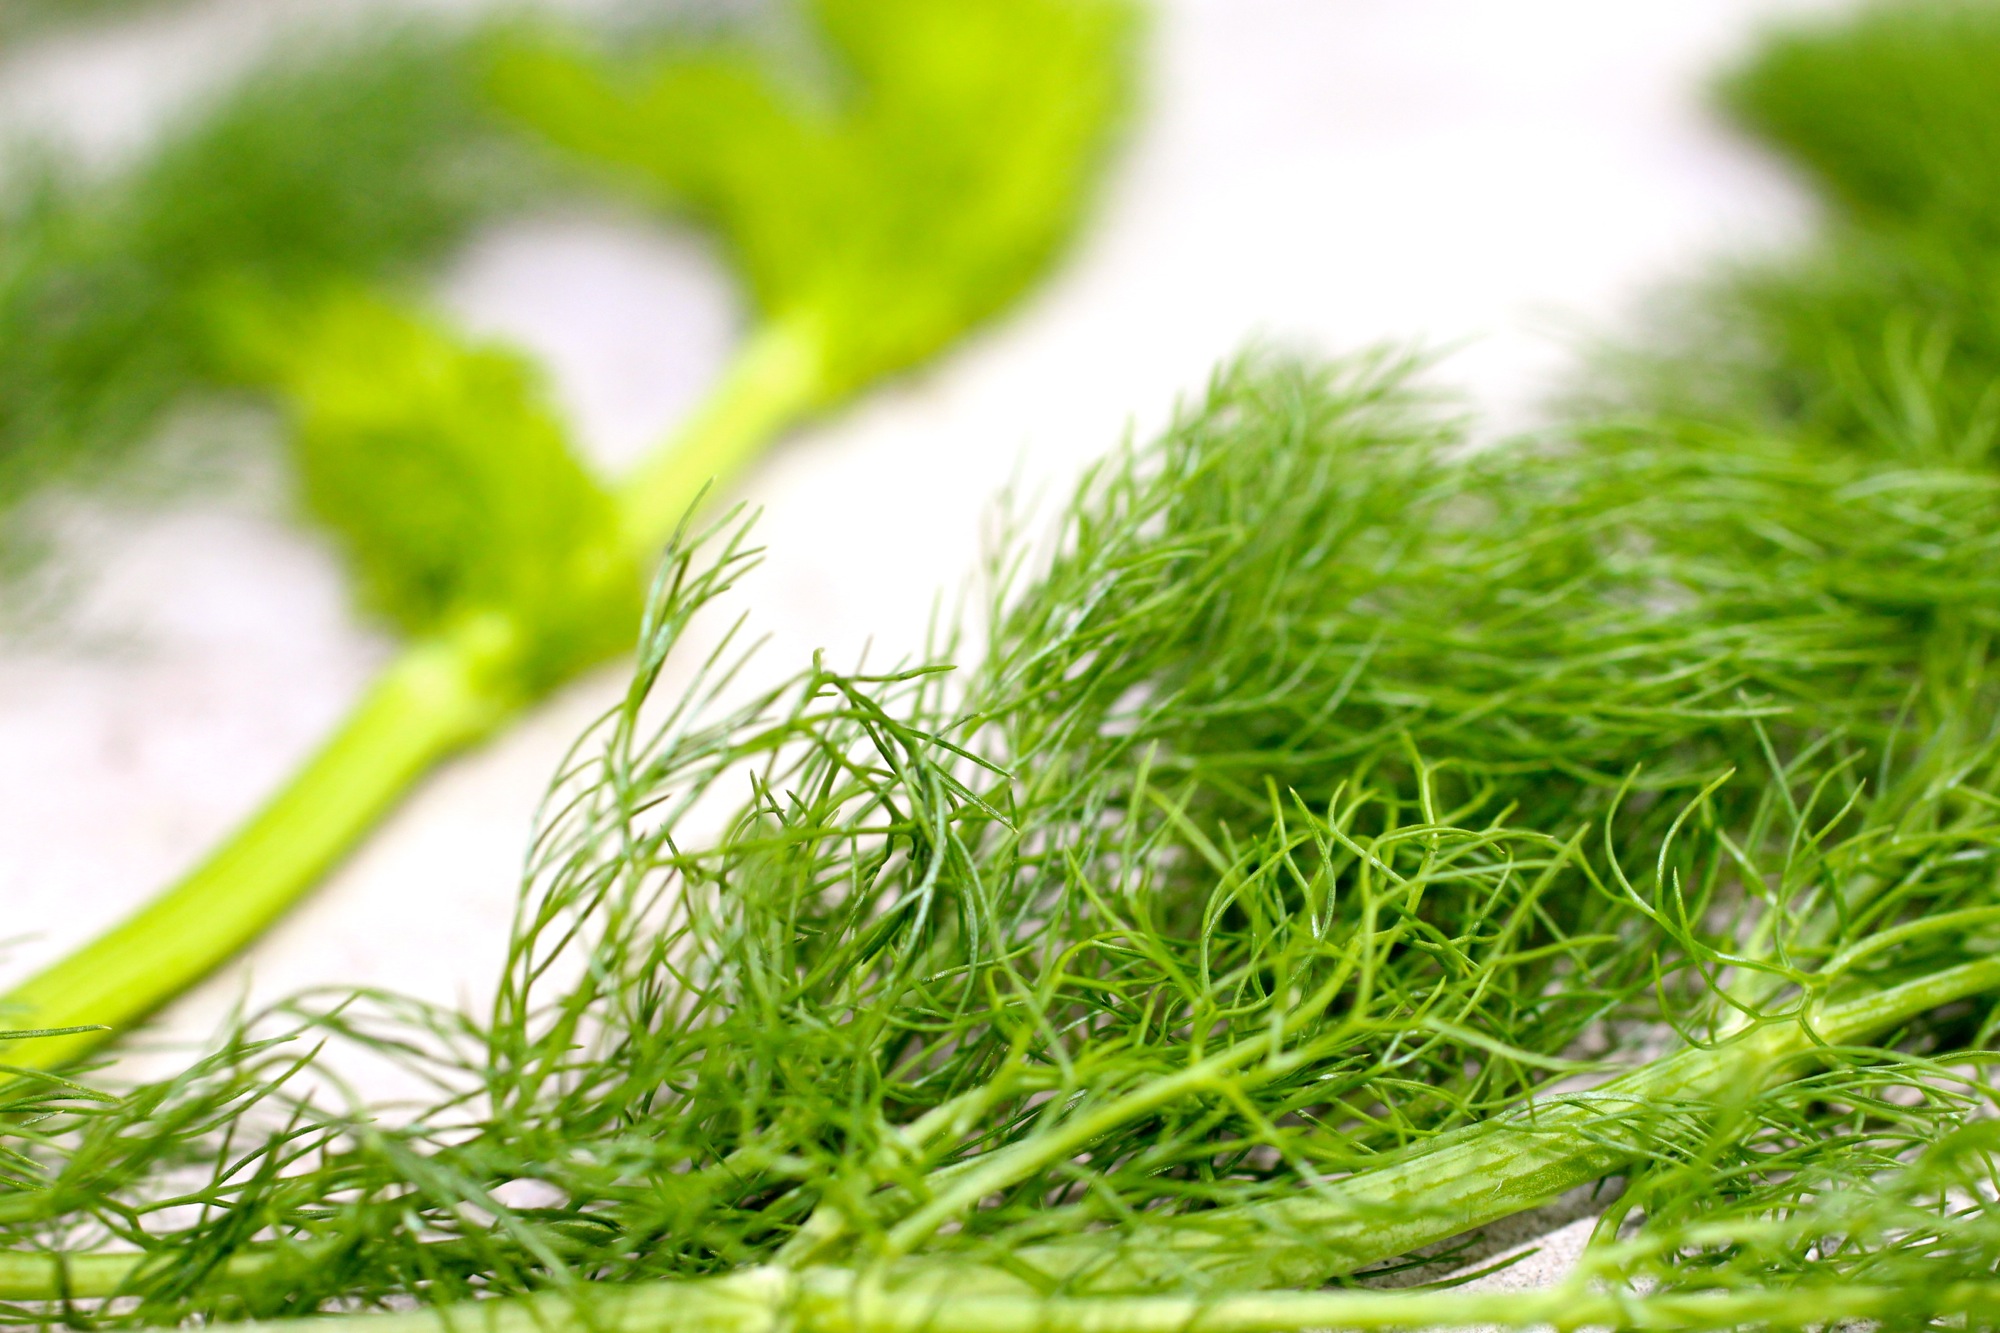
Feathery leaves of wild fennel fronds.

Foraging wild fennel in a North Oakland median.
A member of the same family as carrot, parsley, and dill, fennel has thin feathery leaves that connect to a larger stem. The plants can grow very tall and may have delicate yellow flowers. On foraging walks, I always get very hopefully asked about how to harvest the fennel bulb, but alas, wild fennel does not have a large bulb as you find with conventional fennel. Fortunately, the leaves are incredibly abundant and flavorful, as are the stalks, and flowers, pollen, and seeds in season. Fennel often grows alongside poison hemlock, which is in the same family, but has leaves more like carrot tops and purple splotches on the stems. If you are unsure if what you have is fennel, give it a smell - the smell will undeniably tell you if you have fennel. You can find fennel primarily in the spring through early fall, though I have seen it at all times of the year, and the flowers and pollen can be found in the summer.
Although you probably wouldn't want to make an entire salad of fennel, the sweet anise and licorice flavor works great as a garnish. Try it in sauces, on fish or chicken, in soups, in omelettes, desserts, and as a salad component. The pollen is lovely as a tasty condiment and the seeds are a digestive aid.
When in doubt - smell the plant and if it's fennel, it will definitely smell like fennel.
The below is NOT FENNEL, but POISON HEMLOCK. Note the carrot-like leafy tops and purple splotches on the stem. The poison hemlock flowers are similar to fennel so be sure you carefully determine what you're picking and identify the fennel by the feathery, thin leaves and smell.

Photo credit: http://www.kingcounty.gov/

Cherry and Wild Fennel Clafoutis
The easy dessert that doubles as breakfast!

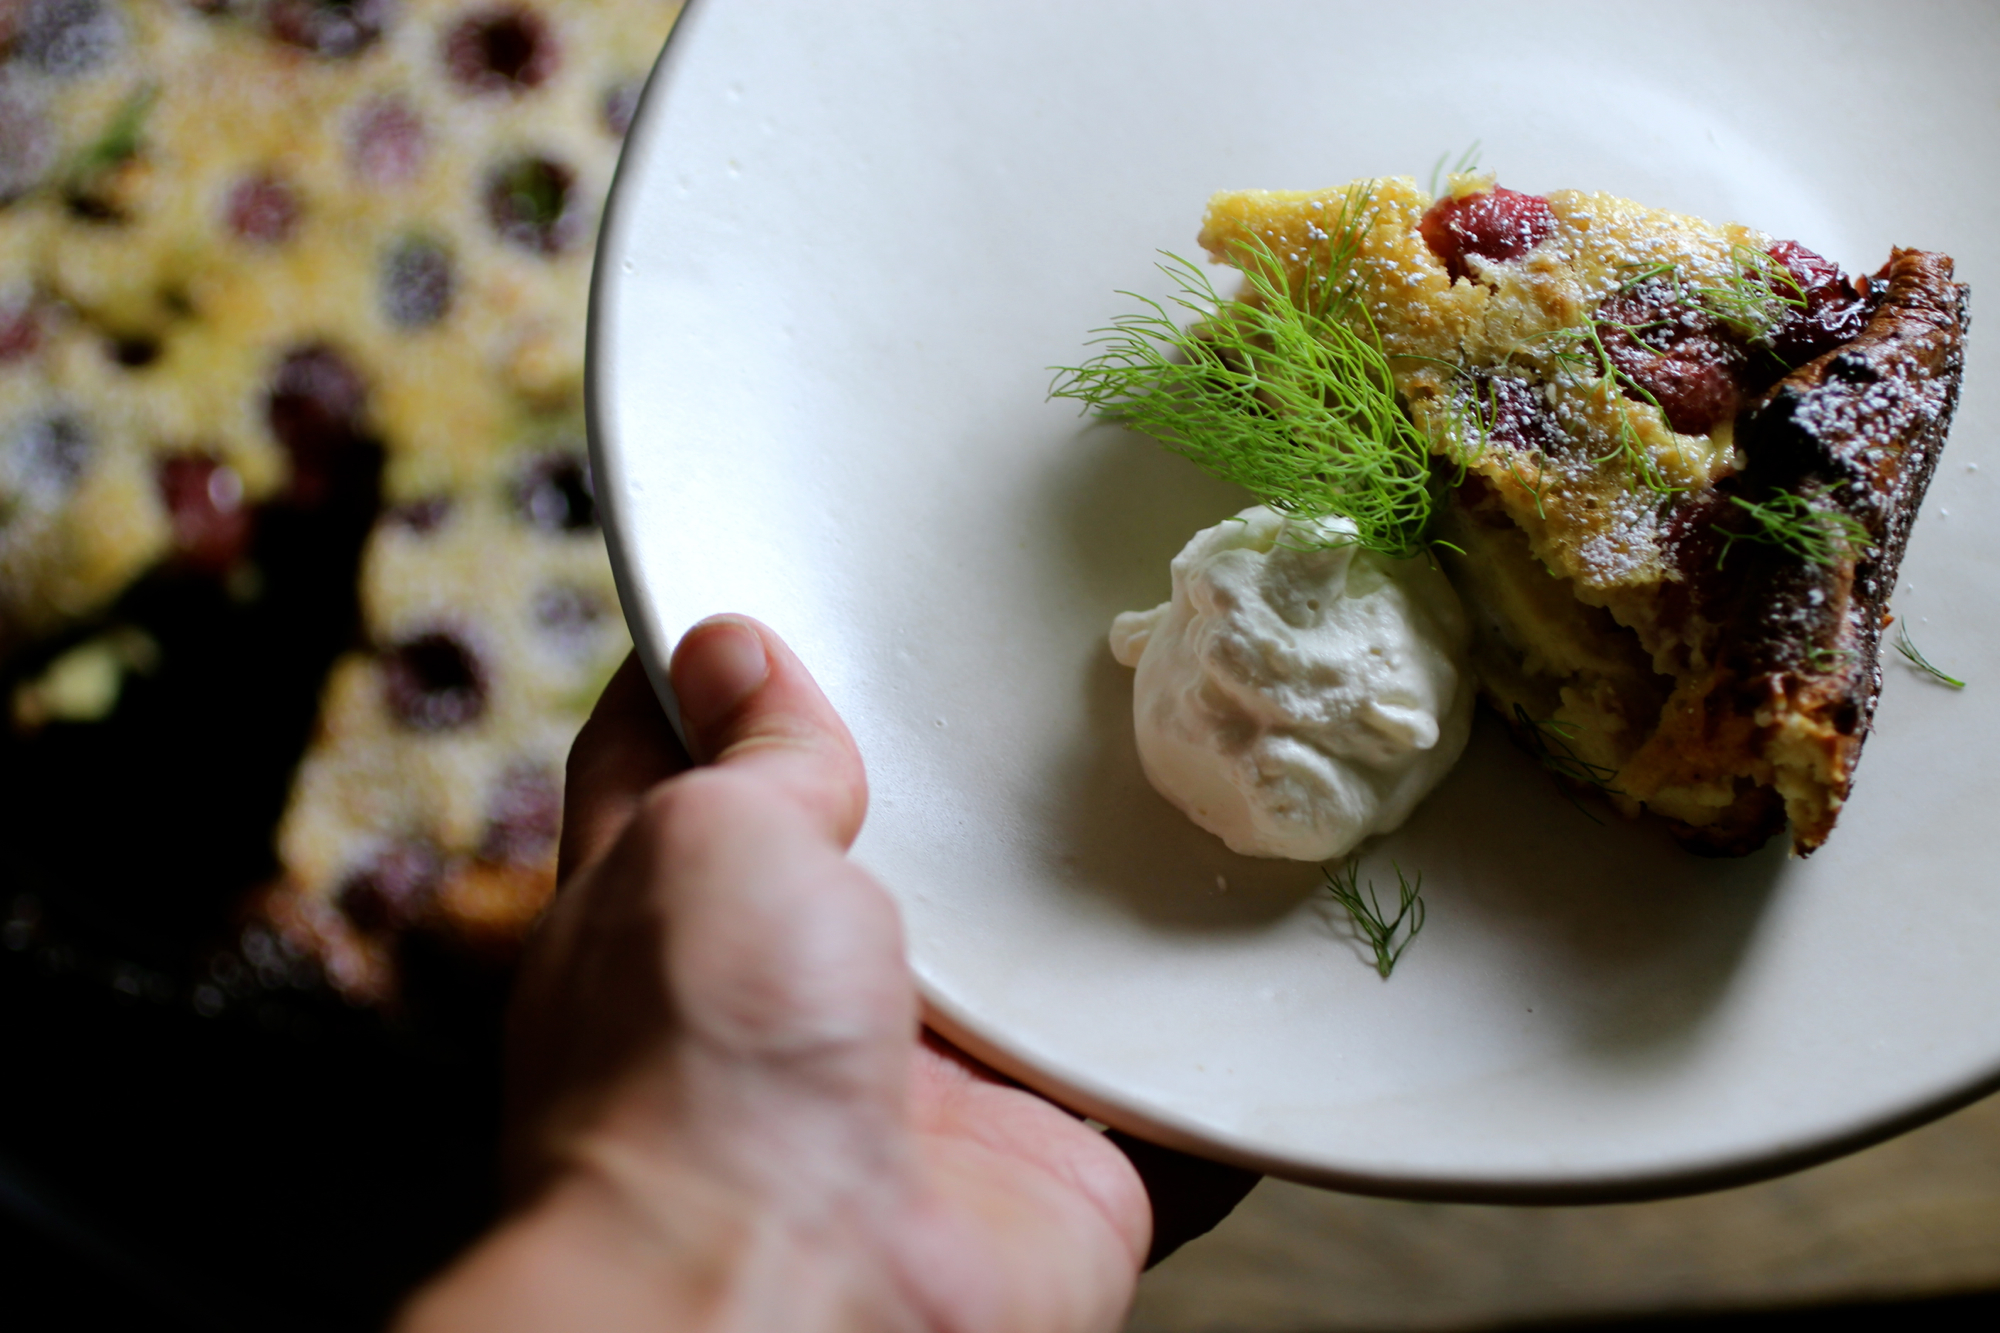
Sometimes, a word for a dish or a food preparation method I have never used will come to me and I will not rest until I have experienced it. That is what happened with "clafoutis" - I have no idea where I was introduced to the word, but after we picked up some cherries on our way back from a wedding in beautiful Los Olivos, all I could think about was making a cherry clafoutis, while at the same time asking myself, "cherry clafoutis is a thing, right?" This is where the internet came in, helpfully proving that cherry clafoutis is, indeed, a thing and although I don't necessary need a reason to make special desserts, my mother was serendipitously visiting for Mother's Day. Using a recipe from Saveur as a base, I decided to decrease the egg because some comments complained of eggy-ness and I tend to shy away from really eggy desserts and include wild fennel (more on wild fennel including foraging here), as cherry and fennel go together in a delightful way.
There are a few great things about this dessert. The first is that it's easy - really easy. It's also visually impressive in the cast-iron pan and versatile in ingredient options (apricot + almond? pear + bergamot?) and, because it's not super sweet, it's also versatile in potential eating occasion. We enjoyed it with fennel whipped cream as dessert and again the next day with coffee for brunch and I'm pretty sure no one would turn their nose up to a clafoutis at tea time. So, now you have no excuse - get out there, forage some fennel (which is all over the bay area), buy some cherries, and make this deliciously easy puffed crepe-like cake! Recipe below serves 8.
“Cherries can also be unpitted, which provides a more rustic flavor and texture, but I did not this time, as I knew my mom wouldn’t like it!”
1 cup chopped wild fennel fronds, plus a few fronds for garnish
1/2-1 cup whipping cream, depending on how much your group likes whipped cream (optional)
7-8 tablespoons sugar, divided
1 tablespoon plus 1/2 teaspoon vanilla extract, divided
1/2 tablespoon butter
1-1/4 cups whole milk (can be substituted for a combination of 3 parts reduced fat and 1 part whipping cream, if you happen to have these around like I did)
2 tablespoons kirsch or Luxardo (I had Luxardo, but think it would be better with kirsch)
5 eggs
1/2 teaspoon medium coarse Kosher salt, divided
3/4 cup all-purpose flour
3 cups black or sour cherries, pitted (see post on how to pit cherries like a boss)
Confectioner's sugar, for dusting

Infuse whipped cream with wild fennel by allowing whipping cream to impart fennel flavor overnight.
To make fennel whipped cream: Place 1/2 cup chopped fennel in a mason jar, pour whipped cream over top, cover, and refrigerate overnight. Remove fennel then beat cream until whipped, adding 1-2 tablespoons of sugar and 1/2 teaspoon of vanilla toward the end of beating. Refrigerate until used.
Heat oven to 425 degrees F. Grease a 9'' cast-iron skillet and set aside. Whisk milk, sugar, kirsch or Luxardo, vanilla, eggs, and 1/4 teaspoon salt until combined. Add flour and whisk until smooth, about 30 seconds.
Pour batter into buttered skillet, then distribute cherries evenly over top. Bake until a skewer inserted into batter comes out clean and a golden brown crust has formed on top and bottom of clafoutis, about 25 minutes. Dust with confectioners' sugar and serve with a dollop of fennel whipped cream, if desired.

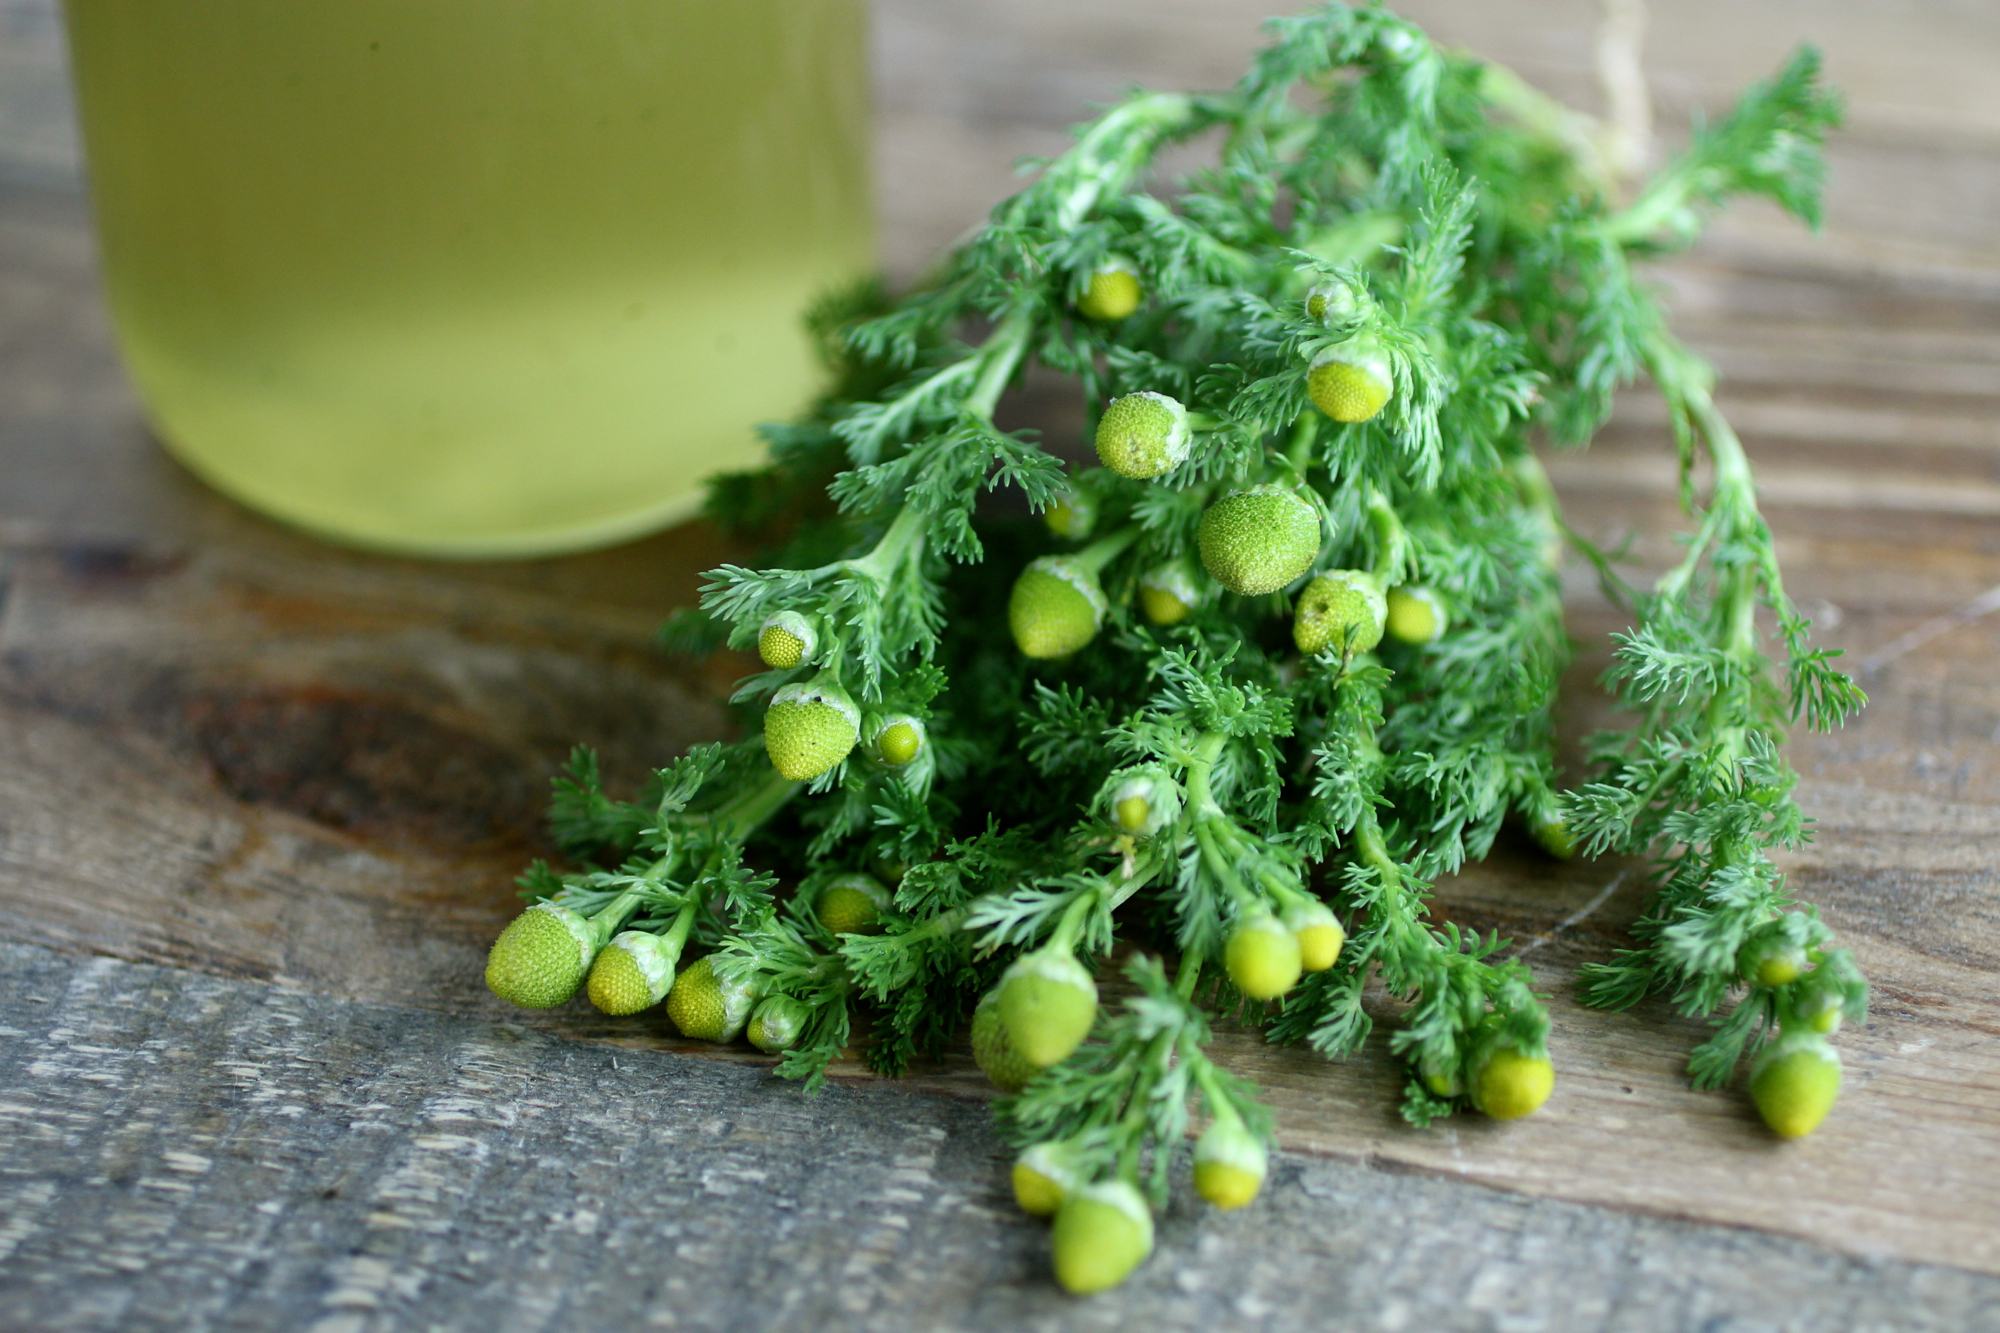
Wild Chamomile Simple Syrup
Cocktail flavor from between the cracks.


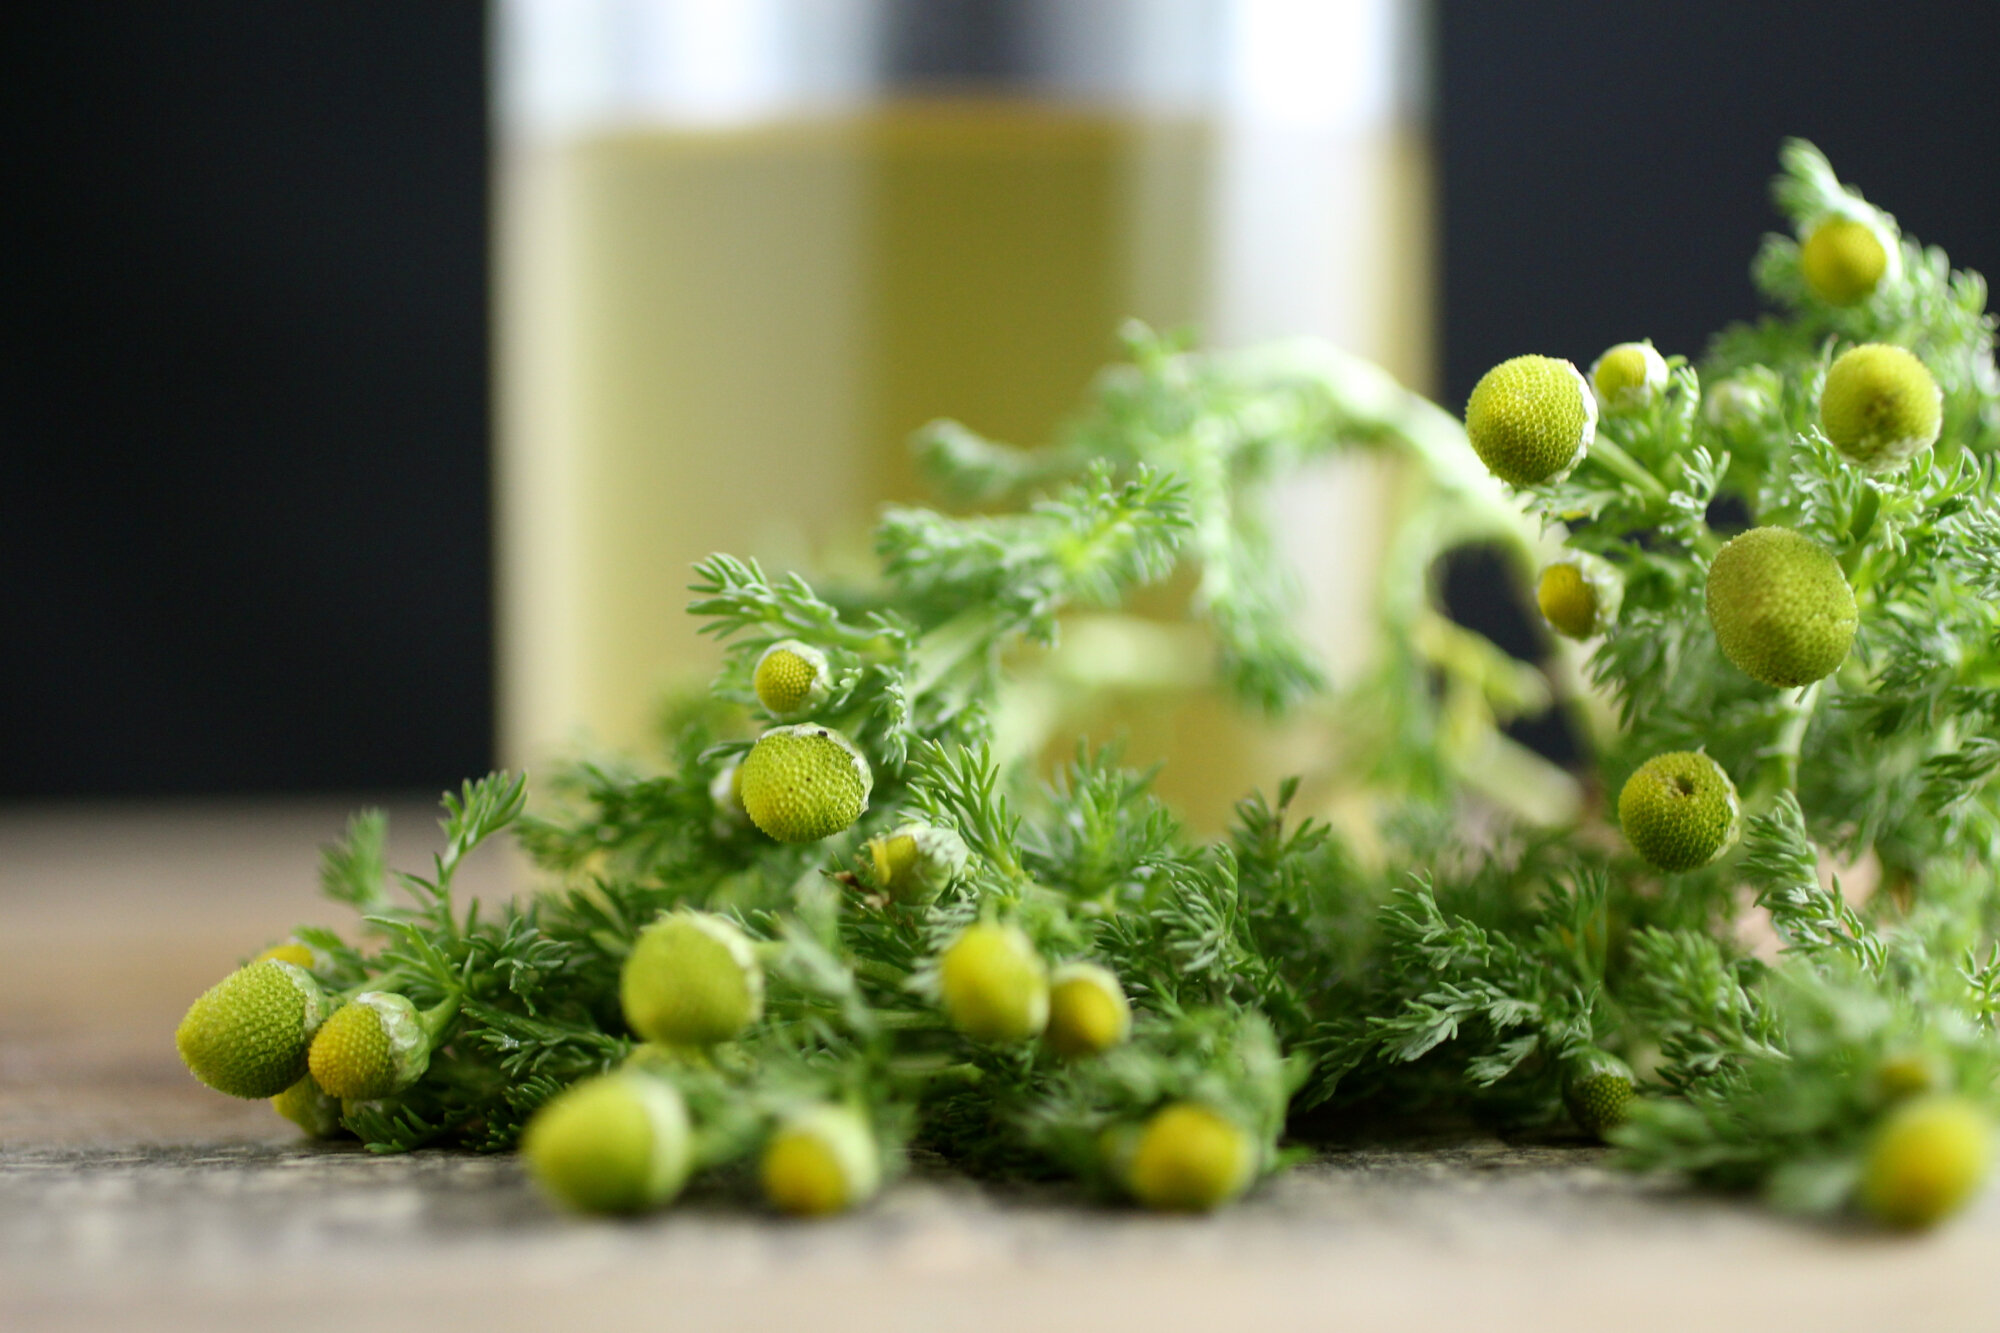
Wild chamomile, or pineapple weed grows almost everywhere and is very distinctive.
Wild chamomile, Matricaria discoidea, has a wonderful fragrant aroma that makes for great cocktails. Learn more about this edible weed here. One simple way to incorporate the flavor into cocktails is by infusing a simple syrup with the flowers and leaves of the weed. Not only is this syrup fantastic in cocktails, such as The Schoolyard, but it's also lovely in lemonade, ice tea, drizzled over ice cream (or made into ice cream or gelato), cakes, tarts, etc. Below recipe is for about 1 cup of simple syrup.
1 cup washed pineapple weed flowers and tops of leaves: Flowers can be removed from the weed using scissors, some of the top leaves around the flowers are okay, but you want to make sure it's mostly flowers.
1 cup sugar*
1 cup water
Combine sugar, water, and pineapple weed in a small heavy saucepan.
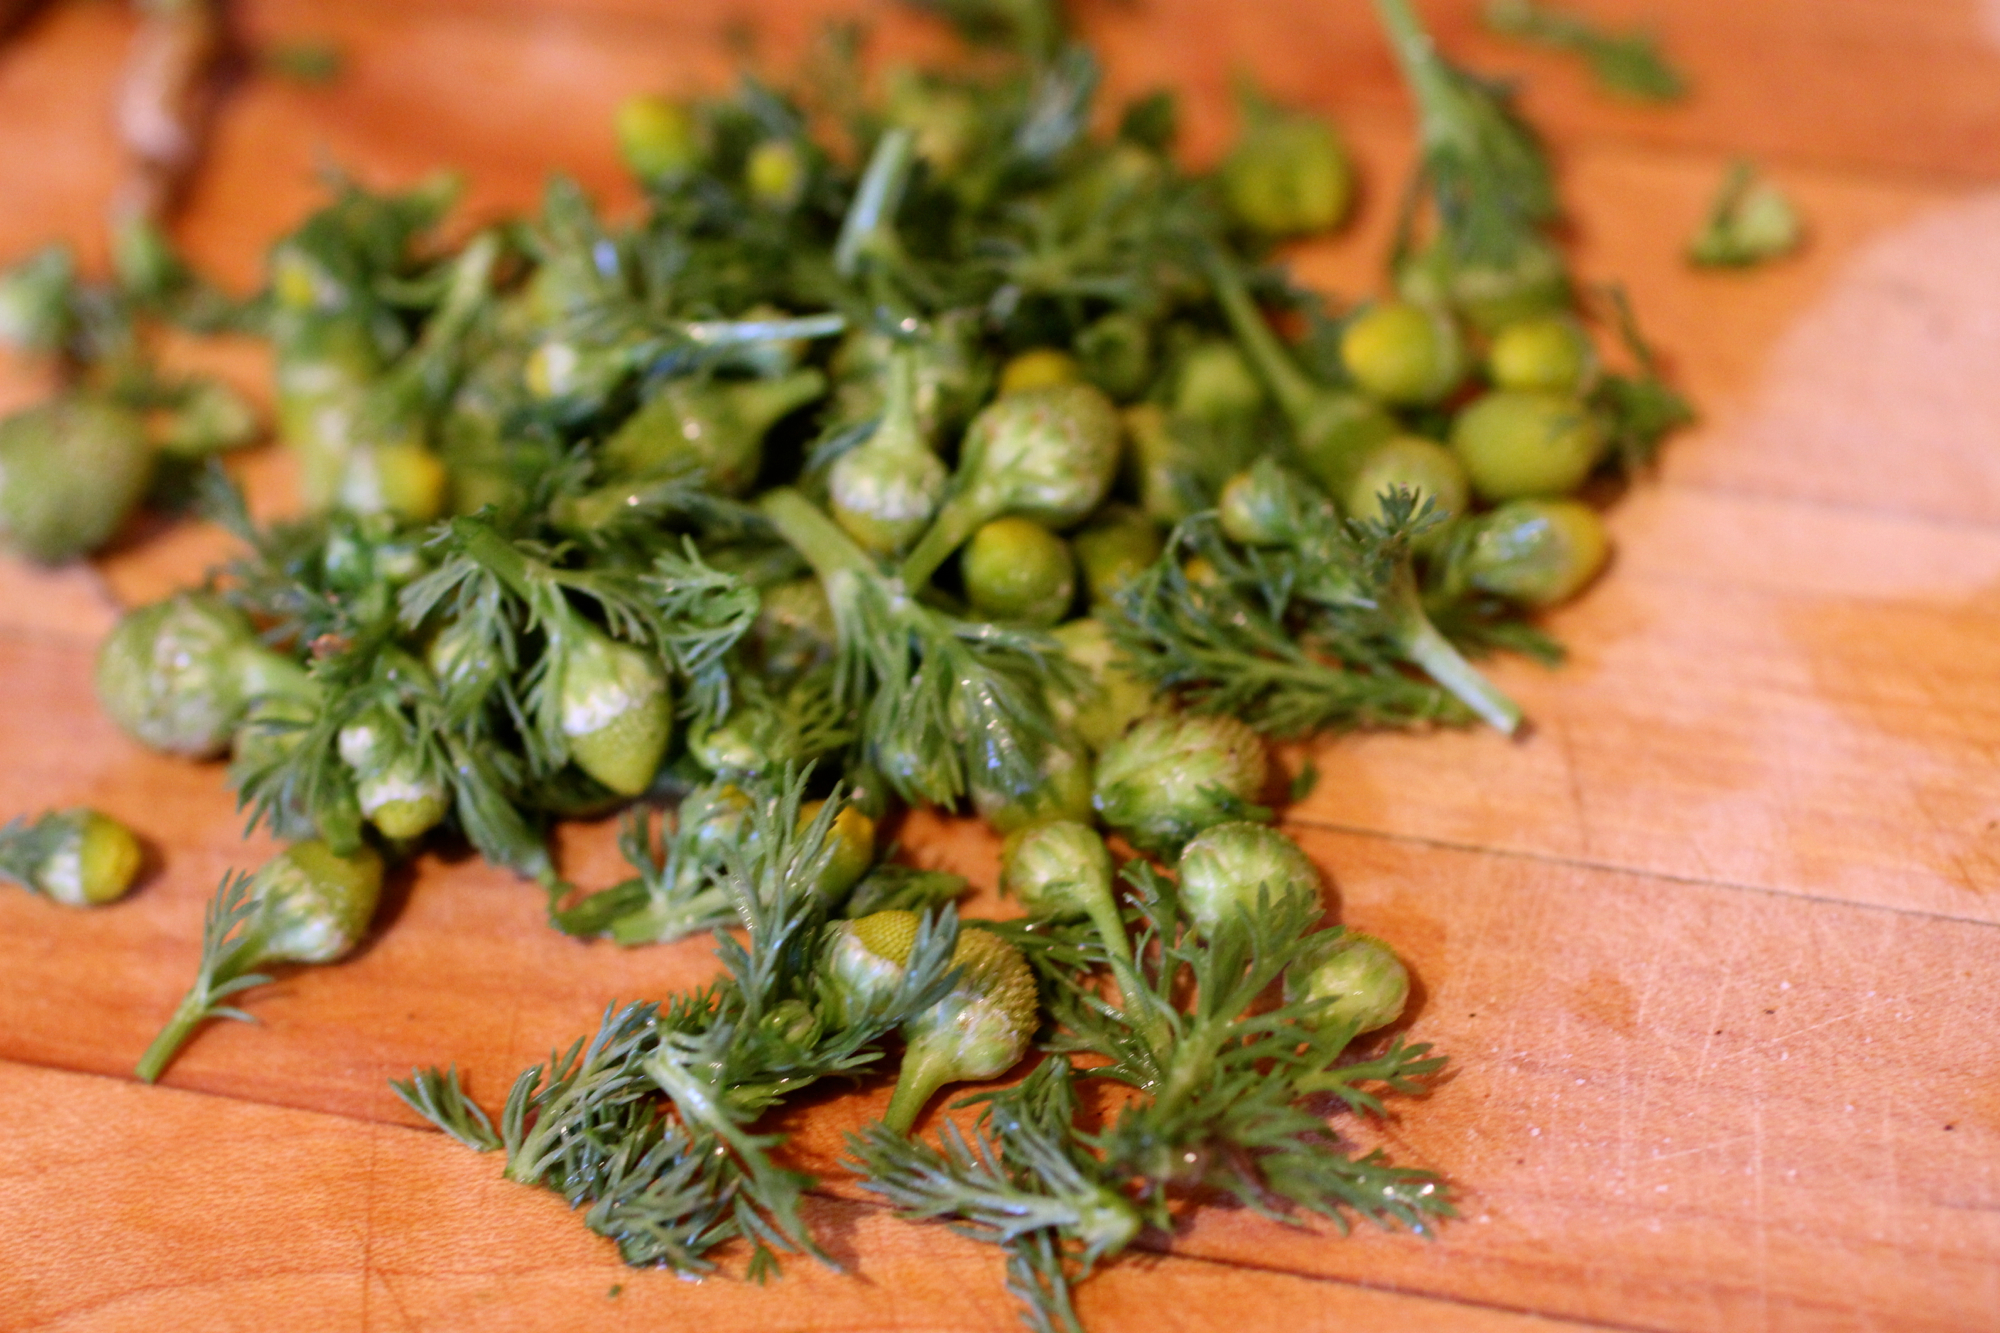
Use scissors to easily cut off pineapple weed flowers and leaves.
Bring to a simmer, stirring occasionally, for 5 minutes. Remove from heat. Let the syrup cool completely, then squeeze as much juice as possible from flowers, pour through cheesecloth into a jar or resealable container. Simple syrup will last 1 month refrigerated.
*You can also make a 2:1 (sugar: water) simple syrup that will last up to 6 months refrigerated. This 2:1 syrup is sweeter than most, so you will need to add less to recipes.

Wanting the Unwanted: Why Eat Weeds
Wild food week 4/4 - 4/10!

What is the first food that comes to mind when you hear "foraged"? My guess is that a mushroom came to mind. While it's true that most mushrooms are grown in the wild, there's an abundance of other wild plant foods that are much easier to find and identify.
Just because these wild plants are out there, does that mean we should eat them? My colleagues and I of Berkeley Open Source Food (BOSF) are arguing yes. Here's why:
Nutrition:When the human diet shifted from hunting and gathering to agriculture some 10,000-20,000 years ago, we began the process of selecting certain monocultures for specific characteristics. Decreasing agricultural diversity had benefits, including population growth, but also led to a decrease in a variety of nutrients, particularly phytonutrients, causing the Western diet to have a much narrower range of nutrients today than it did thousands of years ago. These phytonutrients may reduce our risk for modern chronic diseases such as diabetes, heart disease, and cancer. Incorporating more wild foods into our diet might help reduce the risk of chronic disease.
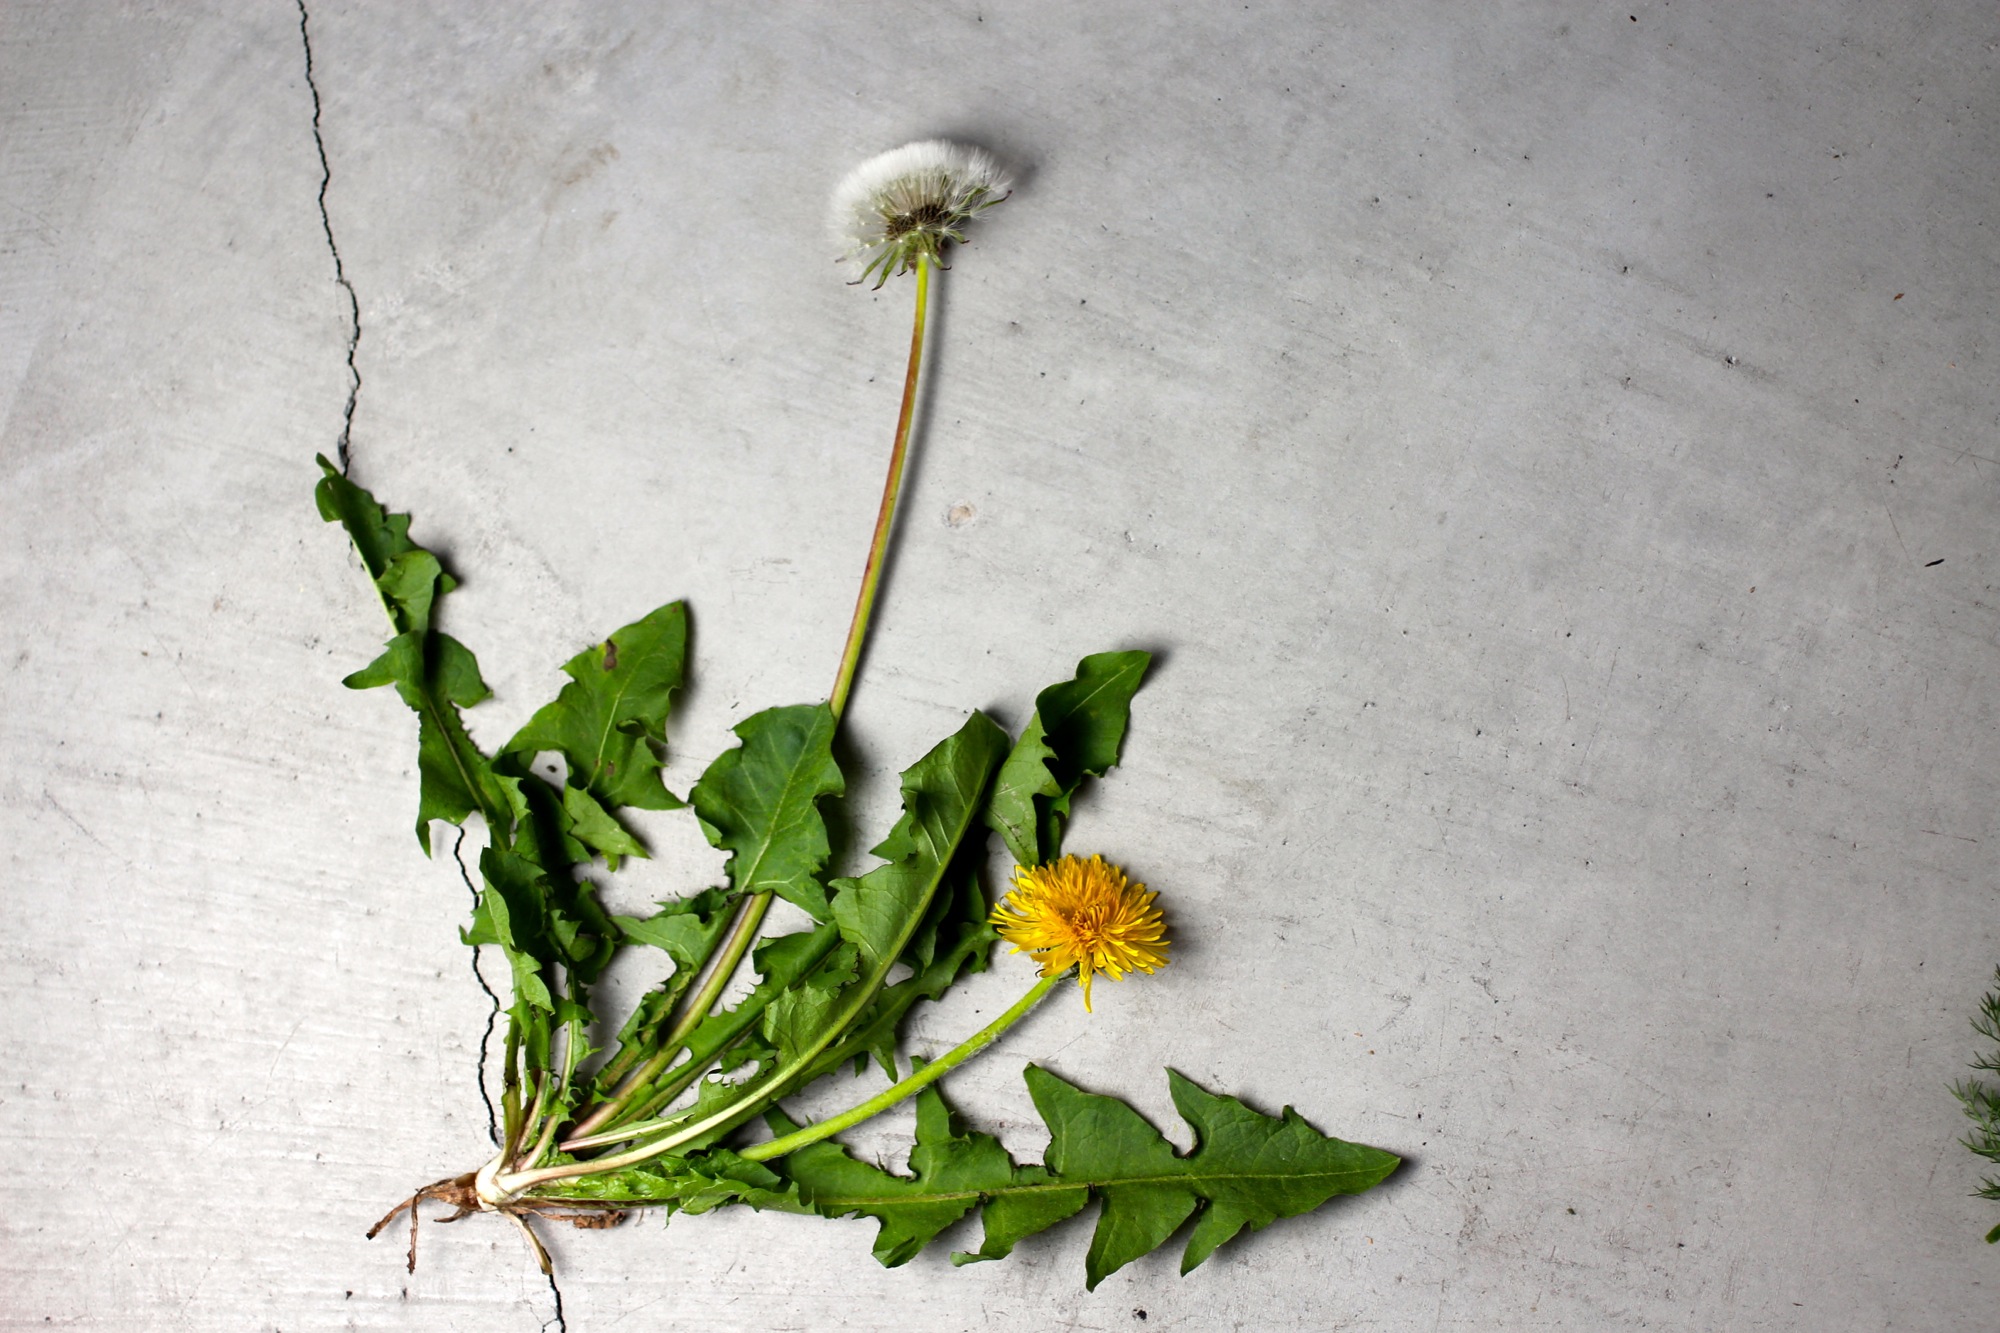
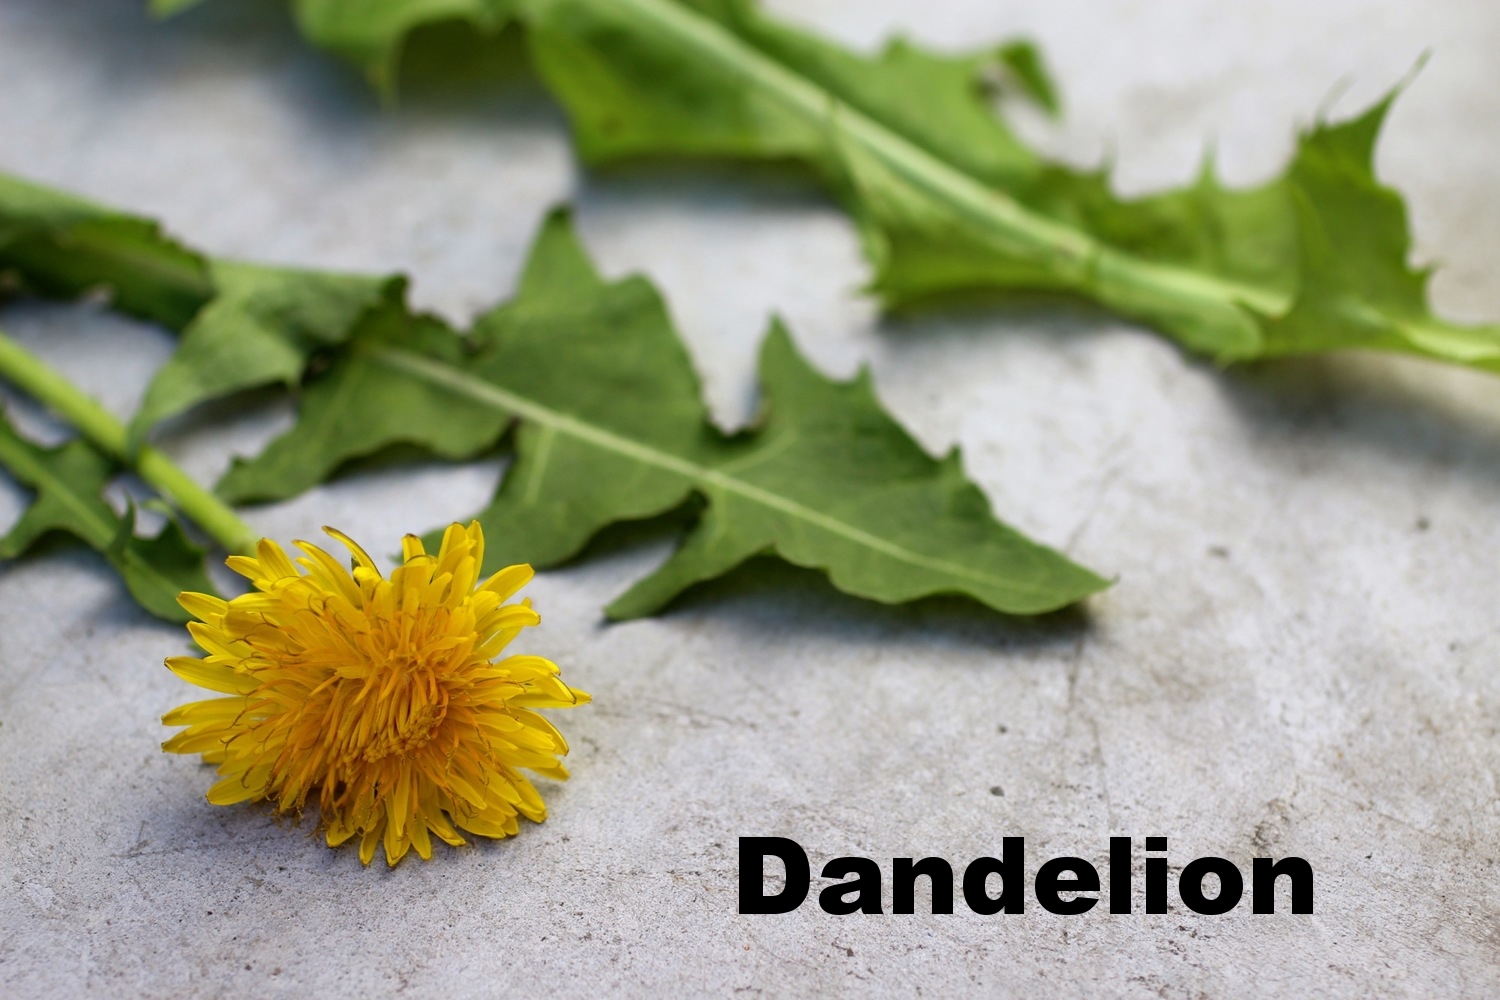
Ubiquitous snack: the humble dandelion
Sustainability: It's no secret that California is experiencing a massive drought. These wild plants require no water beyond what nature provides, are largely drought-resistant, and are abundant in urban environments. Additionally, if we can make it profitable for farms to harvest and sell their edible "weeds" rather than compost them, we'll increase farm efficiency. Finally, of course we also all have Armageddon in the back of our minds (or at least I do) and knowing about wild edible plants will set us up for success when the time comes!
Culture: When was the last time you picked your food from the ground? How did it taste? Did it give you a warm fuzzy feeling? Research indicates that even children who are reluctant to try vegetables will do so if they have a hand in harvesting them and foraging is no different. By knowing where our food comes from, we're helping get back to where we started, if even just a bit, which will result in improved quality of life.
Gastronomy: Let's face it, new, crazy ingredients are fun. Even if you don't want to "get wild" with wild foods personally, it's exciting to go to a restaurant and have them introduce you to a new, delicious, local plant, no?
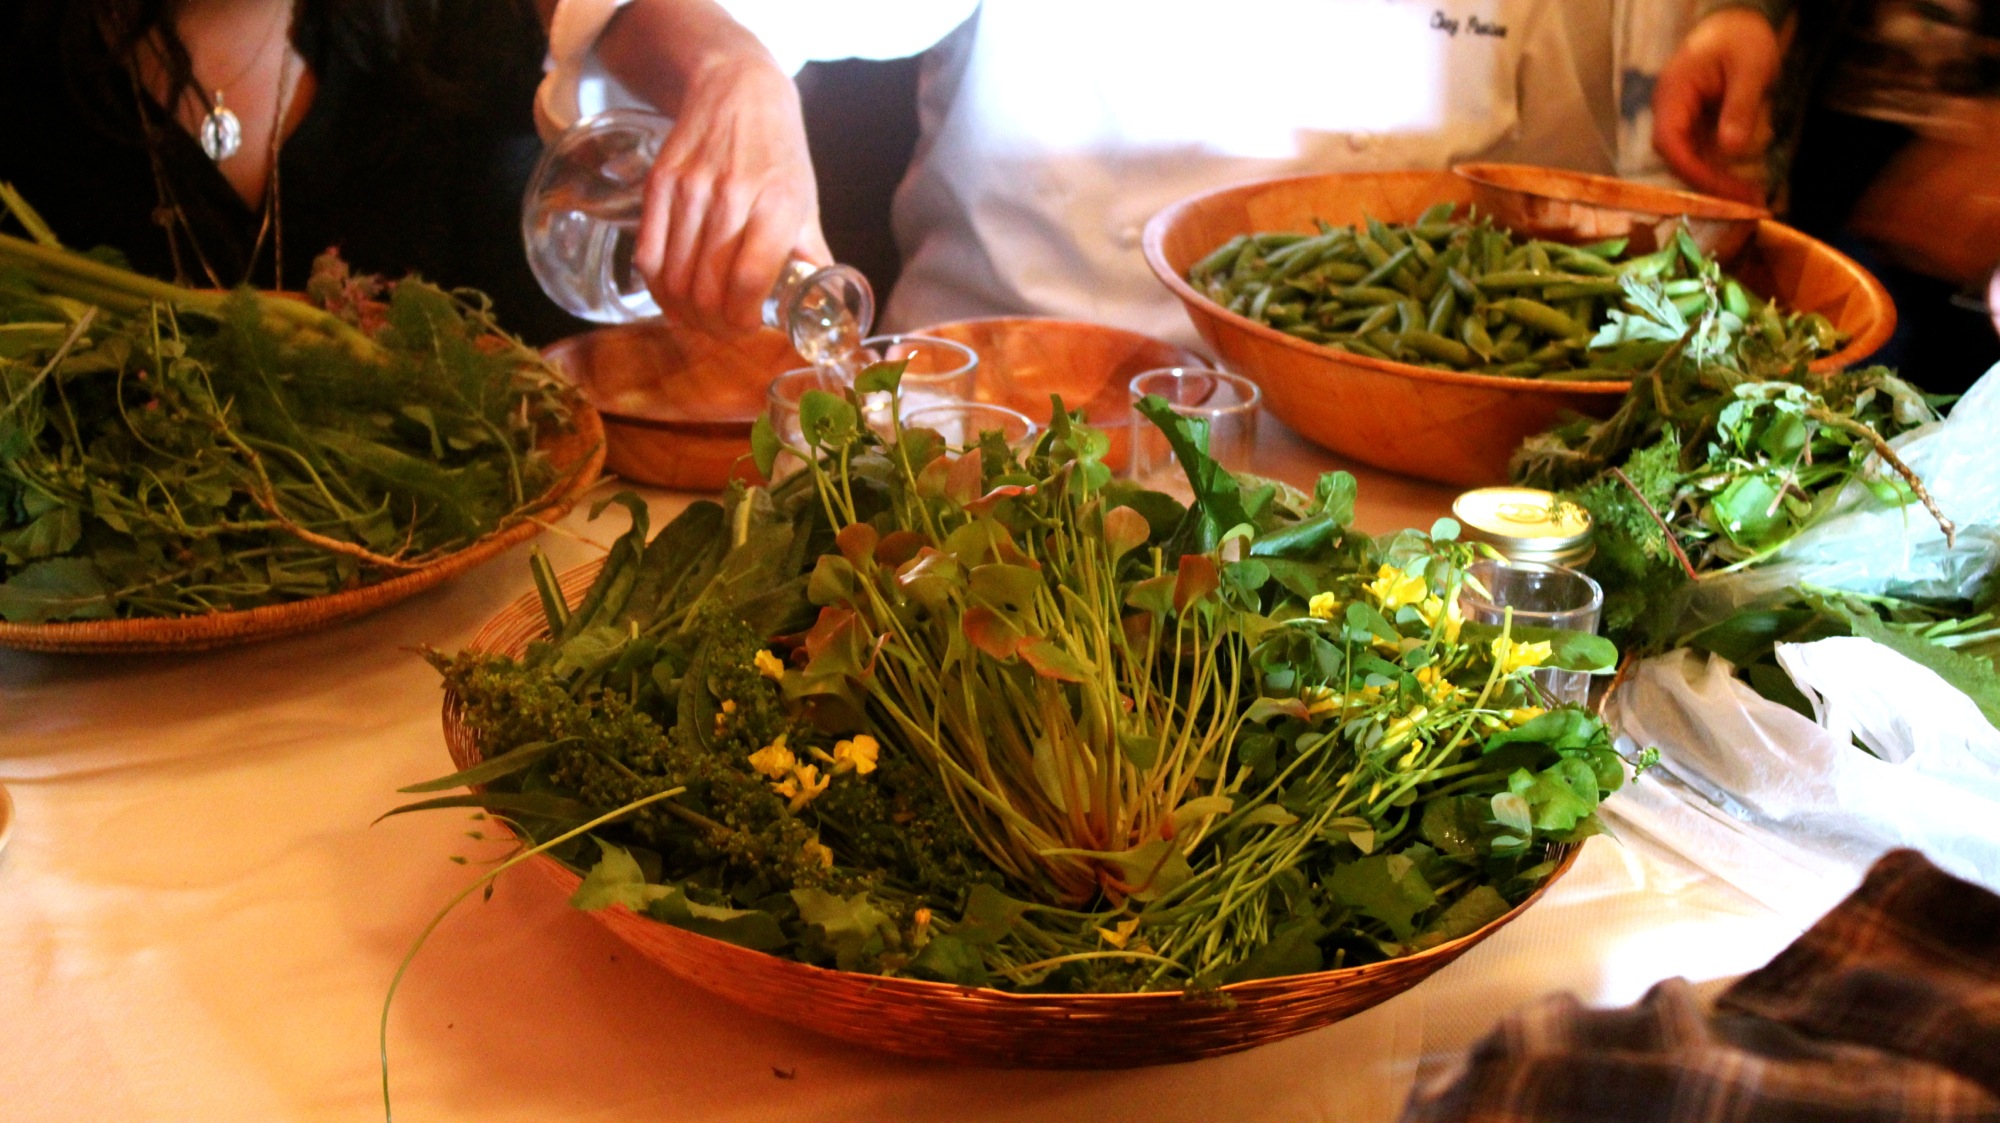
Gastronomy: Getting wild at the Chez Panisse tasting table with chefs from The Perennial/Mission Chinese Food, Mission: Heirloom, and (of course) Chez Panisse.
Tasting table notes.
So, the next question is - how do we get these tasty, nutritious, and abundant plants on people's plates? The answer is multi-faceted, exciting, and challenging. A few of the angles we're taking to tackle the issue include mapping wild edibles in "food deserts", investigating barriers to consumption (and identifying how to overcome these barriers), creating a supply chain and market for wild foods, and promoting consumption of wild edibles.
One project on BOSF's foraged plate now is Wild Food Week, which begins tomorrow (4/4) and runs through Friday 4/10. Our intention with Wild Food Week is to increase awareness of and interest in wild edibles with a series of events from a guided foragers’ walk to dinners at César, Chez Panisse, The Perennial/Mission Chinese Food, and Mission: Heirloom. We are working with several local farms to source the edible weeds and will debut a foraging field guide called The Bay Area Baker’s Dozen Wild Greens. See event details here.
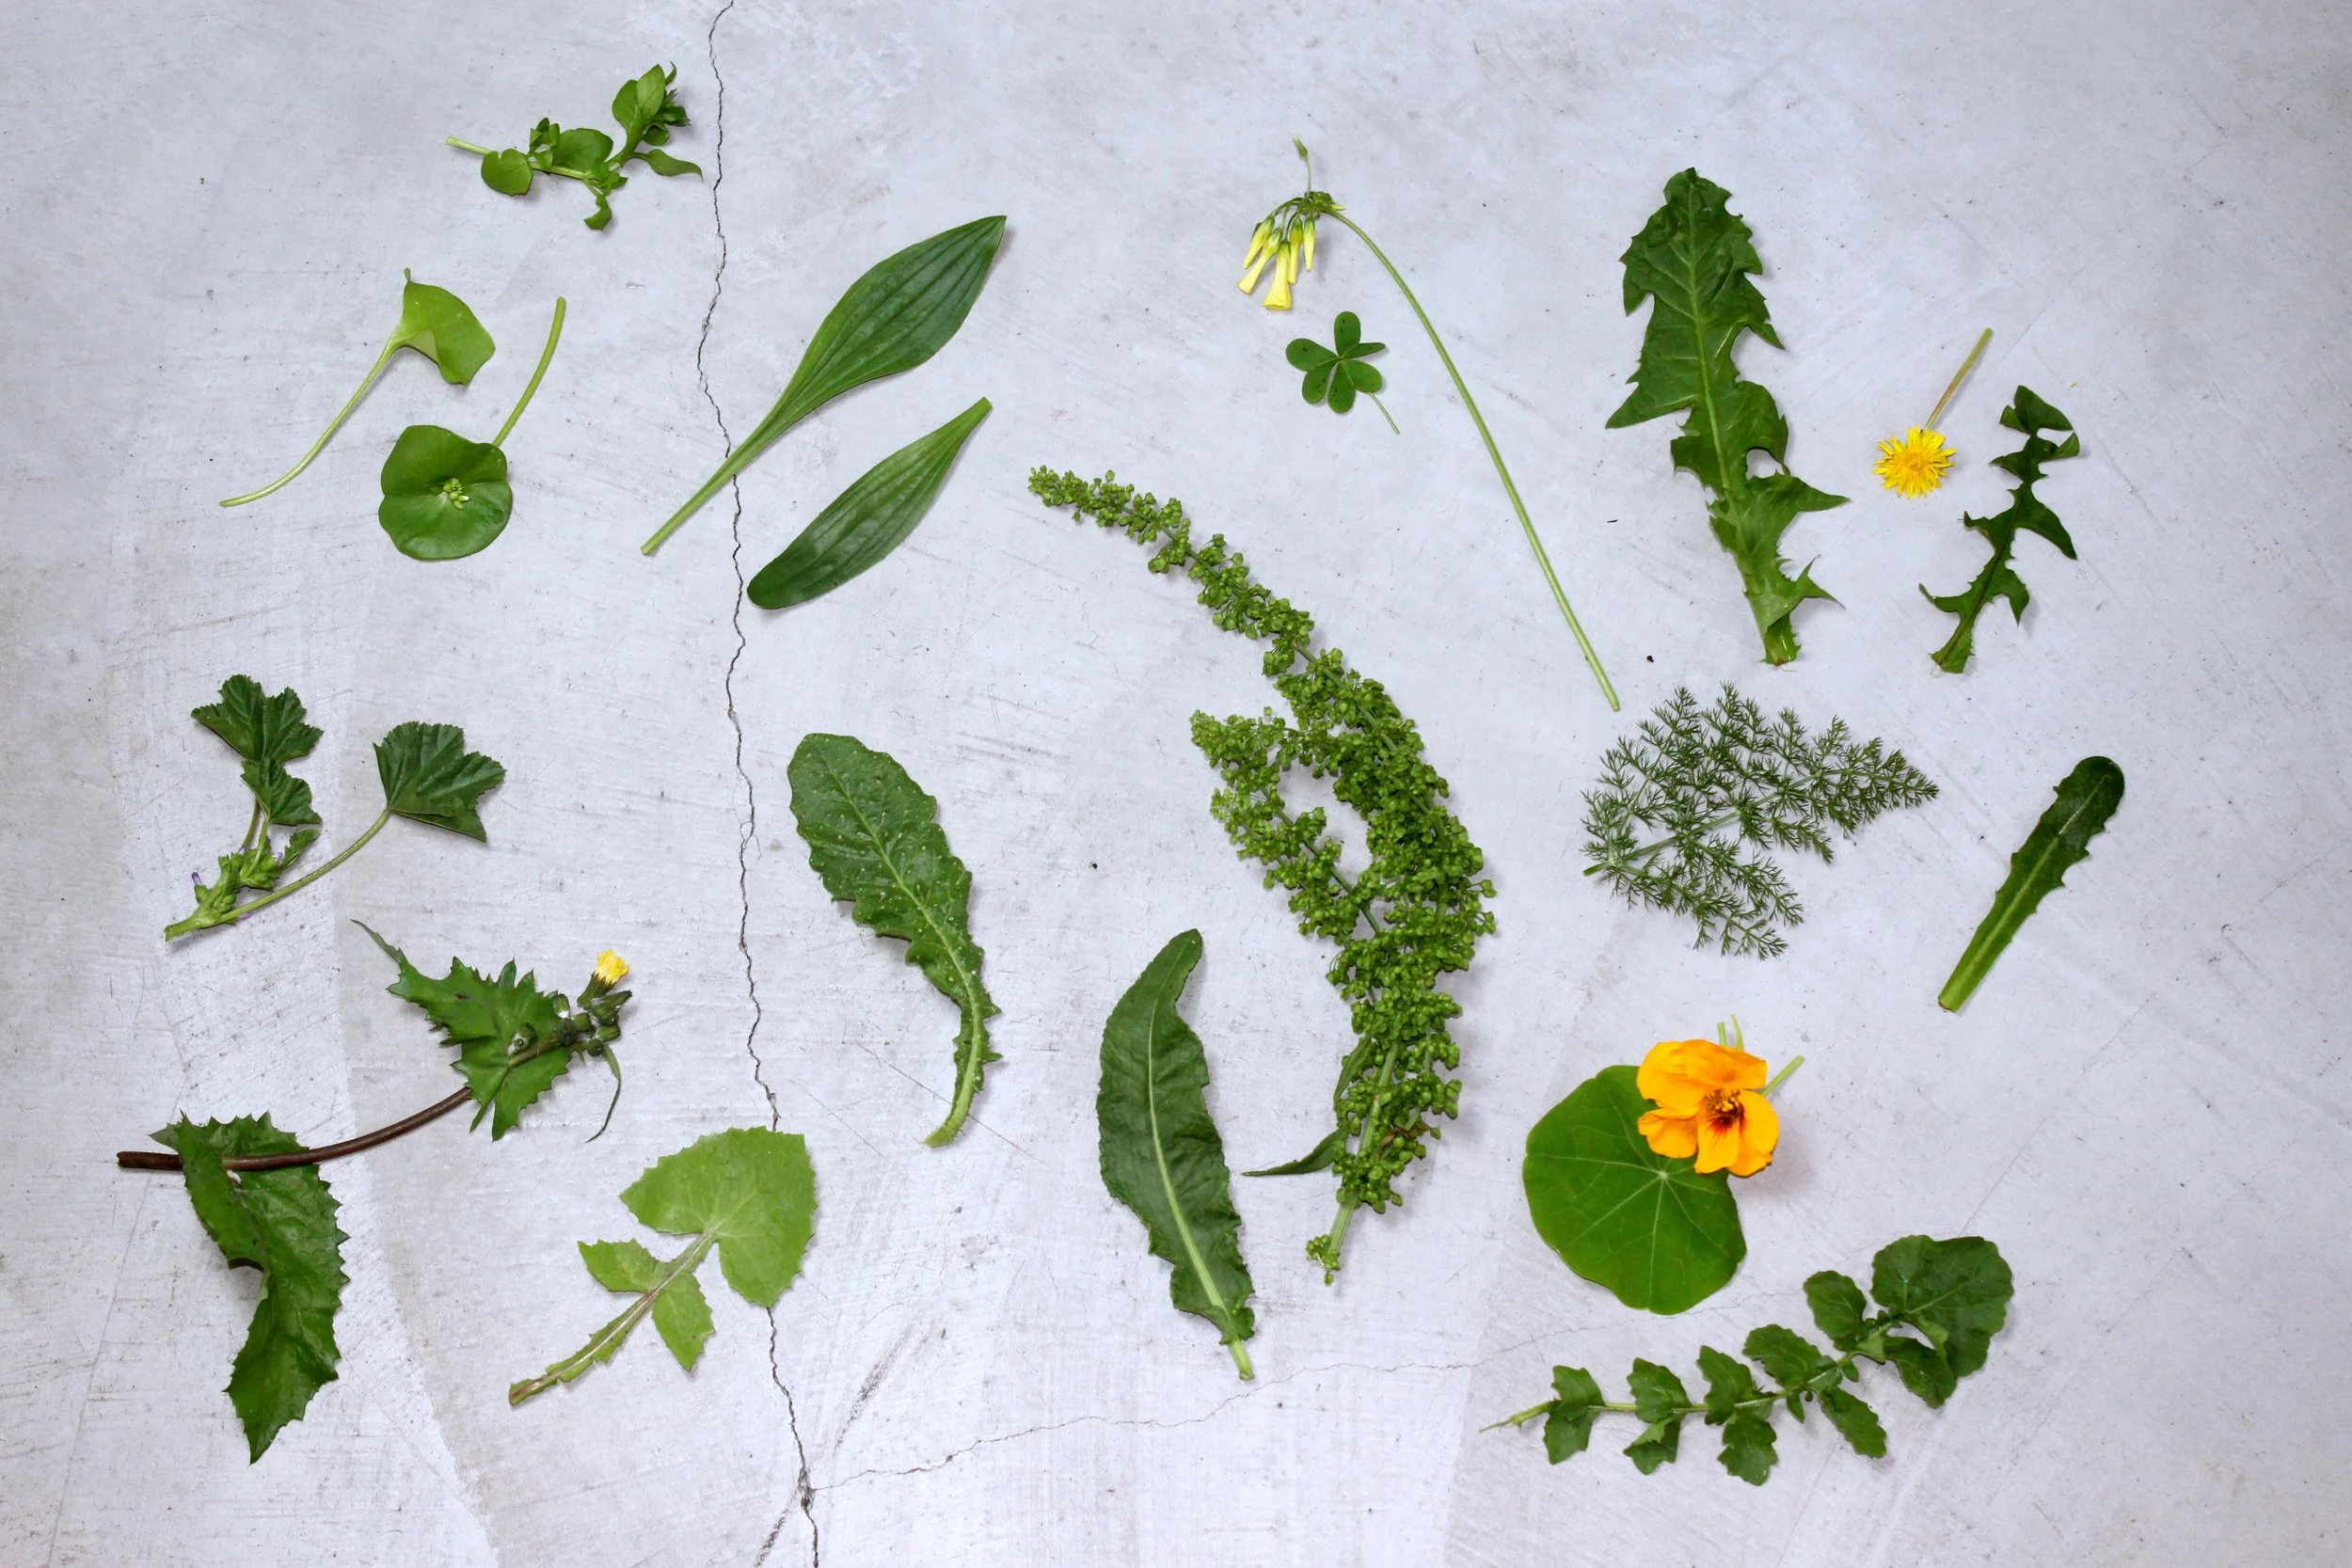
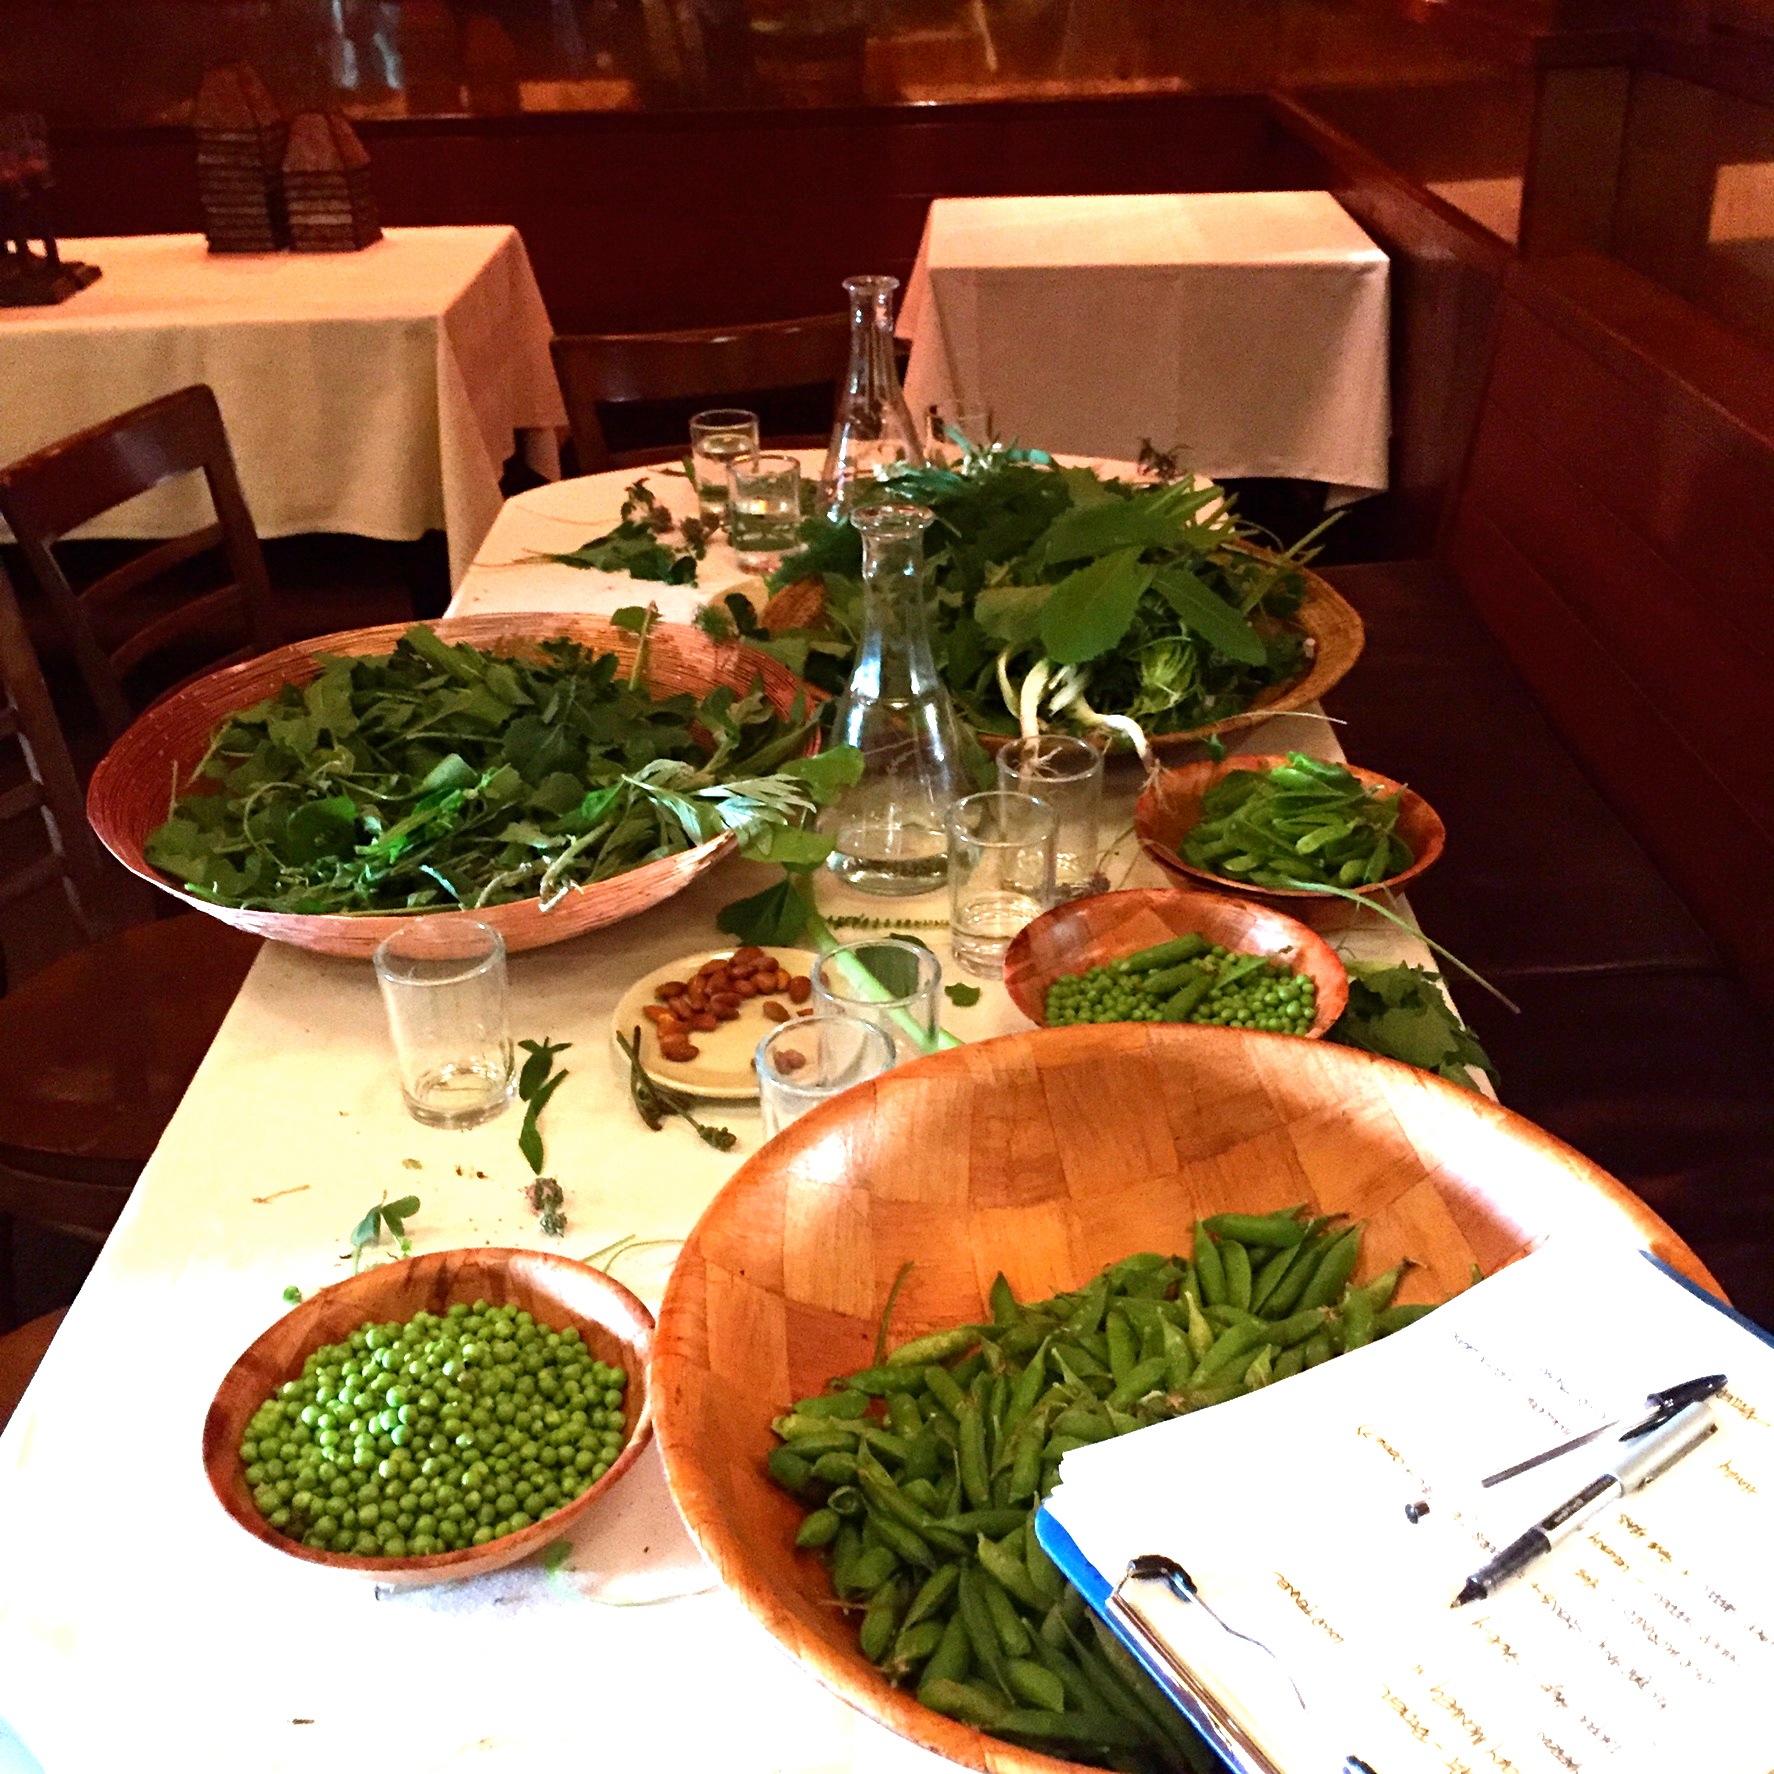
It's been an exciting and eye-opening journey with many unique challenges. I look forward to telling you more about these challenges as well as a debrief on the events and our successes. For now, here's a sneak peak of the top 13 most common wild edibles in the Bay Area that we've included in the Bay Area Baker's Dozen Wild Edibles field guide. If you donate $15 or more to Berkeley Open Source Food, we'll mail you a field guide of your very own! Just be sure to mention this in the "additional details about my support" section. Donate here.


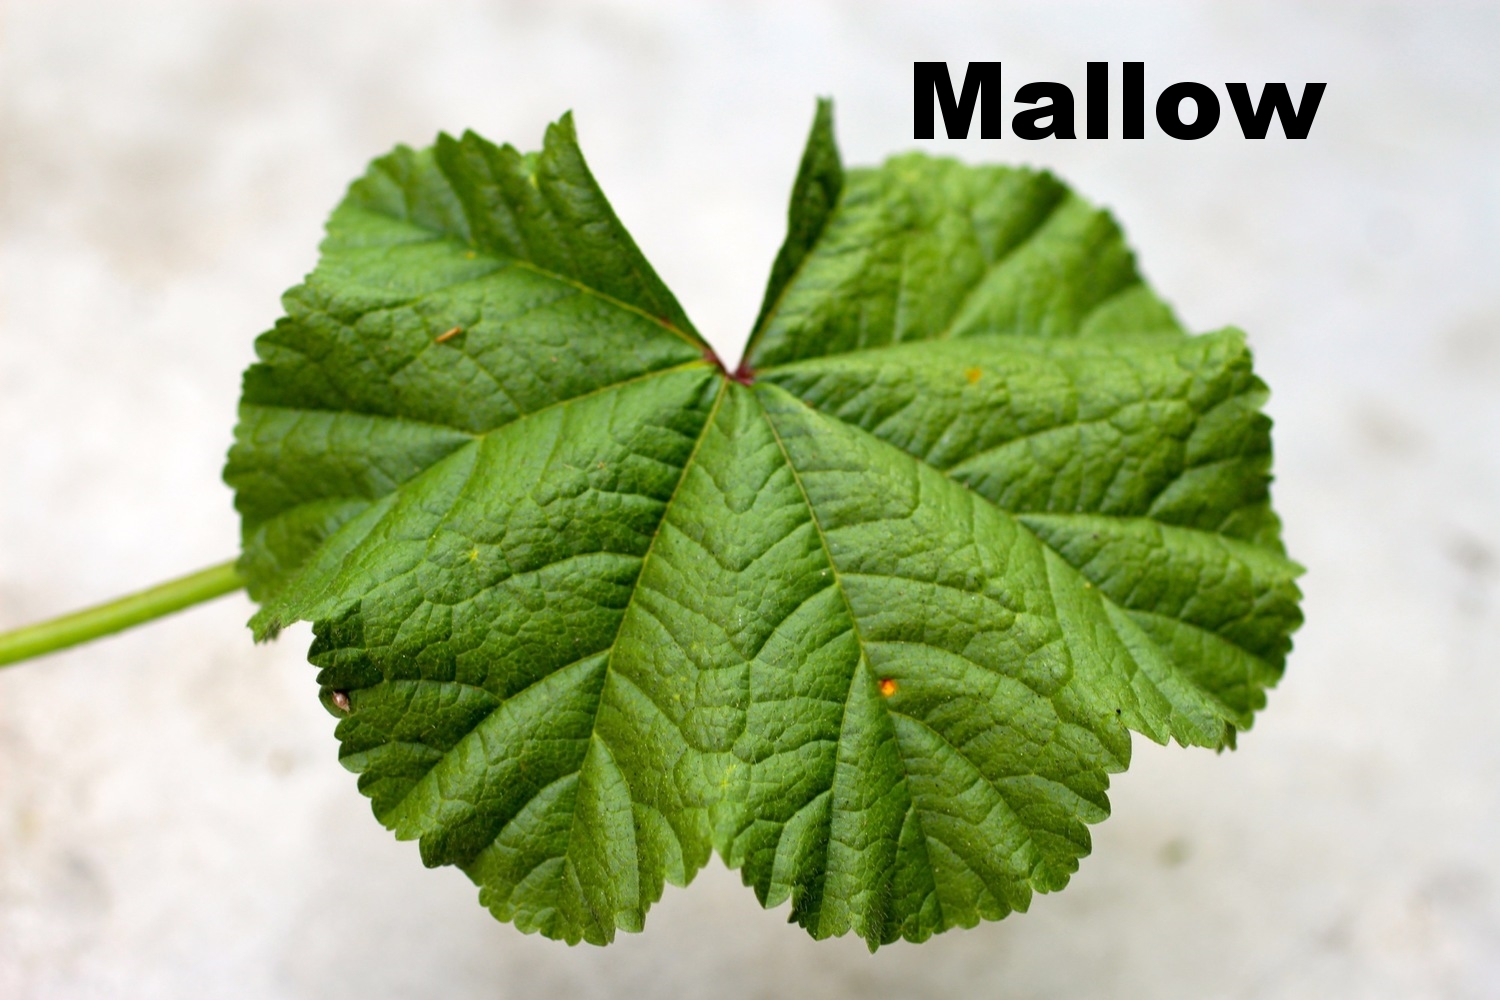
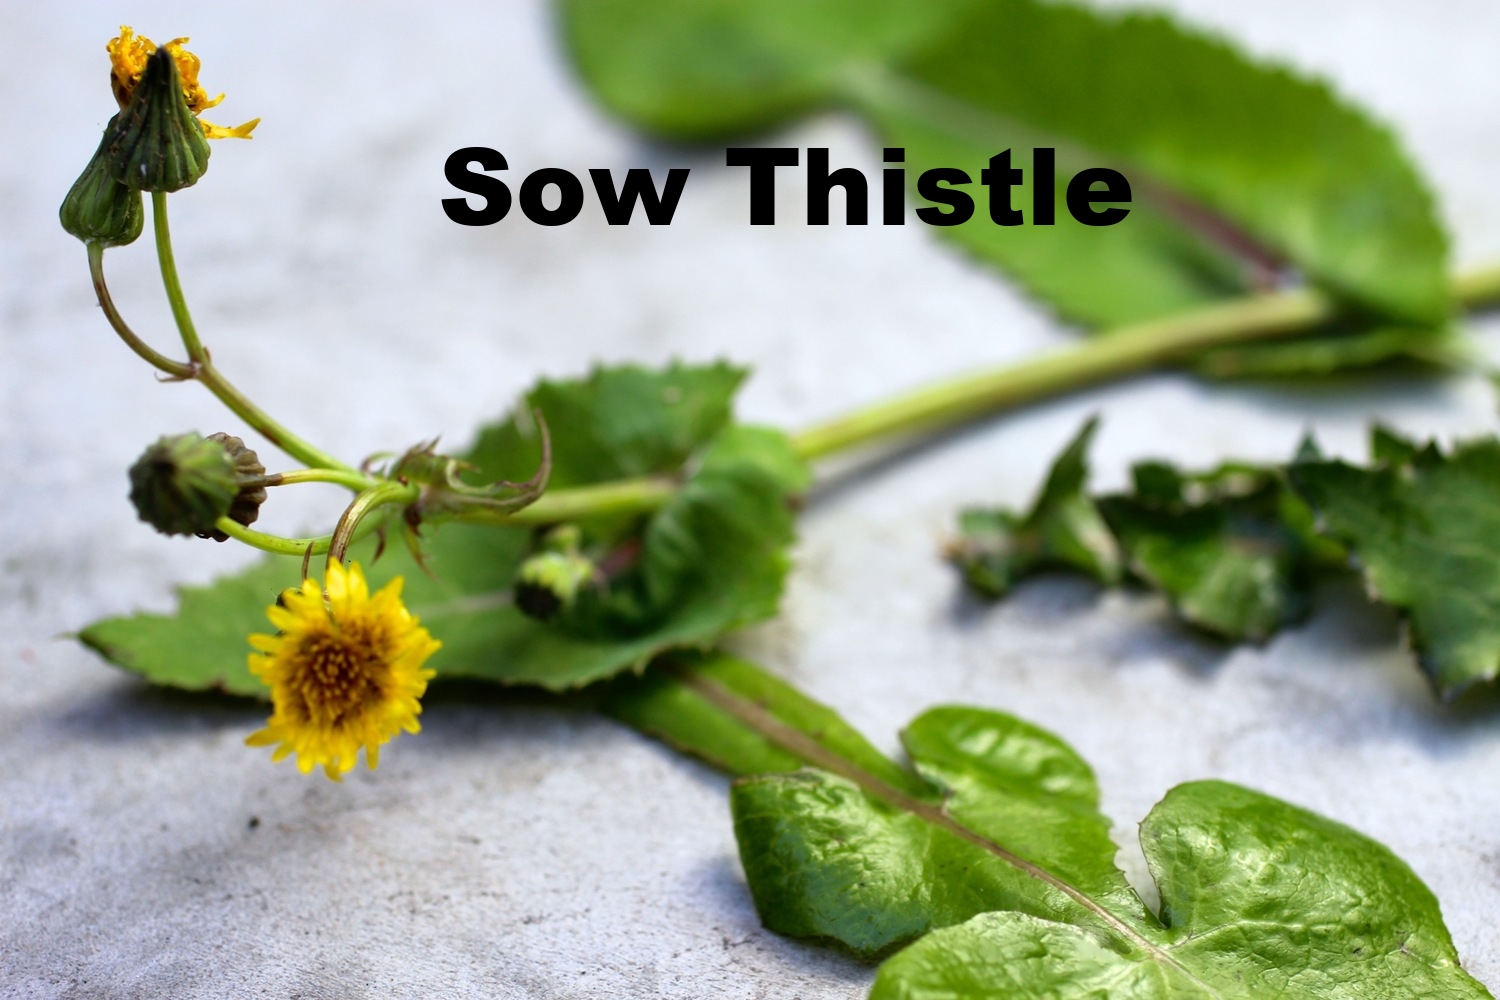
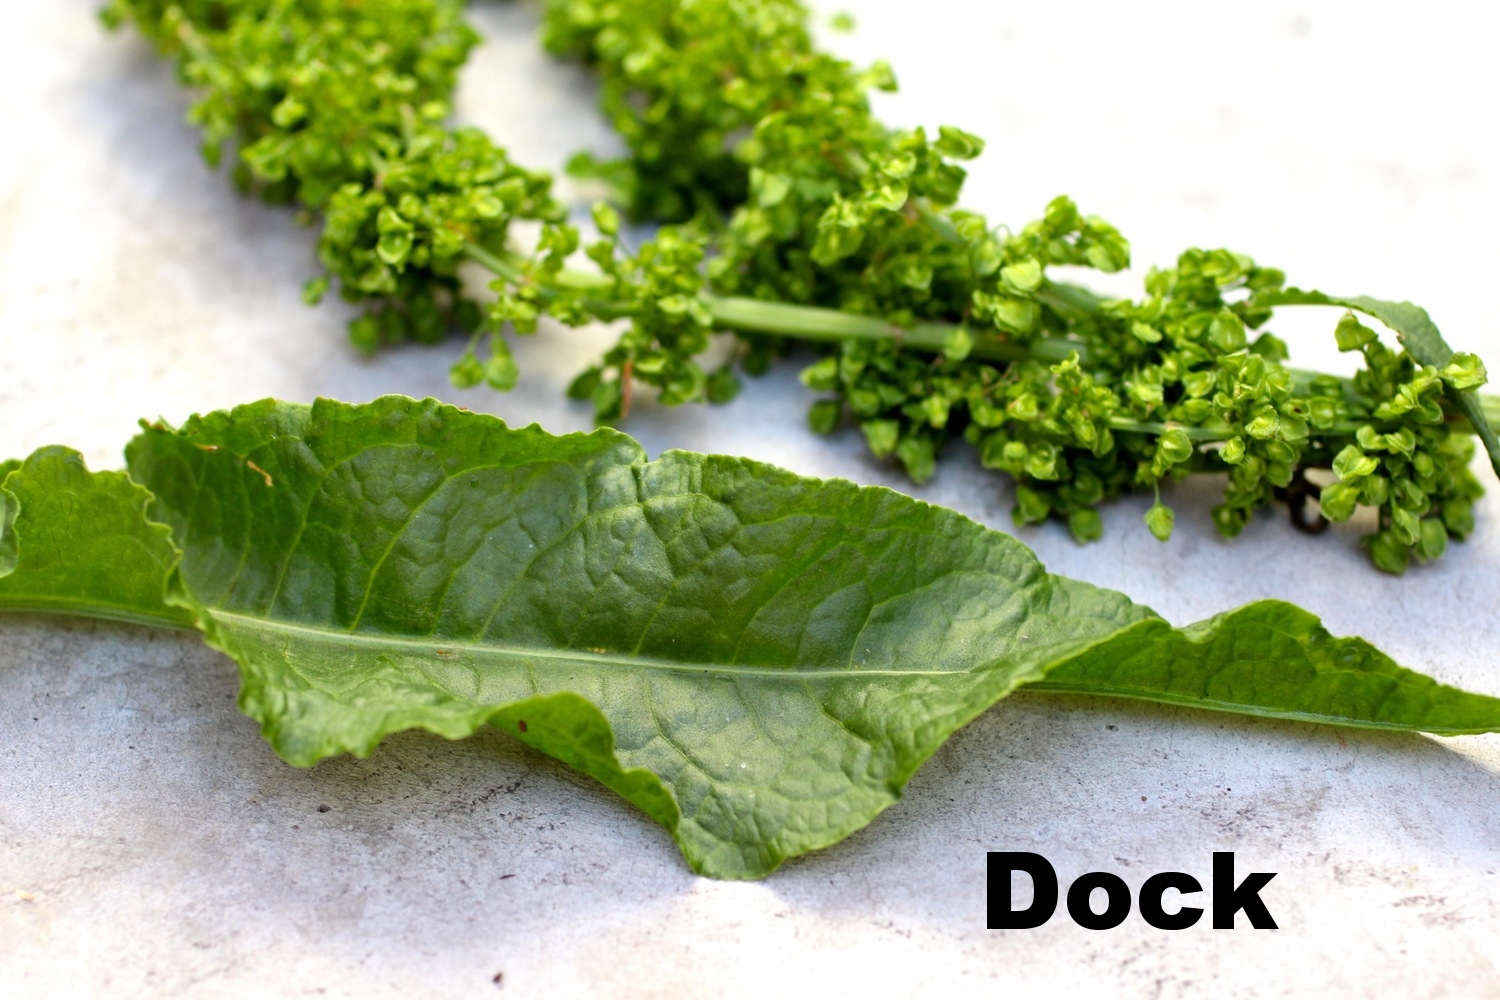
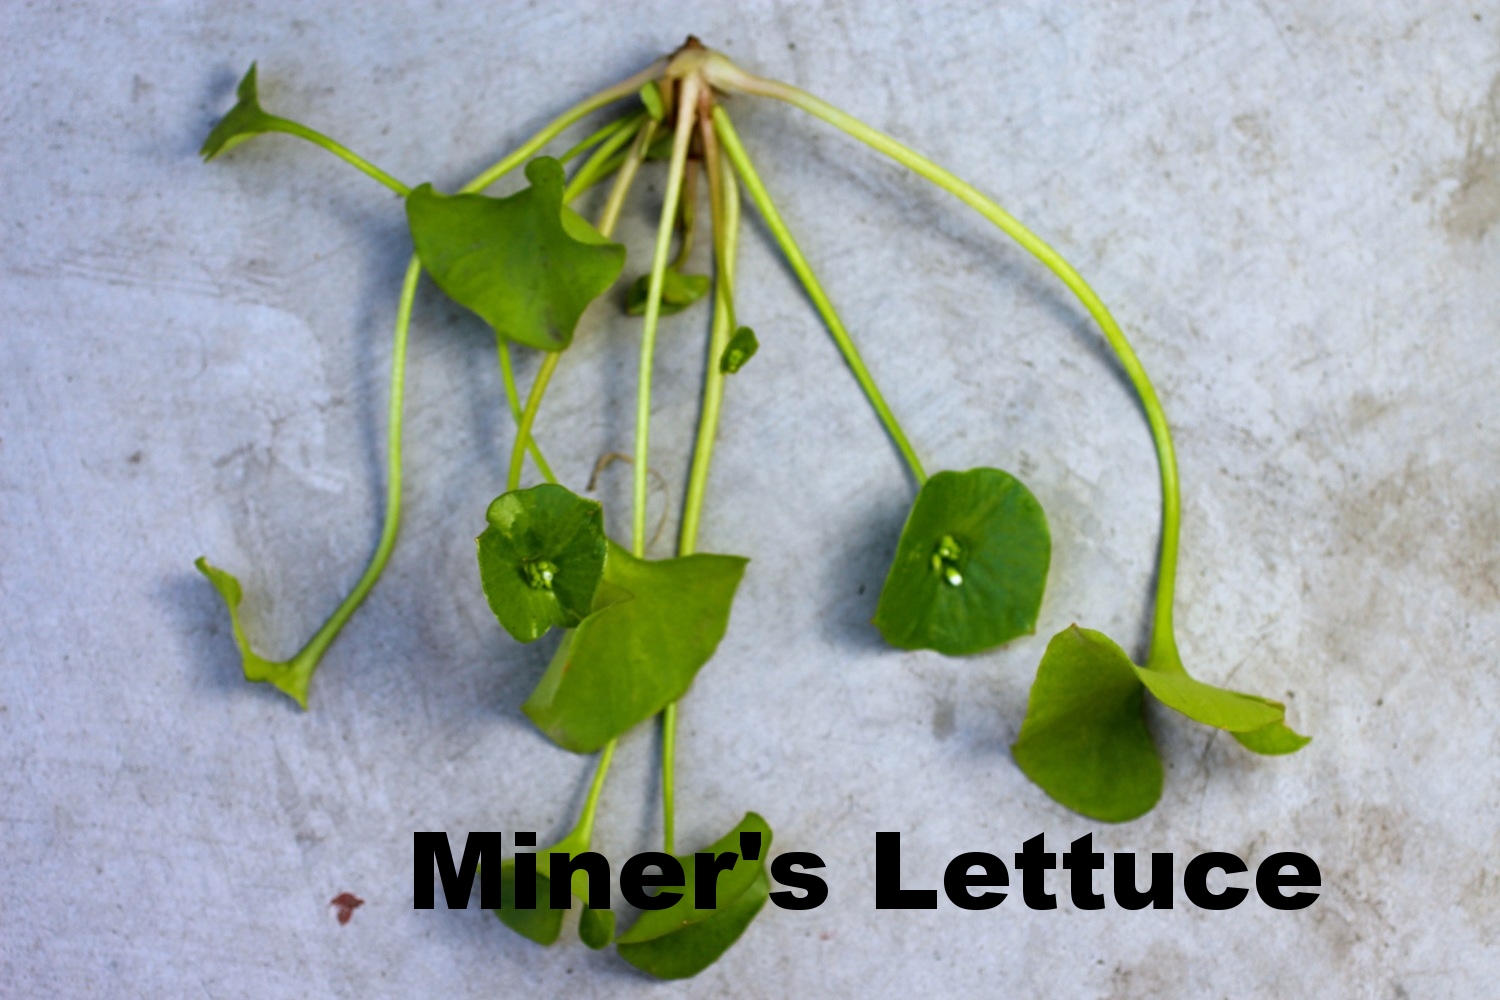

Here's an idea of what the field guide looks like - donate at least $15 to Berkeley Open Source Food and we'll send you one!
We've had a lot of press for this event - check it out!
http://www.eastbayexpress.com/WhatTheFork/archives/2015/03/31/slinging-weeds-wild-food-week
http://us7.campaign-archive2.com/?u=5da7f13757629775a7e122725&id=0b39e78e13&e=d87ccf06ab
http://www.citylab.com/work/2015/04/how-do-you-convince-people-to-eat-weeds/389357/
http://missionlocal.org/2015/04/for-wild-food-week-weeds-for-dinner/
http://www.nbcbayarea.com/news/local/Wild-Food-Week-298812881.html
References:
Gibbons, E., 1962. Stalking the Wild Asparagus, David McKay Co., Inc., NY, 303pp.
Robinson, J. “Breeding the Nutrition Out of Our Food”. The New York Times, 2013.
Craig, W. “Phytochemicals: Guardians of our health.” J Am Diet Assoc. 1997;97:199-204.
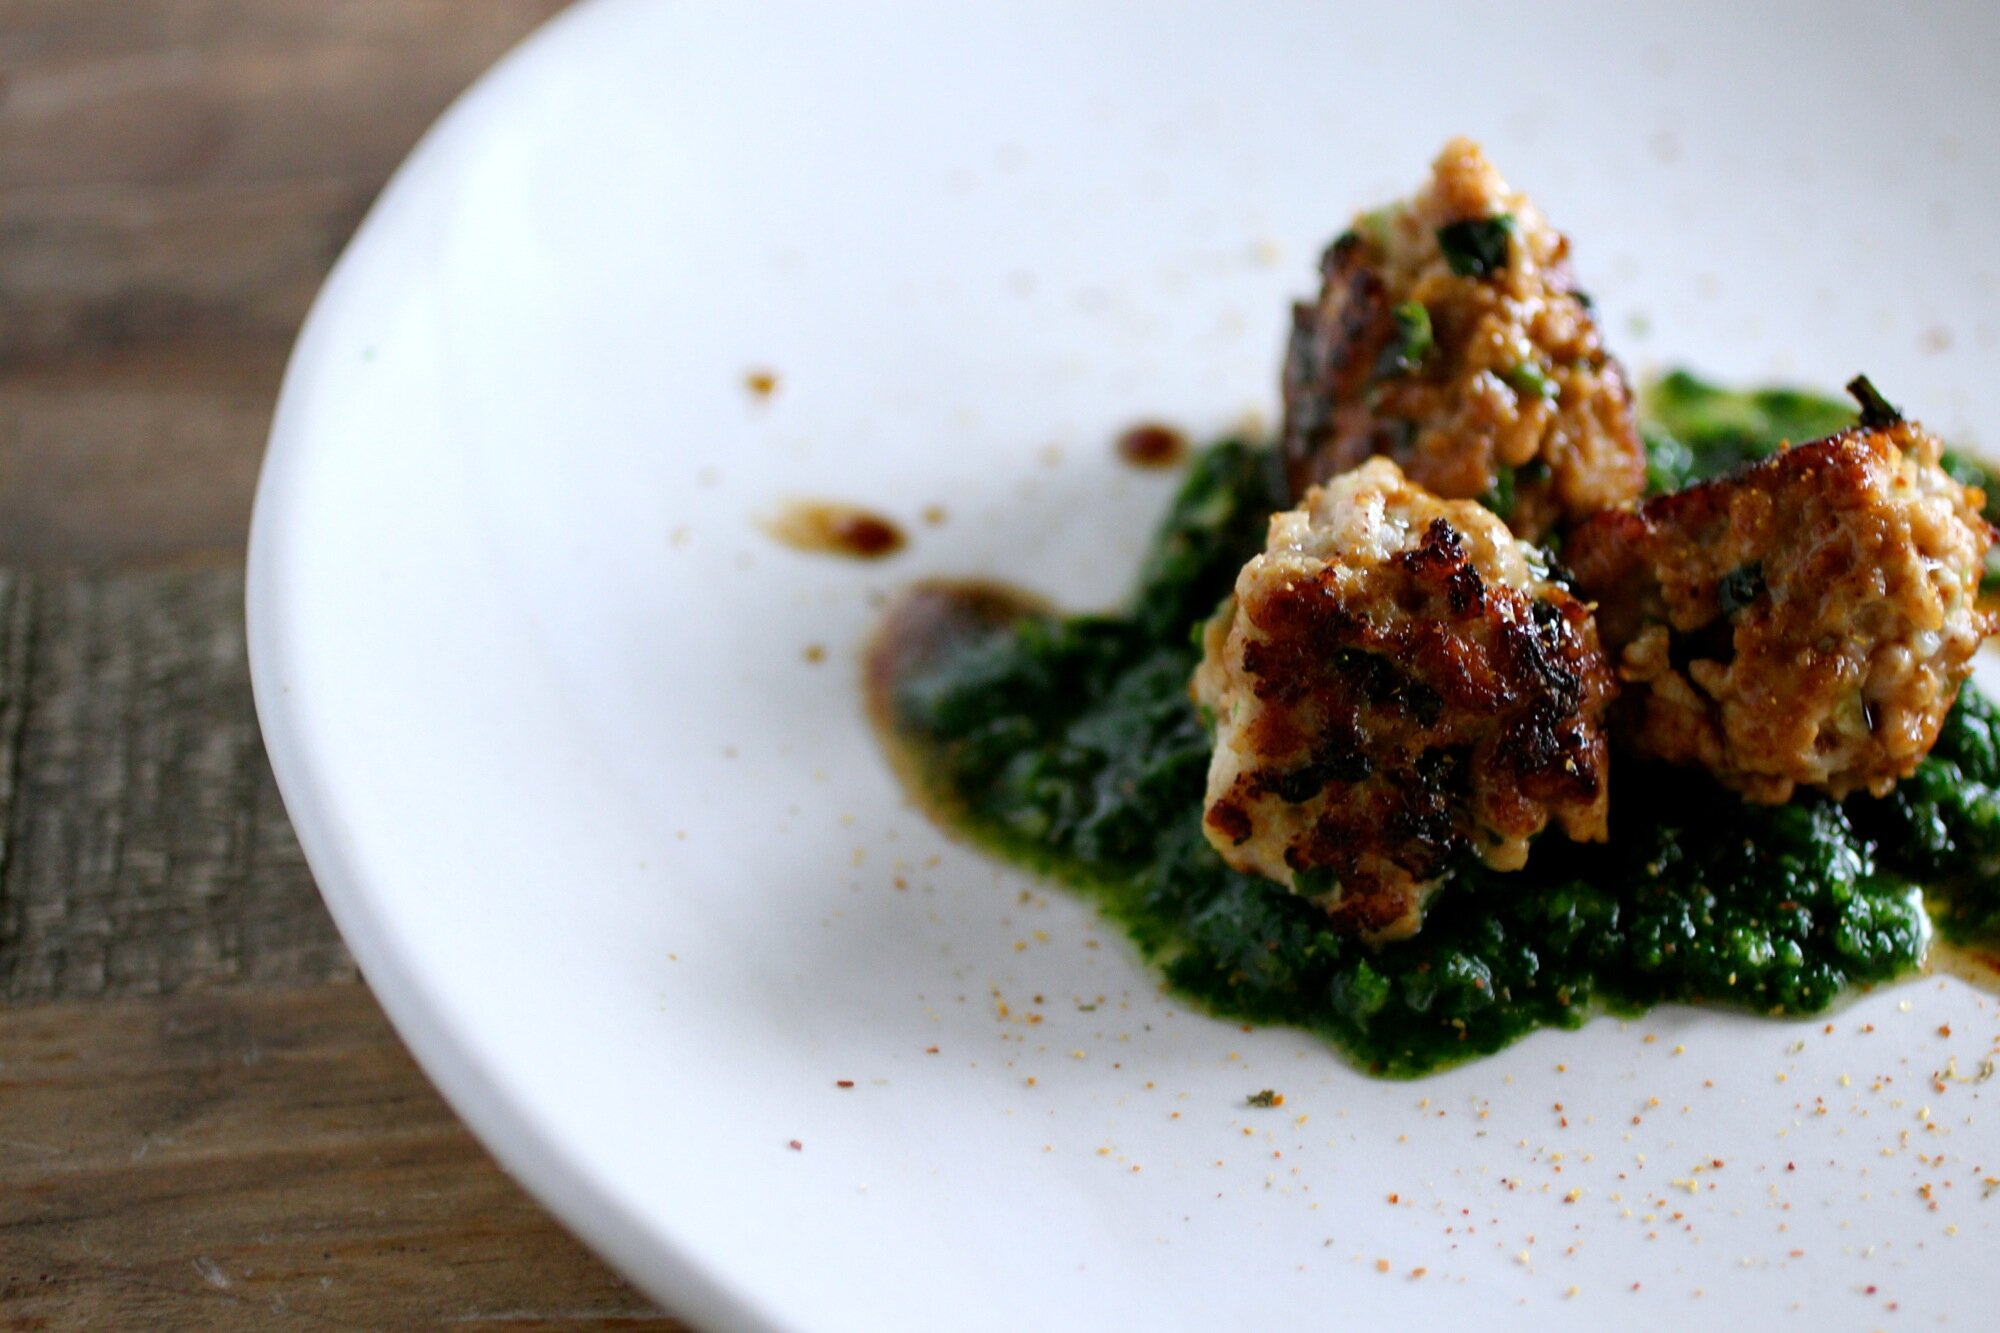
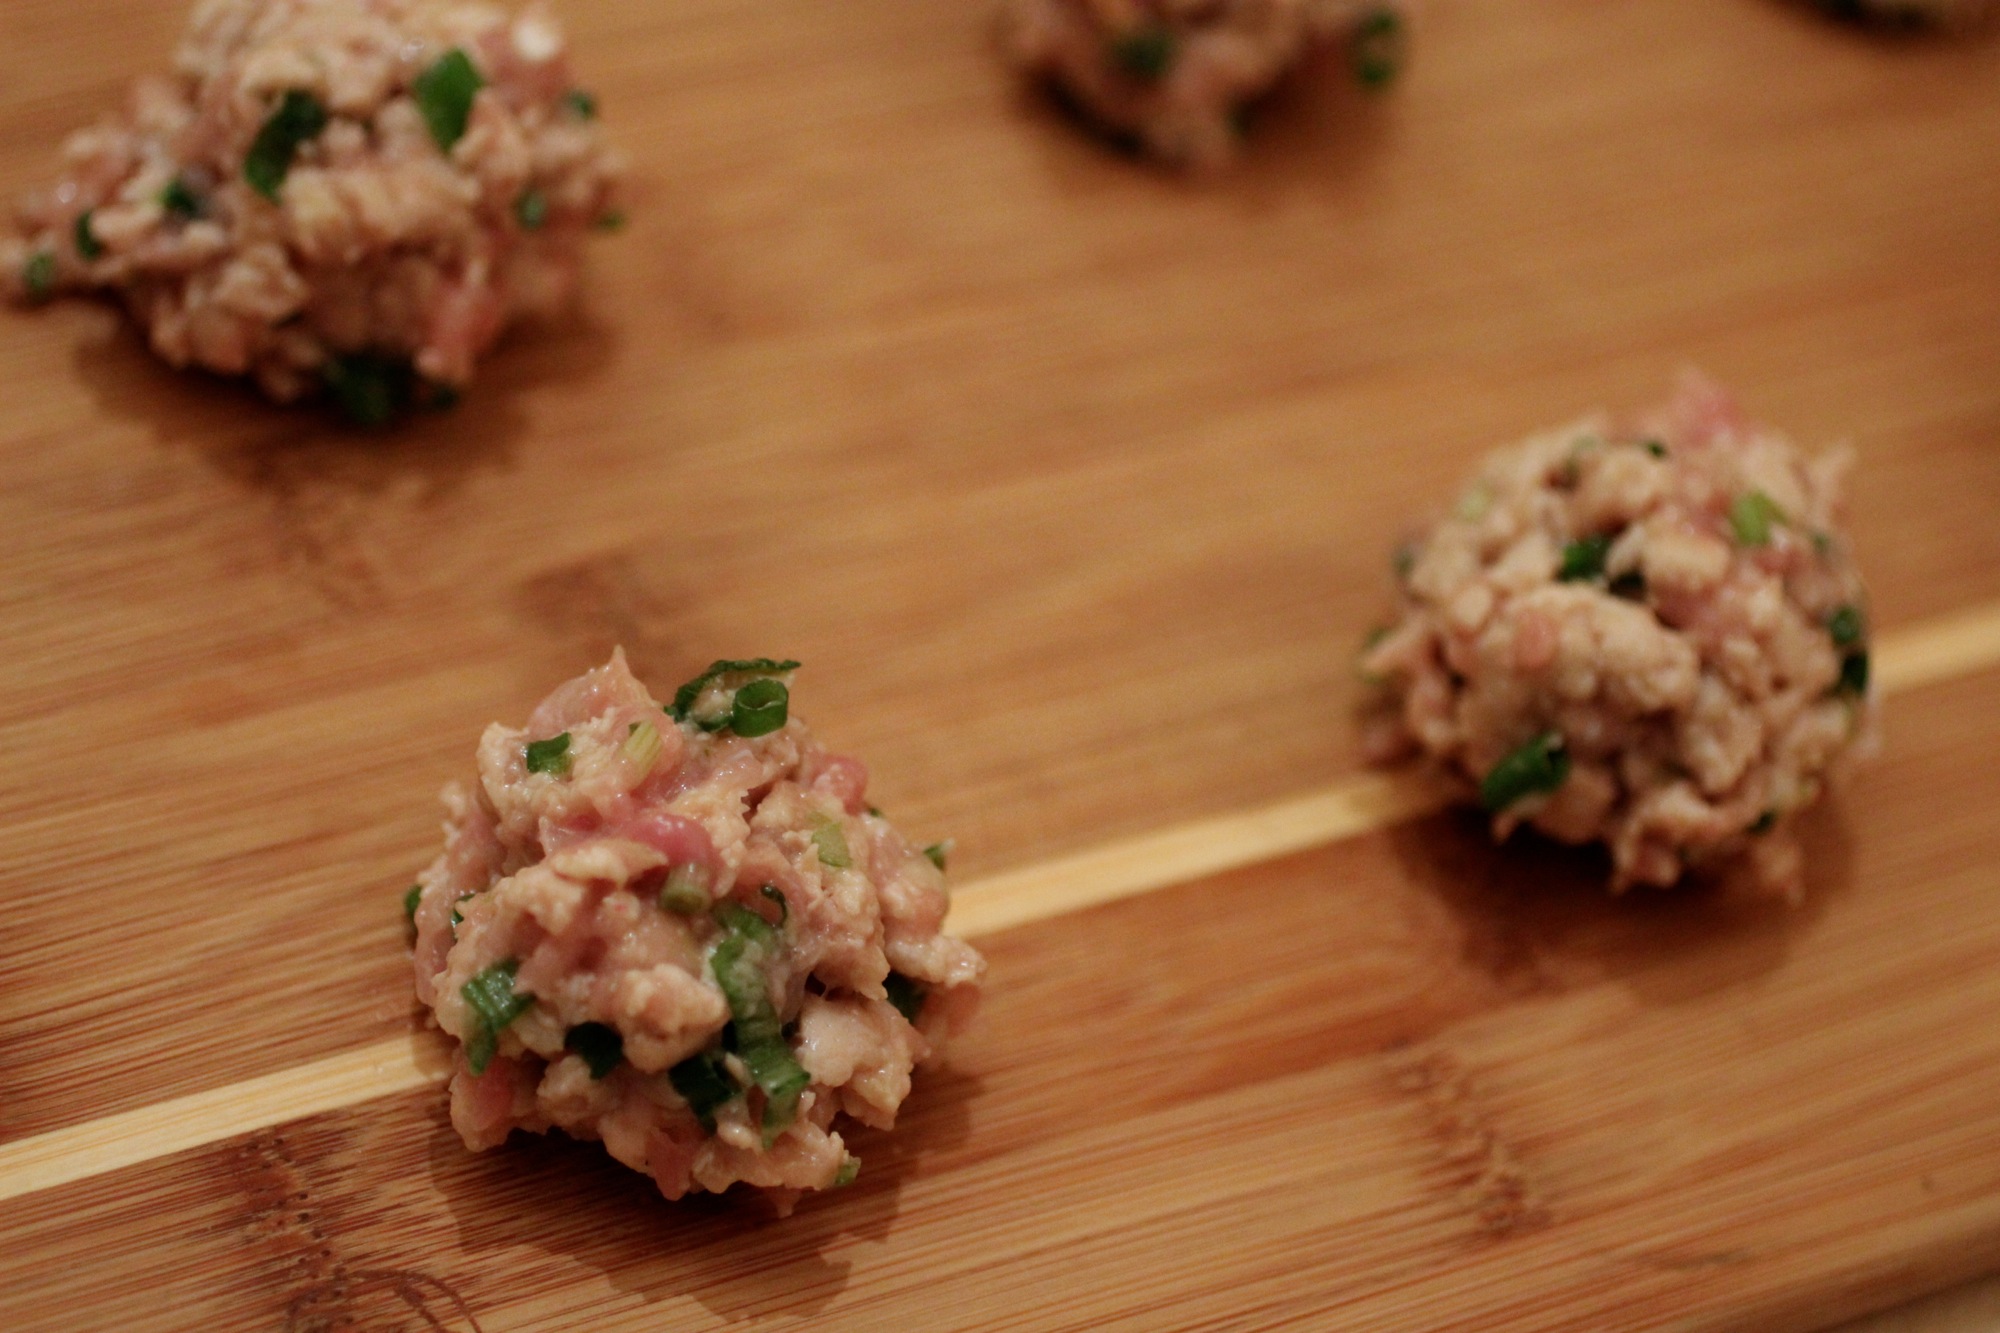
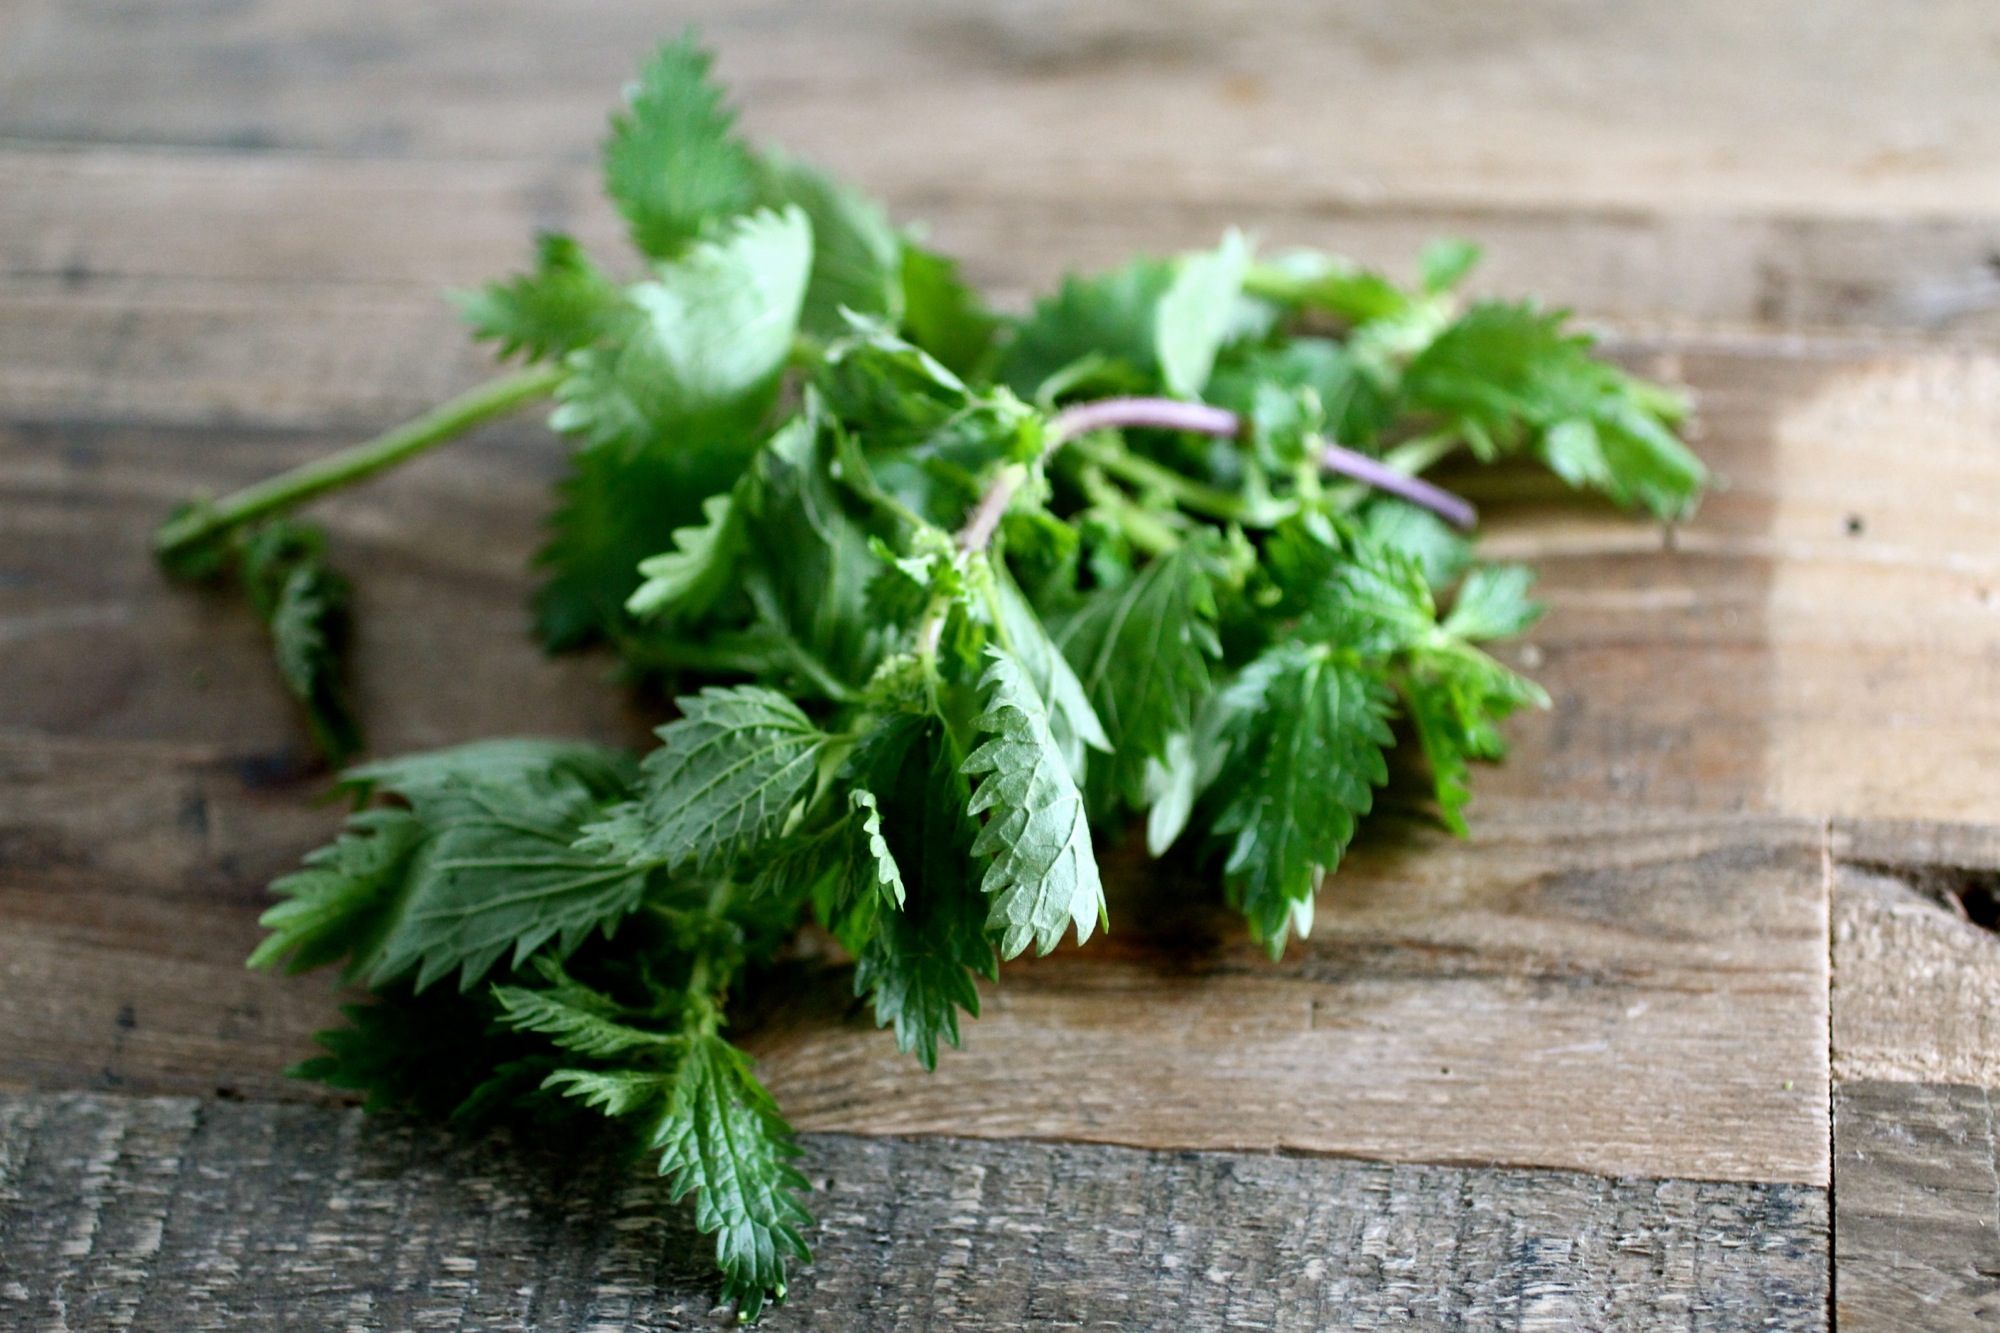
Tsukune (Chicken Miso Meatballs) with Nettle Salsa Verde
Izakaya meets foraged greens.

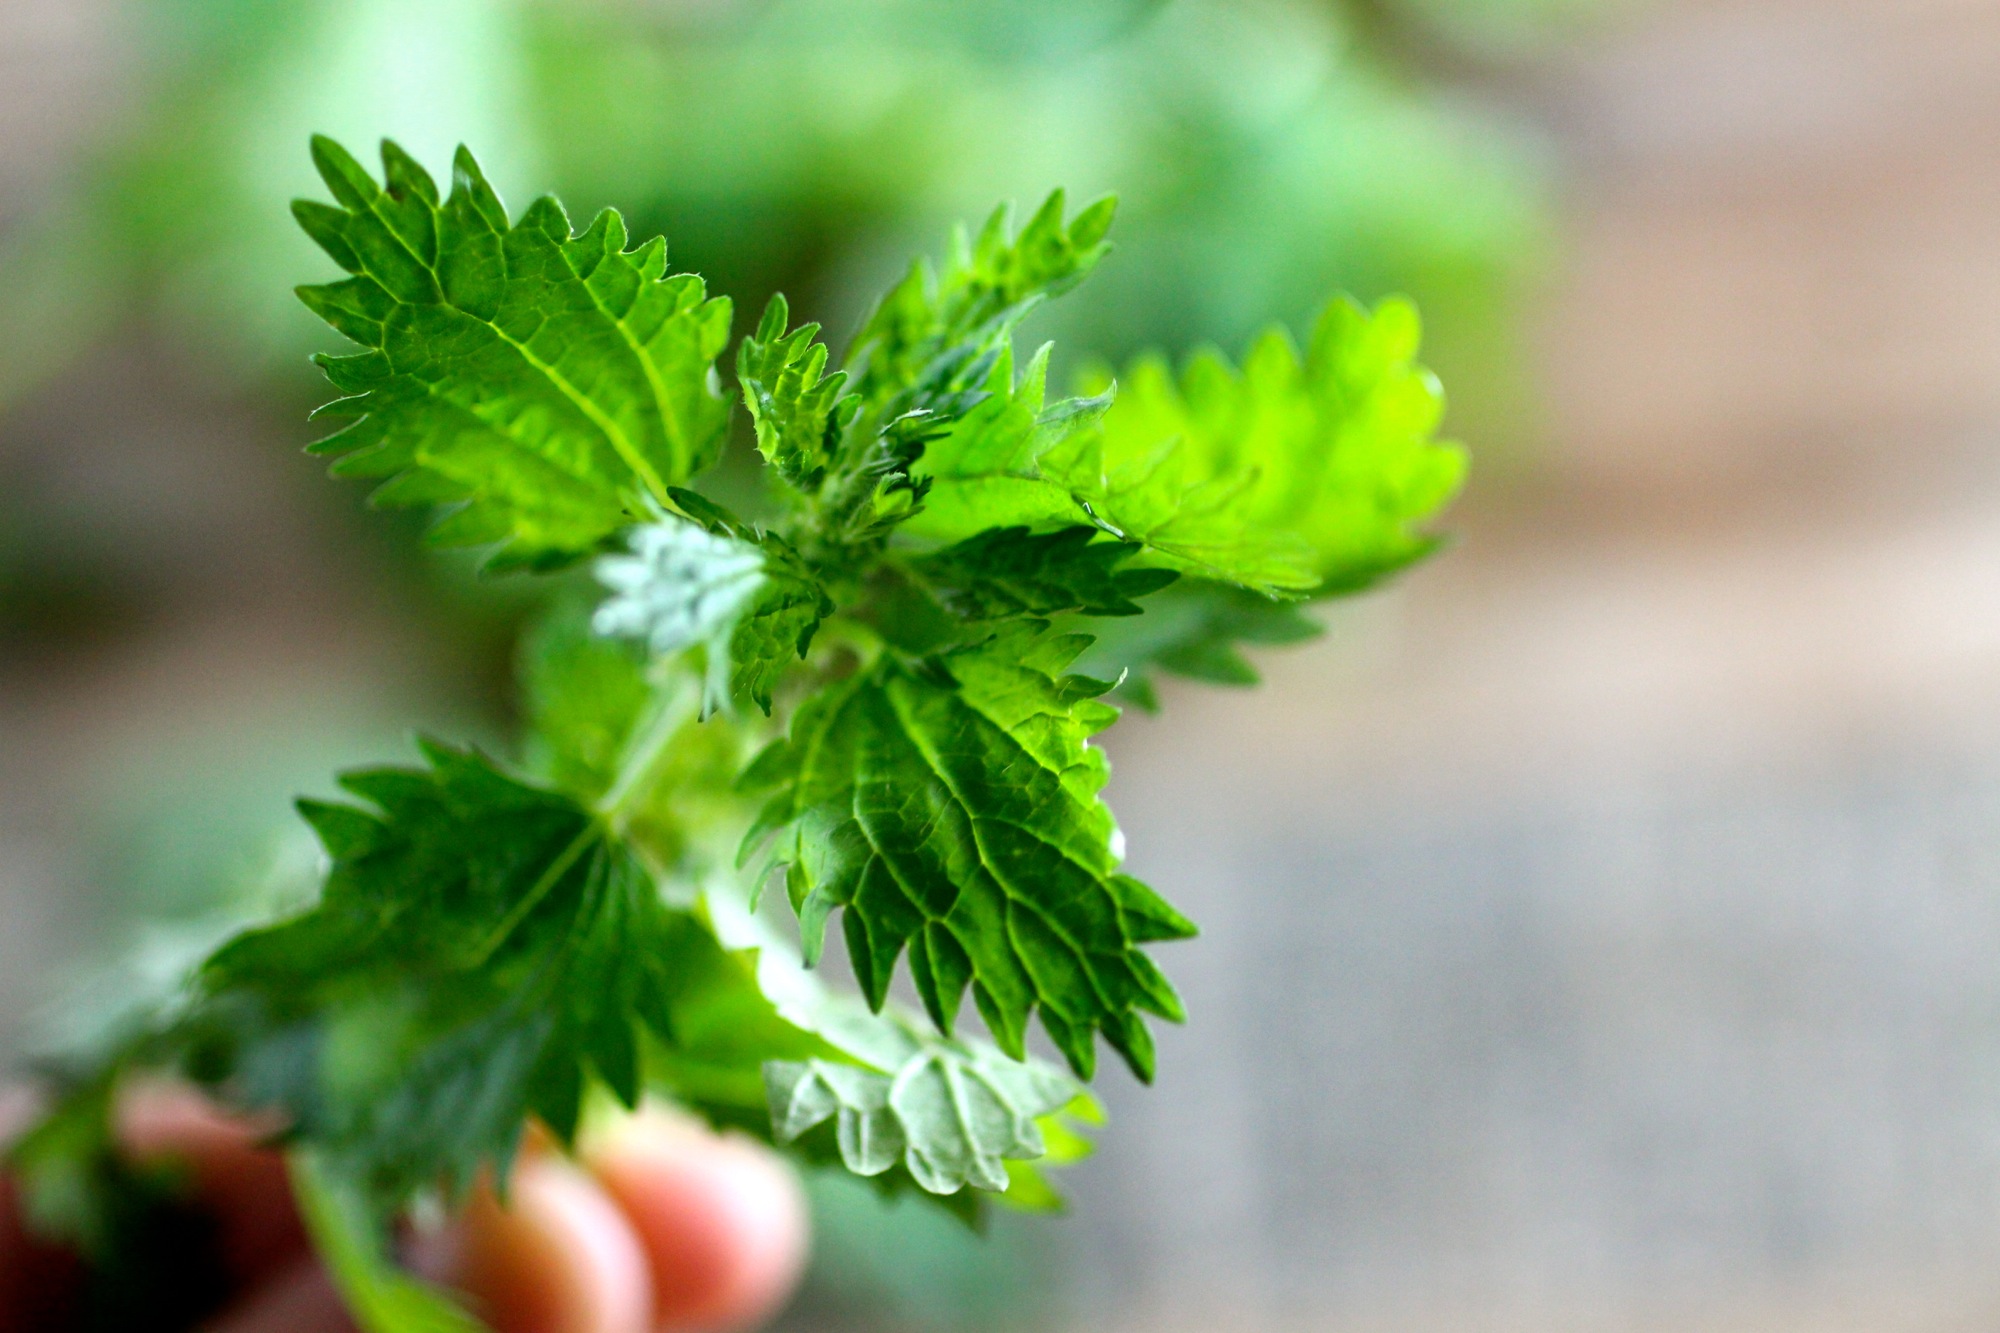
When I have (what I think to be) a unique recipe idea and then find that idea somewhere on the internet, it makes me both happy and sad - happy that the idea is good enough to already be out there and sad that it's already out there. Fortunately, I typically adjust the ingredients enough and add an unusual accompaniment, such as this foraged nettle salsa verde, to make the recipe all my own. The nettle was a volunteer in my snap pea patch and works great as a bright, yet earthy, pairing to the light-bodied and savory tsukune. Remember to be careful when foraging or harvesting stinging nettle - it stays true to its name! Tsukune recipe adapted from here. Serves 4-6.
1 bunch stinging nettles, about 2 cups packed leaves after blanching
1 shallot, chopped
1 clove garlic, chopped
About 1/4 teaspoon sea salt
2-3 tablespoons rice vinegar
1 tablespoon water
1.5 pounds ground chicken, preferably dark meat, divided
1 cup minced scallions (about 4)
1.5 tablespoons white miso
1 tablespoon soy sauce
1 tablespoon brown sugar
1 tablespoon sesame oil
About 1 tablespoon grapeseed or other neutral oil
Shichimi tōgarashi, for garnish
Bring a large pot of water deep enough to submerge the nettles to a boil. Submerge the nettles and cook for 3 minutes.
While nettles are cooking, prepare an ice water bath. Transfer the nettles using tongs to the ice water, cool, then drain and squeeze out excess water. Remove very large or tough stems from the nettles, discard, and blend the remaining leaves and smaller stems in food processor until chopped. Add shallot, garlic, and salt and pulse then incorporate vinegar and water until a texture resembles a coarse salsa. Set aside or refrigerate if preparing more than one hour before making meatballs (can be made up to 24 hours in advance).
Heat a small nonstick skillet over medium heat. Add 1 pound ground chicken and cook, stirring frequently breaking apart pieces, until chicken is opaque and just cooked through, about 2 minutes.
Combine cooked chicken, remaining raw chicken, scallions, and miso in a bowl. Mix together with your hands until a homogenized, sticky mixture forms. Divide mixture into 16-20 meatballs of the same size. Whisk together soy sauce, brown sugar, and sesame oil and keep nearby for use in the next step. If your salsa verde is in the refrigerator, this would be a good time to bring it out to allow it to come to room temperature.
Heat enough grapeseed oil in a large sauté pan to lightly coat pan on medium high. Add meatballs and cook on one side for 2-3 minutes until lightly browned. Drizzle half of soy mixture over meatballs then flip, turn down heat and cook another 2-3 minutes, turning occasionally so that all sides are well-cooked.
Serve meatballs over nettle salsa verde with a drizzle of the remaining soy mixture and sprinkling of shichimi tōgarashi.

Ashes to Ashes cocktail
A delicious way to ease into a meal that is lightly boozy without being boring or too sweet.

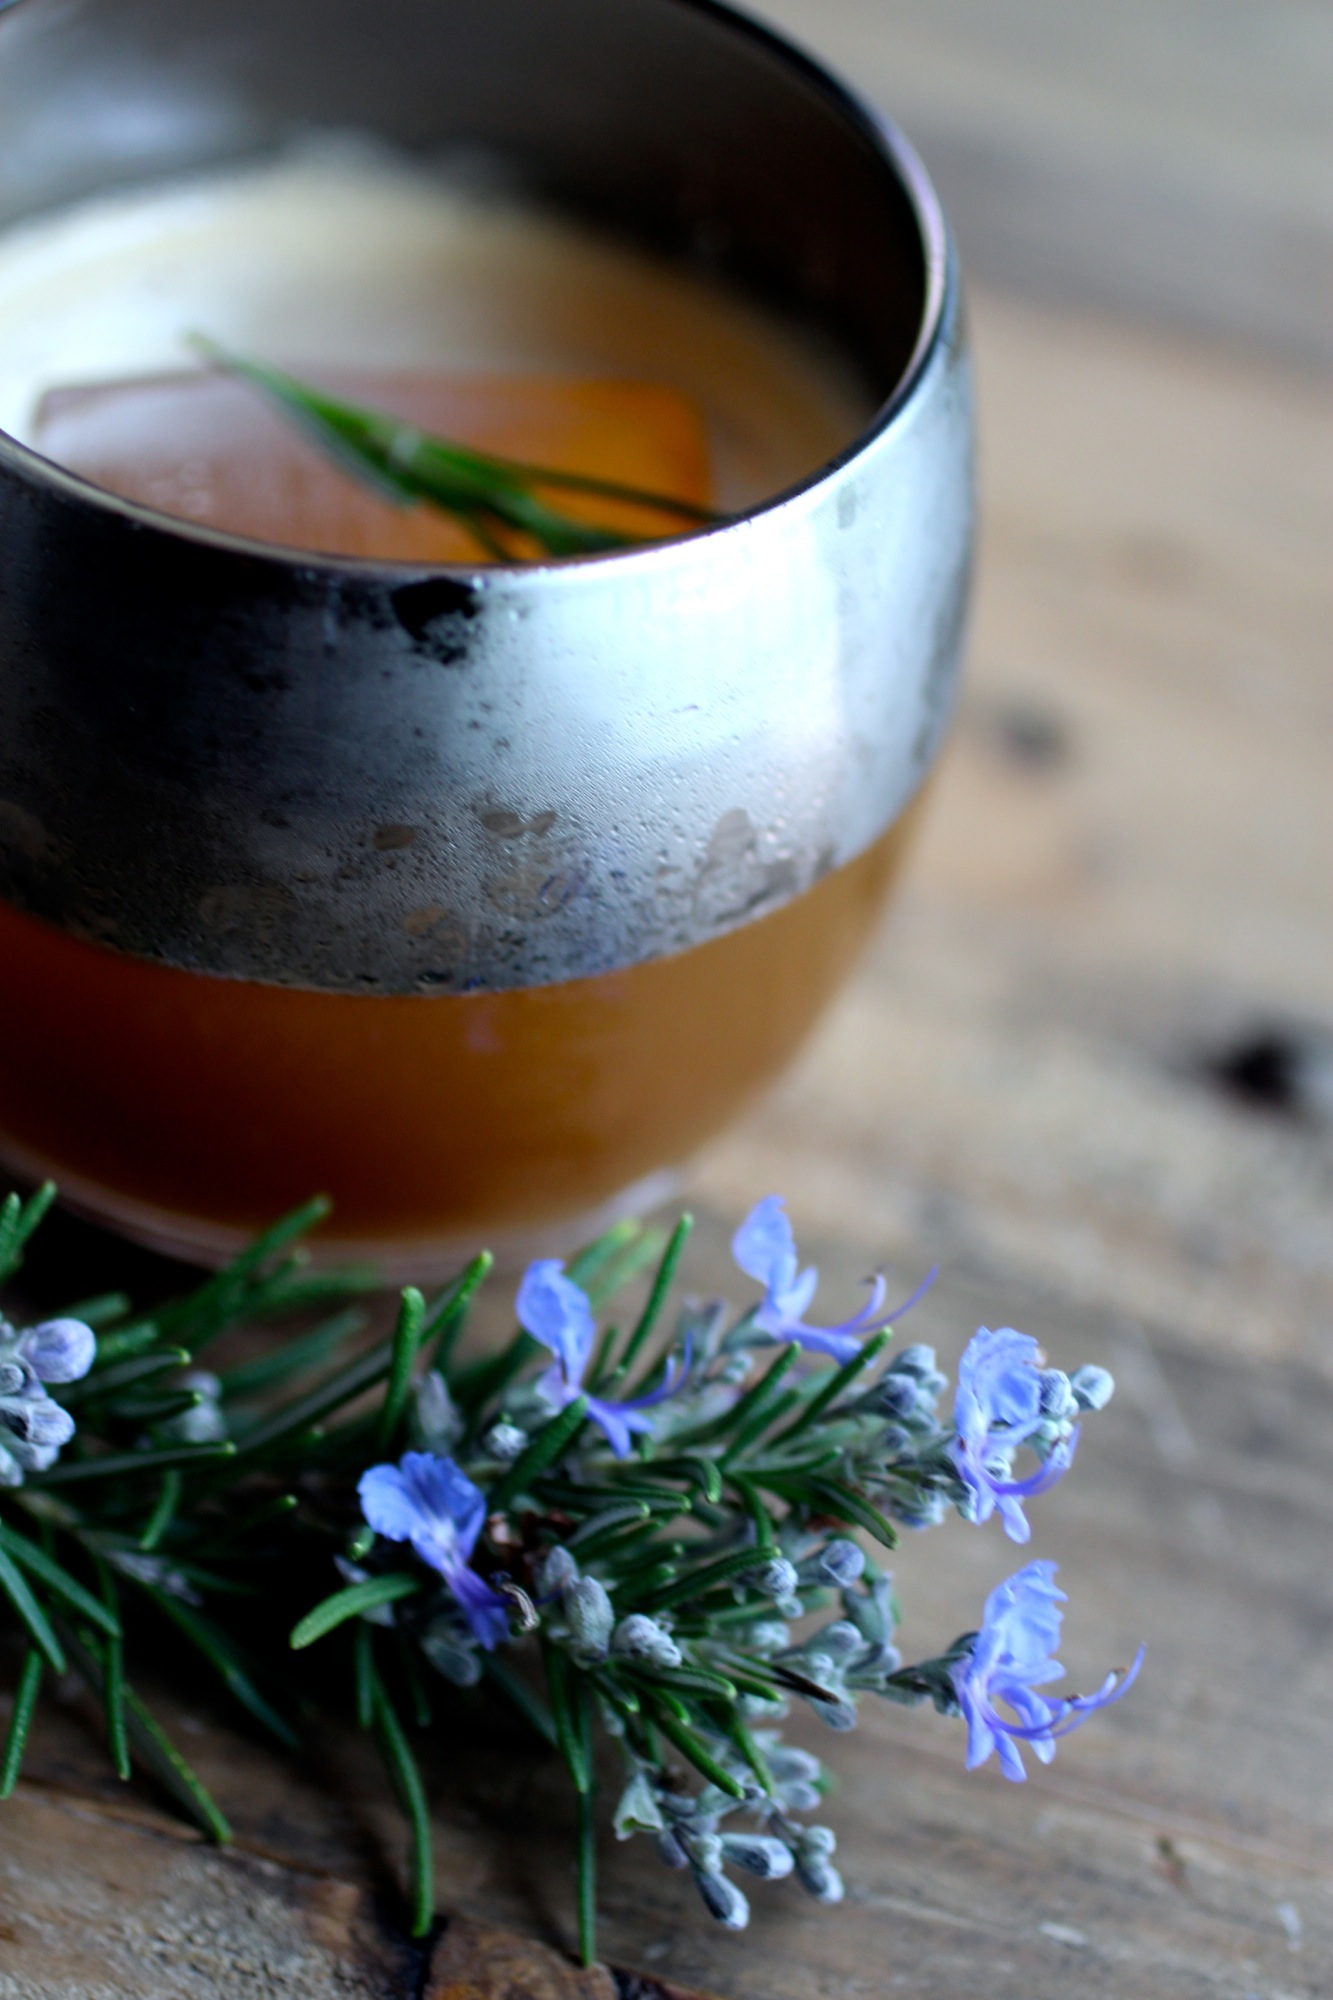
My usual go-to cocktails fall in the "highly alcoholic" arena because that's typically what I'm looking for, but sometimes you want to start out a little mellower. Unfortunately, it can be hard to find a drink that is lower in alcohol without being sweet or tasting watered down. This combination of fernet, rosemary honey, and lemon does a great job of whetting the palate without making you feel like your missing out.
I came across this combination at a.kitchen + bar in Philly where my friend I used to work with at the Nordic Food Lab is now cheffing. The food and a.kitchen is delicious, but a little intense, so starting with this light herbal aperitif was definitely the way to go (before drinking wine, of course). We requested the recipe and have had a fun time recreating the drink at home using foraged rosemary that is beginning to flower, making for an even more appealing garnish.
1.5 oz Fernet Branca
0.75 oz rosemary honey syrup (see below)
0.5 oz lemon juice
0.25 oz ginger syrup
Sparkling water
Fresh rosemary sprigs for garnish
Shake all ingredients apart from sparkling water and rosemary garnish, double strain, then top with sparkling water to fill glass (adjust water according to taste). Garnish with rosemary.
To make honey-rosemary syrup (you might as well make a batch of it for future drinks!):
Simmer 2 parts honey to 1 part water with 1 rosemary spring for about 10 minutes. Remove from heat, cool, then remove rosemary.

Moroccan "Chick-Chick" Salad
Chick peas and chickweed unite.

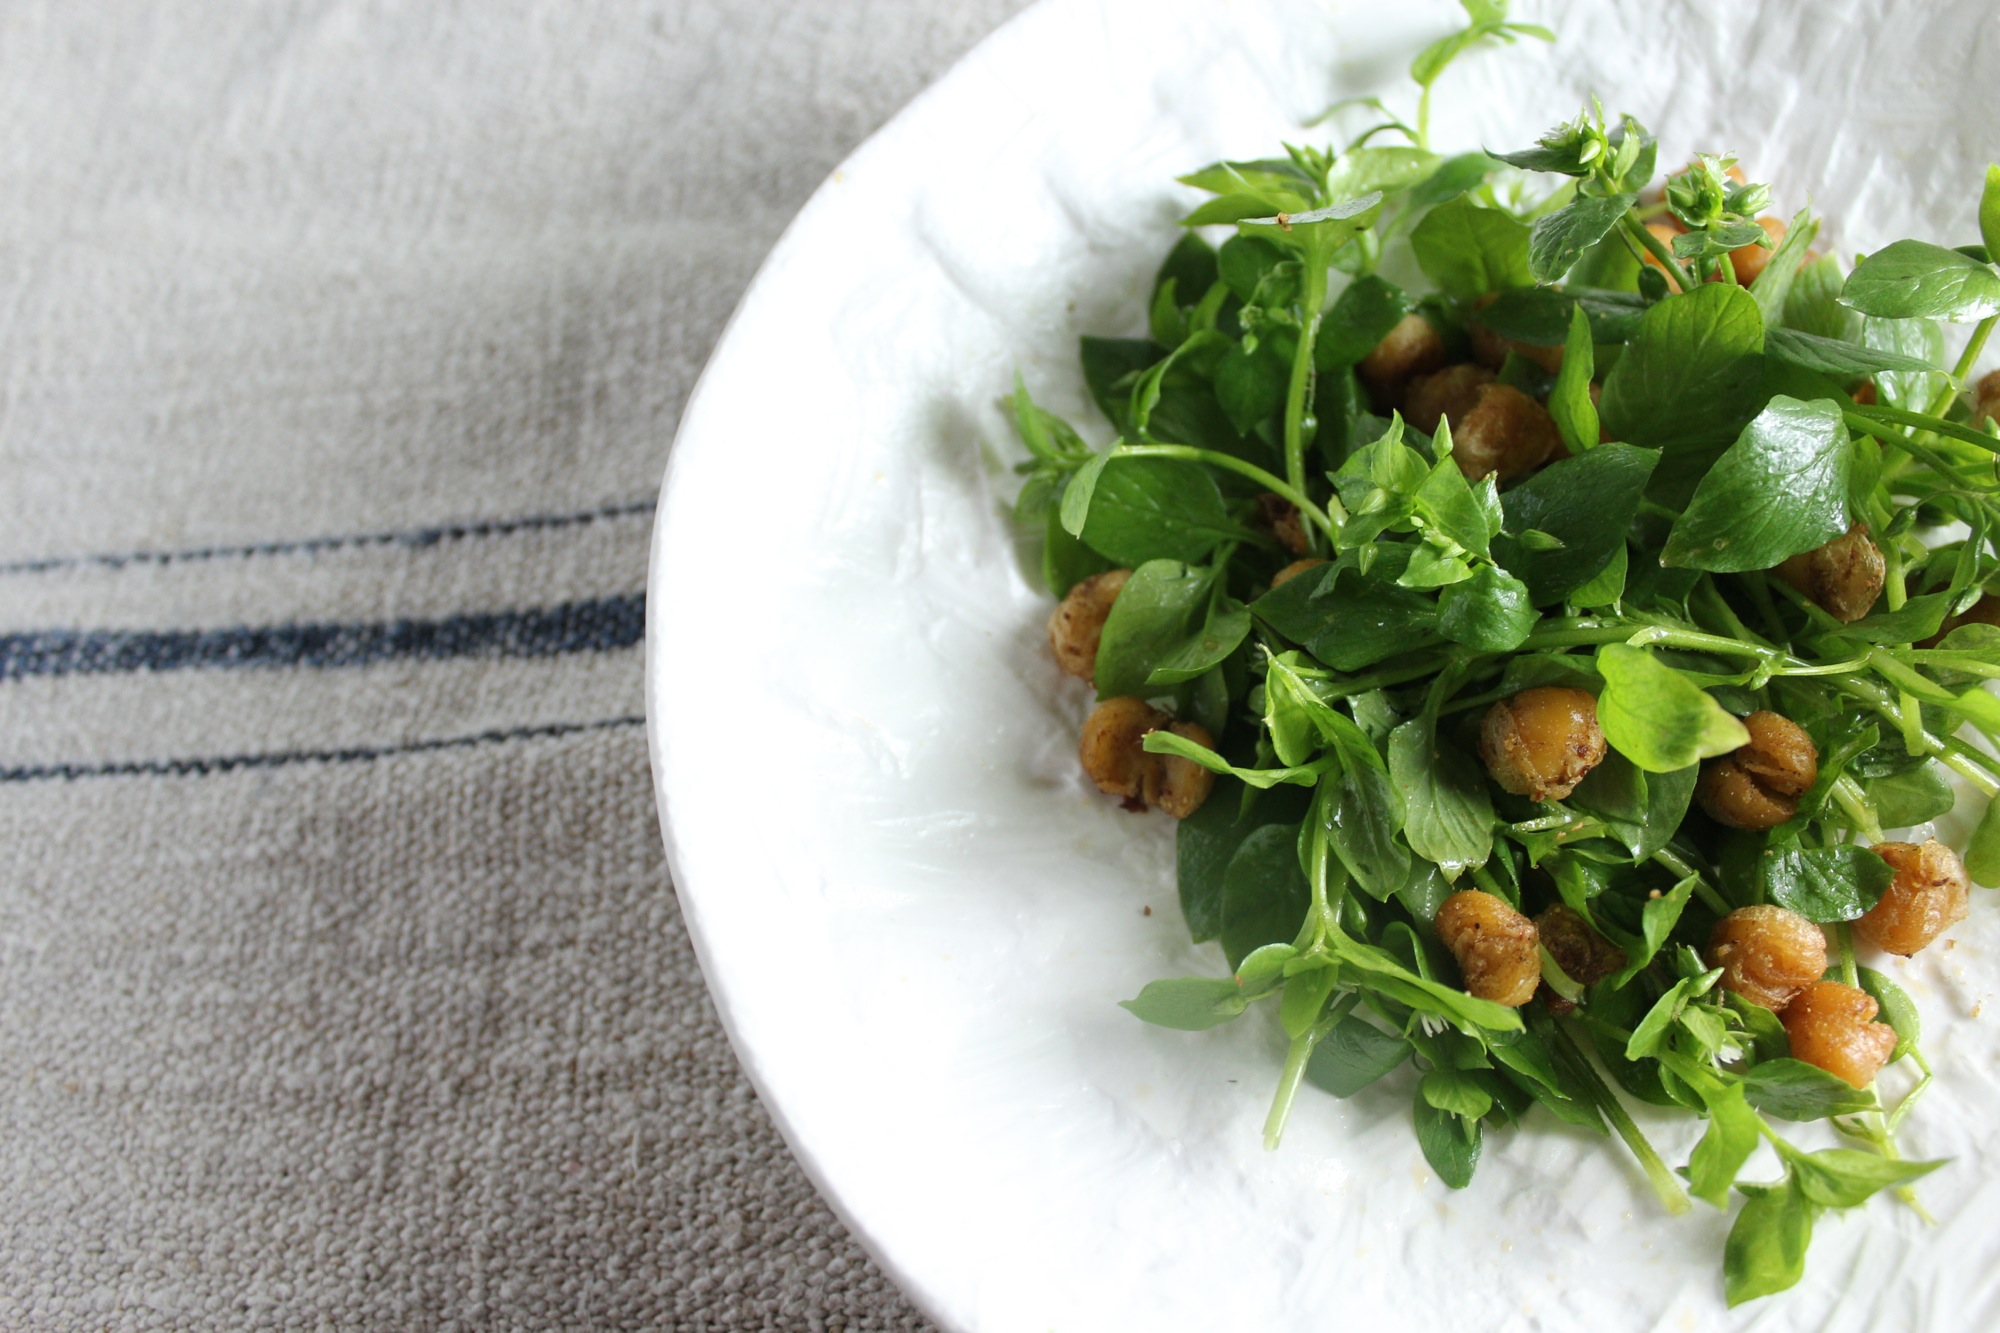
This salad is a fun play on "chickweed" and "chickpeas" blended together with the Moroccan flavors of pomegranate, cumin, and possibly feta.
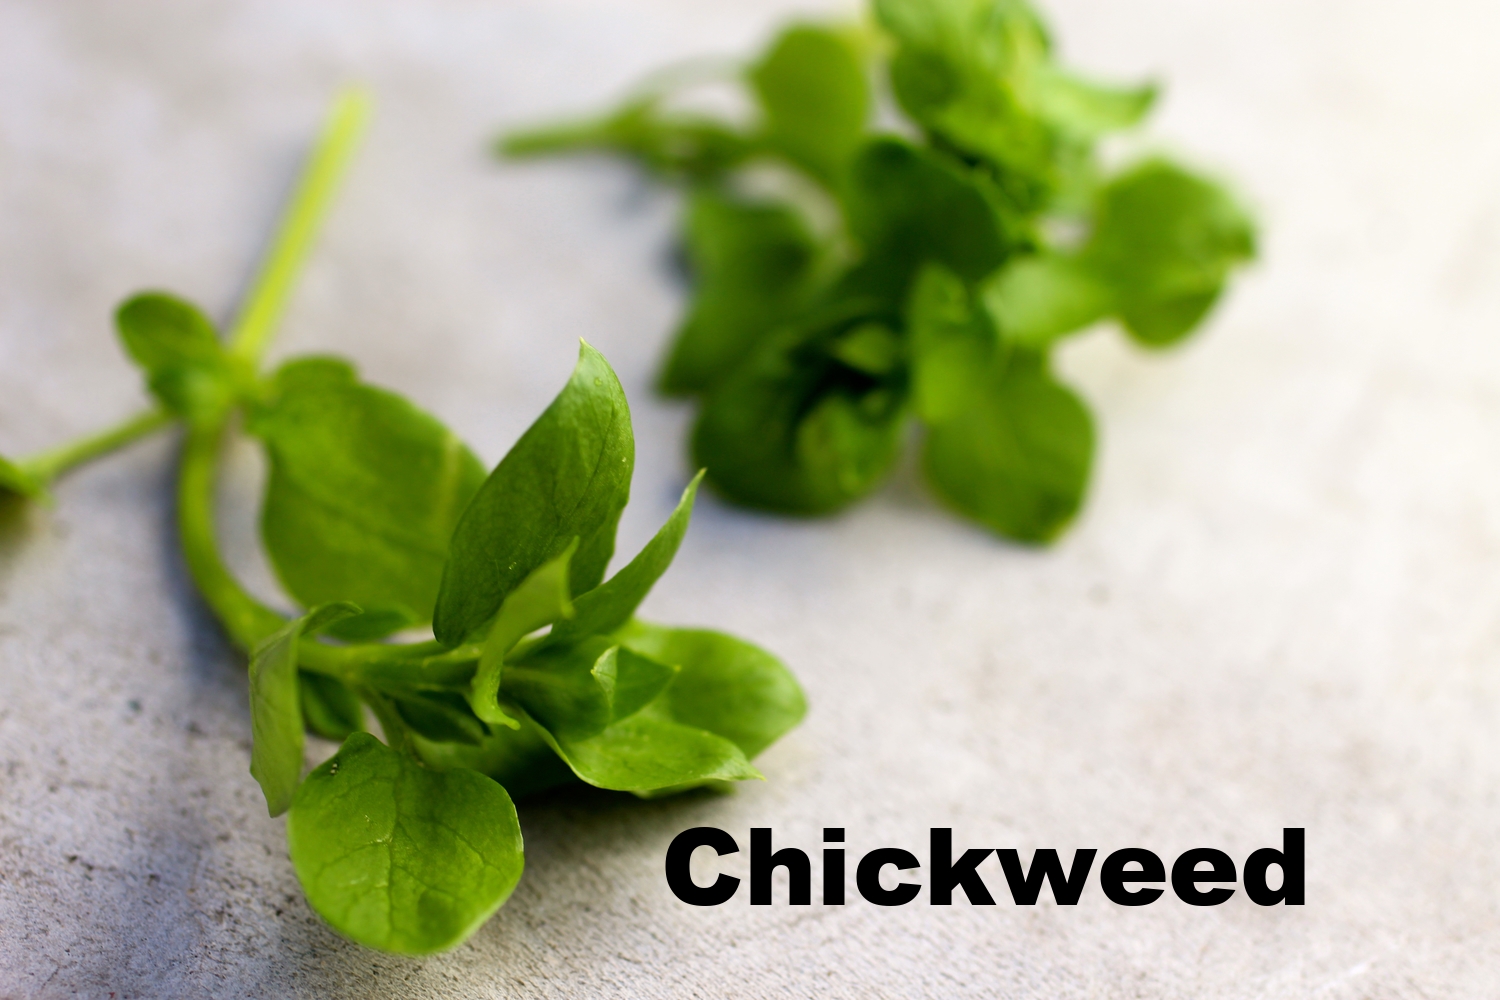
My list of favorite foraged greens is long, but chickweed *might* be in the top 5. If not the top 5, then definitely the top 10. Lucky for me, it is one of the most abundant "weeds" available and is also drought resistant - armageddon? Sign me up!
In the Bay Area, you'll find chickweed in abundance after rains when the sun inevitably returns and all the greens start poking up. What I love about this wild green is how soft and delicate the greens are, both in flavor and texture, while still having a slight crunch and very fresh flavor.
To identify chickweed, look for a sprawling plant with oval pointed leaves and possibly small white star-shaped flowers. The most obvious identifying characteristics are:
It does not have milky sap
It has one line of hairs on the side of the stem
If you pull gently on the outer part of the stem, it will separate and there will be a thin inner part that does not separate (try a few times, it might take a bit to get the hang of it)
Some recipes call for cooking chickweed, but I think it's best raw or, maybe, slightly wilted over a soup or by the hot chickpeas in this salad. Serves 2.
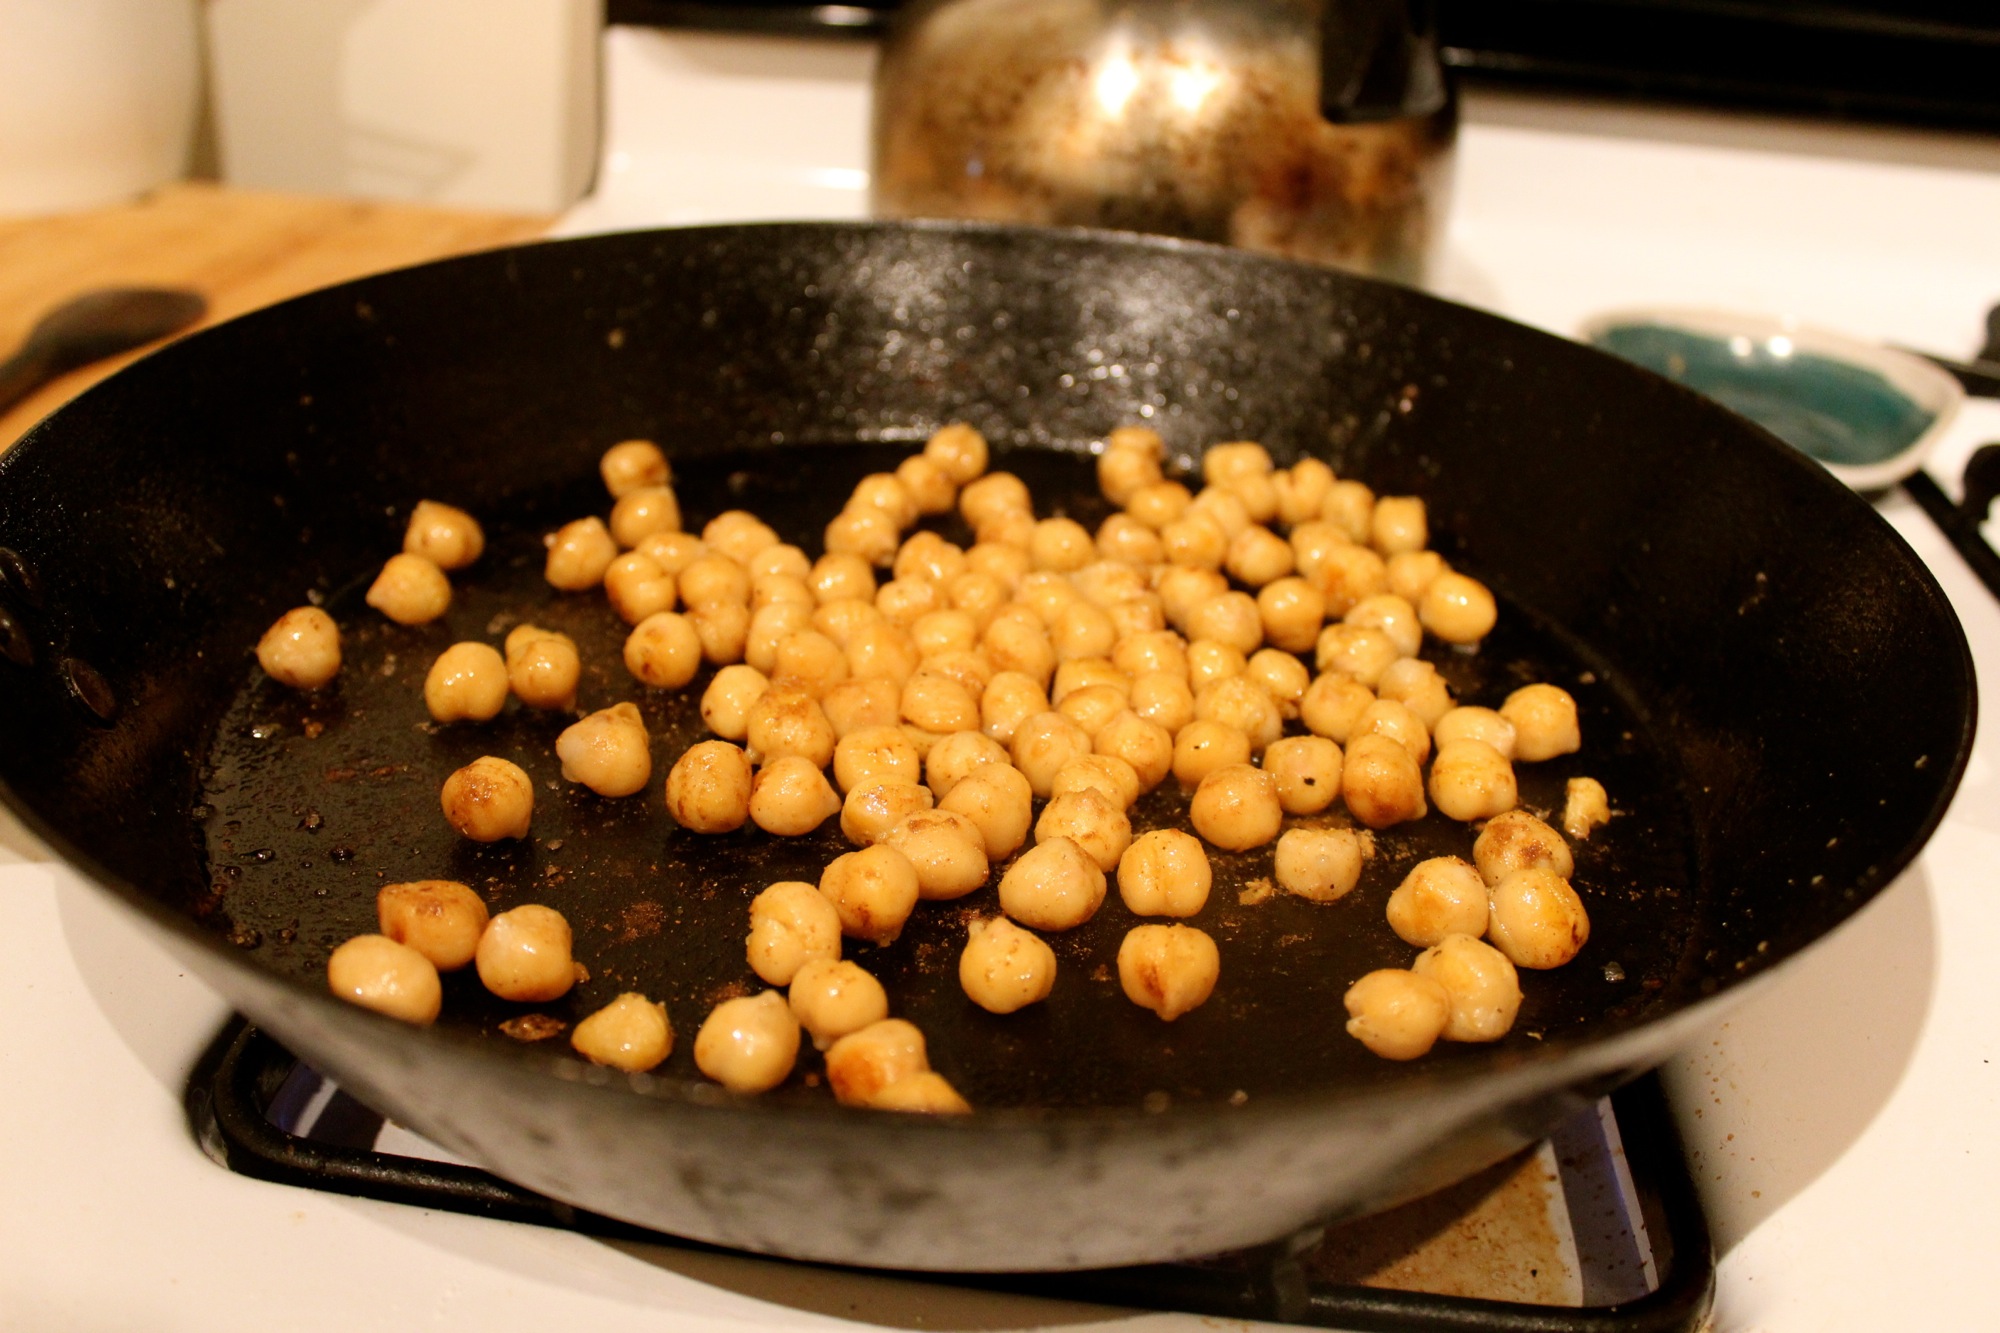
3/4 cup cooked chick peas
1 tablespoon plus 2 teaspoons olive oil, divided
1/2 teaspoon cumin
Sea salt
1 tablespoon lemon juice
1 teaspoon pomegranate molasses
4 cups chickweed, washed and dried
1-2 ounces crumbled feta (optional)
Heat cast iron with about 2 teaspoons of olive oil on high. When cast iron is hot, add the chickpeas. Cook, stirring periodically, until beans are lightly browned, about 5 minutes. Once cooked, place in bowl and toss with cumin and a few pinches of sea salt.
“The term “chickweed” is based on the fact that chickens love it —- cute!”
Add lemon juice, pomegranate molasses, remaining olive oil, and a pinch of salt to a mason jar. Whisk with a fork or cover jar and shake to combine.
Combine chickpeas with chickweed in a bowl, drizzle with dressing, and top with crumbled feta (if desired). Serve immediately.
Moroccan chick-chick salad with optional feta.
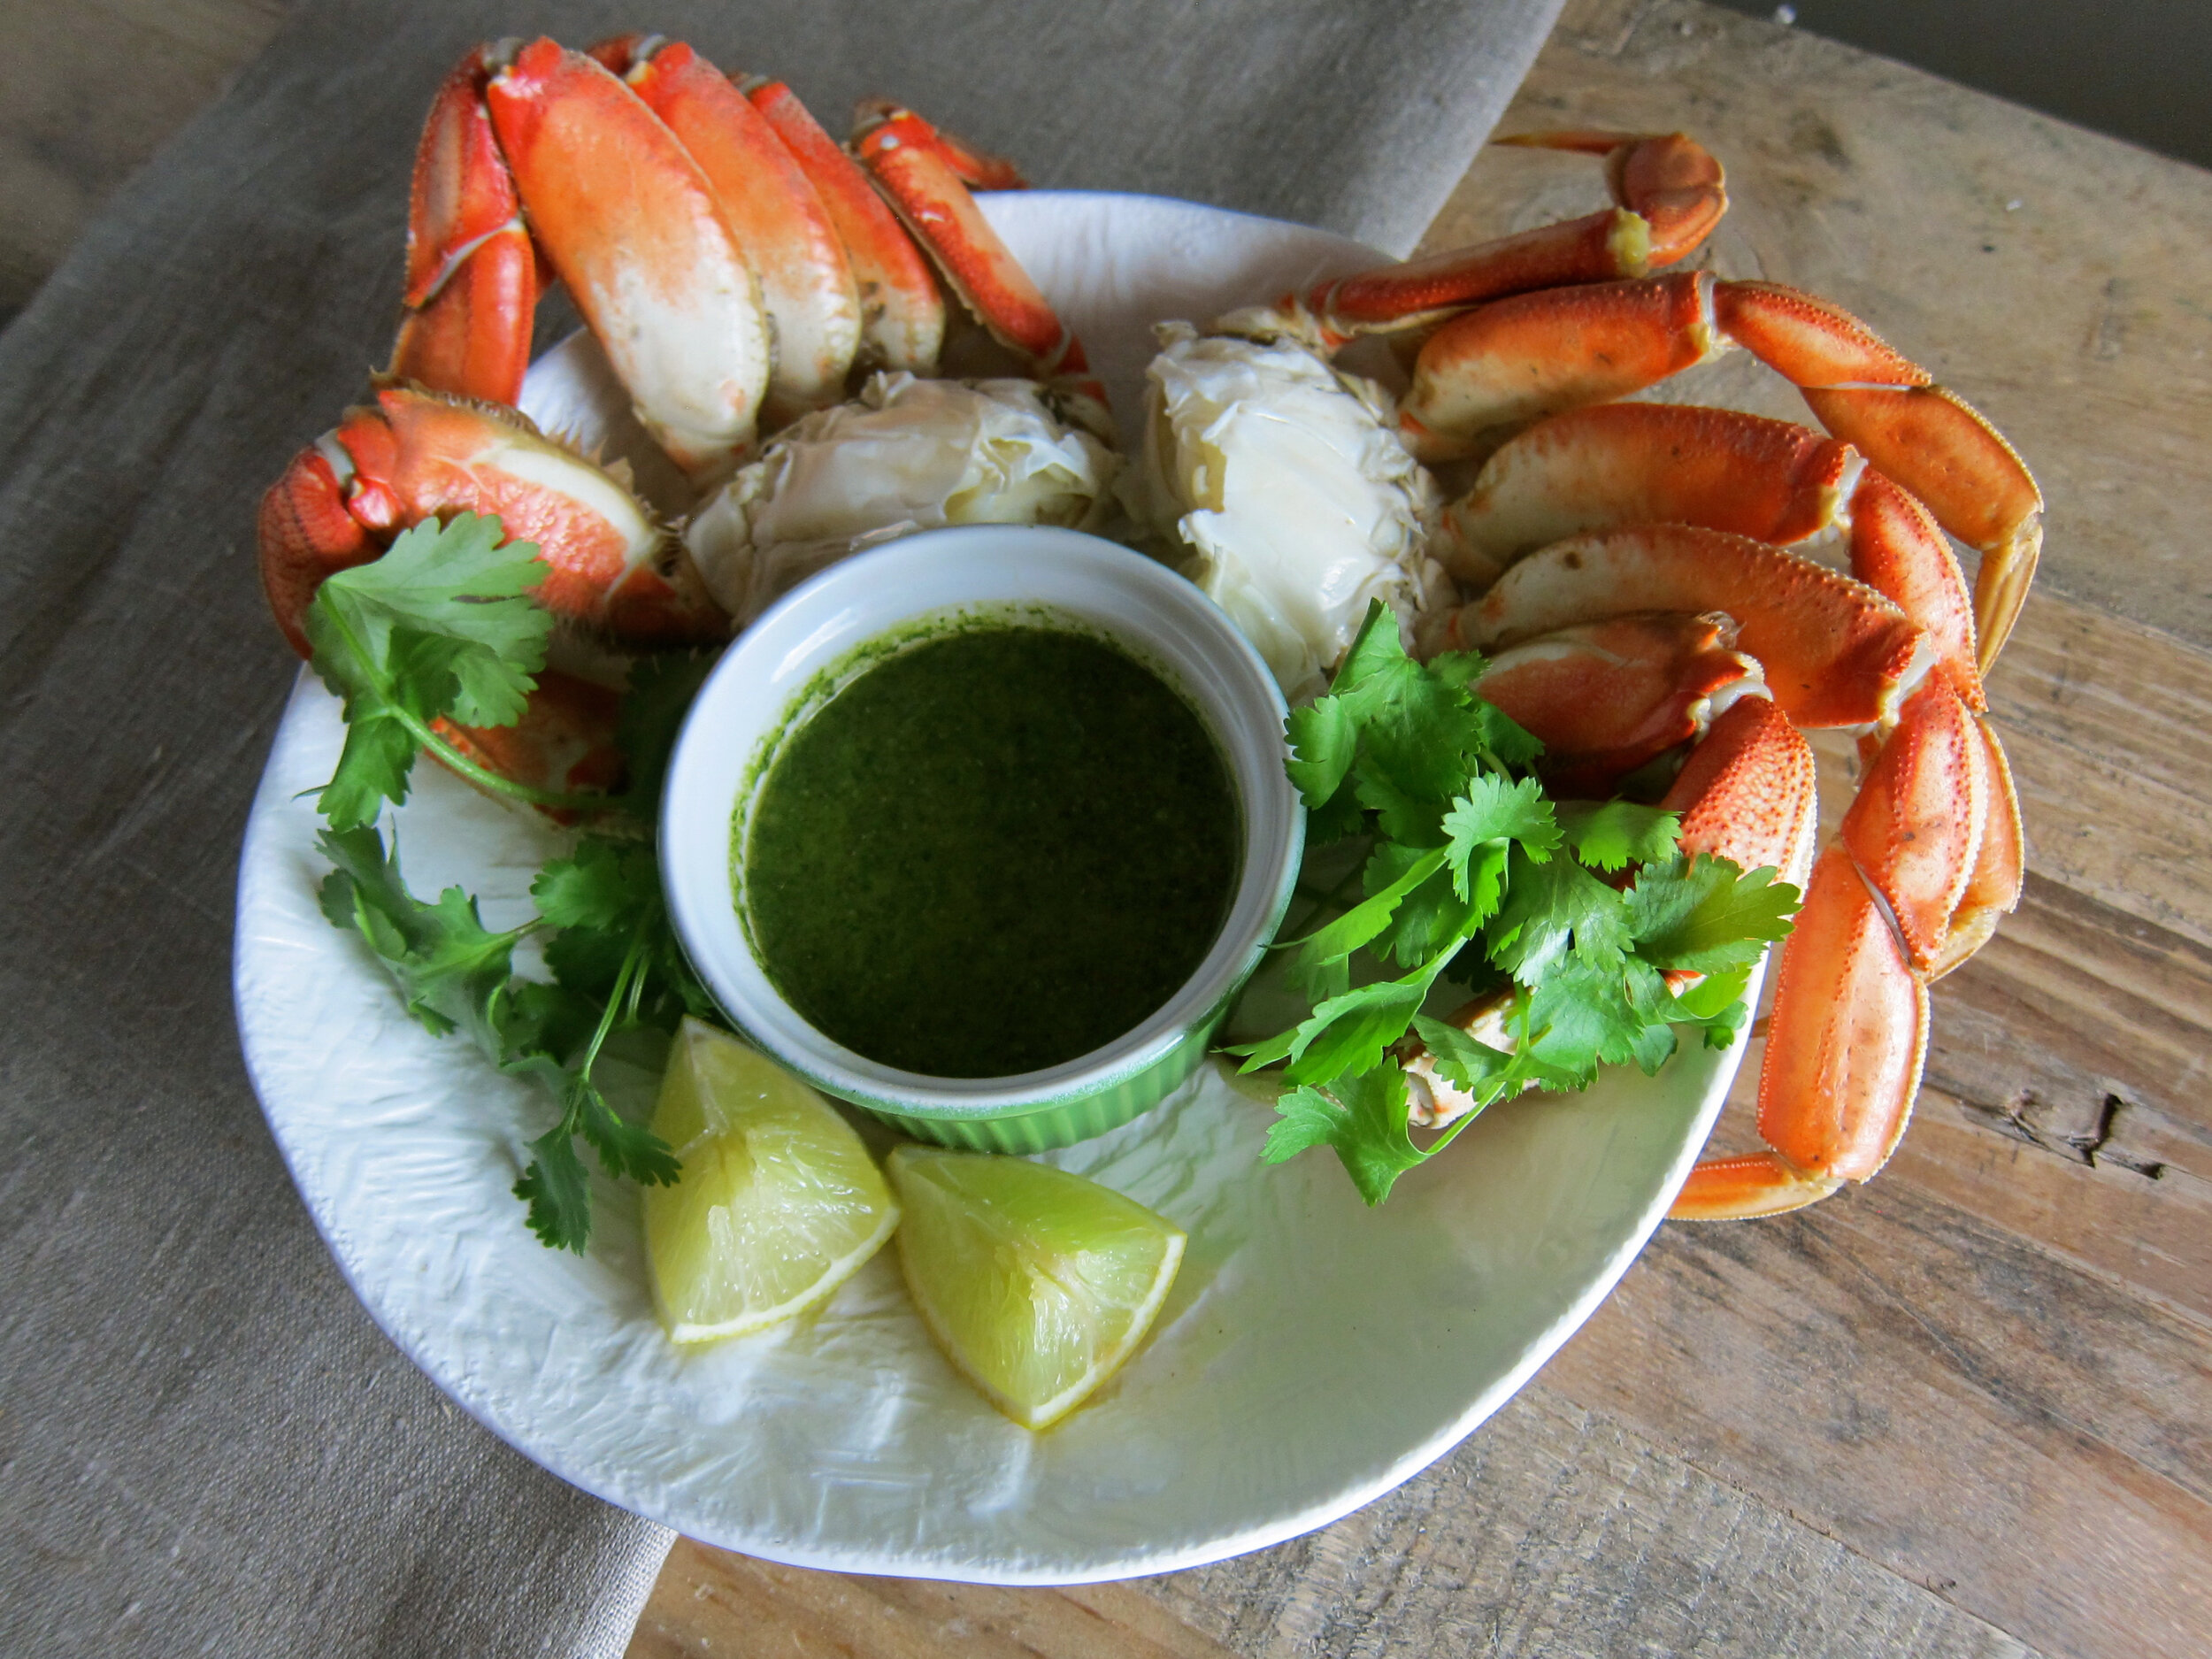
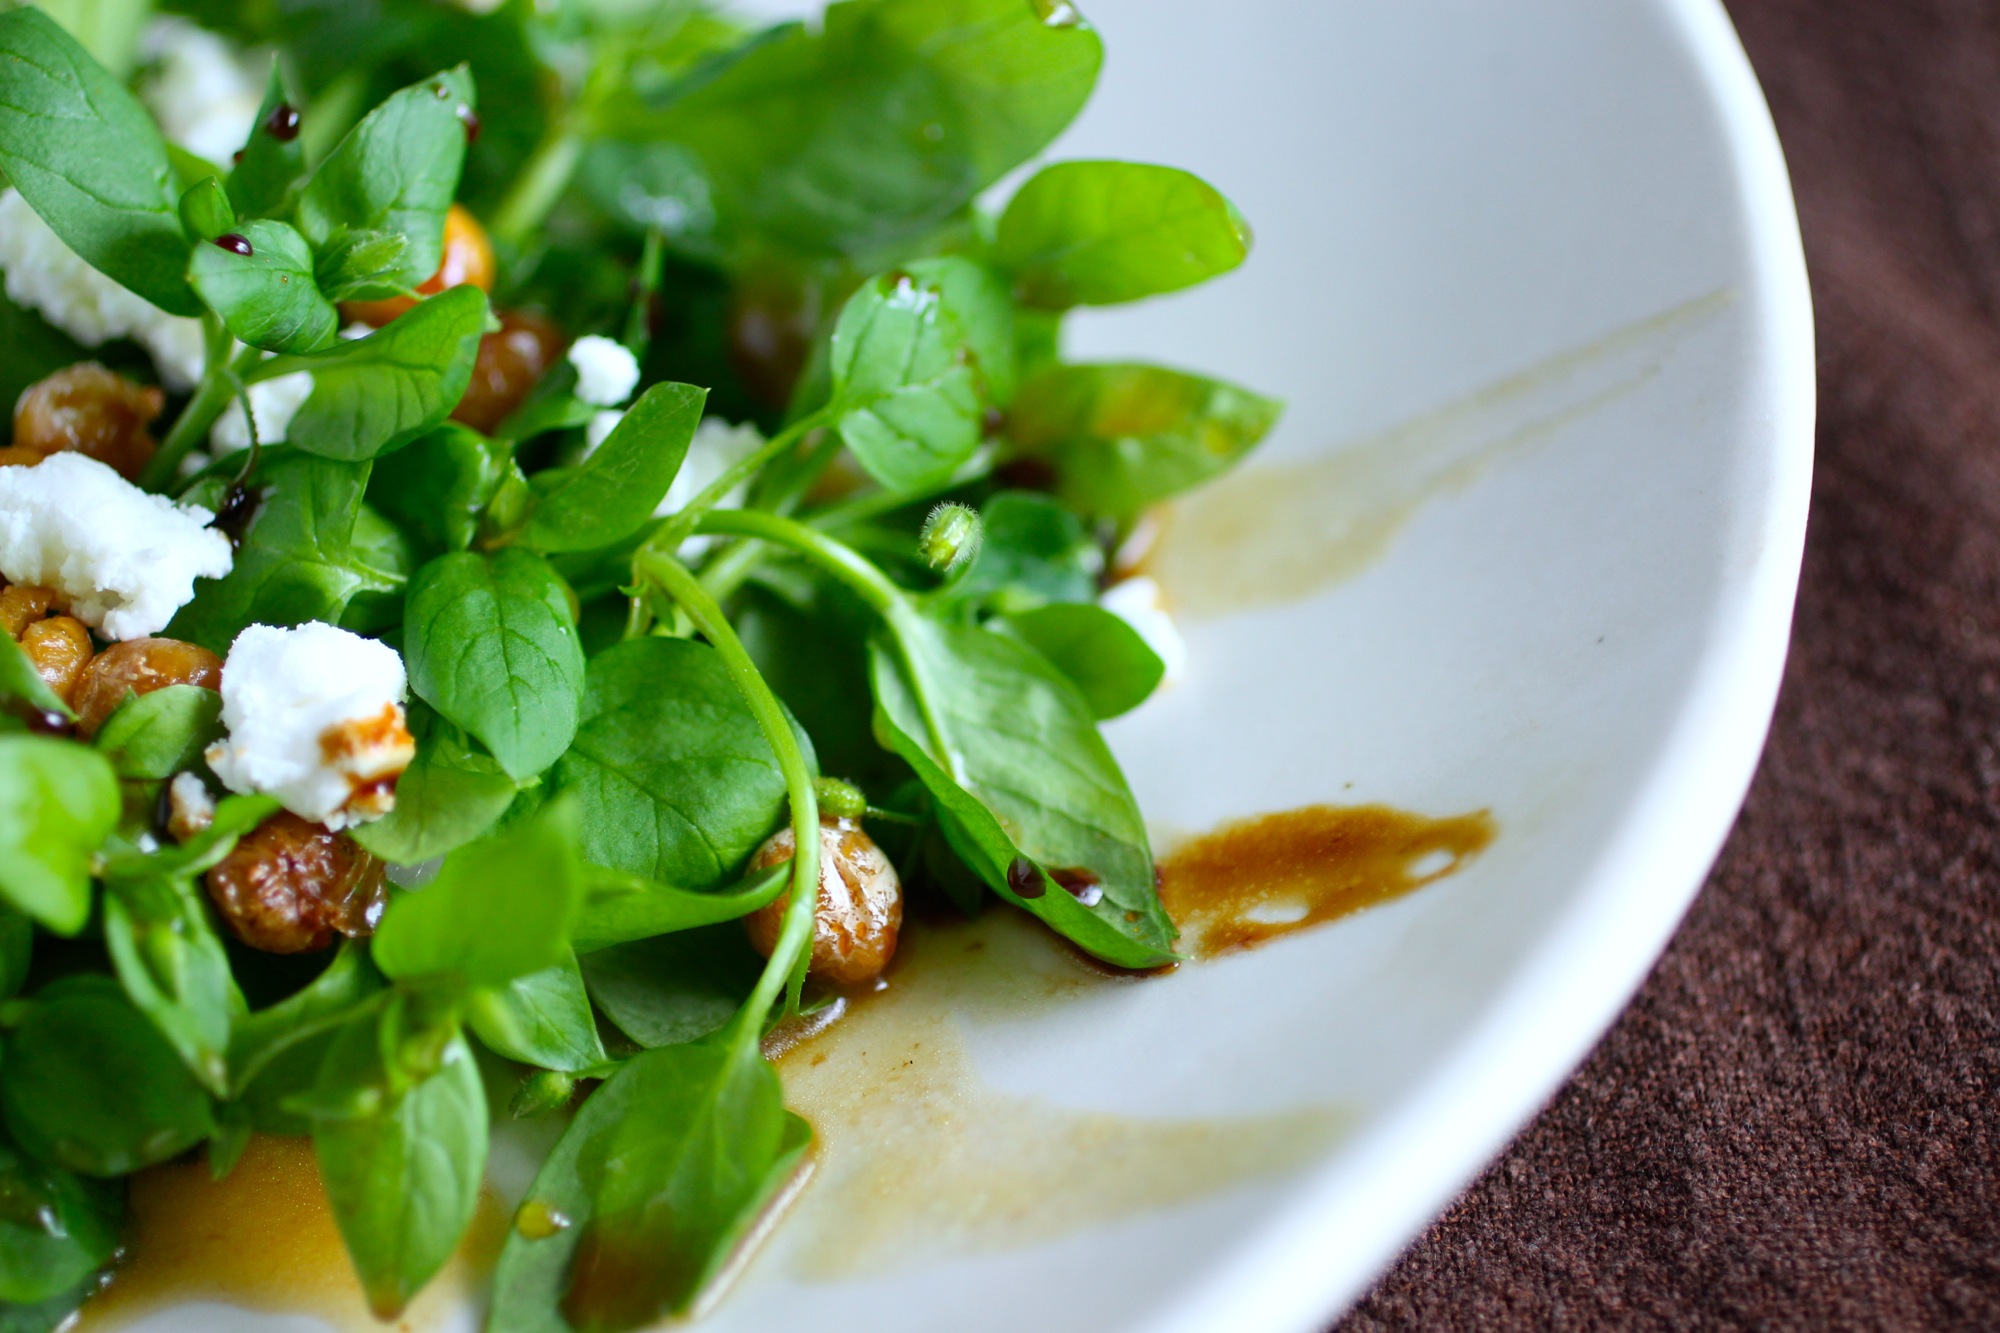
Fresh Crab with Wood Sorrel-Cilantro Sauce
Ocean strawberries meet wild wood sorrel.

Crab season is one of my favorite seasons of the year. I love the fact that we still rely on fishermen and women to brave the seas in order to bring us these delicious crustaceans. Growing up in Humboldt County, my family lived near a crab stand that purported the clever phrase of "ocean strawberries" on their sign and I like to think of them as a cross between this elegant description and giant bugs.
In our house crab alone was special enough and accompaniments didn't go beyond melted butter and crusty bread. Although I still agree that crab is special enough, I wanted to take advantage of the wild wood sorrel prevalent in my neighborhood by making a vibrant and spicy dipping sauce of wood sorrel, cilantro, serrano, and sesame.
“Many plants, including wood sorrel, contain oxalic acid, which can be toxic in large quantities. Remember to enjoy in moderation.”
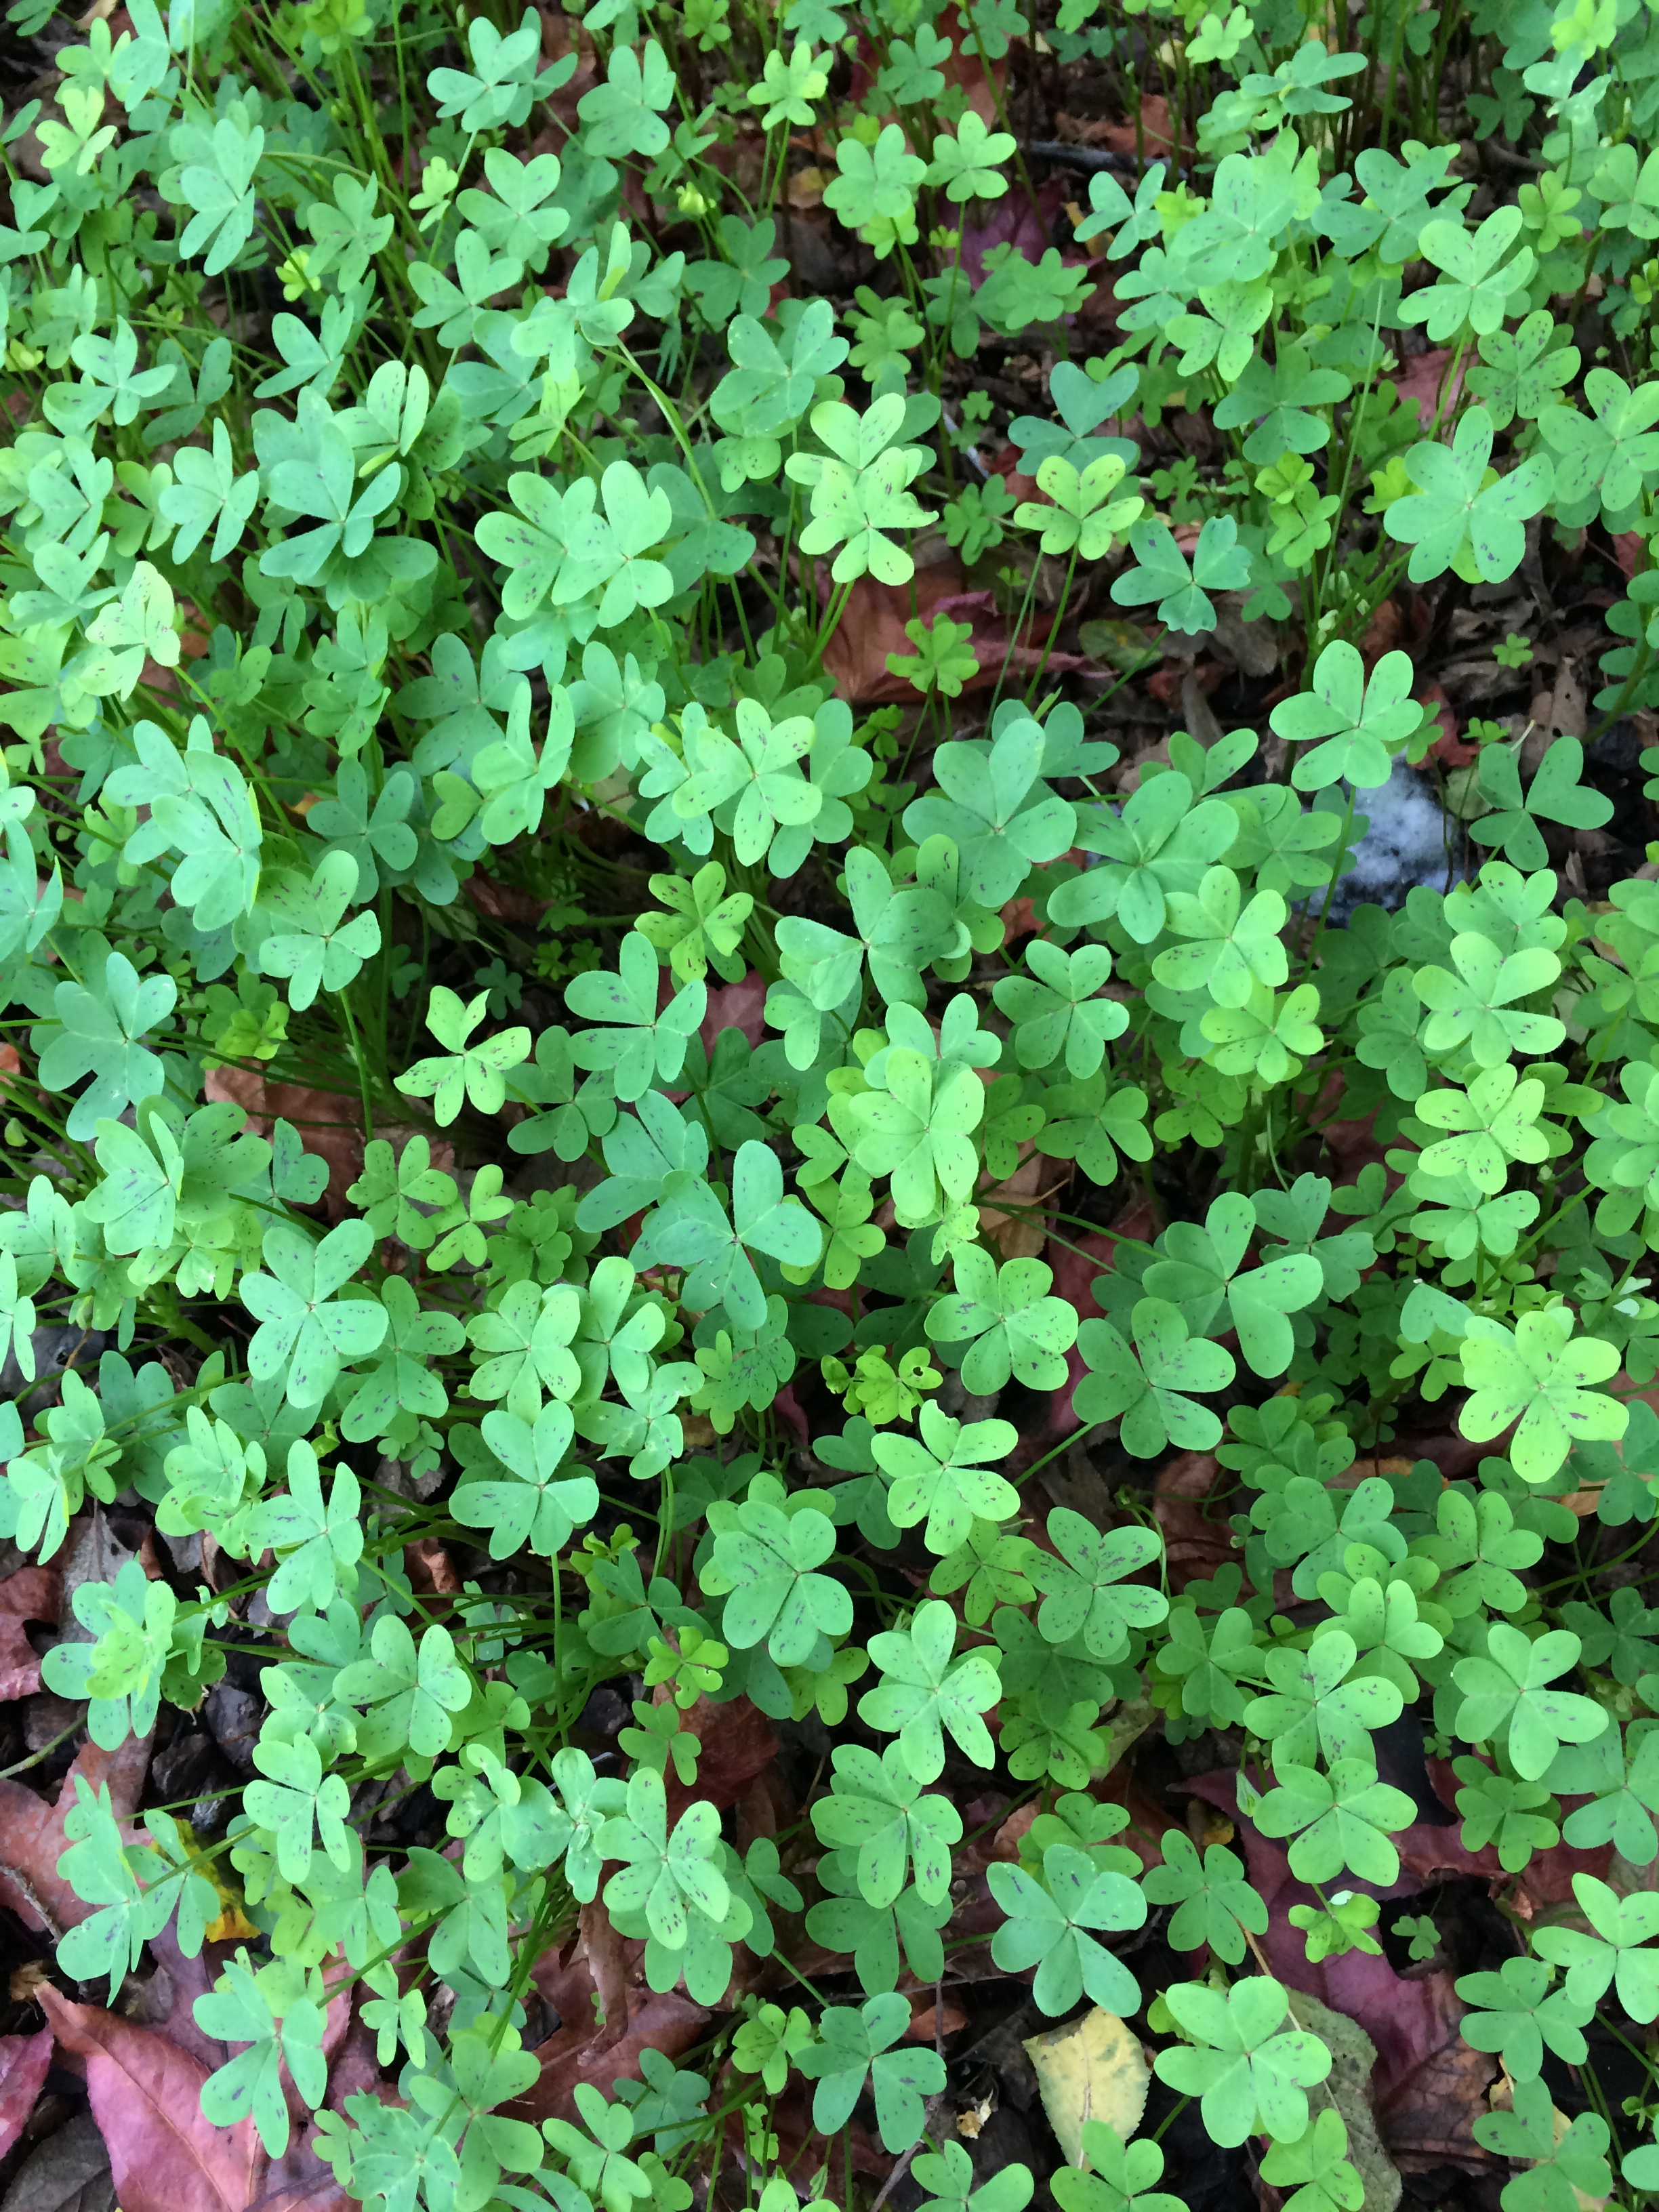
Wood sorrel looks like clover, but with yellow flowers on long stems. These are the somewhat fleshy flower stems you may have chewed on as a child walking around town (at least I did) to release their sour juices. The juice or ground leaves can be used as a unique way to provide a lemony kick to sauces or as a bright garnish - a little goes a very long way. Wood sorrel is high in Vitamin C and some use the plant medicinally for liver and digestive issues, but these latter benefits are not confirmed by research. The reason why wood sorrel is so lemony is due to its oxalic acid content, which can be toxic if eaten in large quantities and those with kidney or intestinal problems and pregnant women should avoid it. However, other plants contain oxalic acid as well so the general rule of thumb it to eat wood sorrel in moderation, meaning using some in sauce or as a part of a salad or garnish every once in a while is fine, and consume in combination with a balanced diet. There are also no dangerous look alikes for wood sorrel, making it a great foraged food for newbies! The below recipe serves 4.
2-4 fresh crabs (2 for half a crab each, 4 for heavy crab eaters)
1/2 cup wood sorrel leaves
2 serrano peppers, chopped with seeds removed
1 cup cilantro, chopped
Juice from 1/2 lemon
1 tablespoon ponzu (can substitute 1 teaspoon soy sauce + 2 teaspoons water if needed)
1 teaspoon yellow miso
1-2 tablespoons toasted sesame oil
Cooking and cleaning the crab: Go here for more information and step-by-step photos.
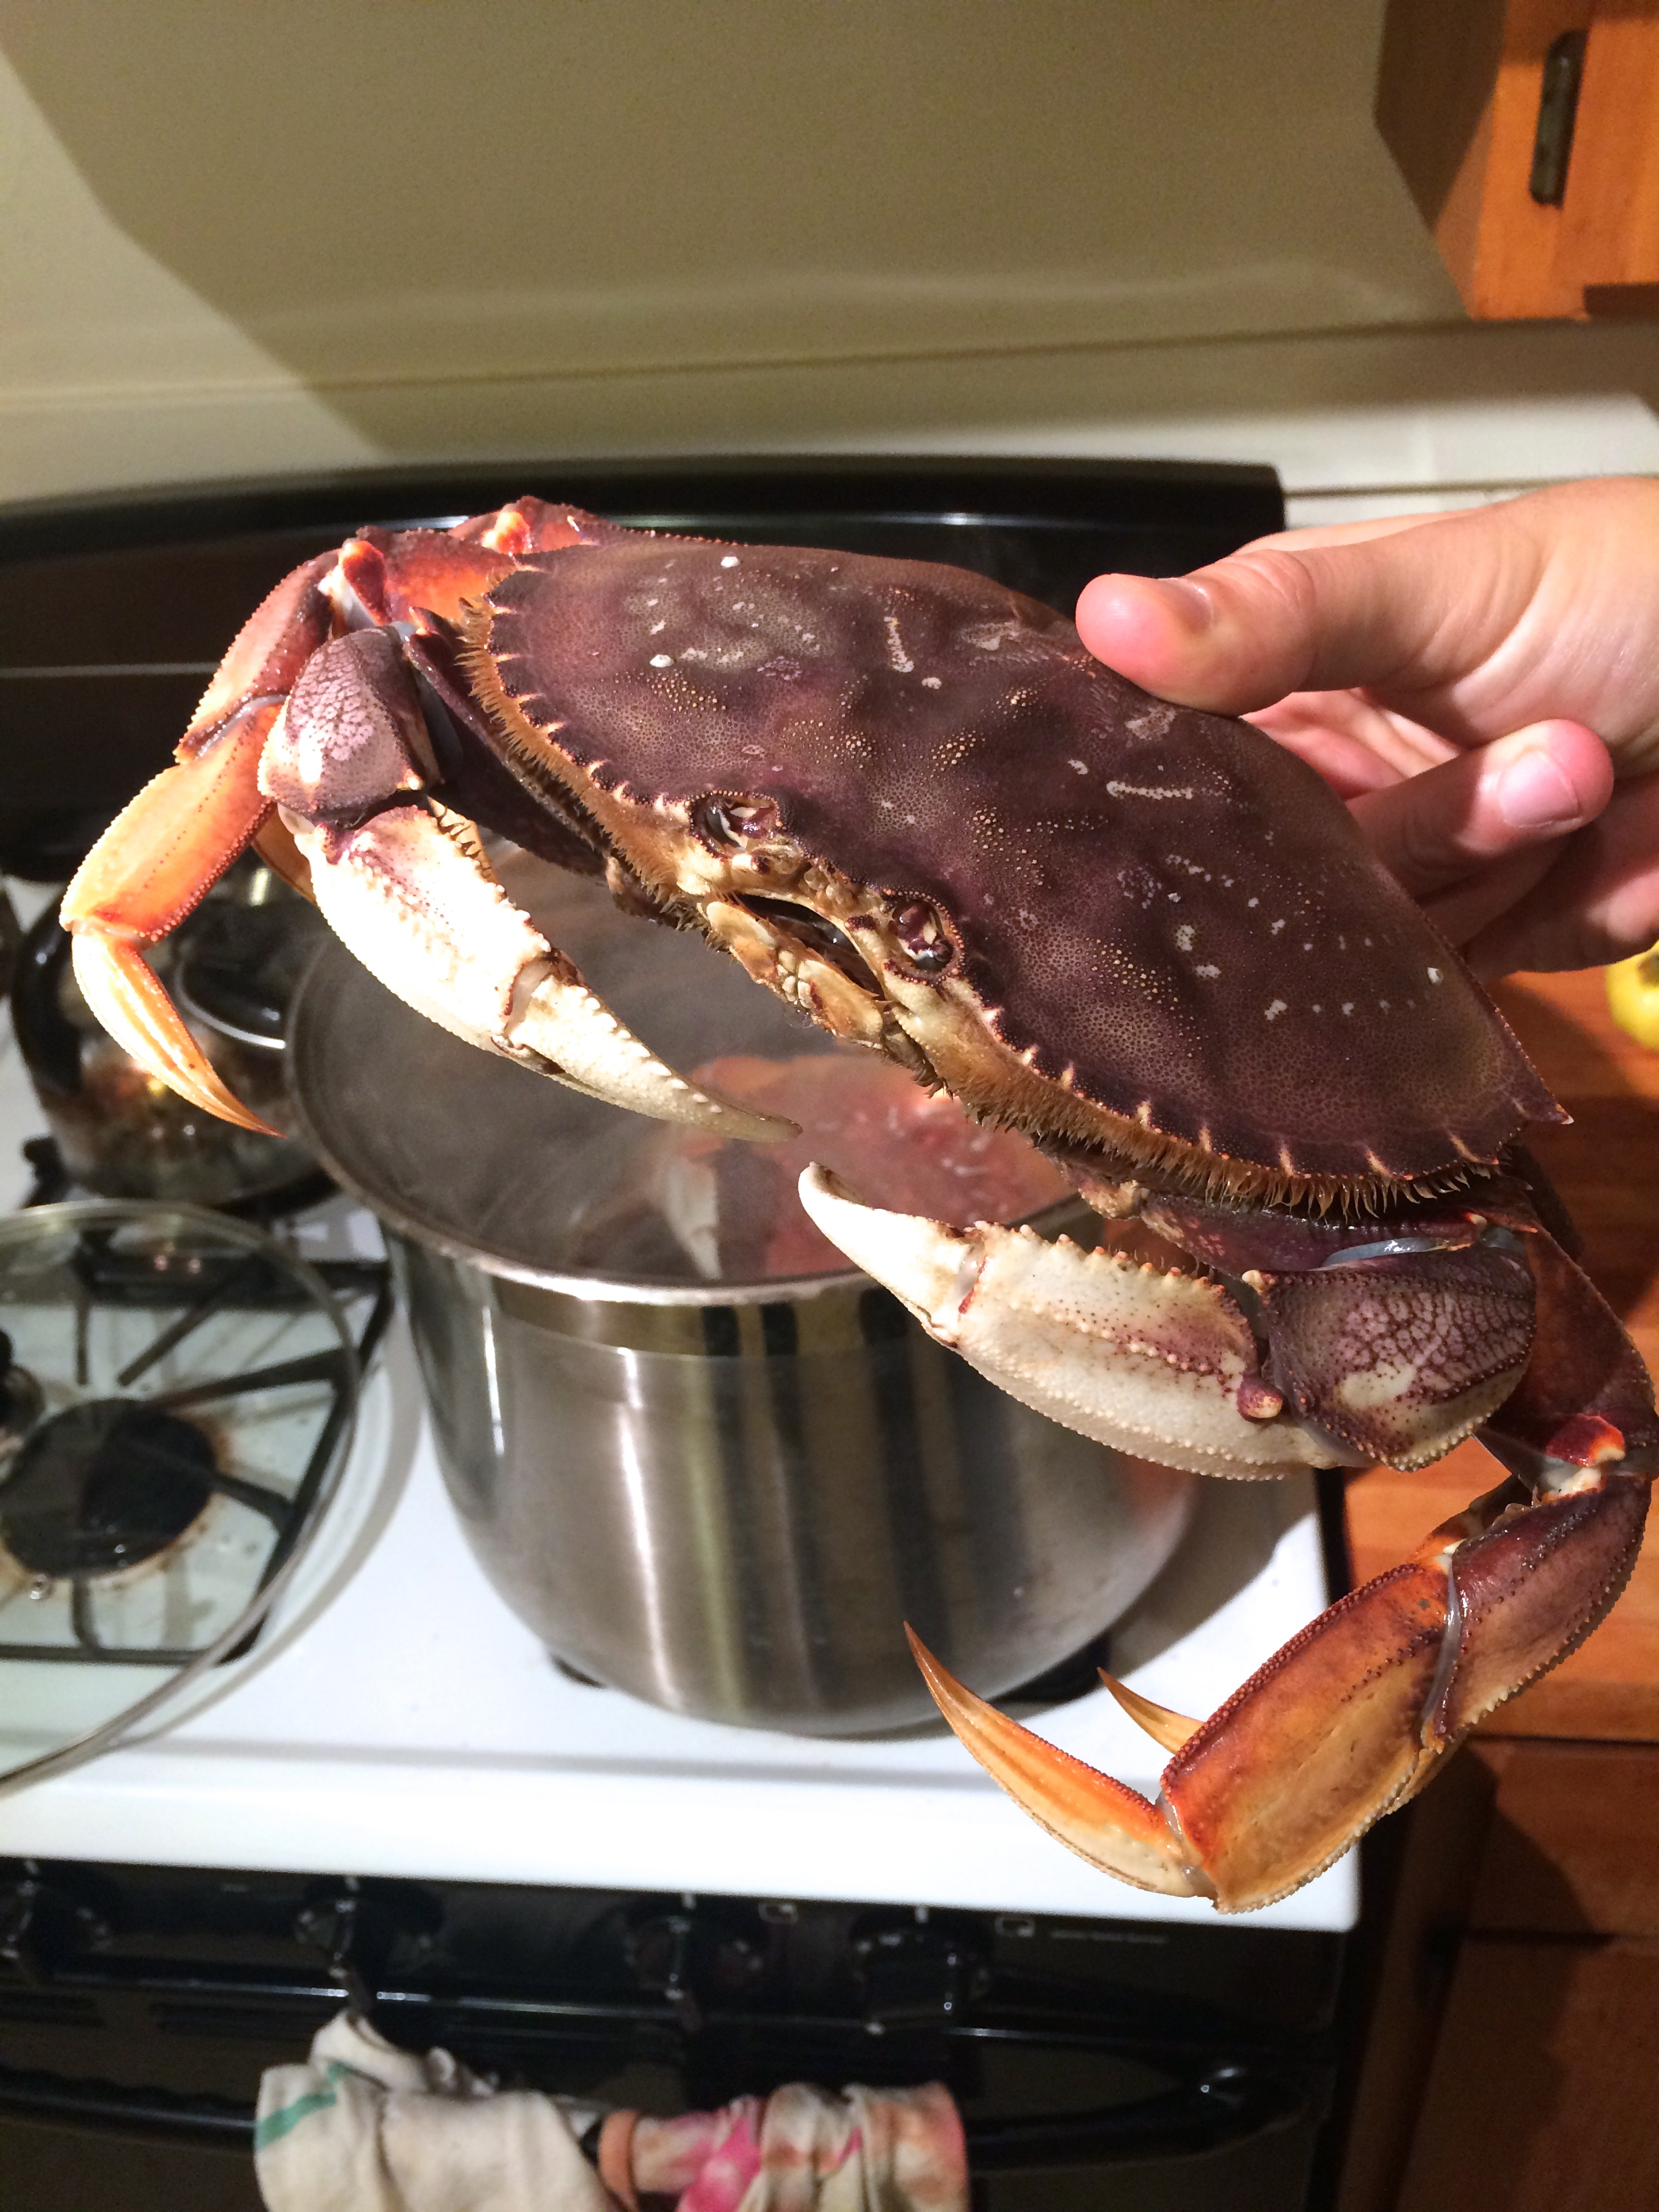
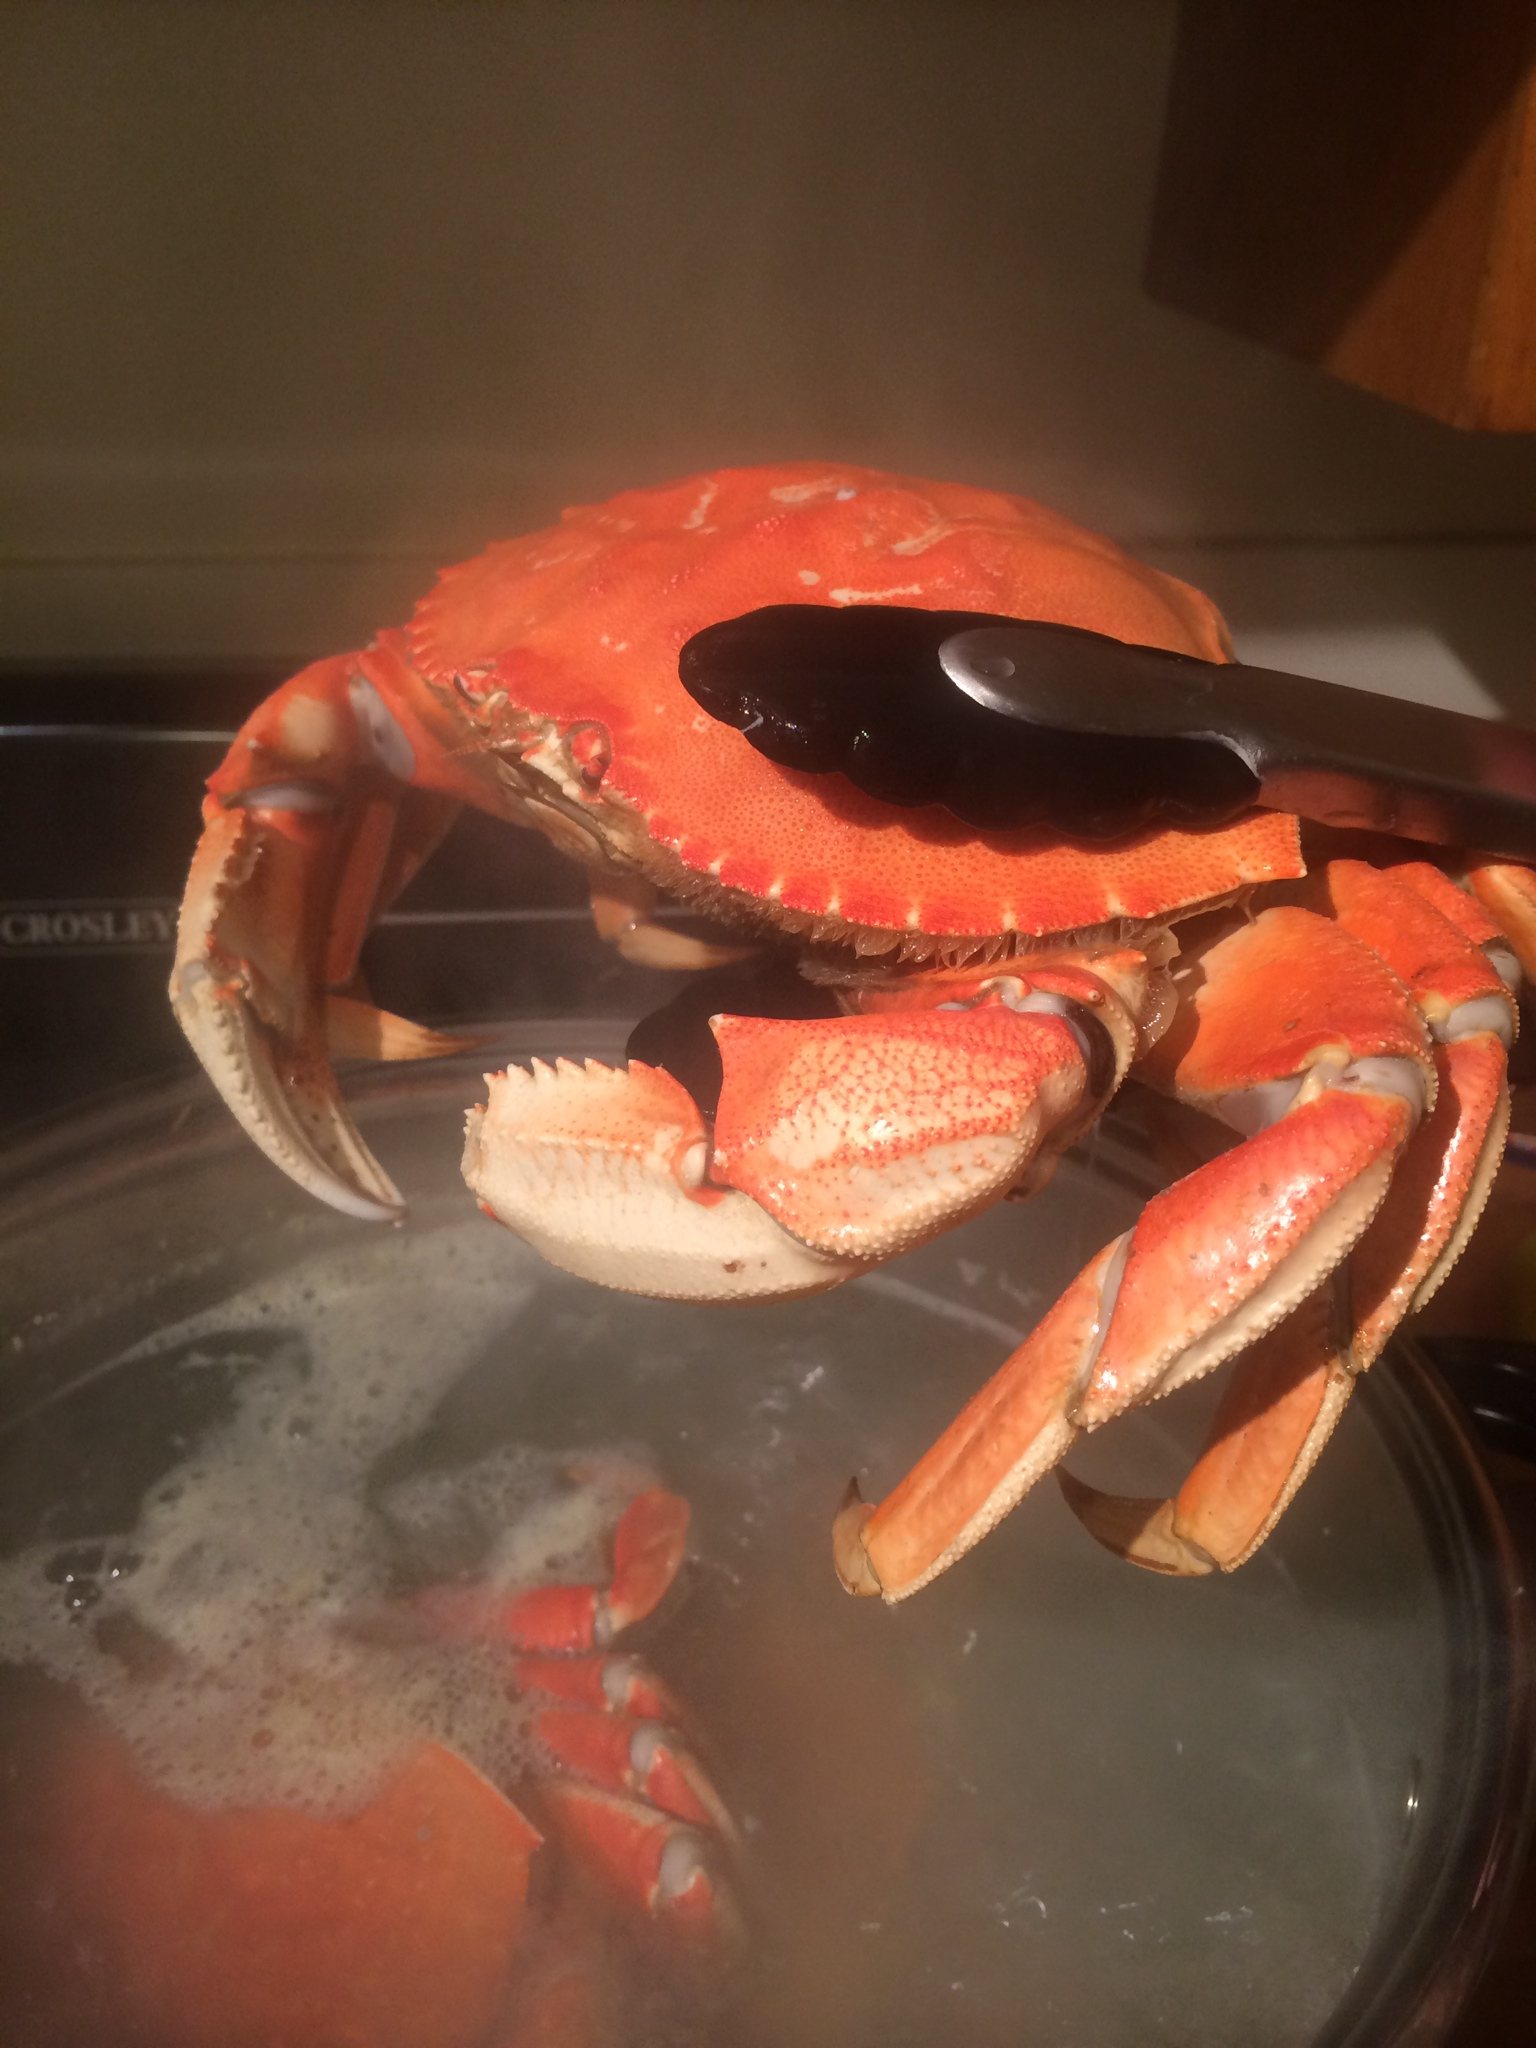

Get a large pot of water to a rolling boil. There should be enough water to cover the crabs. Throw your crabs in and cook them for ~7-8 minutes per pound. That's 7-8 minutes for the average weight of the crabs, not total weight. So, if I have 2 crabs that weigh 1.5 pounds and 2 pounds respectively, I should cook them for about 12-14 minutes. Round down when possible, as you can always cook the crab more if needed, but crab cooking is pretty forgivable. The crabs will change from a purplish color to a bright orange-red.
Remove crabs and rinse under cool water until cool enough to handle.
“Protip: All crabs available to eat are male, as the female are thrown back in to encourage population growth. ”
Turn the crab upside down. Stick your finger underneath the "apron" (little tail looking thing) and pull it off. Remove the carapace (large back shell) by putting finger in hole where apron was and ripping the back shell from the legs. It's actually pretty easy and fun.
Rinse off or save the guts (yellow gushy stuff) found in the carapace. The guts can be eaten on rice, in a stew, or on their own if desired.
Remove the gills (spongy soft jagged things) from either side of the body as well as the mandible (sharp mouthparts in the front).
Give the body a final rinse - remove the greenish-brown and yellow goop - and break the body in half if desired. Serve at room temperature or cold with wood sorrel sauce (below).
To make the wood sorrel sauce: Simply blend all ingredients except sesame oil in a food processor or immersion blender. Drizzle in sesame oil until desired flavor and consistency is achieved.
Here's a quick video demonstrating how to clean a Dungeness Crab:

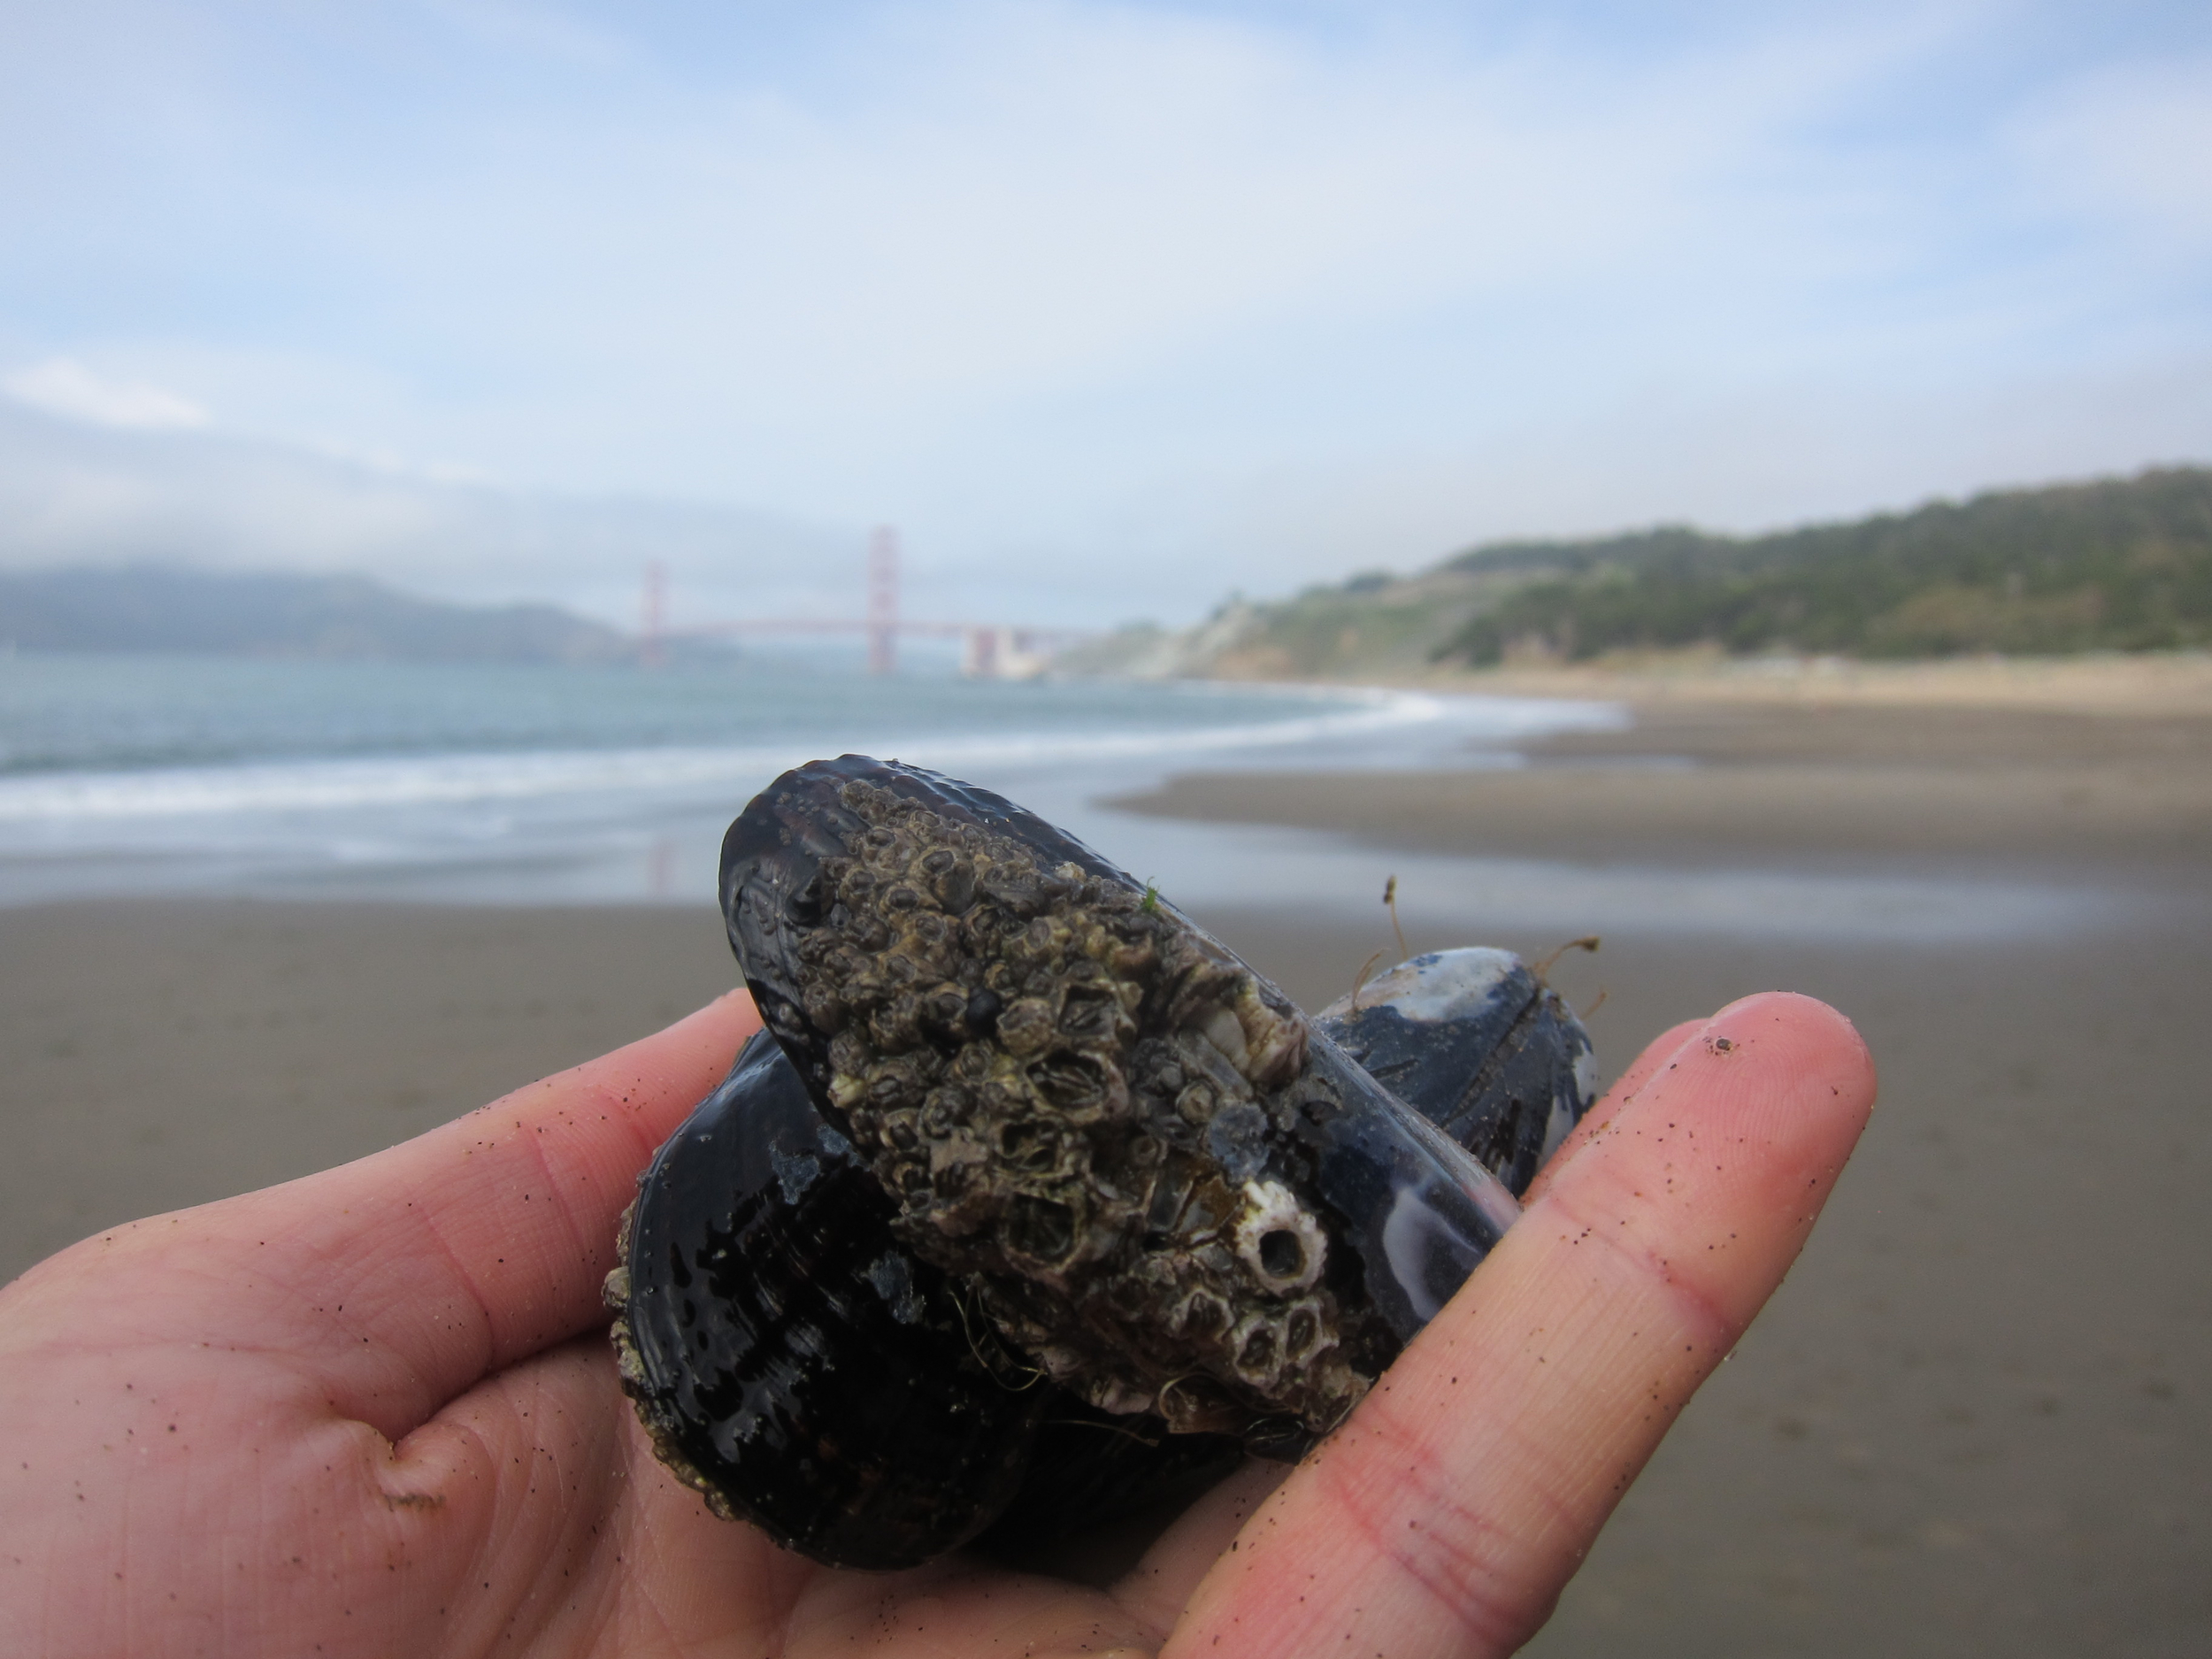
Foraging Mussels
The easy street to self-sustaining.


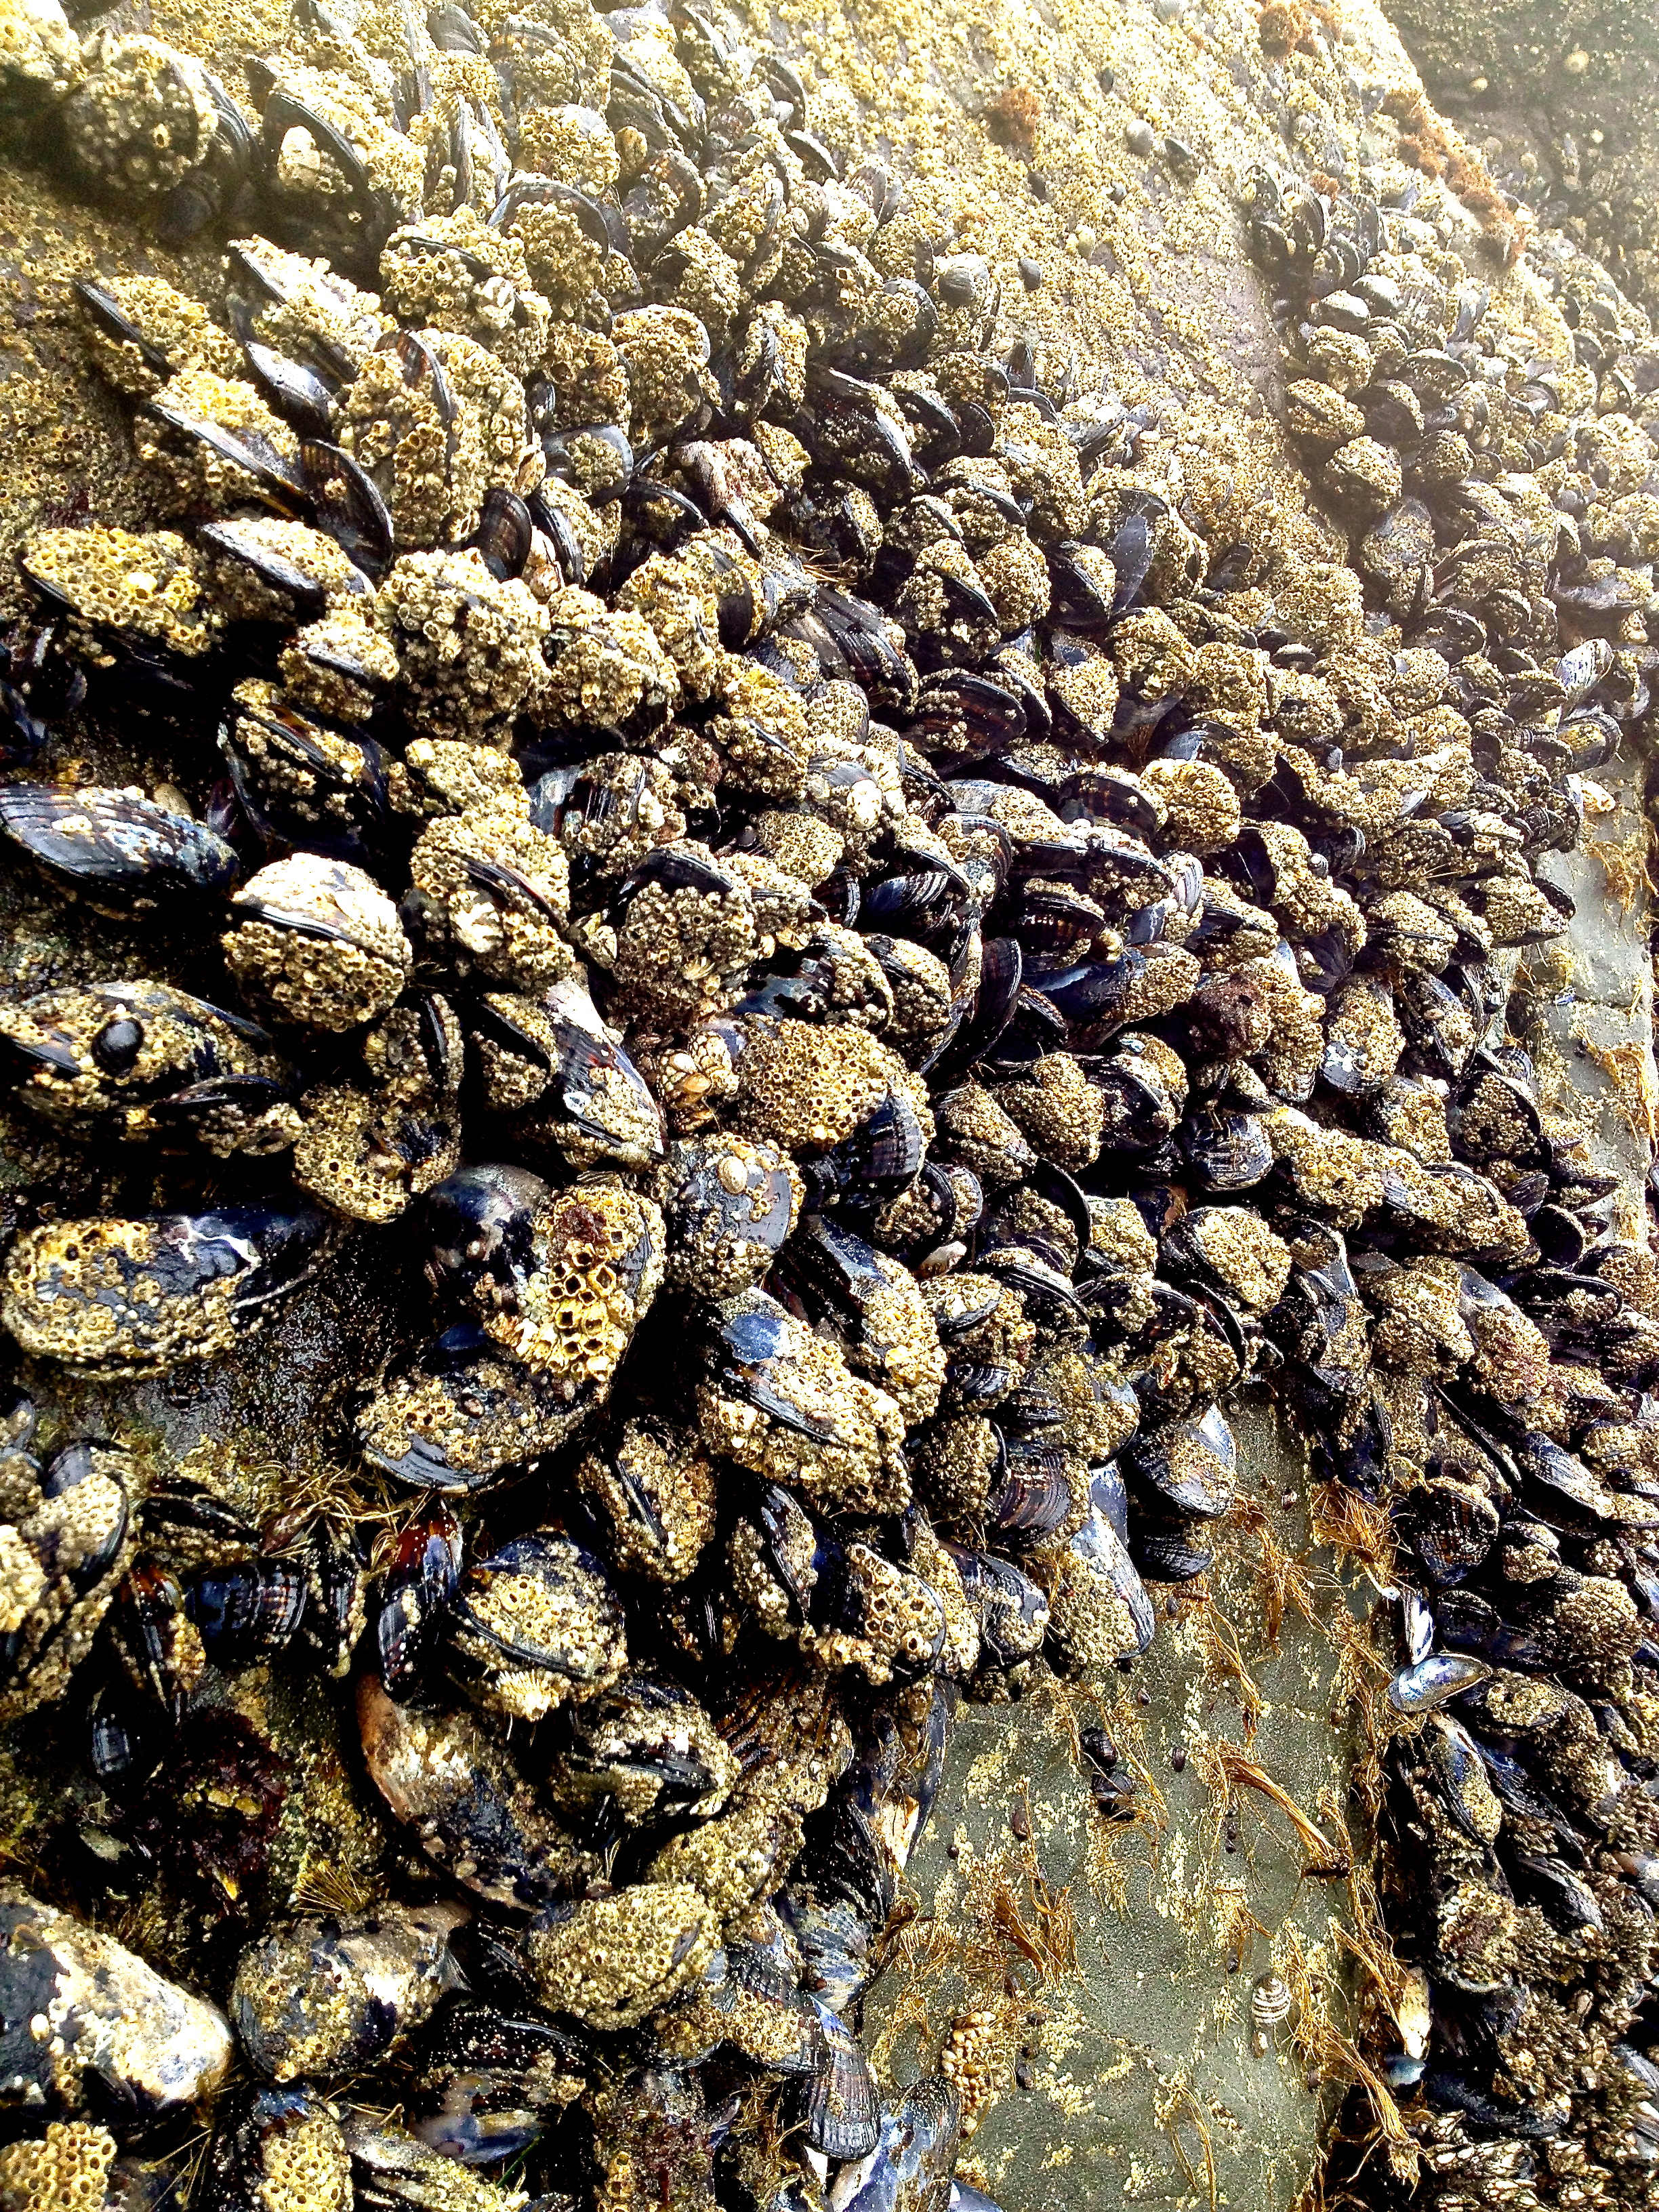
If you haven't been mussel foraging, it's easier than you think - I guarantee it. All that it requires is a little bit of forethought, gloves, and a bucket. The last time I went to Baker Beach in San Francisco and there were tons of mussels clinging to a few rocks and our buckets were filled in no time. Yes, the mussels can be a bit rugged in texture, but believe me, they're worth it! Here's what you need to know and do before you forage mussels in California:
Only go during the months from November to April. From May to October mussels are quarantined due to potential paralytic shellfish poisoning - not something you want to mess with.
Call the California Shellfish Biotoxin Information Line at 1-800-553-4133 to double check that waters are safe at the time that you plan to go (sometimes the quarantine for longer periods depending on weather and water conditions).
Stop by a drugstore and pick up a one-day fishing permit or purchase one online from the CA Department of Fish and Wildlife and bring it with you, otherwise you are subject to fines.
Go at low tide: Foraging mussels is best at low tide and mussels can often be found clinging to rocks near the water.
Mussels can only be pulled by hand, do not use other instruments, such as screwdrivers or crowbars.
Bring: Thick gloves, as the mussels can be sharp and a bucket, to hold your booty.
There is a collection limit of 10 pounds (in the shell) per permitted collector per day.
For more information about regulations, visit the CA Department of Fish and Wildlife.


Foraged Herbes de Provence

Sometimes, a blend of herbs is used so often that it is considered its own flavor. Herbes de Provence is such a mixture, typically including dried rosemary, lavender, and thyme, but it may also have other herbs common in the south of France such as oregano or marjoram.

What was the impetus for this combination and why do the flavors combine so well? Likely, not much thought went into what is now classic, but rather it was a “use what you have” scenario. One theory for successfully combining ingredients is that if ingredients share flavor compounds, which the Herbes de Provence ingredients, they will compliment each other. Although this hypothesis makes sense and is somewhat calming, as it gives us a succinct way to understand flavor combinations, it only really works in Western cuisine. In Eastern Asian cuisine on the other hand, recipes frequently avoid overlapping flavor compounds. The scientist in my wishes the theory was consistent for all foods, but the artist in me is inspired by the fact that opposites can attract.
This is more of a guide than a recipe, as it can be adapted to suit your needs and ingredient availability. We foraged our herbs on a hike in France, but that doesn’t mean you can't forage or purchase the same herbs from the U.S.! I highly recommended drying the herbs yourself, as dried herbs are often sitting on the shelf for very long periods of time and can be flavorless.
3 parts fresh rosemary, on the stem
3 parts fresh thyme, on the stem
1 part lavender, on the stem
Other Provençal herbs, as desired (marjoram, oregano, savory, etc.)
Allow herbs to dry by setting them apart from each other near sunlight and/or fresh air for 2-3 days. This may take longer if in a humid and/or cold climate.
Once herbs are completely dry, remove leaves from stems by running finger down spine into a bowl.

Crush herbs using a food processor or mortar and pestle to desired texture. I prefer herbs to be well, but not finely, crushed. Enjoy for up to a year.
Suggested uses: Herb-rolled chèvre (fresh or hot as in Chèvre Chaud salad), meat-rub, in olive oil for bread dipping, topping grilled vegetables.