

olive oil chocolate mousse
Bring out the rich chocolate flavor with olive oil and cardamom.

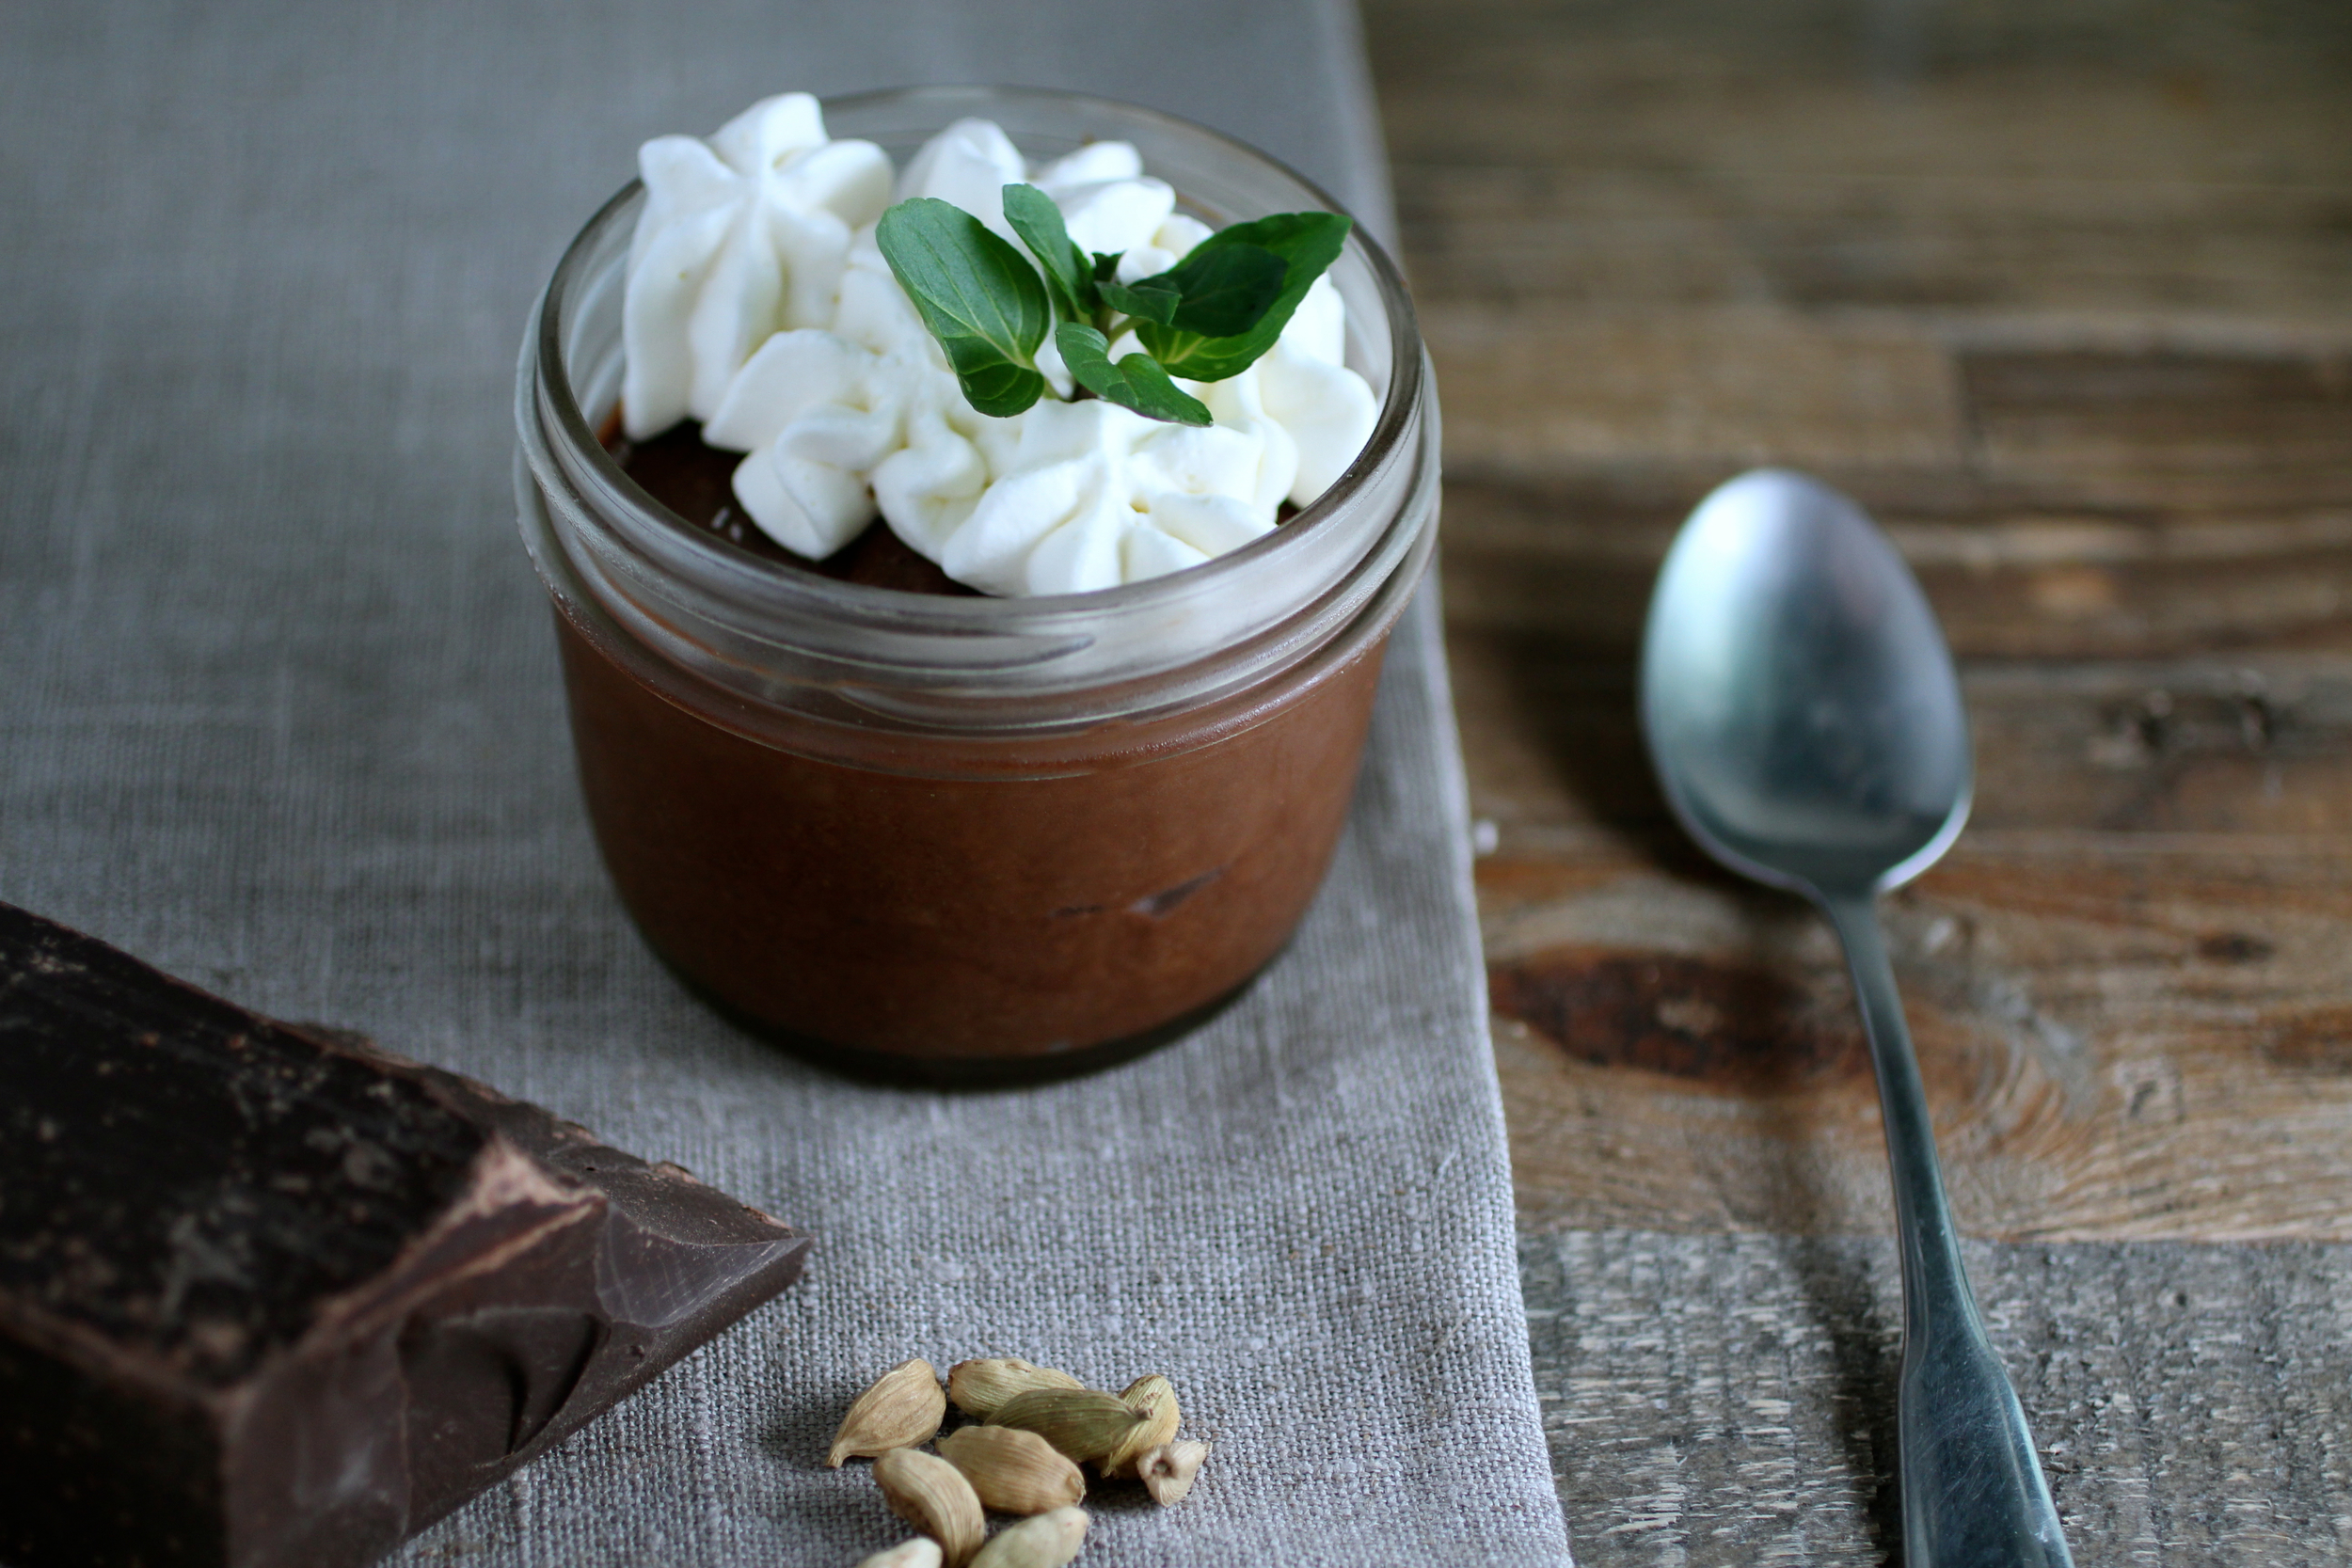
The first time I made this dairy-free chocolate mousse recipe adapted from What Einstein Told His Cook I had my doubts. Chocolate mousse without heavy whipping cream? Why bother. However, the final product did not disappoint - the whipped egg white proteins provided a delicate fluffy web that encased the rich egg yolk, chocolate, and olive oil. My twist was the addition of ground cardamom pods to put a Middle Eastern spin on a classically French dessert to help meld with the olive oil flavors and provide a bit more complexity and brightness. I also added a dollop of whipped cream (blerg, there goes the "dairy free" part, but you don't have to use it), a sprig of chocolate mint, grated dark chocolate, and a bit of coarse sea salt. The result was amazing - really, one of those desserts that people keep talking about. I will definitely be making this again. Serves 4 (servings aren't large, but are generous given how rich the dessert is).
4 oz very good dark chocolate (the darker the better), finely chopped
7-9 cardamom pods, seeds removed and ground with mortar and pestle or finely chopped (optional)
2 eggs, divided
1/2 cup powdered sugar
2 tablespoons very strong coffee at room temperature
1 tablespoon Cointreau (optional)
1/2 cup extra virgin olive oil
About 1/8 teaspoon sea salt
Whipped cream, fresh mint or chocolate mint, and grated chocolate, for garnish (optional)
Melt the chocolate in a double boiler, stirring occasionally. Mix in cardamom and set aside to cool while preparing the egg mixture.
In a large bowl, whisk the egg yolks and powdered sugar until pale yellow and fluffy (about 1 minute). Whisk in the coffee and Cointreau (optional) to combine then stir in the melted chocolate. Add olive oil and mix well.
In another medium bowl, beat the egg whites with an electric beater until stiff peaks have formed (stage III). Fold 1/3 of the egg whites into the chocolate mixture with a whisk until all patches of white disappear then fold in the remaining egg whites using a rubber spatula just until combined. Do not overmix.
Transfer mousse to individual serving cups and refrigerate until well-chilled, at least 1 hour or overnight. Serve with whipped cream and optional fresh mint leaves and grated chocolate.
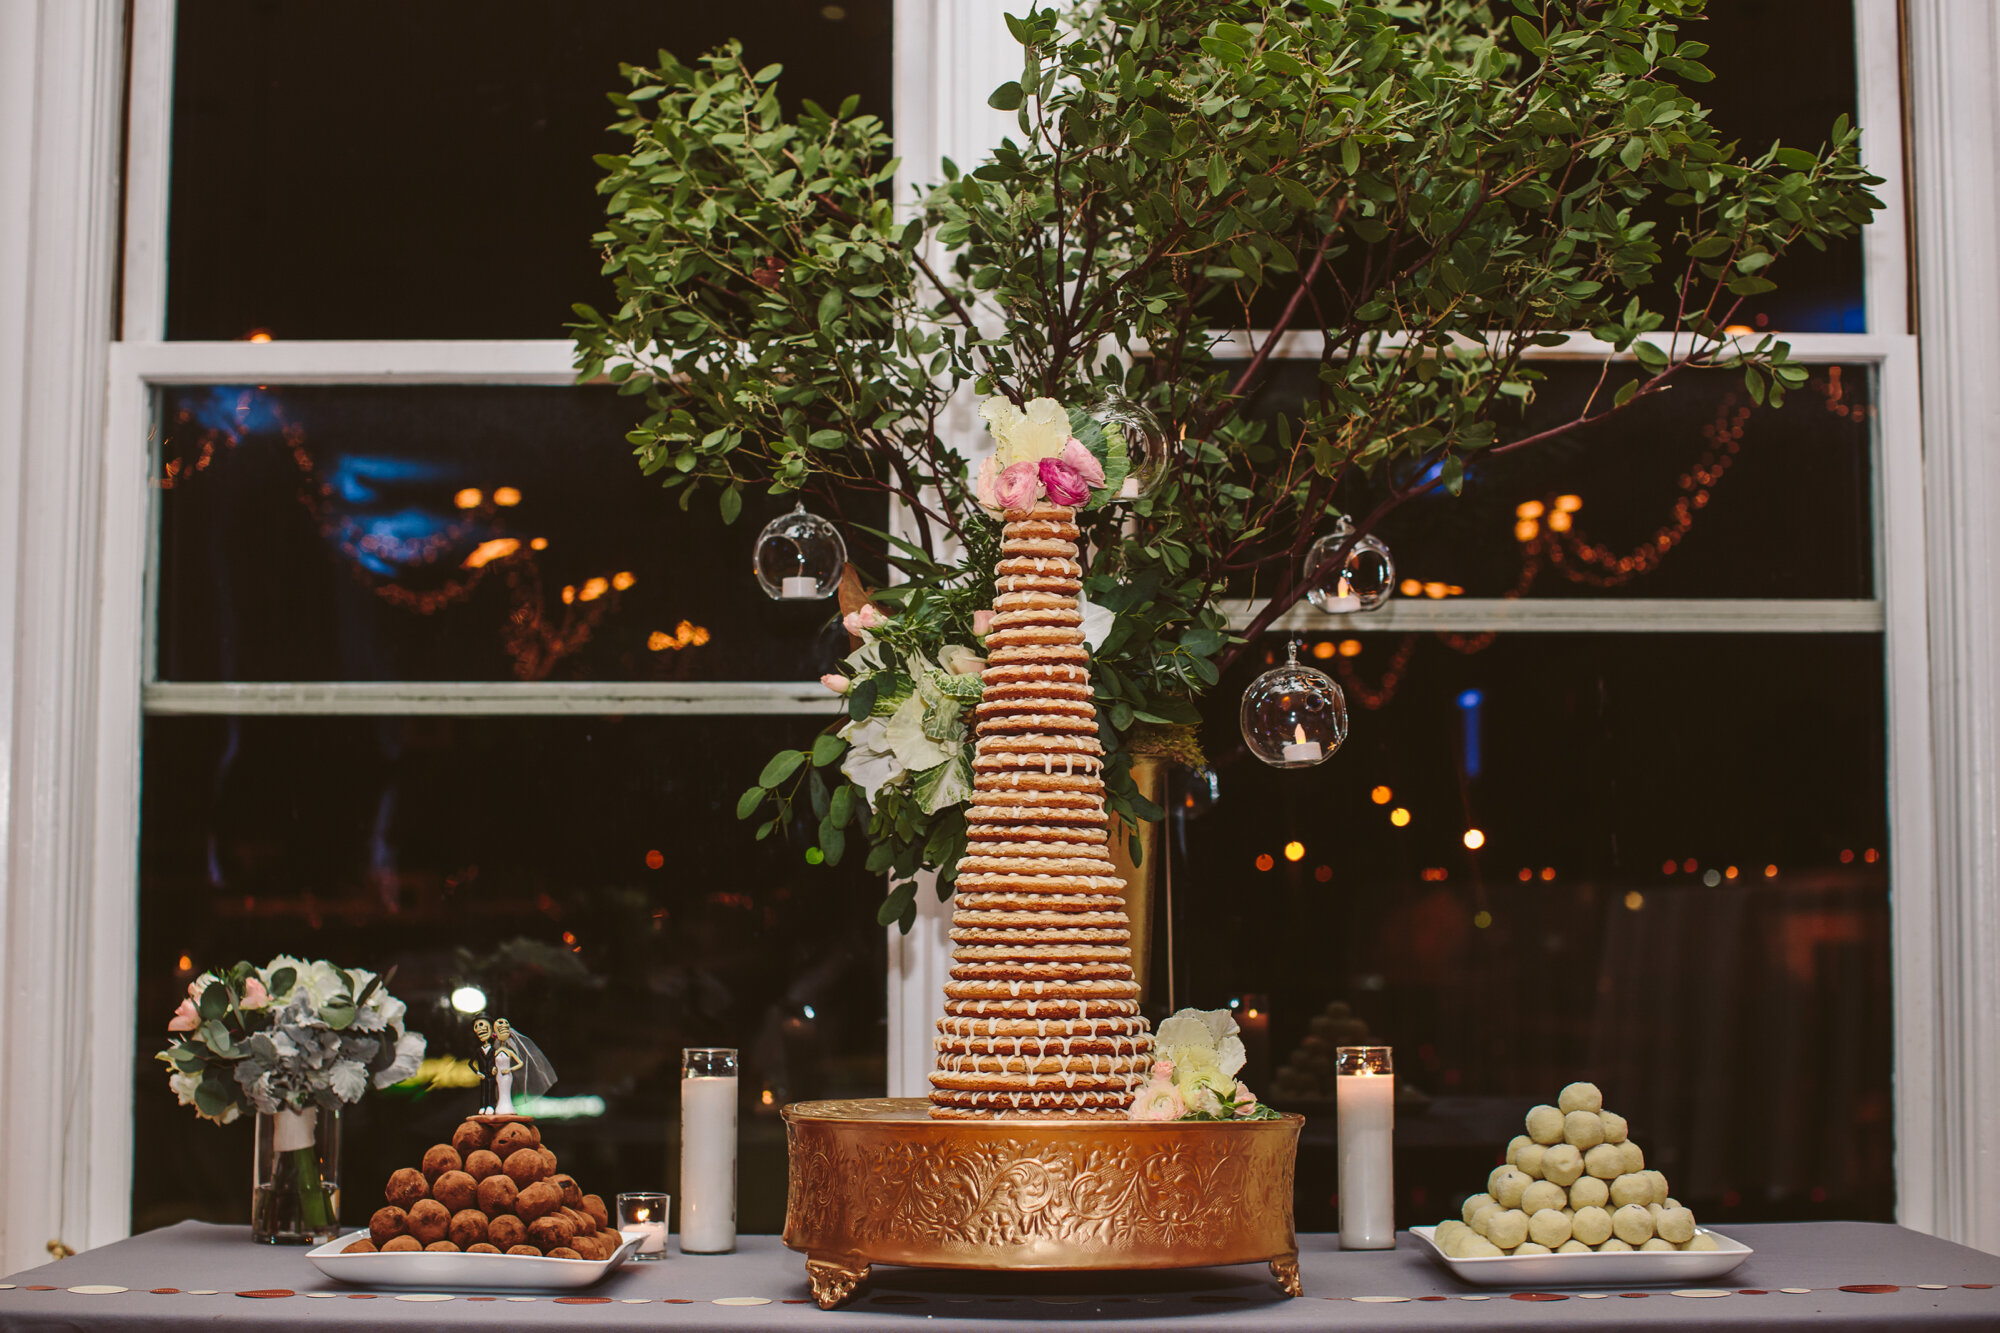
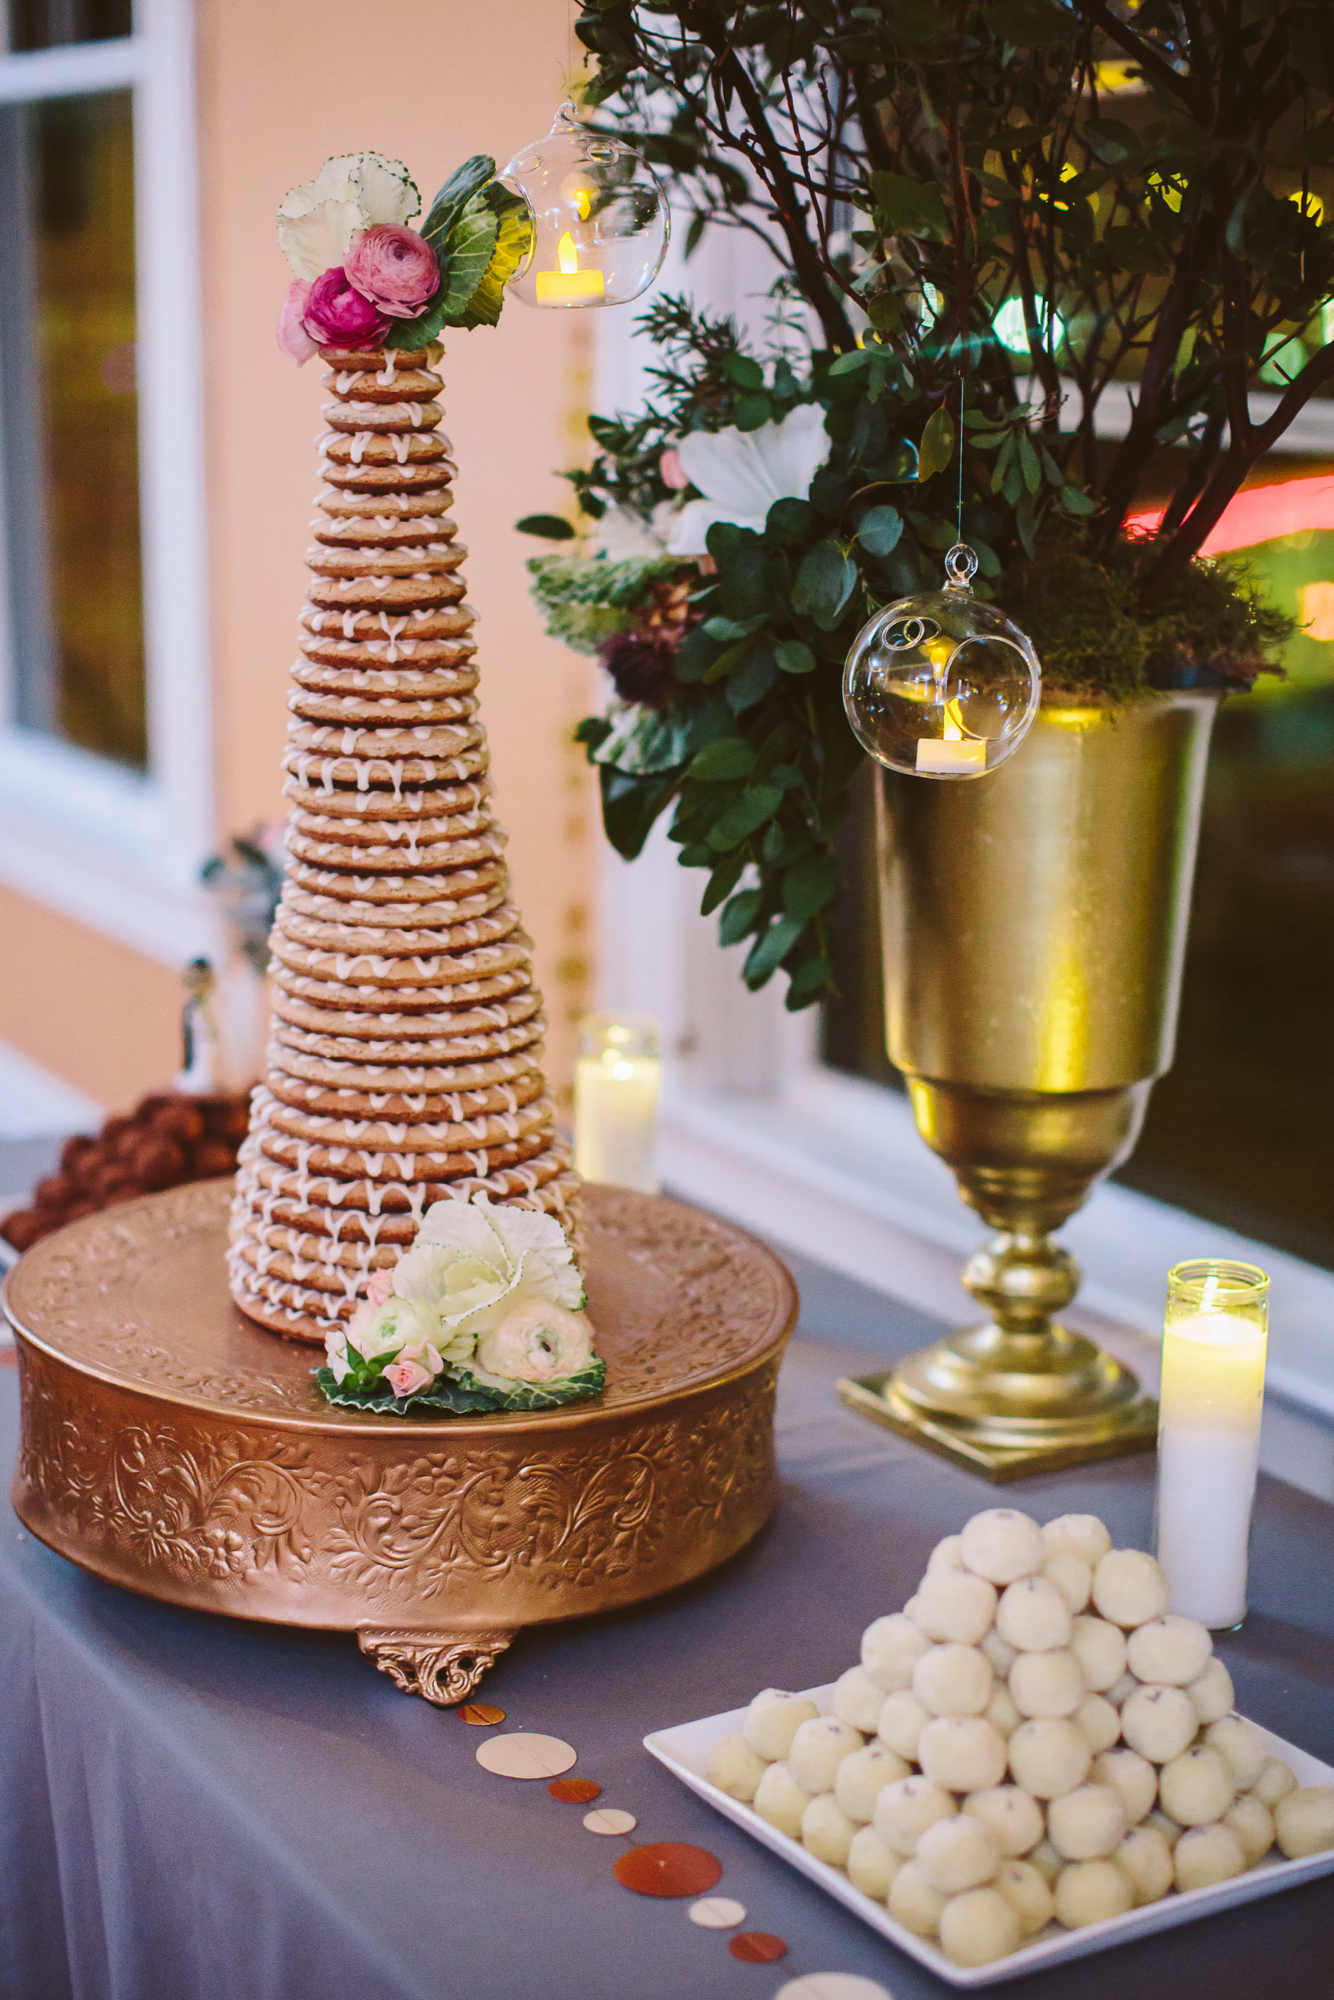
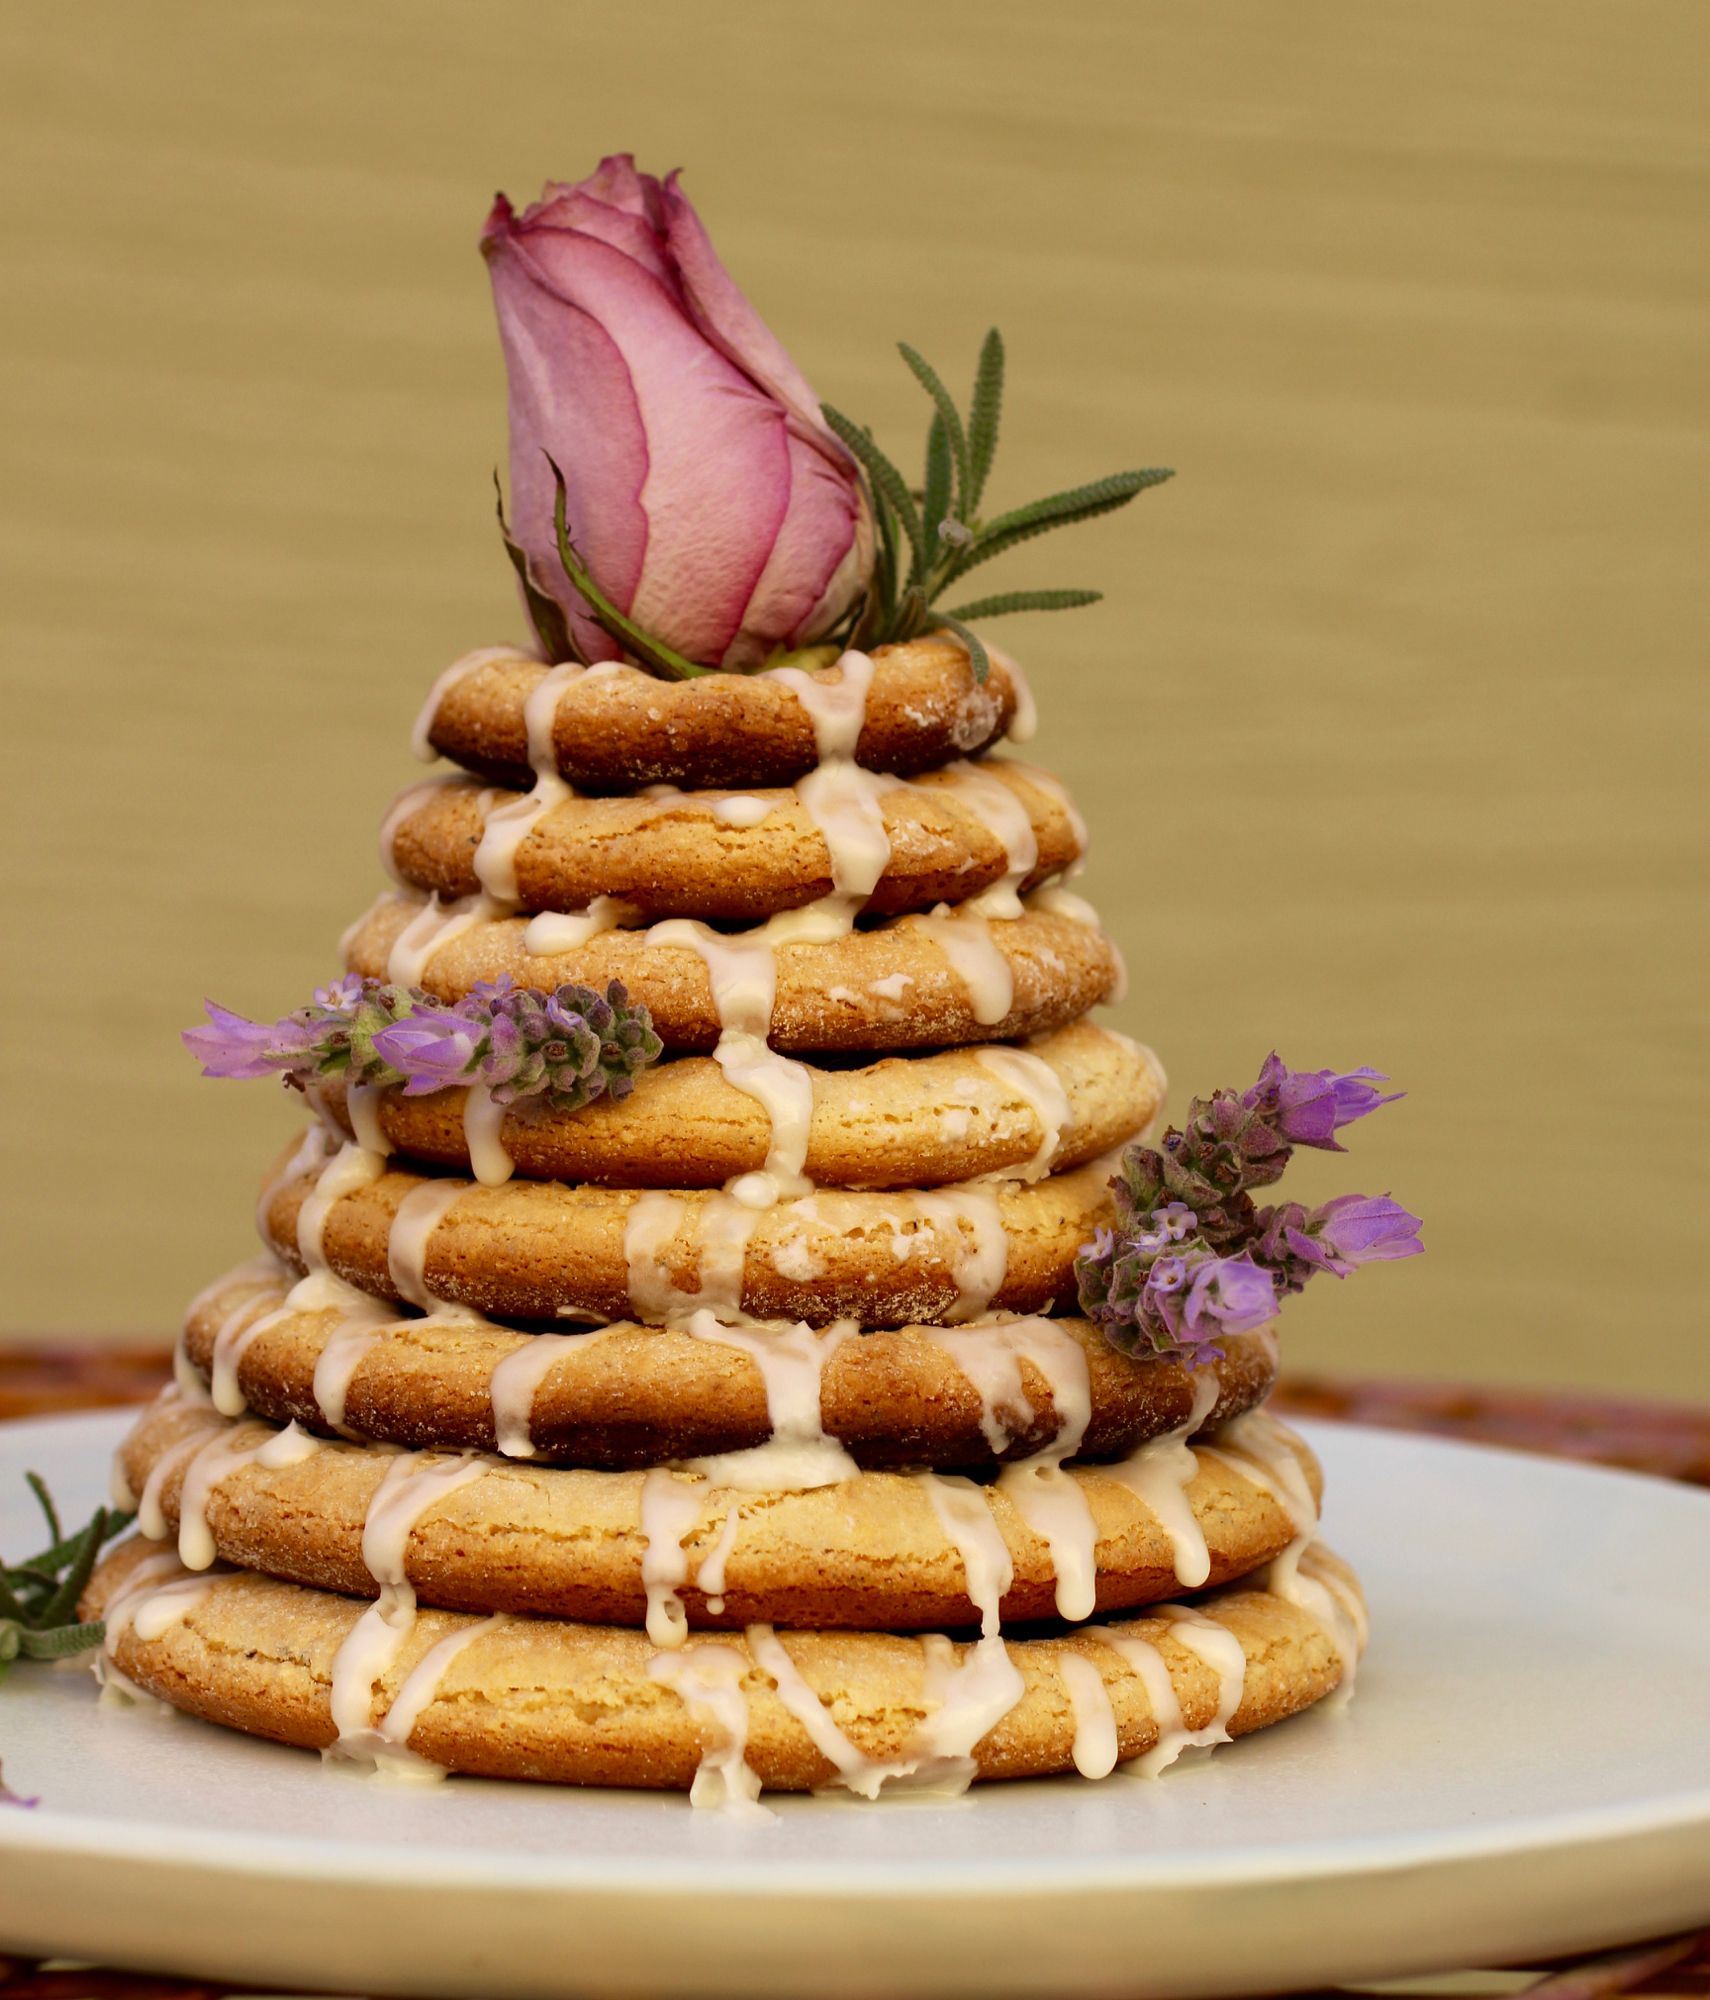
Kransekage: Danish almond (wedding) ring cake
Cardamom-flavored chewy rings traditional at weddings and New Year's Eve parties.

Beautifully stacked kransekage tower.
Like many Americans, I can trace my ancestry back to many, many different countries. However, whether because my last name is Rasmussen, a classic Danish last name, (and my great-grandfather was Rasmus Rasmussen) or because I just love the culture so much, I feel the biggest connection to my Scandinavian-Danish heritage. So when I was betrothed and started diving into the (very wide) world of weddings, I immediately began looking up Scandinavian and Danish wedding traditions. There were a few traditions that jumped out at me, including one that involves cutting the groom's tie to symbolize his imminent wife's good sewing skills, which we decided to forego, but just one that stuck. Naturally, the one that stuck was the traditional wedding cake, called Kransekage.
More cookie than cake, kransekage is typically served at weddings and New Year's Eve parties and our wedding just happened to be on December 31st. The cake rings symbolize wedding rings and I suppose for NYE they are symbolic of the year going 'round and 'round, but I'm just hypothesizing. Apart from the serendipity, I was also drawn to kransekage because it's flavored with cardamom, probably my favorite dessert flavoring, and made with almond meal, egg white, and sugar, which is a recipe for success in my book. Lemon zest is the final ingredient that provides a welcome brightness. That's right, just a total of five ingredients and if you're into the world of gluten free (I eat everything, but just sayin'), then this dessert is for you. On a romantic note, serving this cake at our wedding made sense because my now husband visited me in Denmark (I was on a research stint there for a summer) way back when we first started dating. I've told him numerous times that if he hadn't visited it probably wouldn't have worked out because, I mean, come on - live a little! Luckily, he did.
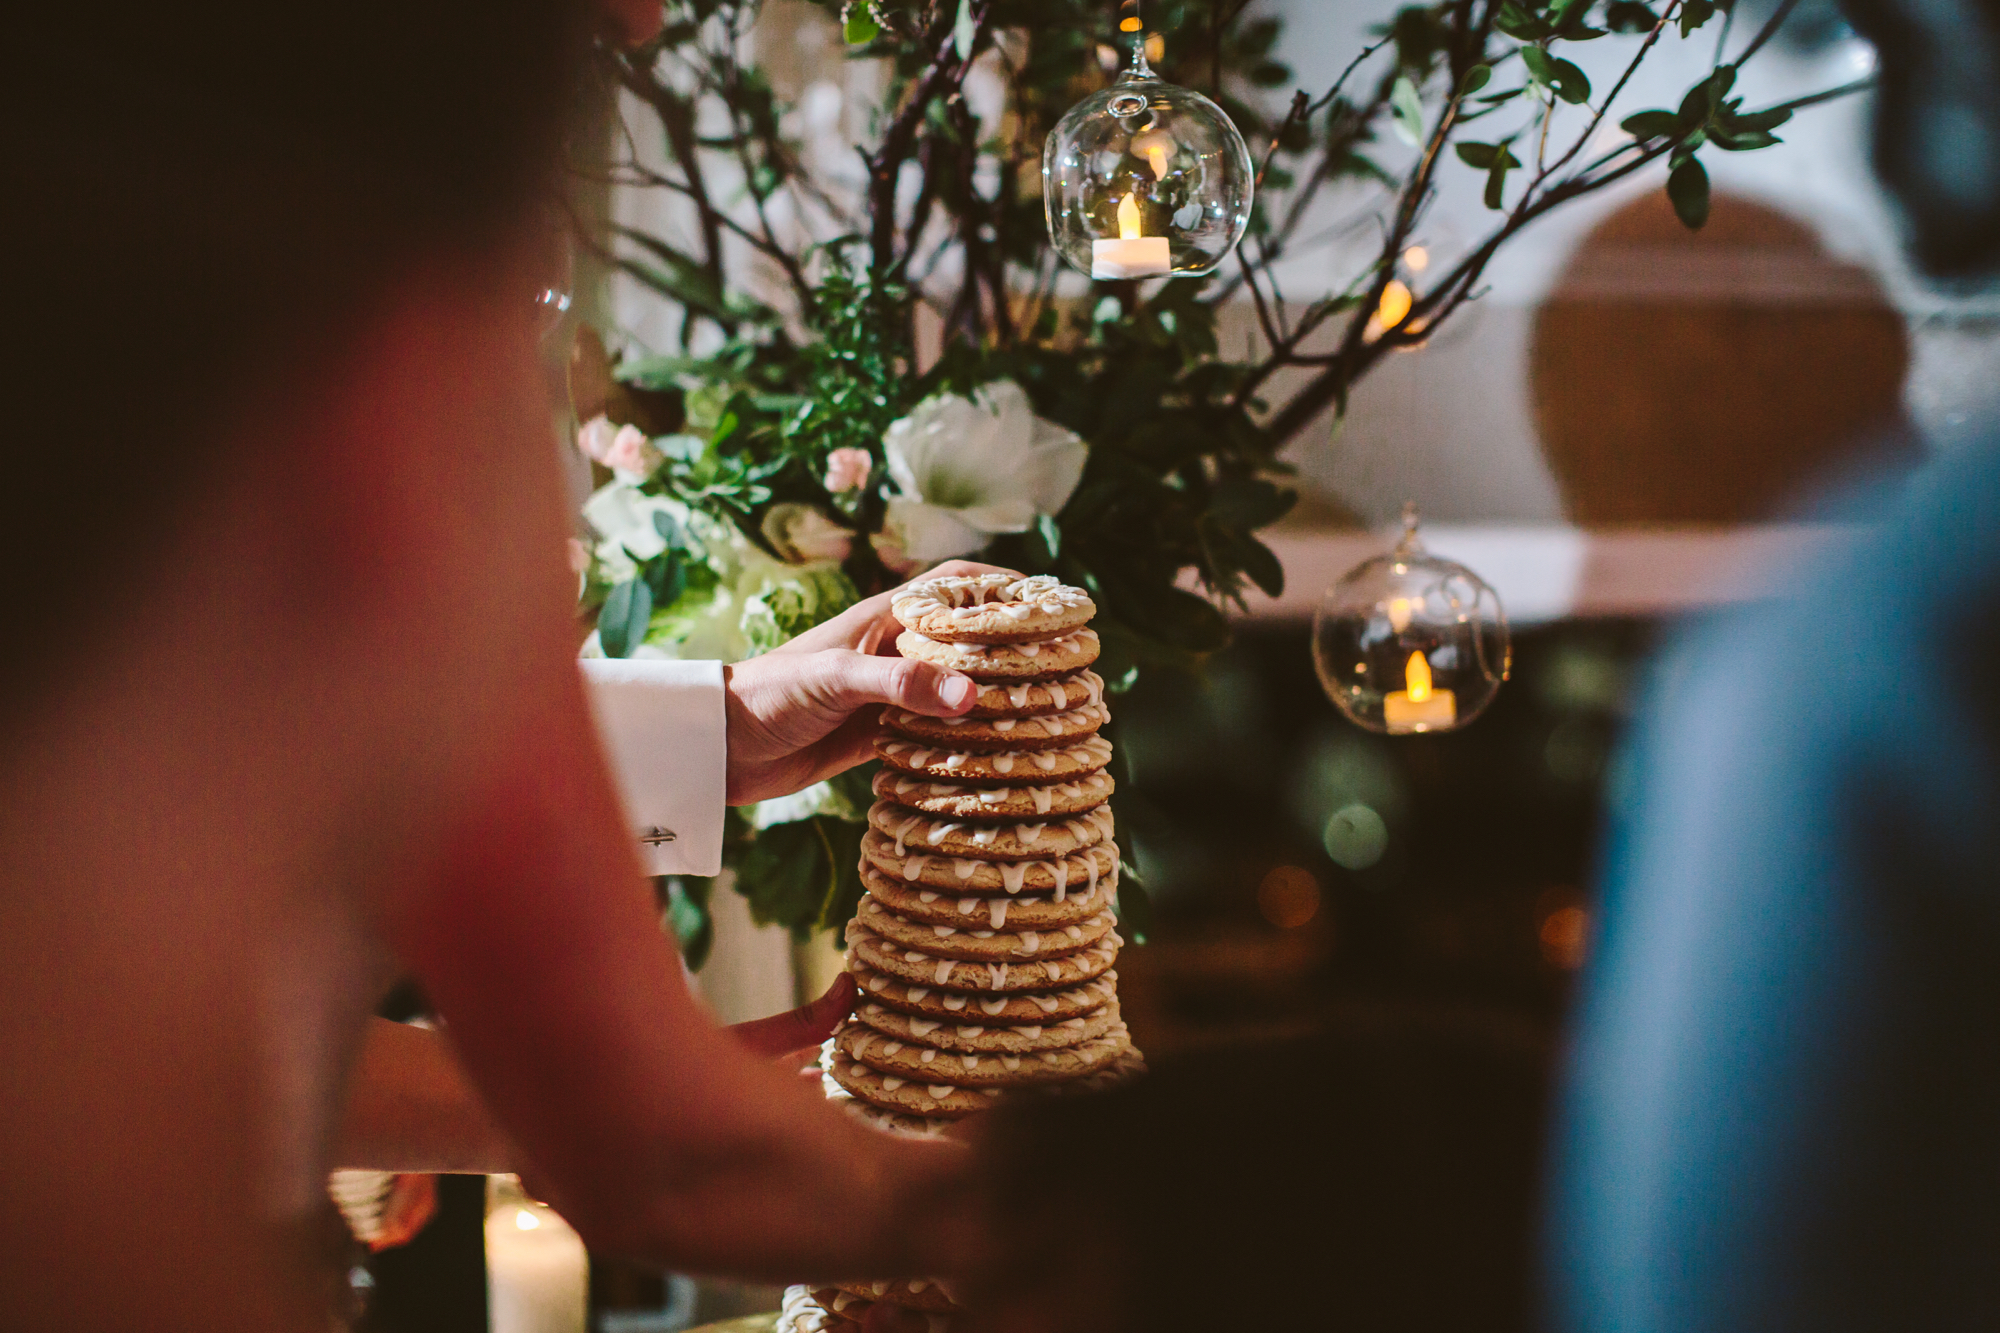
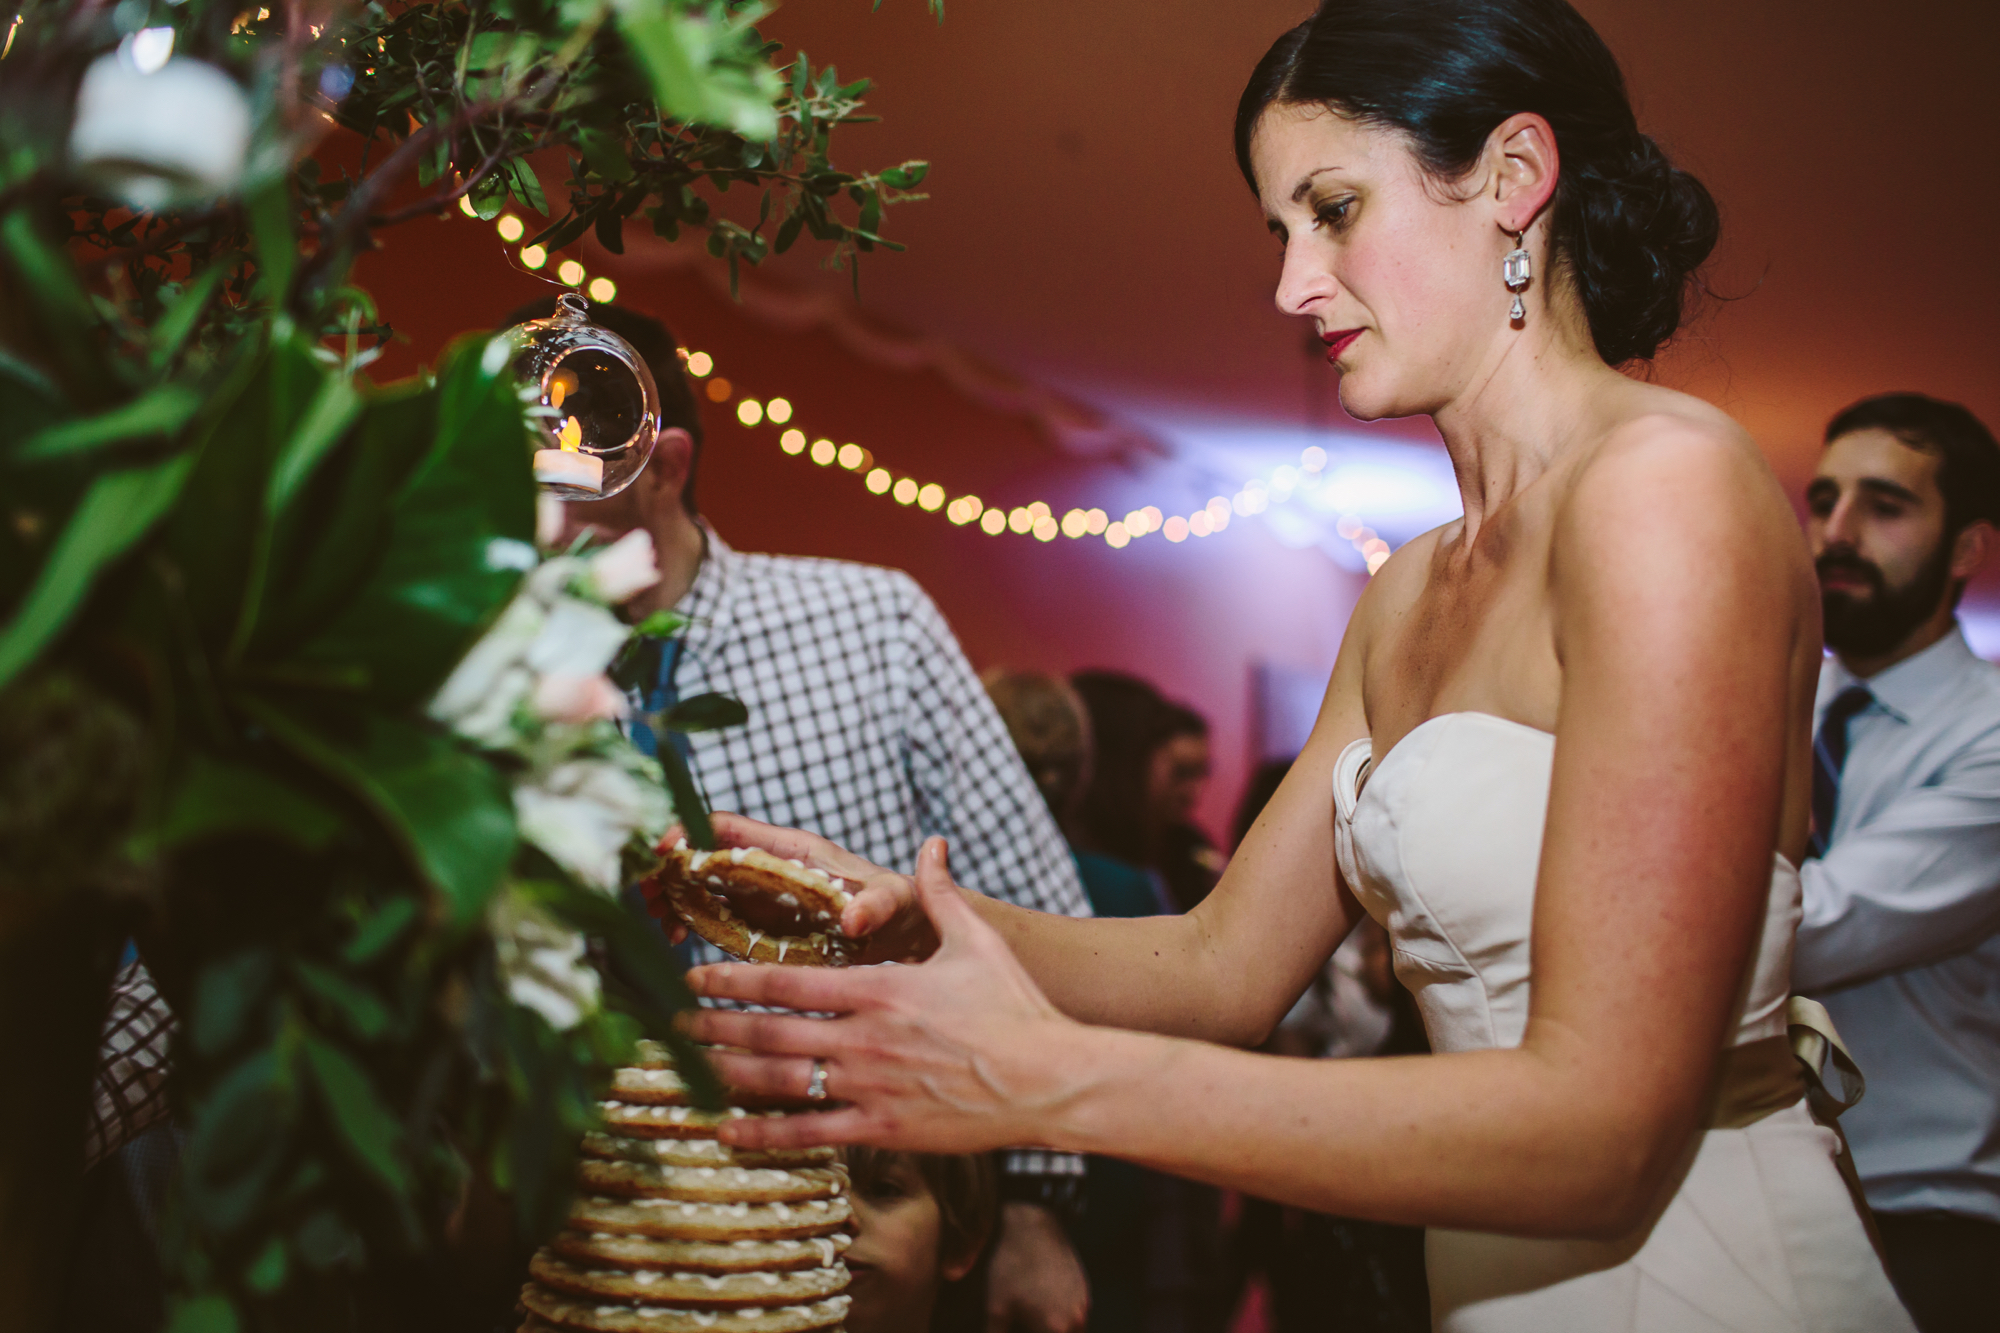

I originally intended to purchase a kransekage cake from a baker for the wedding, but being the crazy person that I am, I ended up making it. I'm not saying this to brag (okay, maybe I am just a little), but really - the cake is that easy that a bride can make it for her own wedding! I made my other friend's more classic American wedding cake and I would never put that pressure on myself as a bride. Also, I did have some delicious back-up truffles made by a local baker just in case. The great thing about this cake is that, in addition to being super simple and forgiving, you are supposed to make it a few days in advance to let the rings reach their optimal chewiness. Truly! Don't let the fact that you need special pans turn you away, as you can buy them on Amazon for twenty bucks. That being sad, I am absolutely willing to sell this cake to anyone who's interested in my making it for their wedding!
My wedding cake test-run.
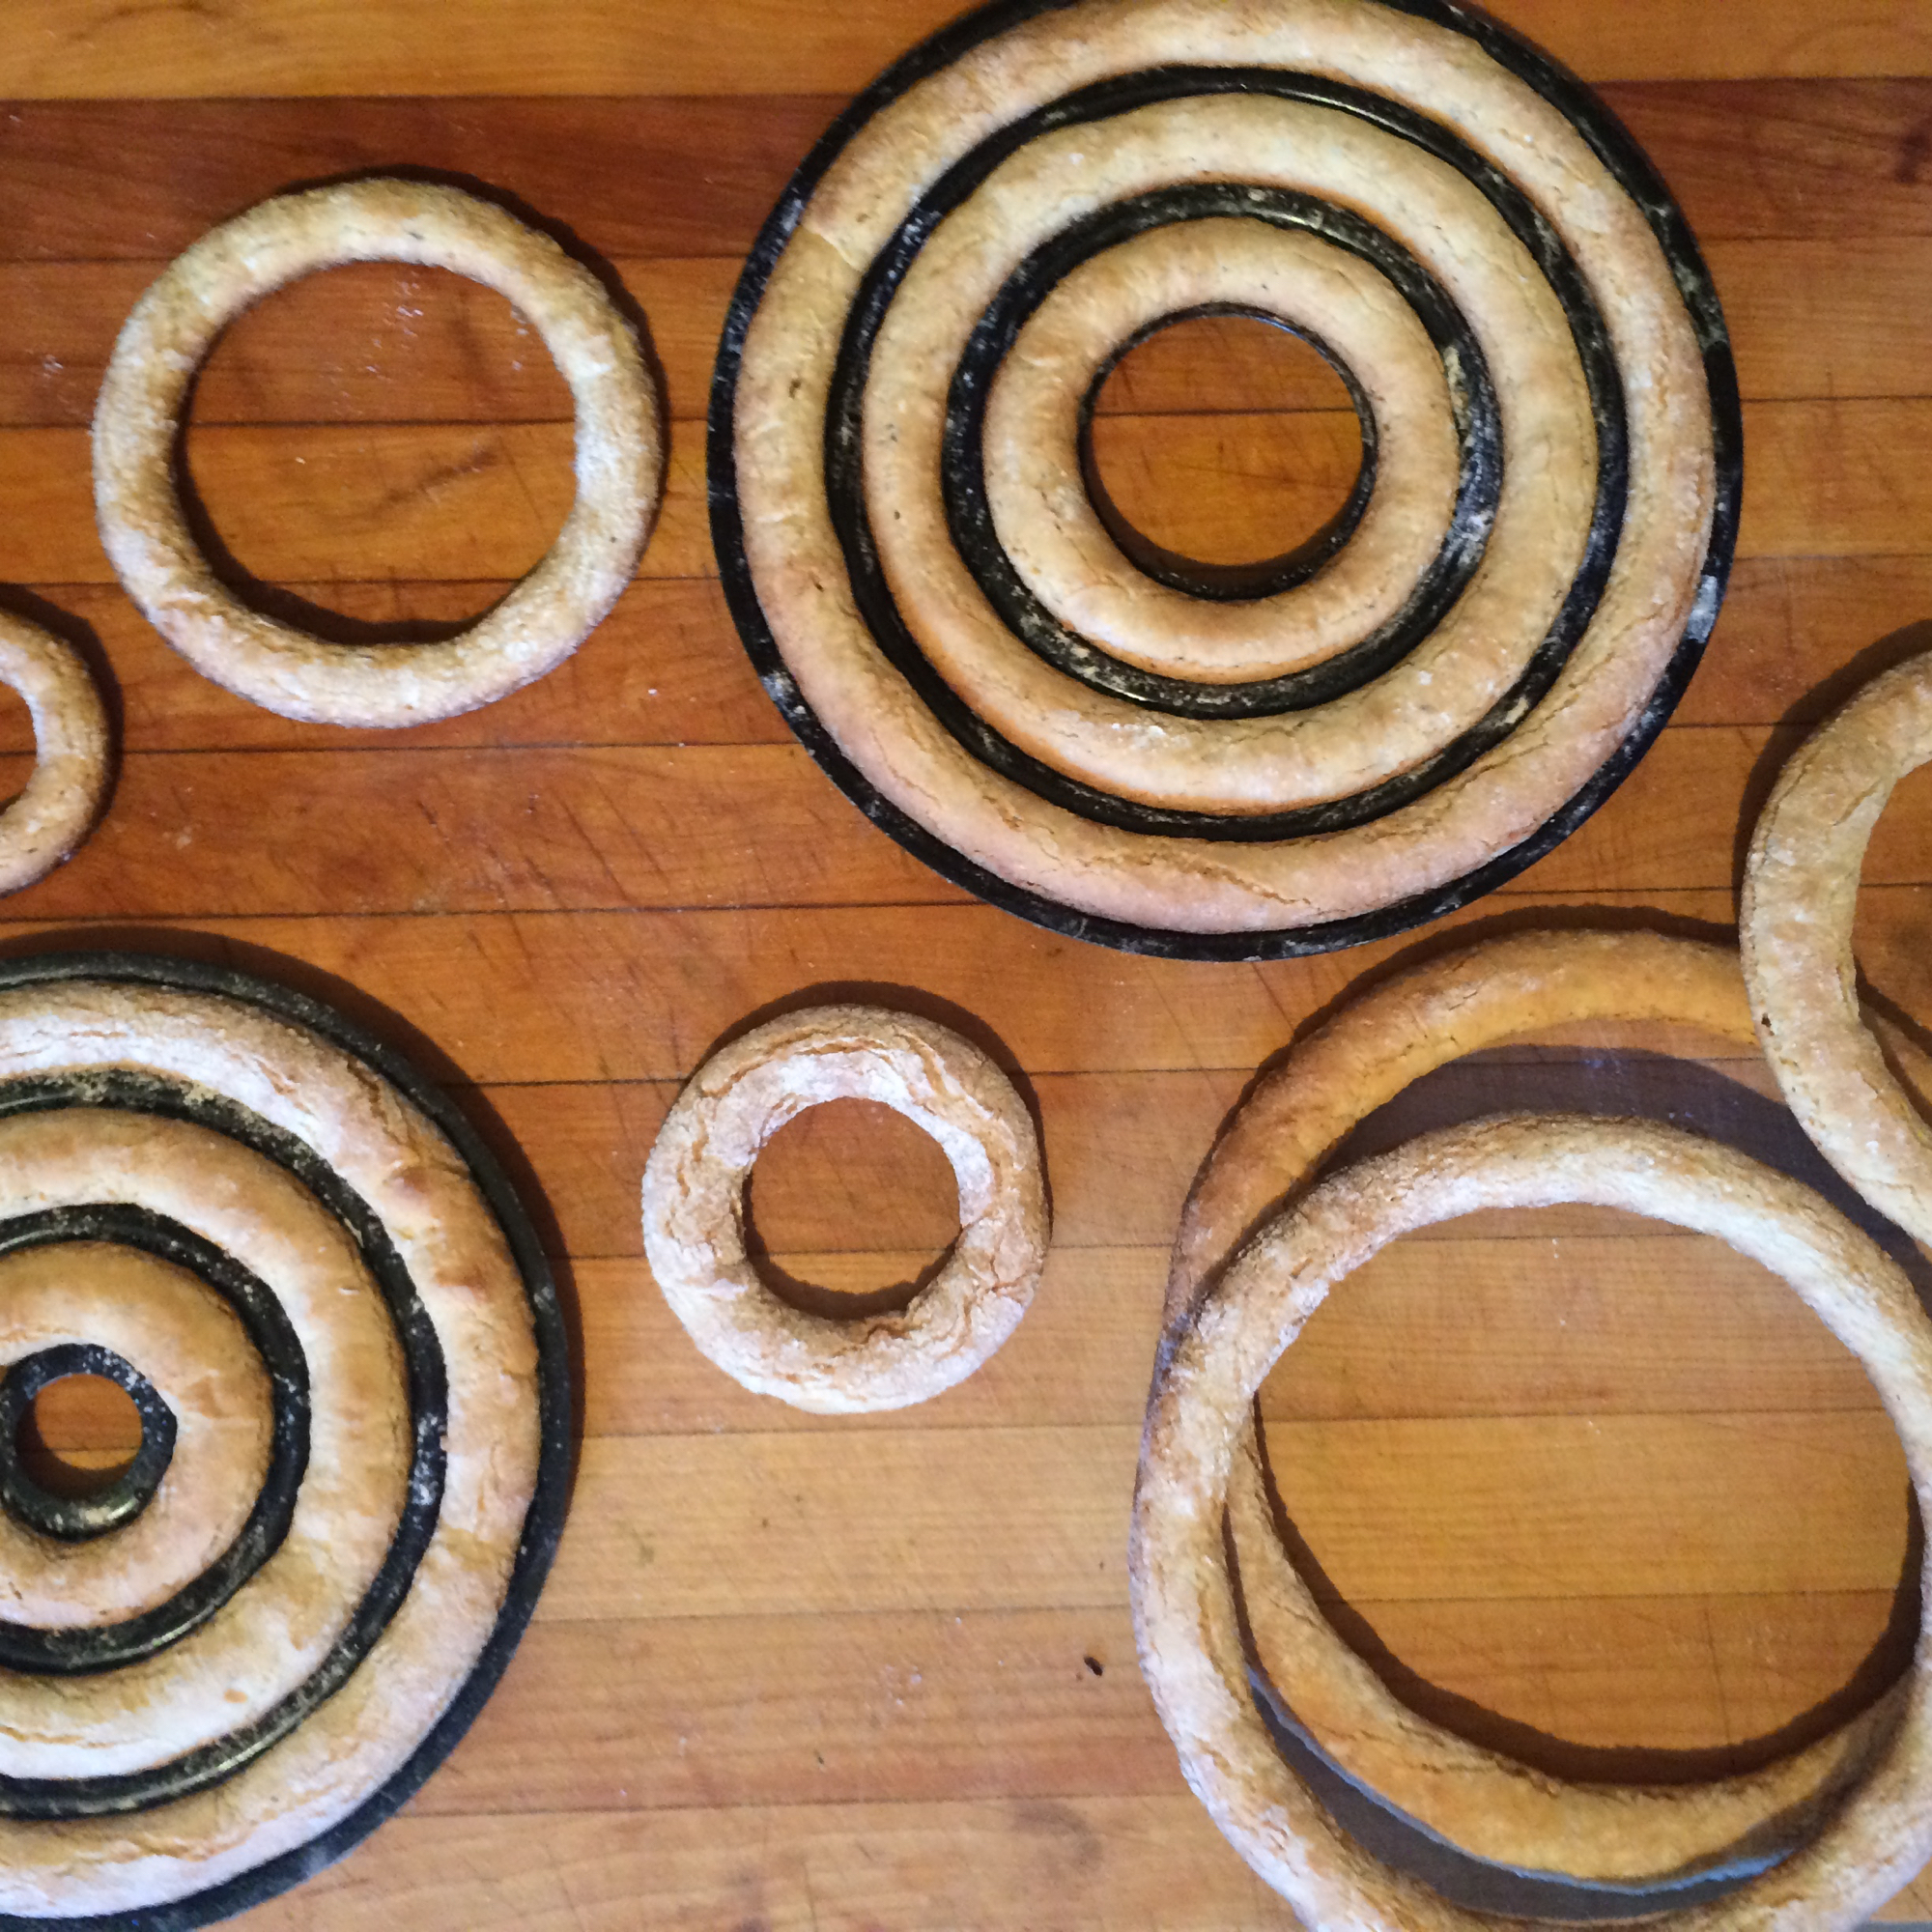
Almond-cardamom cake rings fresh from the oven.
I've been meaning to post this recipe for some time, but now that it's been nearly a year since our wedding(!) and I plan on making it again for our anniversary/NYE, I thought it was the appropriate time. Below I have the recipe to make about one (set of) pan's worth as well as 3x that, which is what I used for the wedding that served about 80 adults (though it went fast!) The preparation method is same for both. The measurements are in metric weight and U.S. volume, which I know is strange, but that's what worked the best for me!
Krasnsekage A Ingredients*: Makes enough dough for one set of these pans (~25 servings)
410 grams almond flour or finely ground almond meal (125g/cup), Bob's Red Mill's normal bag is 450g almond flour
410 grams powdered sugar
Up to 40 grams gluten-free, rice, or all-purpose flour (about 9g/Tbs, I ended up adding 3 Tbs at first, then 4 more Tbs)
3 tsp freshly grated lemon zest
3 tsp ground cardamom
1/2 tsp salt
3 large egg whites (= 90g)
Extra flour and grapeseed oil or cooking oil spray for greasing the molds
1 set of kransekage ring molds (18 rings)
Krasnsekage B Ingredients*: Makes enough dough for 3x one set of these pans (~80 servings)
1,100 grams (1¼ lbs) almond flour, or finely ground almond meal (125g/cup), Bob’s Red Mill normal bag is 450g almond flour
1,100 grams (1¼lbs) powdered sugar
Up to 100 grams (about 3/4 cup) gluten-free, rice, or all-purpose flour (about 9g/Tbs, I ended up adding 1/4 cup at first, then 6 more tablespoons)
2 tablespoons plus 2 teaspoons freshly grated lemon zest
2 tablespoons plus 2 teaspoons ground cardamom
1-1/2 teaspoons salt
8 large egg whites
Extra flour and grapeseed oil or cooking oil spray for greasing the molds
1 set of kransekage ring molds (18 rings)
Preparation: Same for both versions, but you'll prepare and bake 3 batches for Kransekage B.
Preheat the oven to 400°F. Spray the ring molds with cooking oil spray or lightly brush them with grapeseed oil. Lightly dust them with flour. Set them onto cookie sheets.
In a large bowl or bowl of electric mixer, combine the ground almonds, icing sugar, one-half of the flour, lemon zest, cardamom, and salt. Mix on low speed using hand mixer or Cuisinart to combine. Add egg whites one at time and beating well after each addition.
The dough should be starting to come together and come away from the sides of the bowl. You can tell if the dough is moist and pliable enough by pinching some of it between your fingers. It should stick nicely together. If it is too moist, add more flour by tablespoon. You are aiming for the texture of soft ‘playdough’.
Scrape the dough onto your work surface and pat it into a large ball. Cut the ball into quarters and roll each chunk into a smaller ball. Work with one ball at a time and keep the rest covered with plastic wrap to prevent them from drying out.
Roll each ball into a long, even rope. I found it handy to use a ruler to keep the ropes uniform. For my 18-ring set of molds, 1/2 inch thick. Lay a piece of rope into one ring at a time, pinching off the excess length and smoothing the ends together to seamlessly join them. The dough is very forgiving, and it`s easy to re-roll a few rings if you don`t have enough dough to make the last ones.
Bake in the preheated oven, in batches, for 8-12 minutes, until the rings are a golden caramel color. The smaller ring pans tend to cook faster, so check on them at 8 minutes.
Leave the cakes to cool in the pans, then carefully remove them. You may have to insert a knife tip underneath the rings to help them pop out of the pans. For Kransekage B, cool the cakes before removing, then wash, dry, and re-grease the pans for the next batch. Store cakse at room temperature for a 1-3 days, preferably 48 hours to give the perfect amount of chewiness. I found that it was better to leave to open air than putting in plastic bags.
Icing Recipe: Make below x1 for Kransekage A and x3 for Kransekage B
1 small egg white
1.5 cups (225 gms or ¼lb) icing sugar
1 teaspoons fresh lemon juice
Icing Preparation: Whisk together the egg white(s) and icing sugar. Add enough lemon juice to make it a good drizzling consistency. Spoon the icing into a piping bag with a small round tip, a squeezable plastic piping bottle made for icing, or a heavy duty plastic bag and snip off a tiny bit of one corner to make a round hole.
To assemble the cake, lay out your rings in order of size. Start with the largest ring and attach it to your base or plate with a ring of icing. Pipe zig-zags of icing loosely over the top of the ring. I added an extra squeeze of icing all the way around the ring, as added insurance since this wedding cake was so tall. If you are making a regular height cake, you won`t need the extra ring of icing -the zig-zags will be enough to hold the rings together. Place the next smallest ring on top and repeat. Continue until you reach the smallest ring at the top.
<img src="https://images.squarespace-cdn.com/content/v1/53df581ae4b0461efc5879aa/1481141410783-4NQ94ALIT65IOCK998HM/image-asset.jpeg" alt="The cake worked!" />

The cake worked!
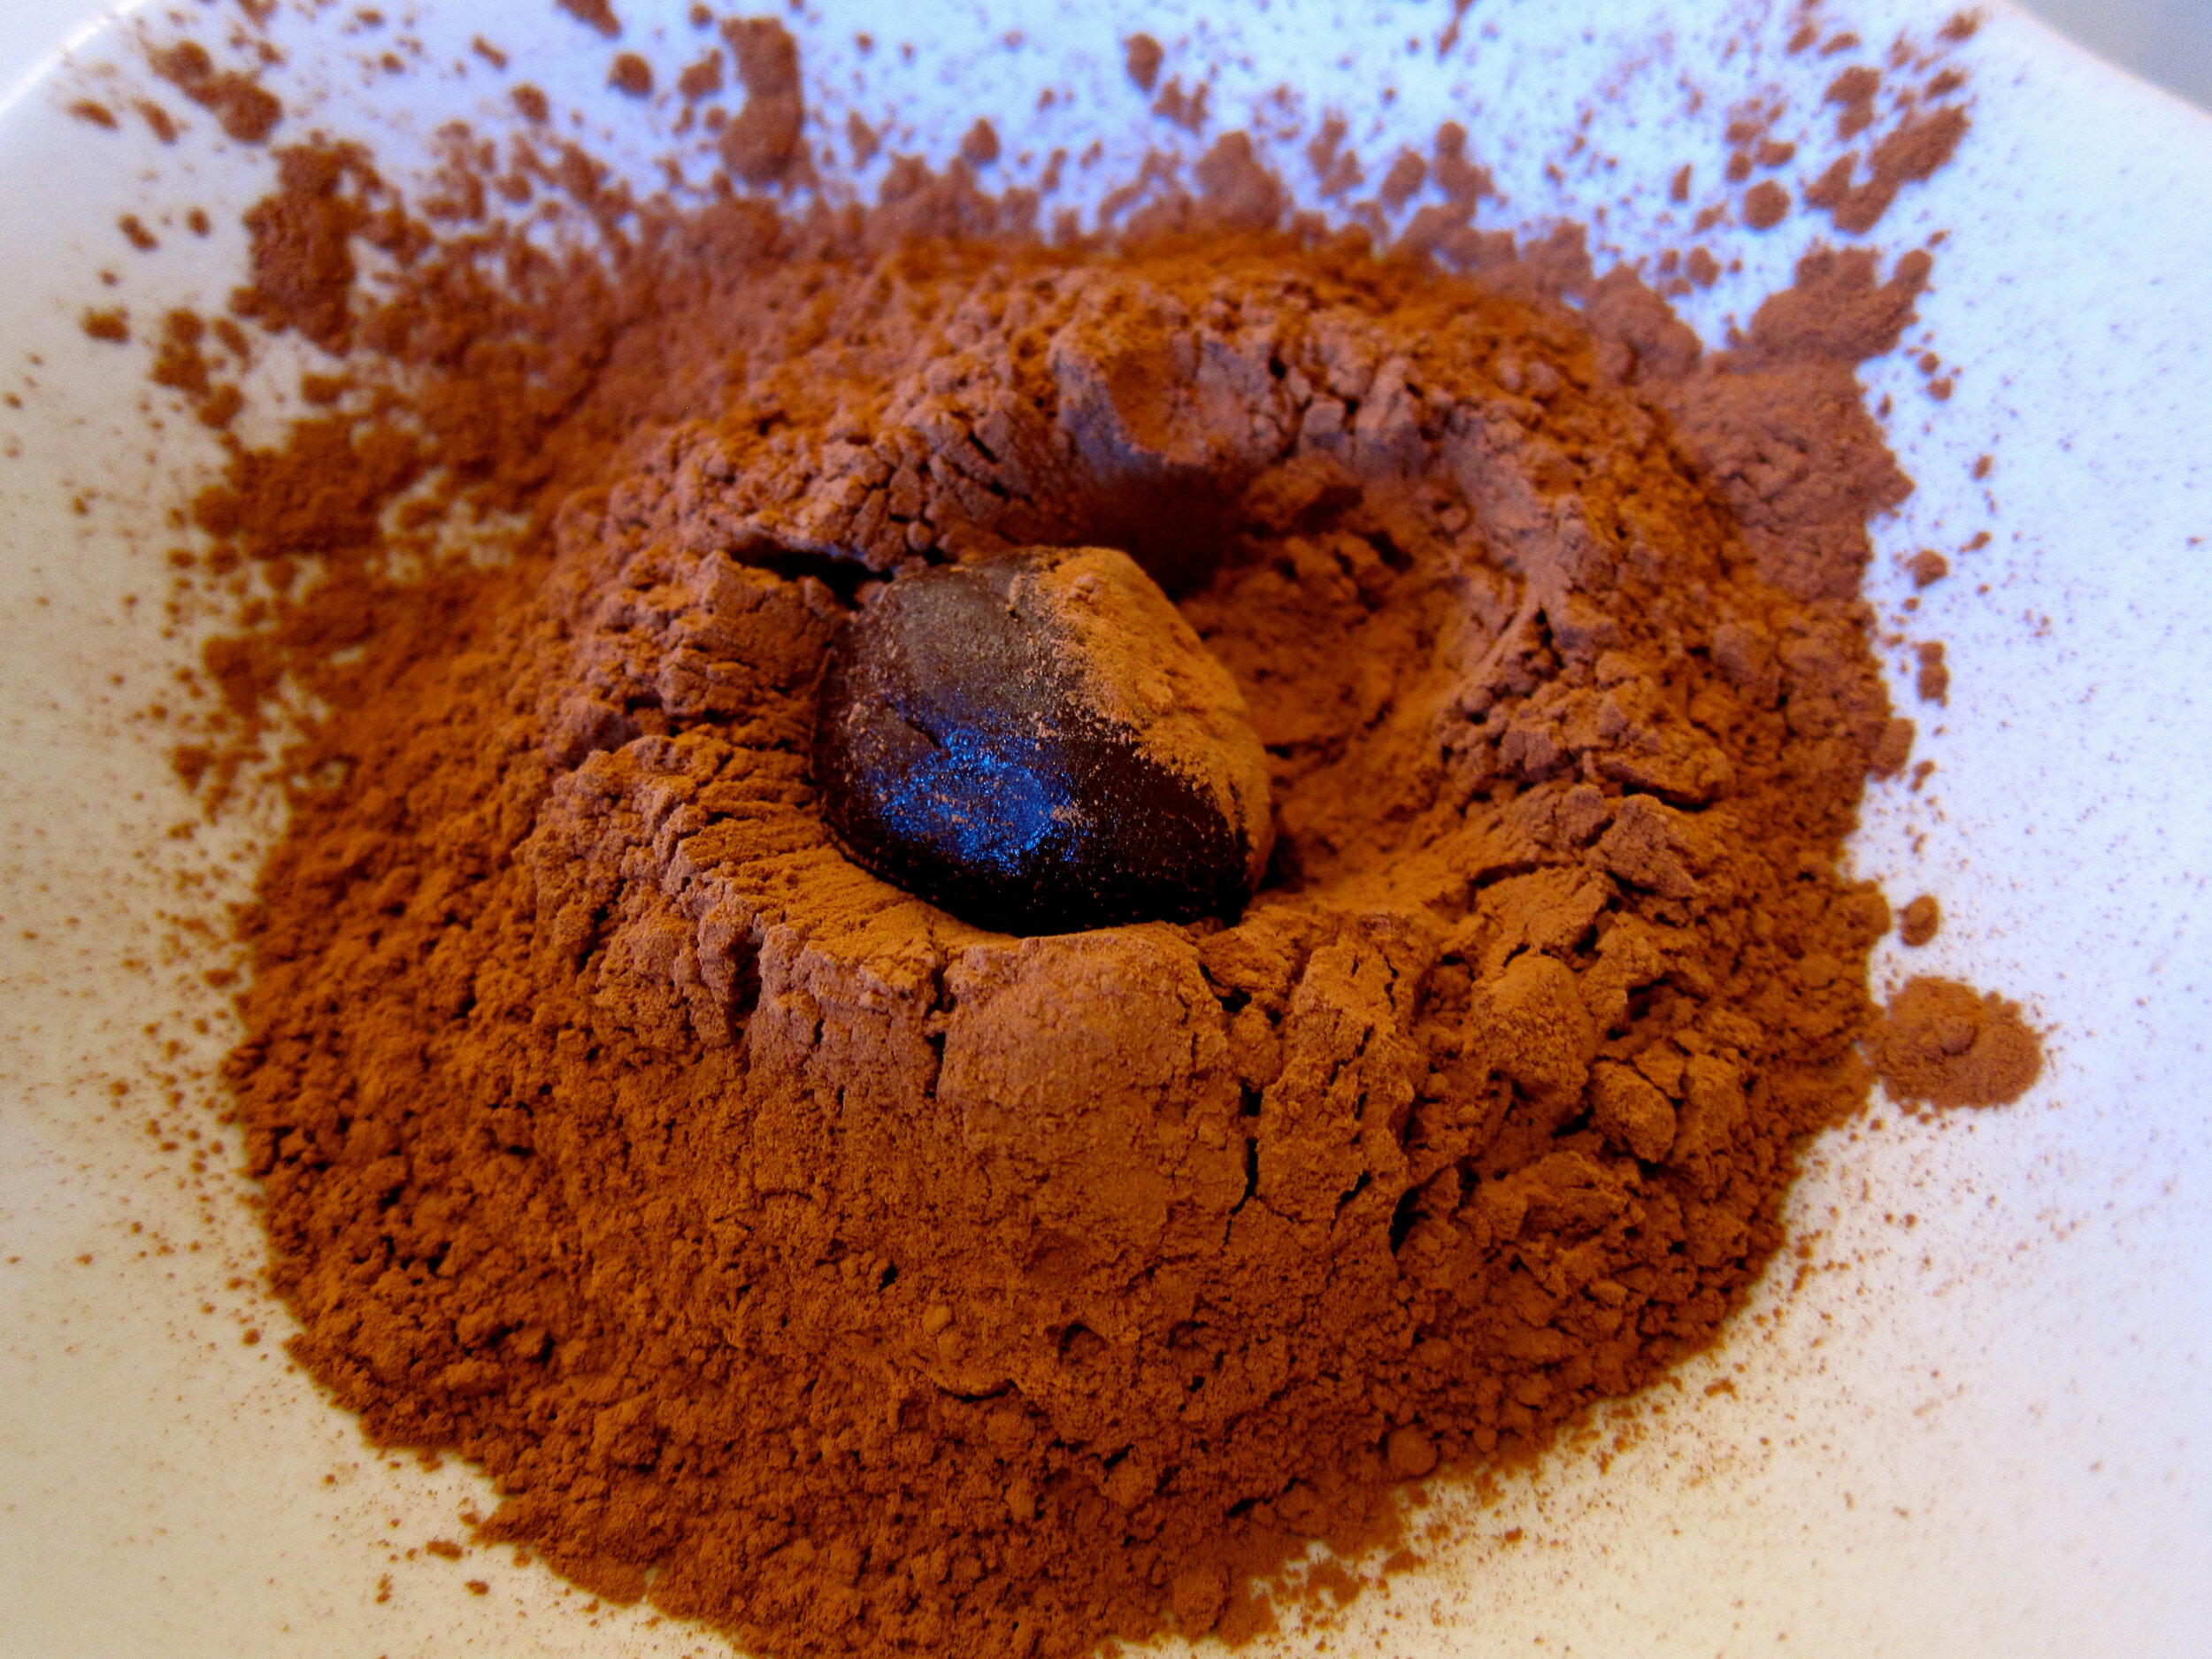
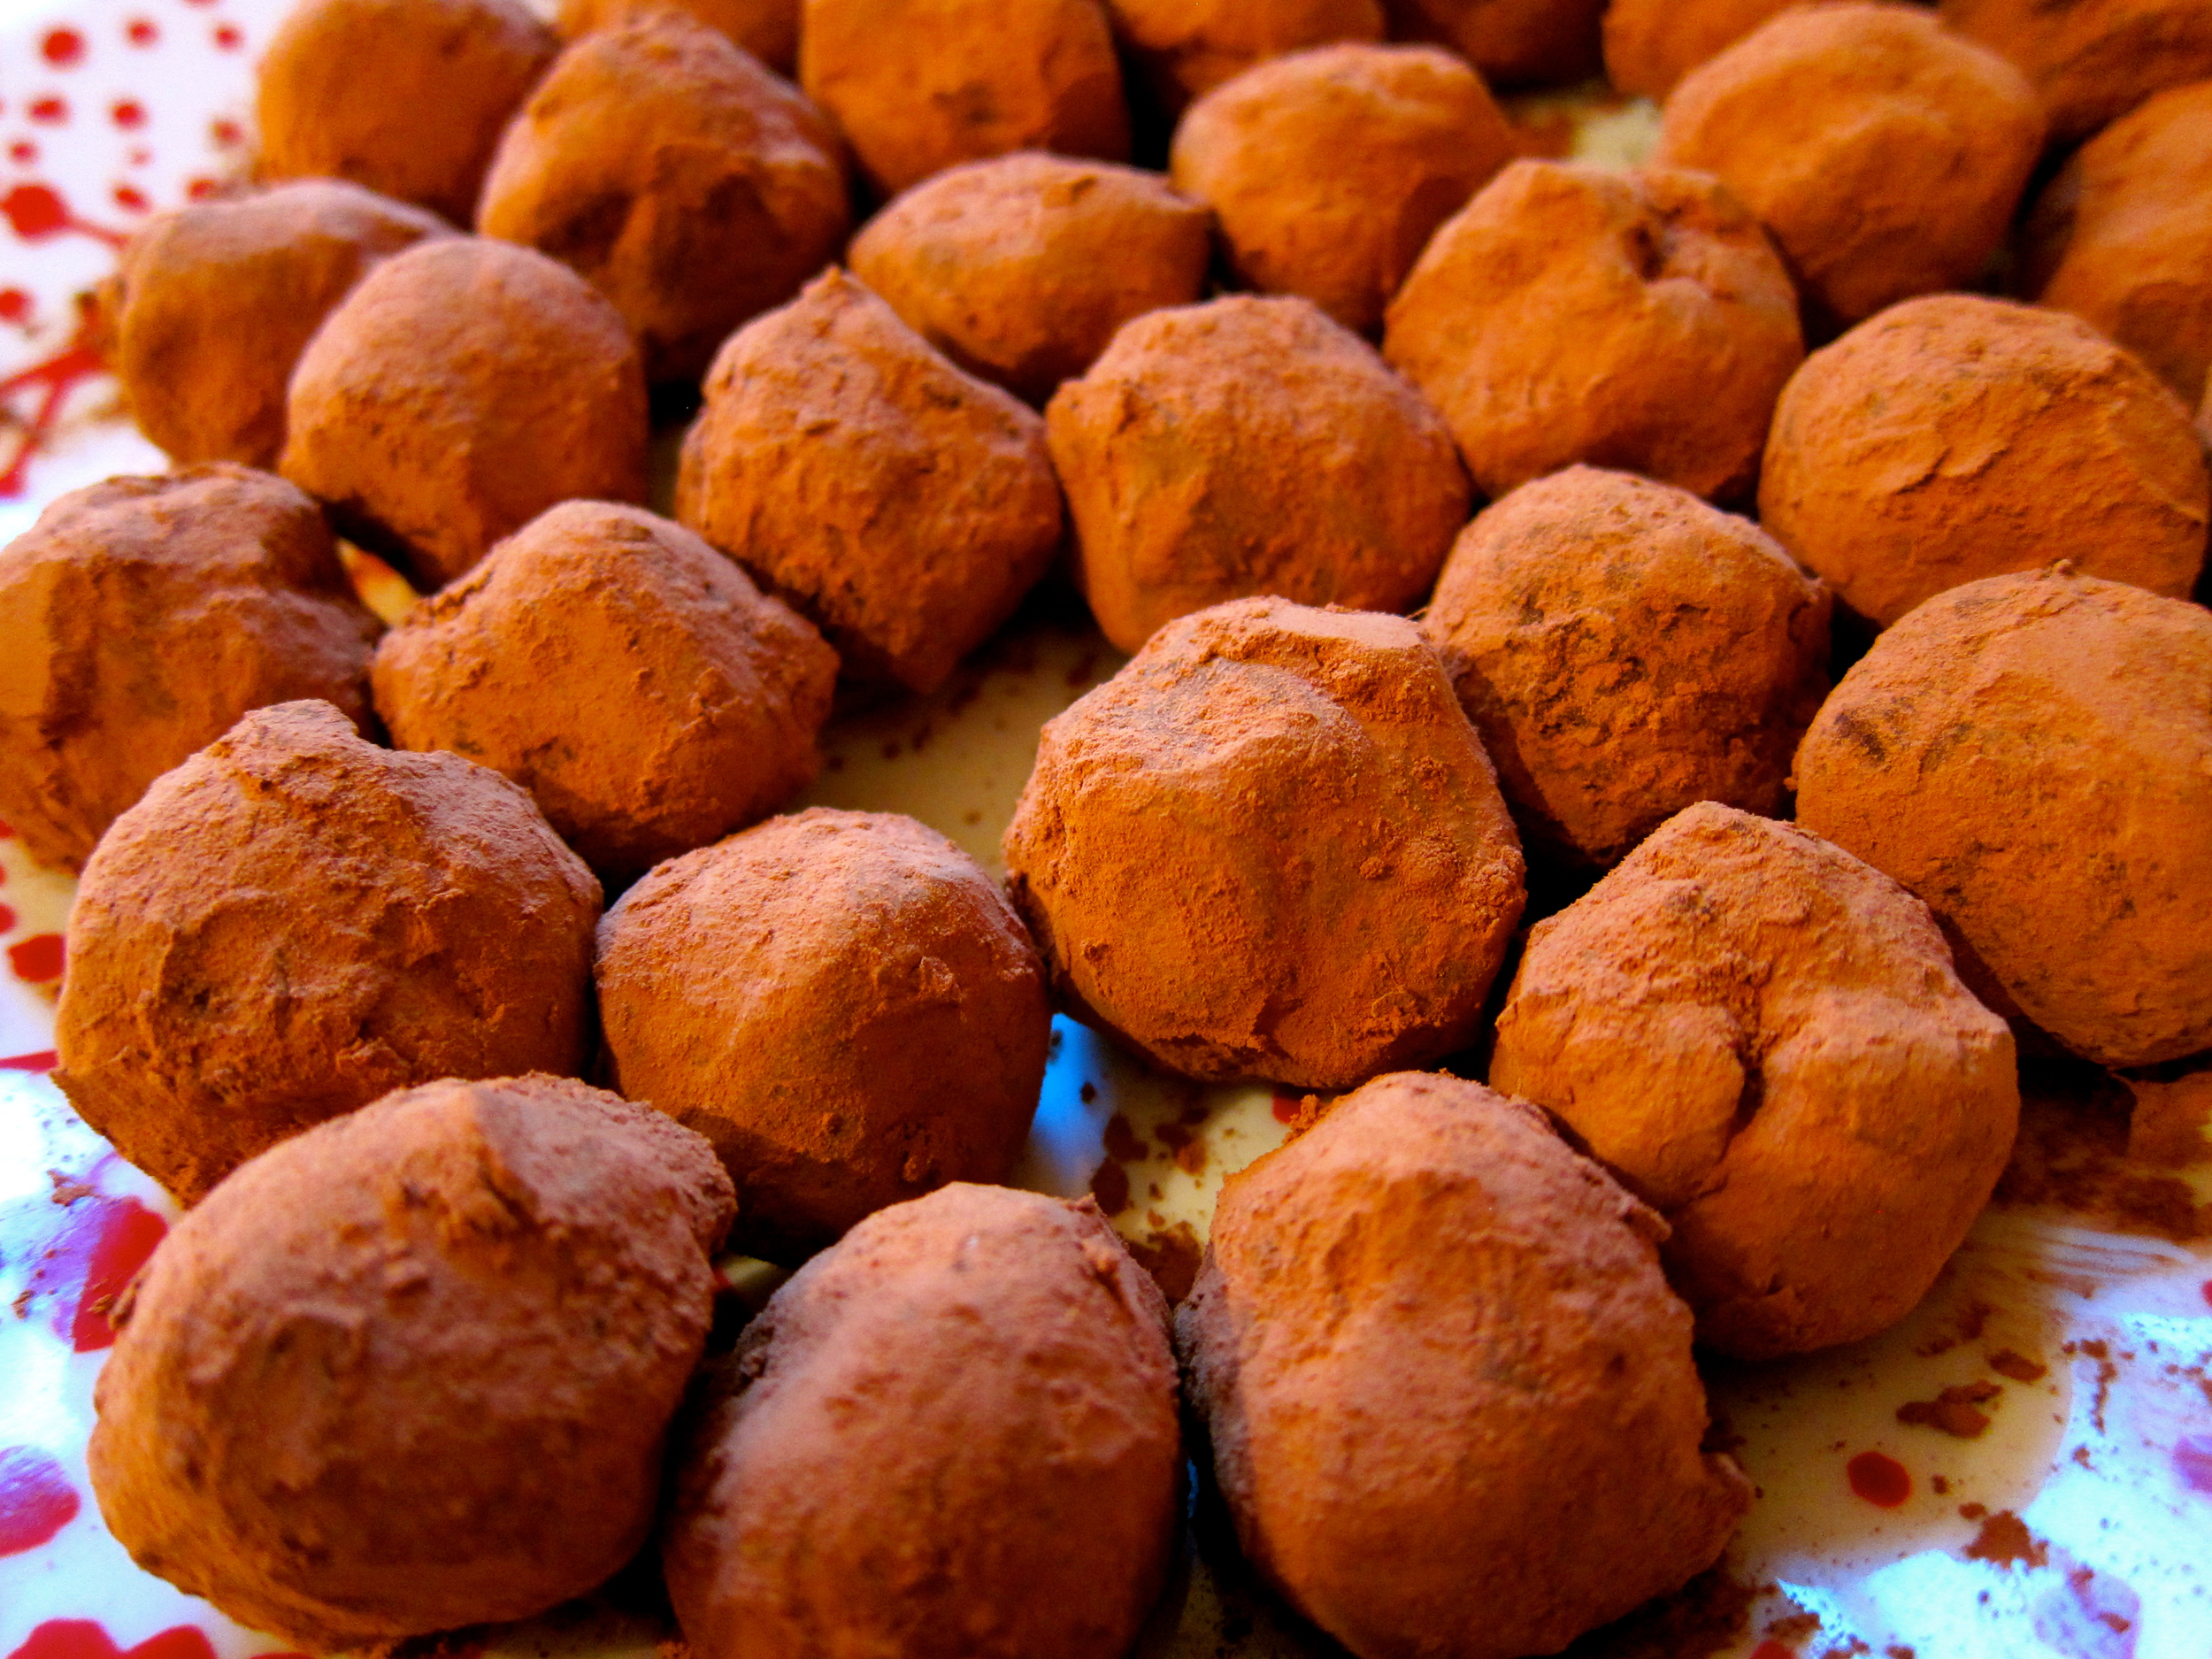
Dark Chocolate and Cardamom Truffles
Put your own spin on this decadent favorite.

Valentine's Day is just around the corner - forget the store bought, everyone would prefer homemade confections! This recipe very easy recipe is also reliable and adaptable, but it does take patience. I’ve also made variations with raspberry jam, orange marmalade, rum/coconut, and black pepper.
8oz bittersweet or semi-sweet chocolate (go high quality, you won’t regret it), very finely diced or shaved
1/2 cup heavy cream
1-2 Tbs brandy
1 tablespoon medium grind coffee
Sea salt, for sprinkling
Unsweetened cocoa powder, for dusting
Place diced chocolate into a large heatproof bowl. Bring cream just to a boil in a small saucepan over medium-high heat; pour over chocolate in bowl. Stir in brandy and coffee. Cover with plastic wrap; let stand 10 minutes. Stir until smooth. Let stand until thick, about 15 minutes.
Pour chocolate mixture into a shallow 8-inch dish or pie plate and sprinkle with sea salt, if desired. Cover with plastic wrap, and refrigerate until mixture is very cold and set but still pliable, about 30 minutes.
Using a teaspoon or a 1/2-inch melon baller, scoop balls of chocolate mixture, transferring them to a baking sheet lined with parchment paper as you work. Refrigerate truffles 10 minutes.
Using hands dusted with cocoa powder, dip each truffle in cocoa powder to coat, then quickly shape truffle into a rough round. Refrigerate truffles in an airtight container until ready to serve, up to 2 weeks; before serving, reshape into rounds, and roll each truffle in cocoa powder, if desired.
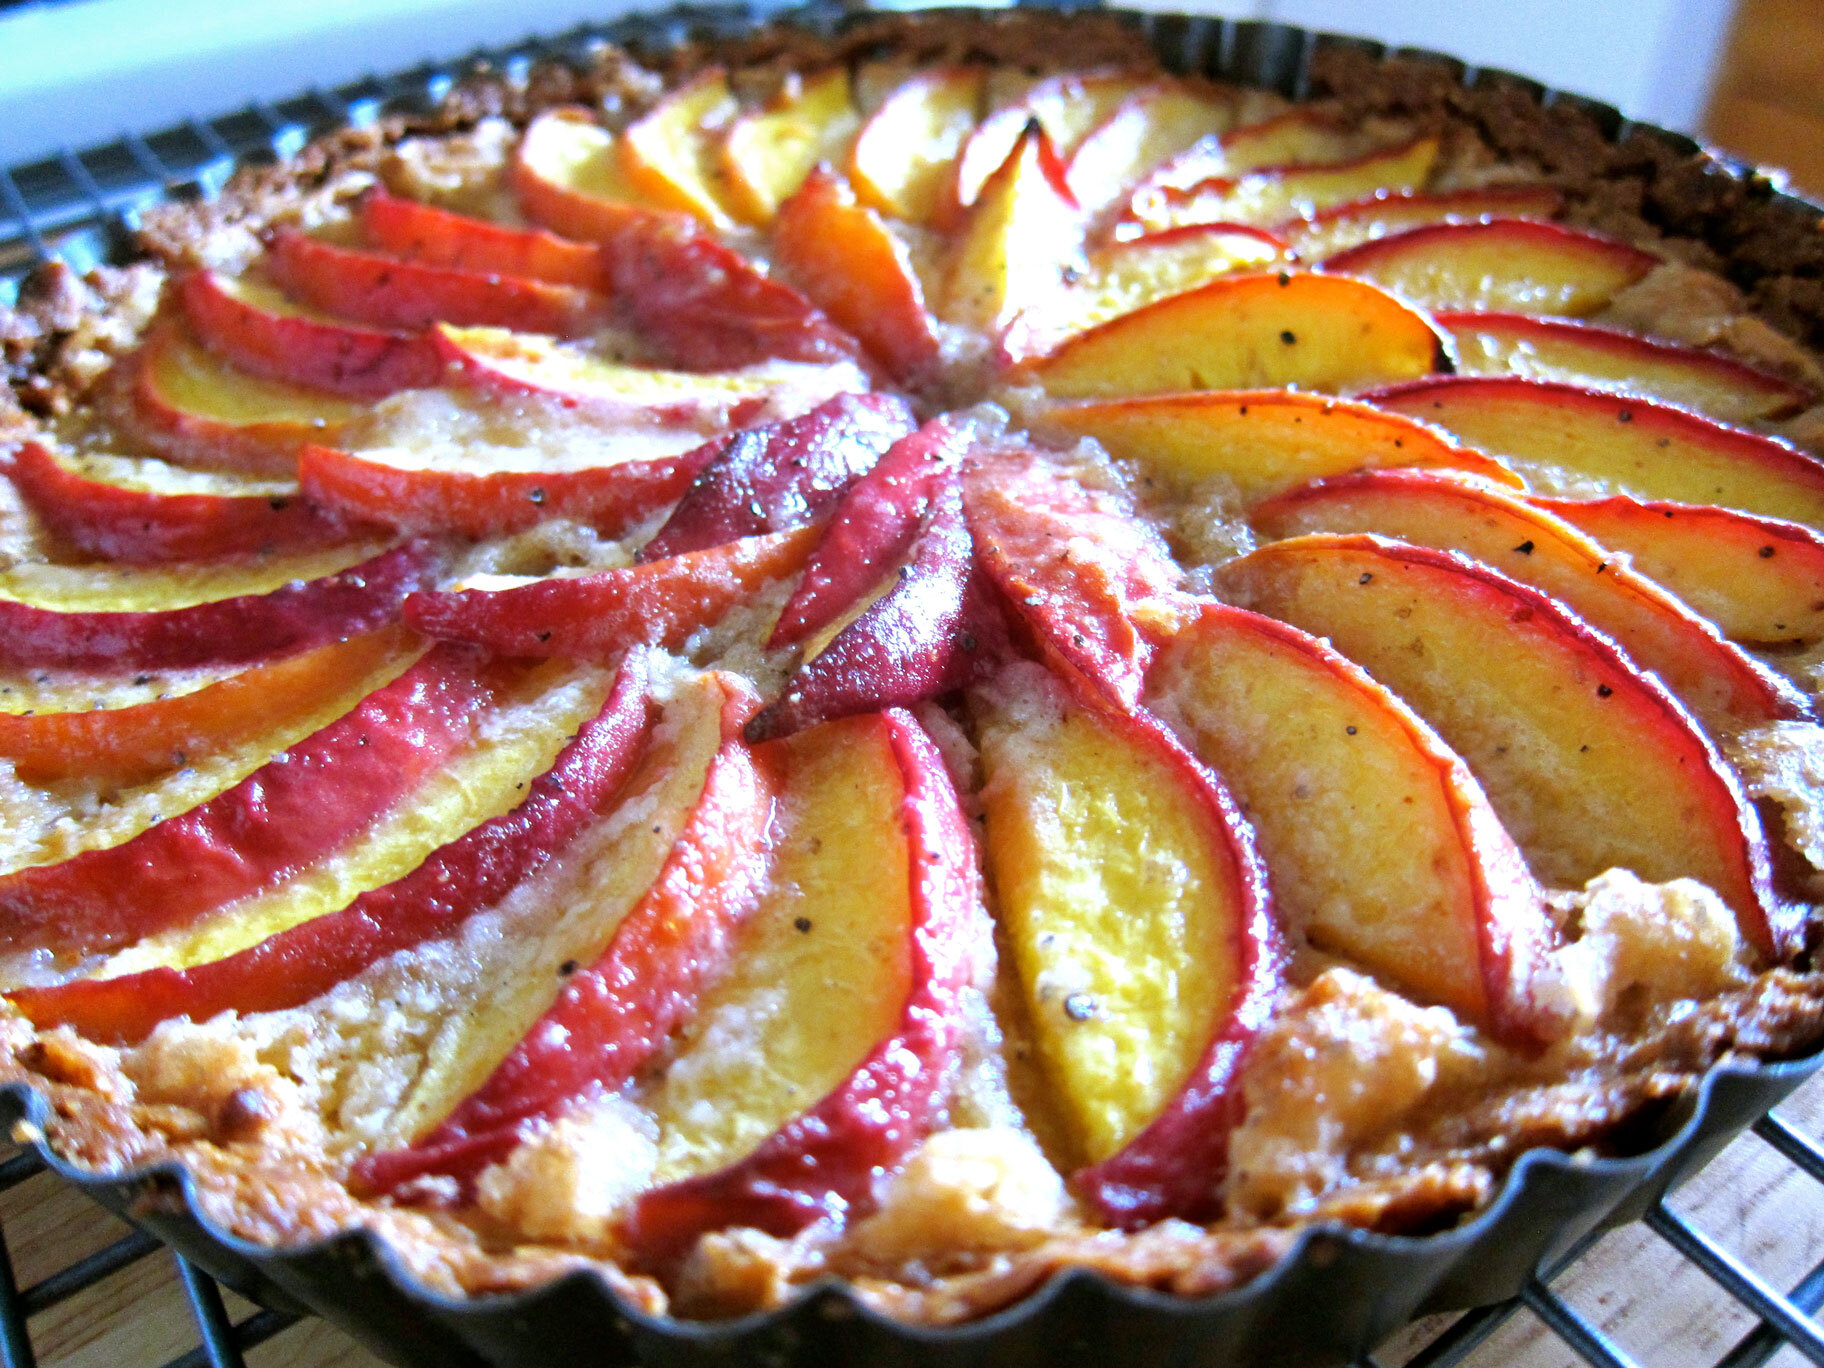
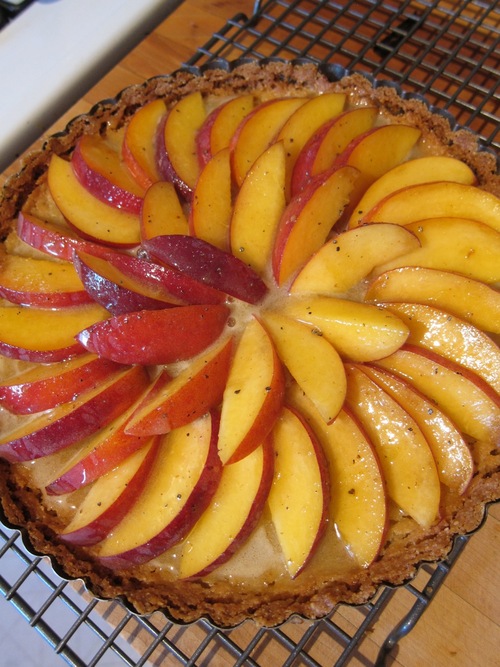
Cardamom and Brown Butter Nectarine Tart
Worth it for the smell alone.

“Caution: Production of this dessert may lead to a decrease in productivity related to ridiculously delicious kitchen smells as evidenced by inability to focus on anything else.”
I’m a sucker for cardamom, browned butter, and stone fruit, so it’s no surprise that this dessert really does it for me. Usually I make crusts with cold diced butter for better flakiness, but the melted butter in this tart crust makes for a very crunchy, more caramelized flavor and texture that’s great with the fruit filling. Using half almond meal in the crust produces great flavor and texture, but the crust falls apart a bit more easily. Amp up the cardamom amount for more intensely cardamommy flavor if you desire.
“Try making the crust with 1/2 cup almond meal and 1/2 cup plus 1 tablespoon all purpose flour for a deliciously nutty twist. ”
7 tablespoons unsalted butter, melted plus 1/4 cup (1/2 stick) unsalted butter, diced
1/3 cup plus 1/4 cup sugar
1/4 teaspoon vanilla extract
1 cup plus 3 tablespoons all purpose flour
1/8 teaspoon plus one pinch salt
1 large egg
10 cardamom pods, seeds removed and ground with mortar and pestle (green pods are the freshest and most flavorful)
3 large nectarines, sliced
Preheat oven to 375 degrees F.
Mix melted butter, 1/3 cup sugar, and vanilla. Add 1 cup plus 1 tablespoon flour and 1/8 teaspoon salt and stir until incorporated.
Transfer dough to a 9” tart pan (preferably with removable bottom). Using fingertips, press dough evenly onto sides and bottom of pan. (I use a 1/3 cup measurer to smooth the crust out)
Bake crust until golden, about 18 minutes (crust will puff slightly while baking). Transfer crust to rack and cool in pan.
Whisk together remaining 1/4 cup sugar, egg, and pinch of salt. Add 2 tablespoons flour and whisk until smooth.
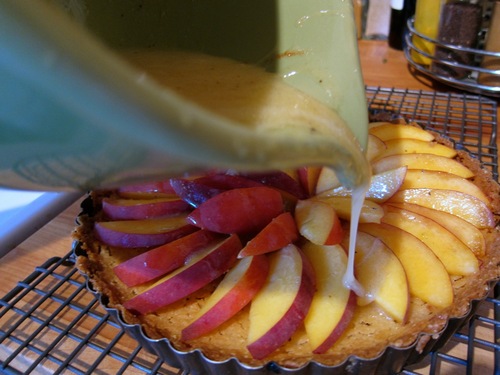
Cook remaining 1/4 cup butter and ground cardamom in heavy small saucepan over medium heat until deep nutty brown (do not burn), stirring often, about 6 minutes.
Immediately pour browned butter into glass measuring cup.
Gradually whisk browned butter into sugar-egg mixture, until well blended.
Arrange fruit in concentric circles in bottom of cooled crust. Carefully pour browned butter mixture evenly over the top and bake until filling is golden and tester inserted into center comes out clean, about 30-40 minutes.
Serve at room temperature or cold, with or without a creamy side such as ice cream, creme fraîche, or whipped cream.