

Celery Root Chips with Paprika Aioli
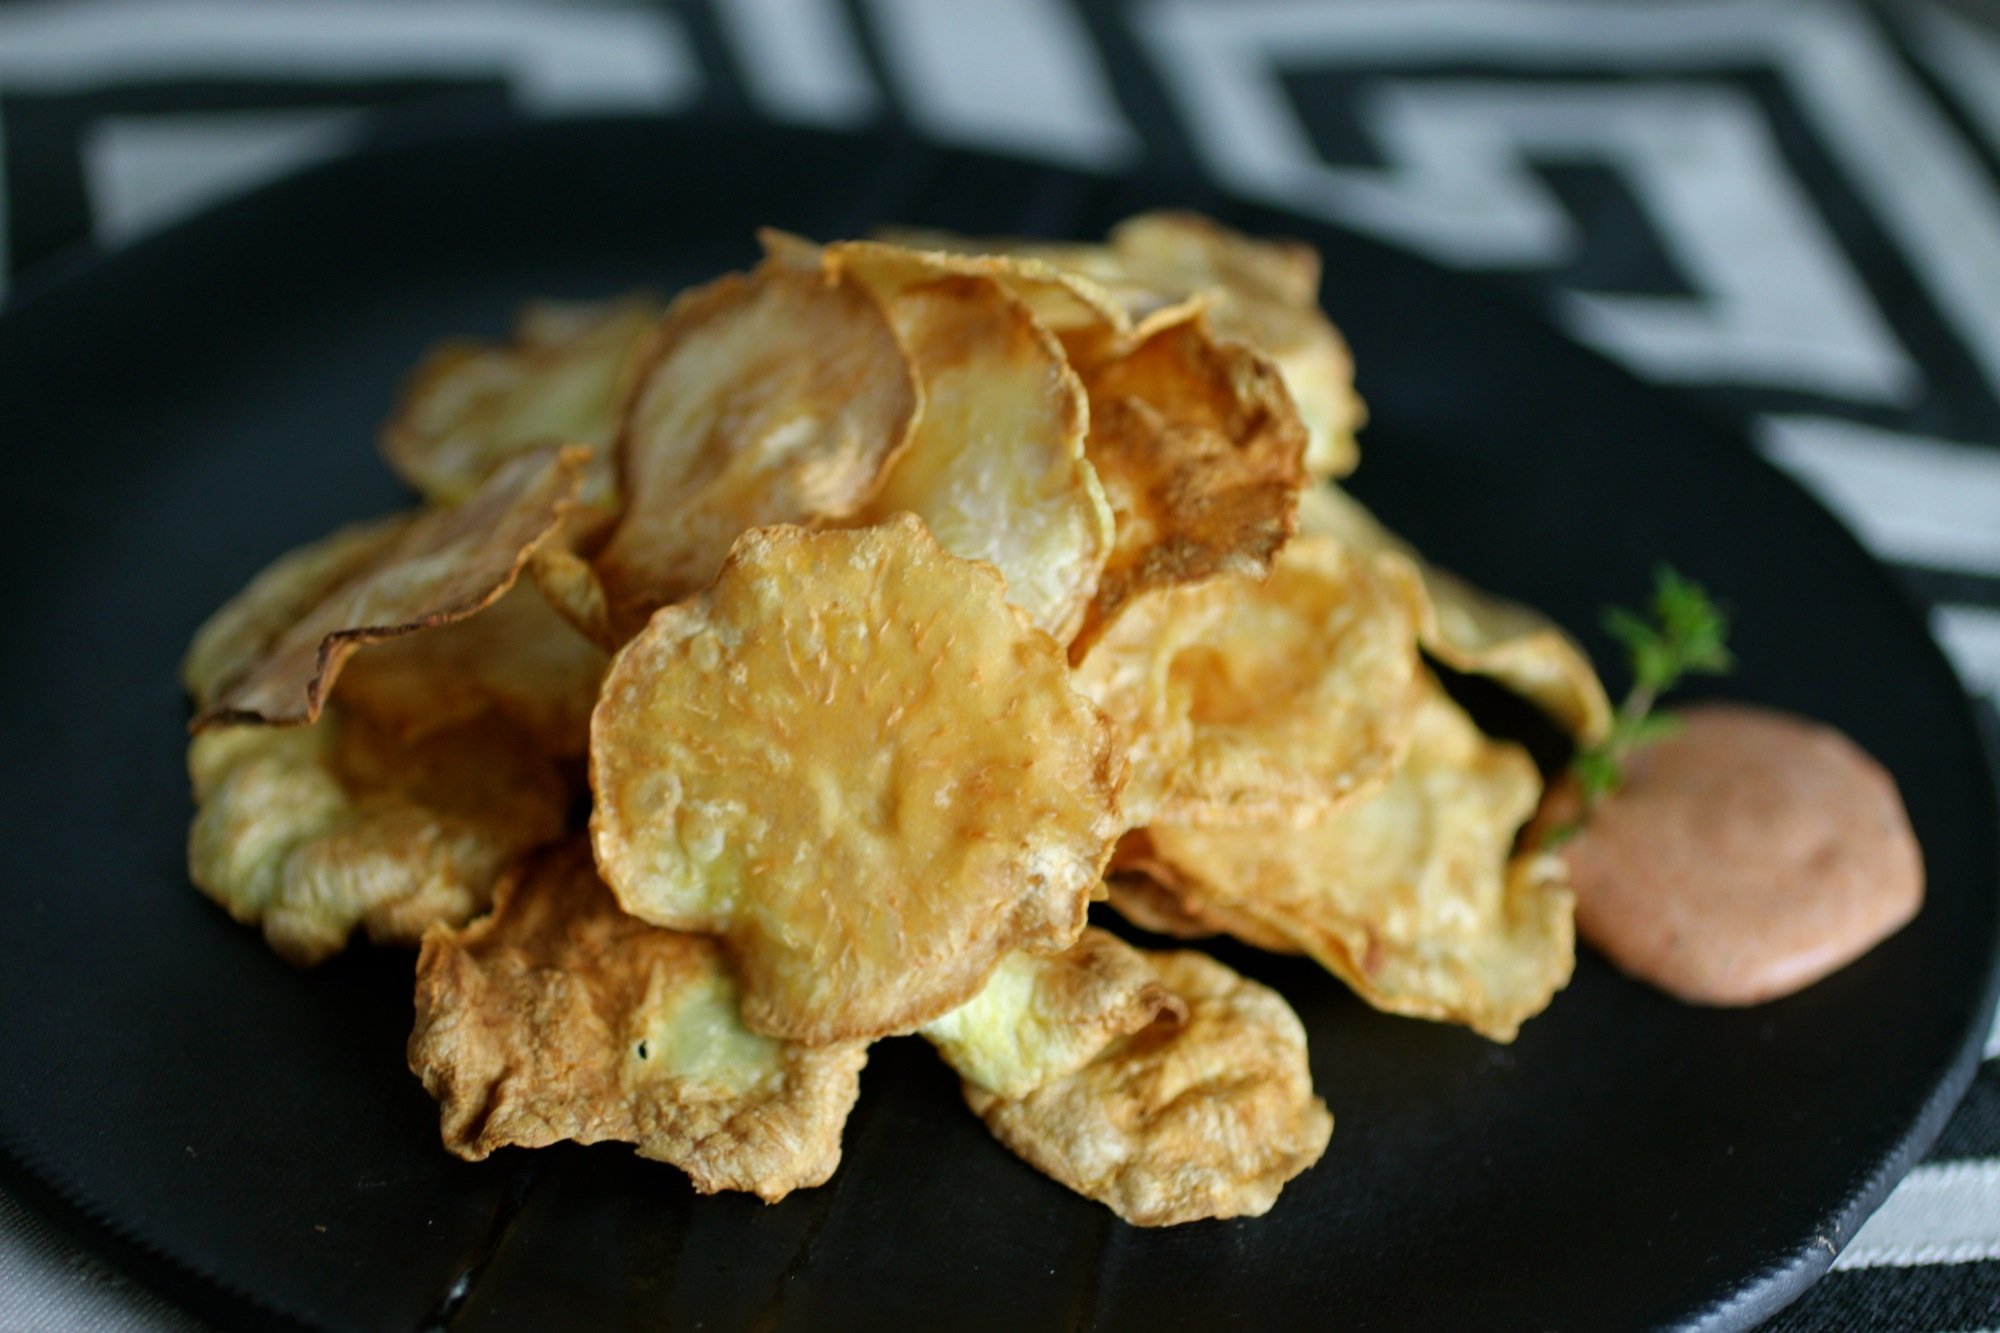
Celery root, celeriac, or whatever you want to call it, let's face it - this root is gnarly. What I love about celeriac is that even though it is gnarly and somewhat intimidating, it can be transformed into something like these chips, that are delicate, light, and elegant. Also - don't worry, it's really not that intimidating after you cut off the outside and the flavor is delightfully nutty - perfect in these chips tossed in coconut oil before baking and paired with smoked paprika aioli (or, honestly, also delicious on their own). Recipe makes enough for about 2-3 people as a snack, but you could probably eat them all on your own.
1 celery root (about 200g)
2-3 teaspoons coconut oil, melted*
About 1/8 teaspoon sea salt
Smoked paprika aioli (optional, see below)
To Prepare:
Preheat oven to 375 degrees F.
Rinse and cut off top and bottom of celery root then, using a knife, cut off remaining peel and any tougher outer layer into strips.
If needed, rinse again to remove any remaining dirt and pat dry.
Using a mandolin, slice into thin circles. The celery root may need to be cut in half first, depending on the size of the root and your mandolin.
Place chips on baking sheet and drizzle with coconut oil. Toss to coat, sprinkle with salt and spread out on baking sheet in a single layer.
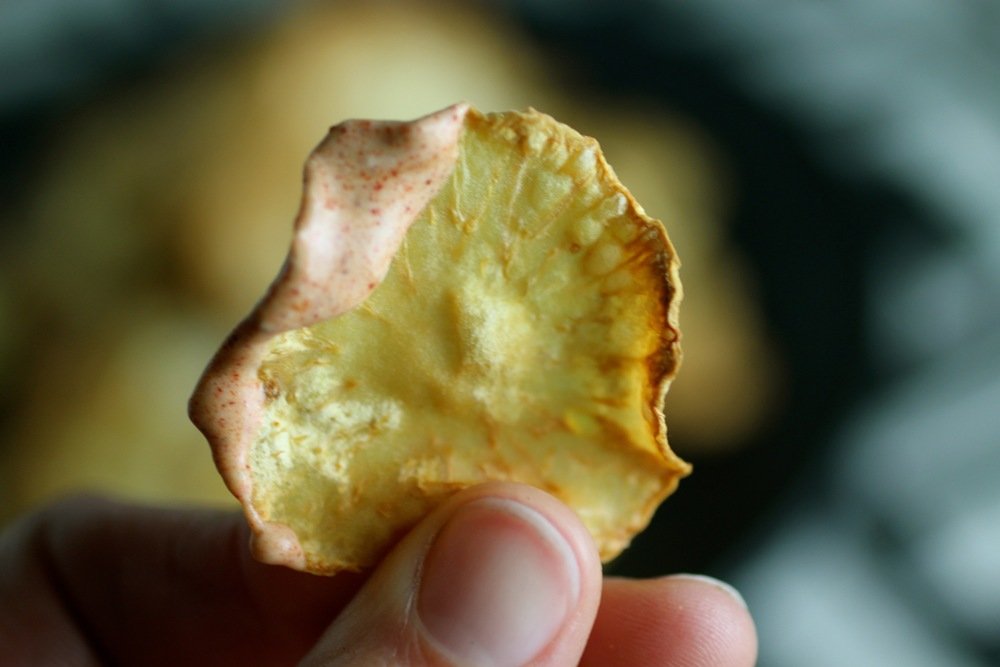
Bake for 15-20 minutes or until golden brown, flipping halfway through. Chips might not be crispy while still warm, but they should become crispy as they cool.
*Olive oil can be substituted for coconut if desired. The flavor is not quite as nutty and can be more peppery, depending on olive oil.
Note: Leaving celeriac chips out for a long time, especially in a humid environment, will cause them to soak up water and lose their crispiness.
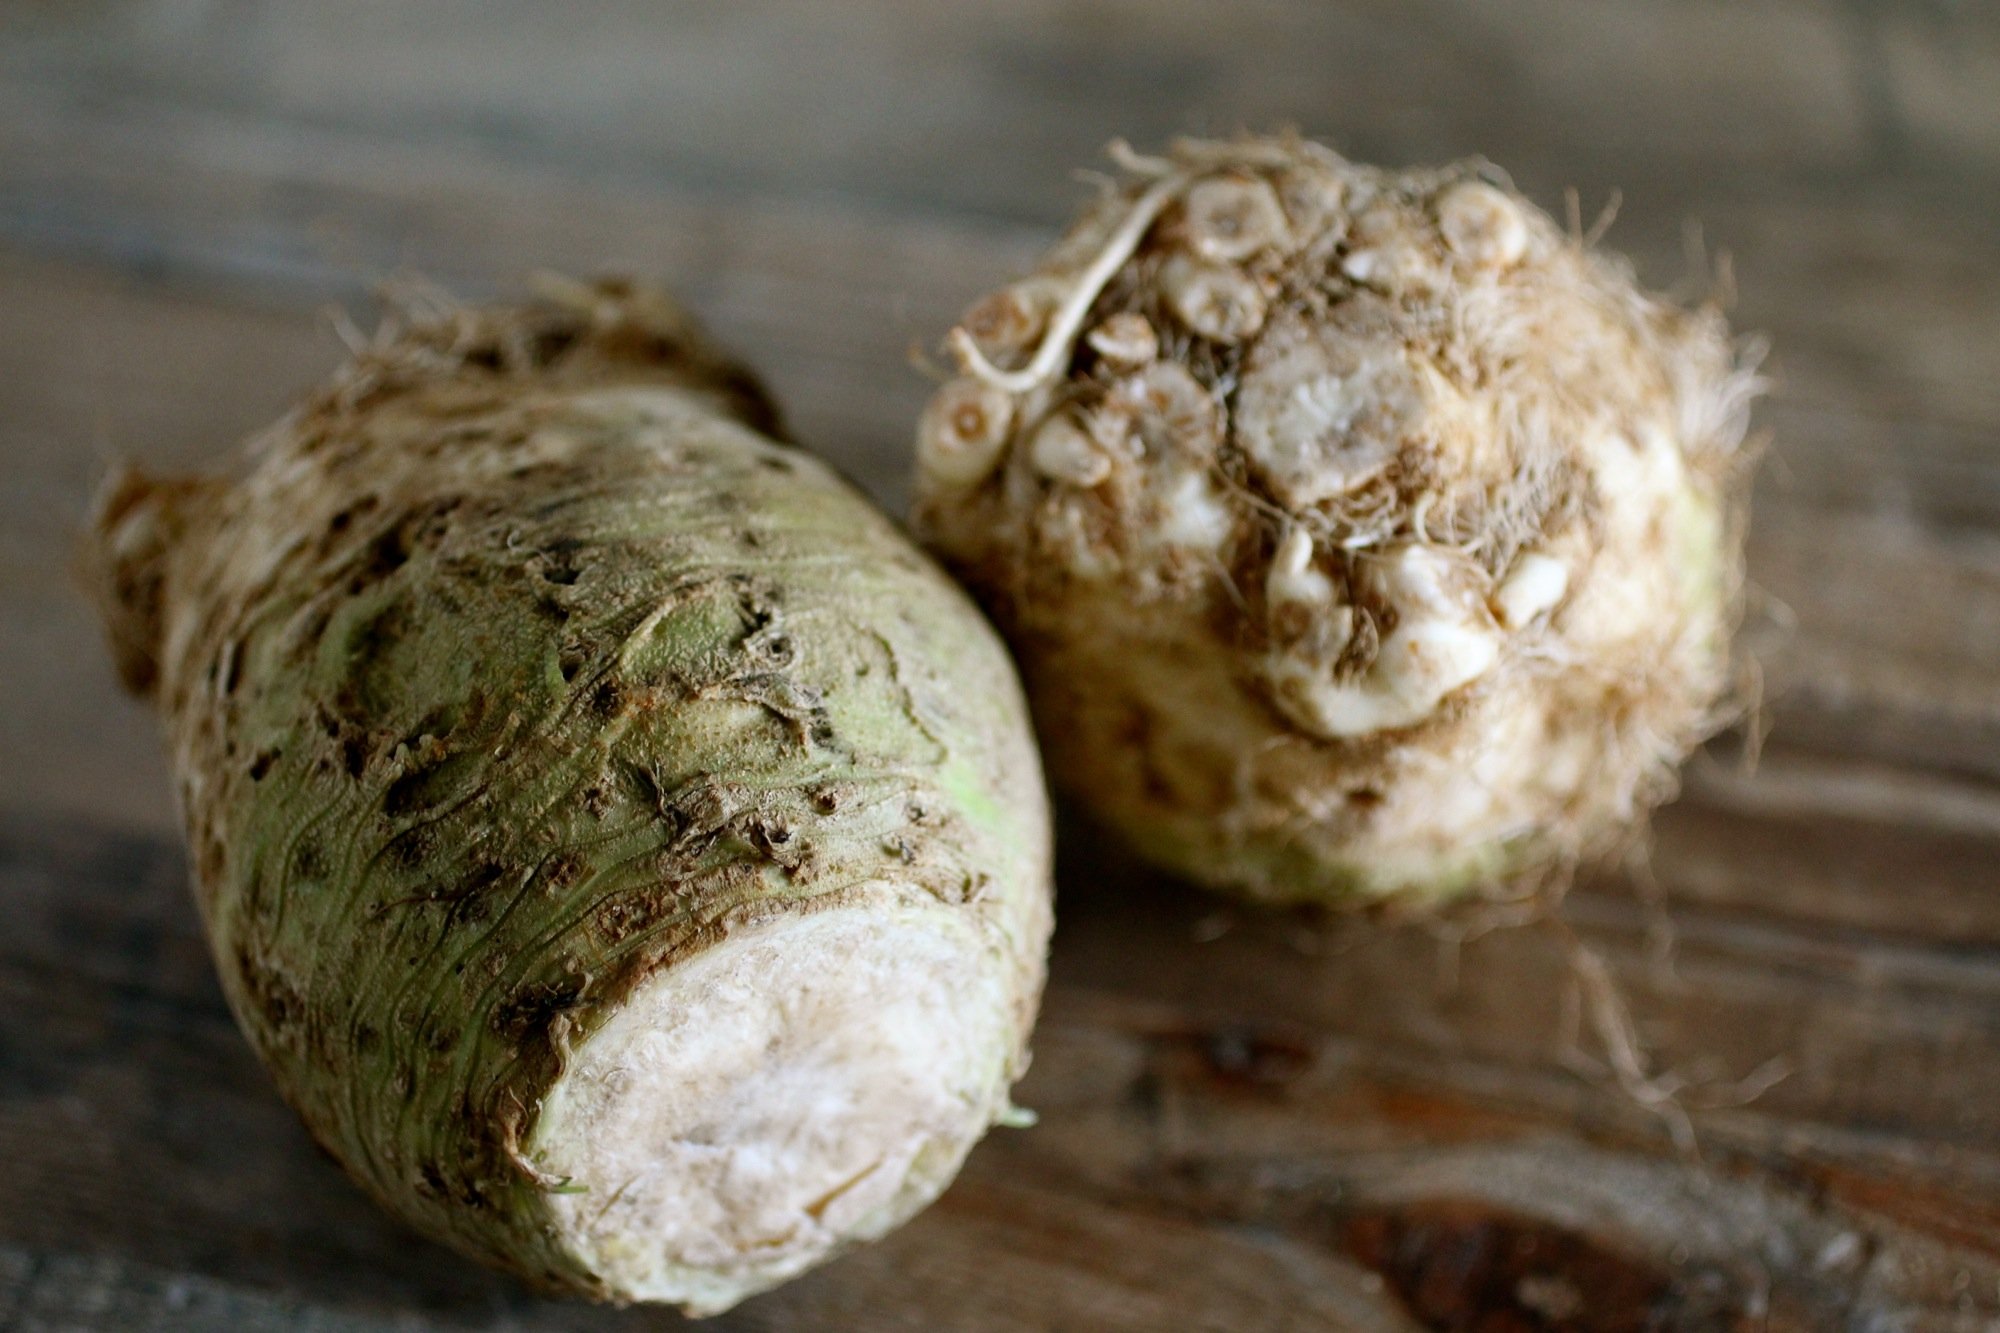
Gnarly celery root - love it!
For Smoked Paprika Aioli- This recipe will make much more than you need for these chips and goes great with raw or cooked vegetables, in salad dressings, on sandwiches, etc. When I make it, I usually split it in half and only add the smoked paprika to one half, as classic aioli is more versatile.
1 egg
1-2 medium cloves garlic, diced
1 teaspoon mustard or mustard powder
Pinch of sea salt
1 cup olive oil and either vegetable or grapeseed oil combination (adjust ratio depending on how rich olive oil-wise you’d like your aioli to taste)
2-3 teaspoons fresh lemon juice
About 1/2 teaspoon smoked paprika (to flavor one half of the aioli)
Blend egg with garlic, mustard, and salt until frothy.
While blending, slowly add in olive oil. Blend until thick and quickly mix in lemon juice. Divide aioli in half and whisk in smoked paprika to one half. Keep refrigerated until use.
CHOMP.

Savory Corn and Chard Porridge
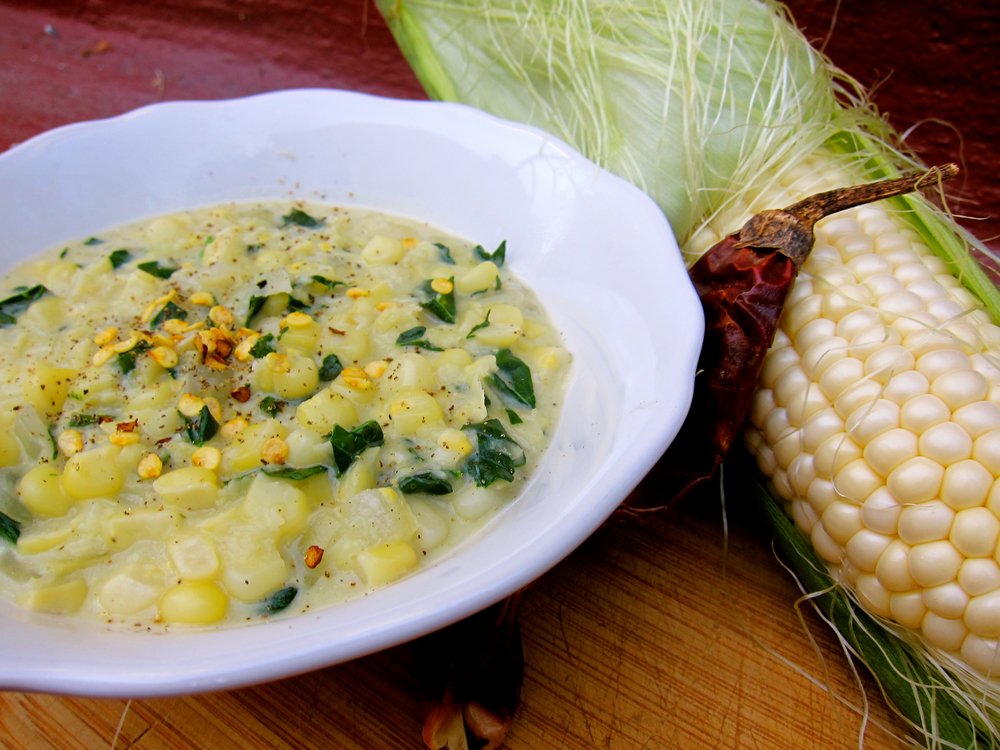
Try this flavorful dish for a unique way to sneak vegetables into your breakfast. Use mustard greens or spinach if chard is not available where you live. Serves 4.
4 large ears of corn
1 tablespoon olive oil
1 medium yellow onion, diced
1/2 cup water
1/2 cup whole or reduced fat milk
1-1/2 cups chard, chopped
1/4 teaspoon salt
1/4 teaspoon ground white pepper
1/2 teaspoon red pepper flakes
1/4 teaspoon coarse ground black pepper
To Prepare:
Using a cheese grater, coarsely grate the kernels off of 2 ears of corn into a large bowl to create a pulp. Using a knife, remove the kernels off of the other 2 ears and add to the bowl with grated corn.
In a large pot, sauté onion in oil on medium-low heat until soft, about 5 minutes.
Add the corn mixture and water to the pot and cook 5 minutes, stirring occasionally. Add milk, chard, salt, and white pepper, and cook until thickened, about 2-3 minutes.
Serve hot, topped with red pepper flakes and black pepper.

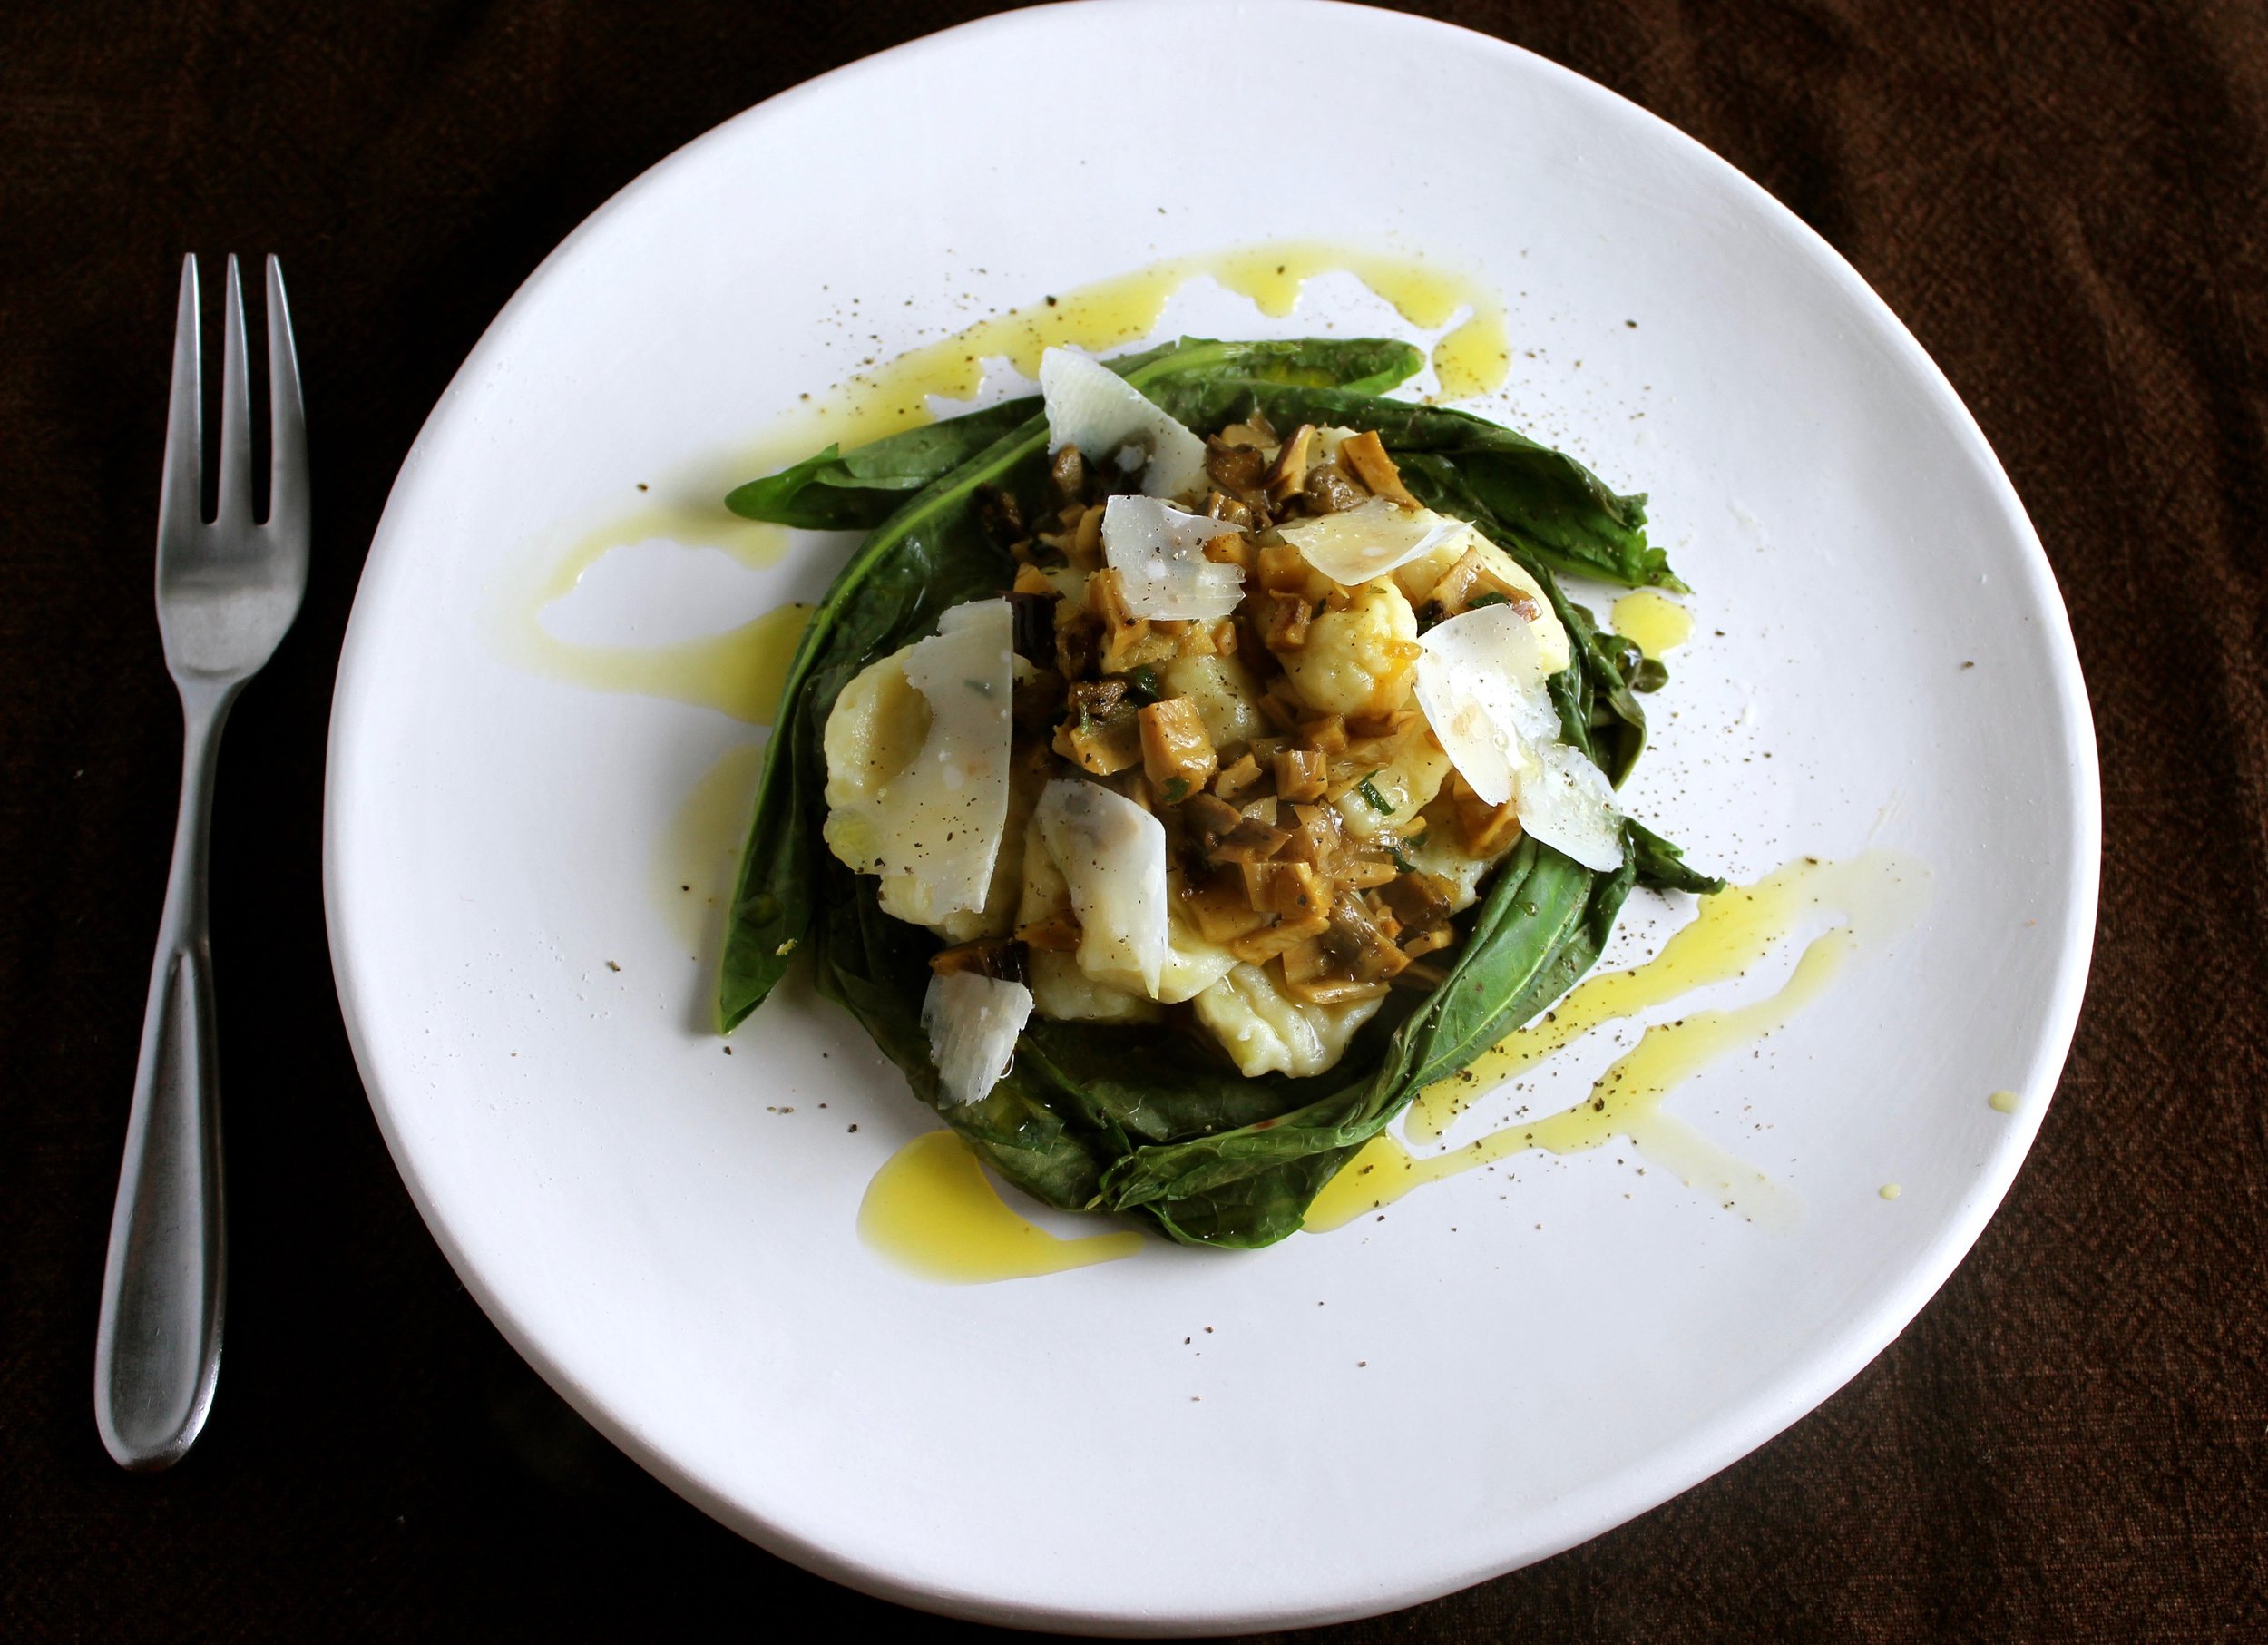
Gnocchi with porcini and Wilted wild greens
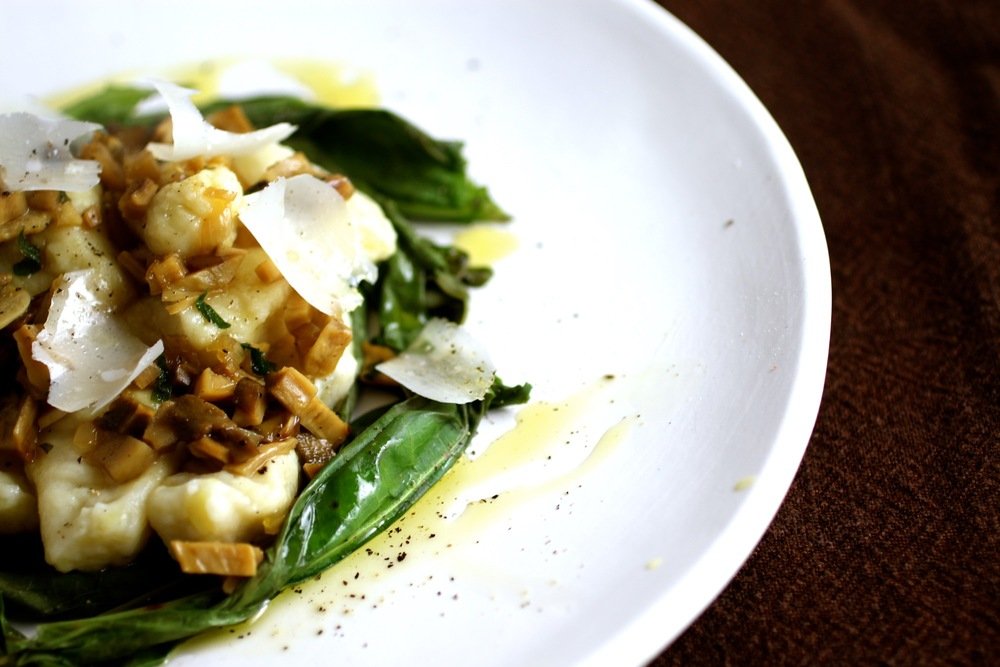
Gnocchi - the pasta of potatoes. If you see gnocchi as simply a vehicle for toppings then you haven't tried legit gnocchi. Making gnocchi from scratch may take time and attention, but the effort is worth it. The resultant soft, pillowy dumplings are stars of the show as much as any sauce. The first time I had the pleasure of tasting homemade gnocchi was in Turin, Italy when I was there for the Slow Food Terra Madre conference and I can still remember the meal - it was that good. My gnocchi may not quite achieve the same level of perfection, but I'll certainly keep trying.
I've made gnocchi several times in the past, each time with a different topping, and I really like how the richness of the mushroom sauce and the green notes of the wild greens (in this case, curly dock - more on the plant in general here) paired with the simple potato pasta in this recipe. The next time I make it however, I will blend the mushroom sauce with an immersion blender for a smoother consistency that doesn't compete with the soft gnocchi "pillows". Feel free to take just the gnocchi portion of this recipe and experiment with your own combinations, such as different mushrooms, a pesto, or a simple marinara sauce. Recipe serves 4.
Gnocchi

Wee little gnocchi dumplings.
2 pounds of golden potatoes
1/4 cup egg, lightly beaten
1 cup all-purpose flour
Sea salt (fine grain)
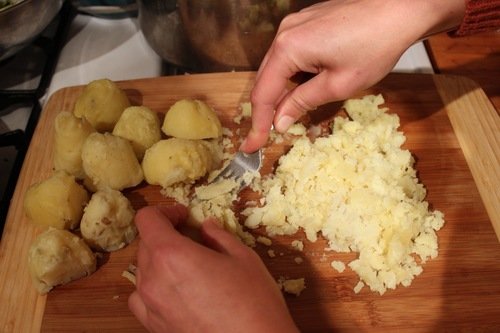
Fill a large pot with water. Salt the water, then cut potatoes in half and place them in the pot. Bring the water to a boil and cook the potatoes until tender, about 25-30 minutes.
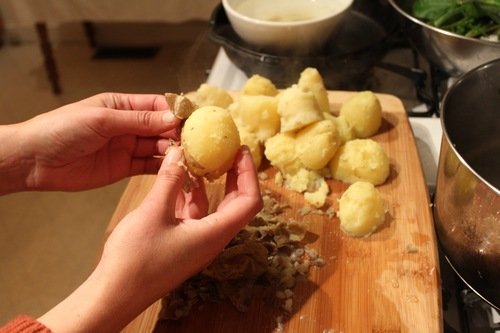
Working one potato at a time, remove potato halves with a slotted spoon and place on a large cutting board. As soon as possible after removing from the water, peel each potato before moving onto the next (these are, obviously, hot potatoes, but you want to work as fast as possible to mash them while they're still hot). Mash potatoes using a fork to create a mound of potato "fluff" - do not over mash. Save the potato water for later.
Let the potato mash cool for about 5 minutes (you want to prevent the egg from cooking). Join the potatoes into a soft mound, drizzle with the beaten egg and sprinkle 3/4 cup of the flour across the top. Using a spatula, scrape underneath and fold to mix in egg and flour. With a very gentle touch, knead the dough. Knead in more flour if dough is too gummy/tacky. The dough should be moist but not sticky.
Lightly flour a new cutting board and separate potato dough into 8 pieces. Gently roll each 1/8th of dough into a log, roughly the thickness of your thumb. Use a knife to cut pieces every 3/4-inch. Dust with a bit more flour.
Shape gnocchi using a fork to create lines in the middle of the gnocchi, so that they kind of look like footballs. Be sure to lightly touch fork into the gnocchi so that it still stays soft and doesn't break. Set gnocchi aside, dusting with flour if needed until you are ready to boil them. Meanwhile, make the porcini sauce.


Porcini Sauce
1.5 cups low-sodium chicken broth
0.75 ounces dried porcini mushrooms, rinsed
2 tablespoons extra-virgin olive oil
1 small shallot, minced
1 clove garlic, thinly sliced
1/3 cup dry white wine
2 tablespoons minced fresh parsley
Salt and pepper
Heat broth and porcini in a small saucepan until simmering. Turn off heat, cover, and Let stand until softened, about 5 minutes. Remove mushrooms, reserve liquid, and dice porcini. Heat 1 tablespoon olive oil in a medium skillet over medium heat. Add chopped porcini, shallot, and garlic; cook until lightly browned, 2 to 4 minutes. Stir in reserved liquid, wine, and remaining tablespoon olive oil, scraping up any browned bits. Increase heat to high and bring to boil; cook to reduce, whisking occasionally, about 5 minutes. Stir in parsley and season with salt and pepper to taste. Cover to keep warm.
Cooking and Serving Gnocchi
A few handfuls of foraged dock, dandelion, or other green, thoroughly washed and trimmed
Olive oil drizzle, salt, and pepper, for garnish
Parmesan shavings, for garnish
Reheat the potato water and bring to a boil, adding more water if needed (you need enough water to cover the gnocchi). Cook the gnocchi in small batches by dropping them into the boiling water. Once gnocchi pop up to the top, remove them with slotted spoon ten seconds or so after they've surfaced. Have a large platter ready with dock or other greens that you will be serving with the gnocchi on the plate. Place the gnocchi on the platter on top of the greens - greens will wilt from the heat of the gnocchi. Continue cooking in batches until all the gnocchi are done. Top gnocchi with porcini sauce, a drizzle of olive oil, salt, black pepper, and parmesan shavings.

Autumn crunch farro salad with Asian pear, celery, and toasted hazelnuts
Autumn crunch farro salad.
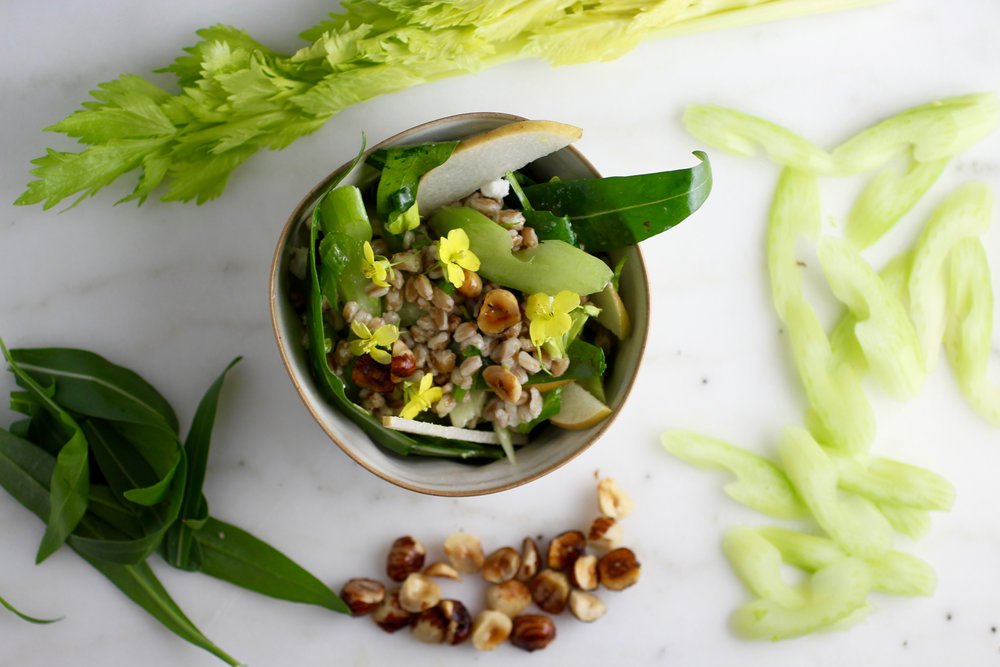
Wholesome, flavorful, crunchy.
By way of a recommendation from a food-minded friend, I was lucky enough to visit the restaurant Ned Ludd on a recent trip to Portland. Defining itself as "an American craft kitchen", Ned Ludd has all of the charm and menu items you'd expect in a Pacific Northwest restaurant with a photo of an axe in the woods on their homepage. Various pickled things, roasted brassicas, and charcuterie definitely make an appearance, as does other "good food that tells a story". Apart from delectable dishes including their delicious grilled flat bread served with olive oil (salivating just thinking about the doughy goodness), another menu item that I recall is one that we actually didn't order - a whole grain salad with a bunch of different chopped ingredients reminiscent of autumn. I specifically made a mental note to take the inspired ingredient combination of farro, arugula, asian pear, celery, toasted hazelnuts, and chevré, and try it at home. While I'm not sure if this is exactly like what they served, as again, we didn't order it, the salad was unique and delicious so I consider it an inspired-recipe win!
The fall is fading fast, but it's not too late to make use of the harvest with this salad. Also, farro is technically considered an "ancient grain" (a grain that is loosely defined as not having changed much over the last several hundred years), which is fun from a culinary sustainability standpoint and a stellar grain to have in your toolbelt. Below is an approximation (feel free to add more or less of whatever you have on hand!) and serves 4.
1 cup cooked farro*
2 large celery stalks, thinly sliced
1 asian pear, cored and thinly sliced
2 cups arugula
About 1/4 teaspoon Kosher or sea salt
Juice of 1 lemon
2 tablespoons olive oil
1-2 ounces fresh goat cheese (chevré), crumbled
1/4 cup toasted hazelnuts**
Arugula or other edible flowers for garnish (completely optional, I just happened to have arugula and flowers growing in my raised bed)
Toss farro with celery, pear, and arugula. Salt to taste.
Put lemon juice, olive oil, and a few pinches of salt in a small mason jar. Shake until combined then toss into farro mixture followed by goat cheese and hazelnuts, reserving a few to add to top.
Garnish with edible flowers (optional) and serve immediately.
*There are many ways to cook farro, but I usually just use 1 part farro to 2 parts liquid (water in this case), bring to a boil, reduce to a simmer, cover, and cook for about 30-40 minutes until farro is "al dente" (because I like it kind of firm), but soft enough to chew. In this instance, about 1/3 cup farro + 1 cup water will yield about 1 cup cooked farro. Some recipes call for cooking farro like pasta, but I feel that is an unnecessary waste of water.
**To toast hazelnuts, heat in a cast iron pan on medium-high until browned, tossing frequently, about 2 minutes and sprinkle with salt. A small amount of oil can be added to the pan and tossed with the nuts if you'd prefer a richer toasted nut.
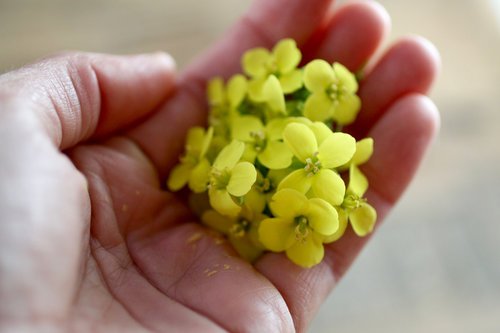
Arugula flowers for garnish that I happened to have from my raised bed arugula - not at all mandatory, but always fun to include some edible flowers!

Asparagus-Wild Onion-Umami
Asparagus-Wild Onion-Umami
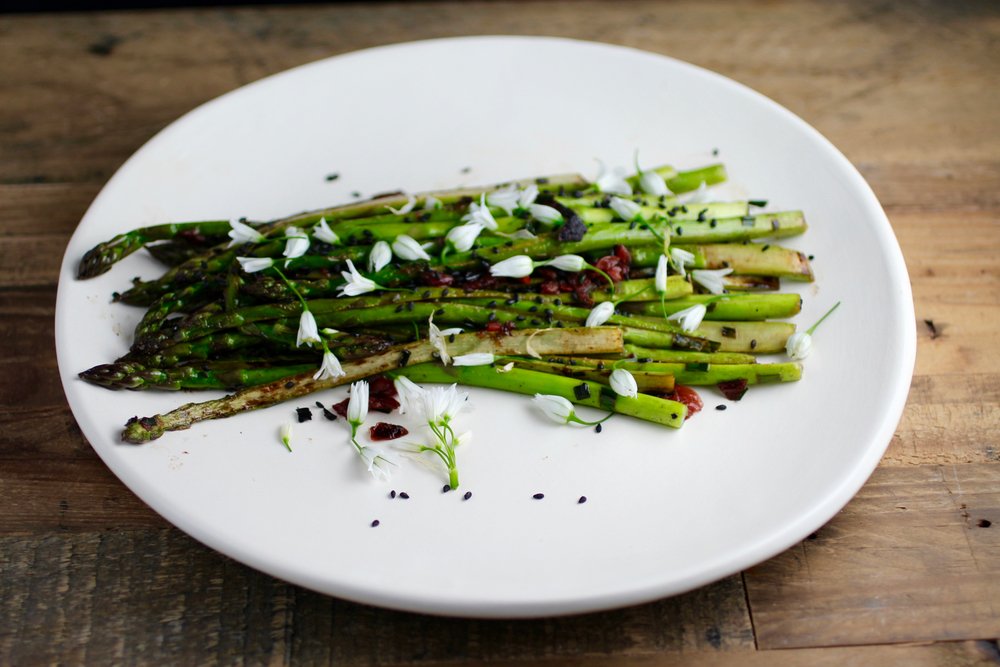
One of my favorite spoils of spring are the wild onions. In the Bay Area, the Allium triquetrum or "three-cornered leek" is the wild onion that abounds and it also happens to be as lovely in flavor as it is in appearance. This wild onion is nicknamed "three-cornered" because of the shape of its stems and has the characteristic allium smell and taste with a delicate sweet note, especially when using its small, white, star-shaped flowers.
There are many ways to enjoy these "three-cornered leeks", but pairing them with asparagus deliciously highlights the season. In California, not many foods are truly seasonal so when they are I like to indulge. Browning the asparagus and chopped onion stems in butter with umeboshi brings in umami elements then topping with the sweet wild flowers and crunchy bits of sesame really knocks it out of the park. We made umeboshi last year with local wild plums, but store bought umeboshi or even miso can be used as a substitute if you do not have access to umeboshi - either ingredient will contribute the umami flavor that you're looking for. Recipe is adaptable to the amount of asparagus you have preference for strength of flavors. The below recipe will serve 2-4 people (in our house, definitely only 2!)
1 pound of asparagus (about 16 spears), tough fibrous stems removed
7 wild onion, aka three-cornered leek, stalks with flowers (there will be several flowers on each stalk)
1 tablespoon unsalted butter
3 umeboshi, finely chopped, or 1 tablespoon red or brown miso
1 tablespoon sesame seeds
For larger asparagus spears: Using a vegetable peeler, peel bottom of spear about 1-inch up from bottom and slice larger asparagus spears in half lengthwise. If you have thin asparagus spears, both of these steps can be skipped.
Remove wild onion flowers and dice stalks. Set aside.
In a cast iron pan, sauté butter over medium-high heat. Add asparagus, toss to coat, and cook until beginning to soften, about 1 minute. Add umeboshi (or miso in small pieces) and diced wild onion stalks, toss to coat, and cook until asparagus browns, about 3-5 minutes, tossing halfway through. Test an asparagus spear to see if it is flavored to your liking - if not, add more butter/umeboshi or miso/onion.
Remove from heat and top with sesame seeds and wild onion flowers. Serve hot.
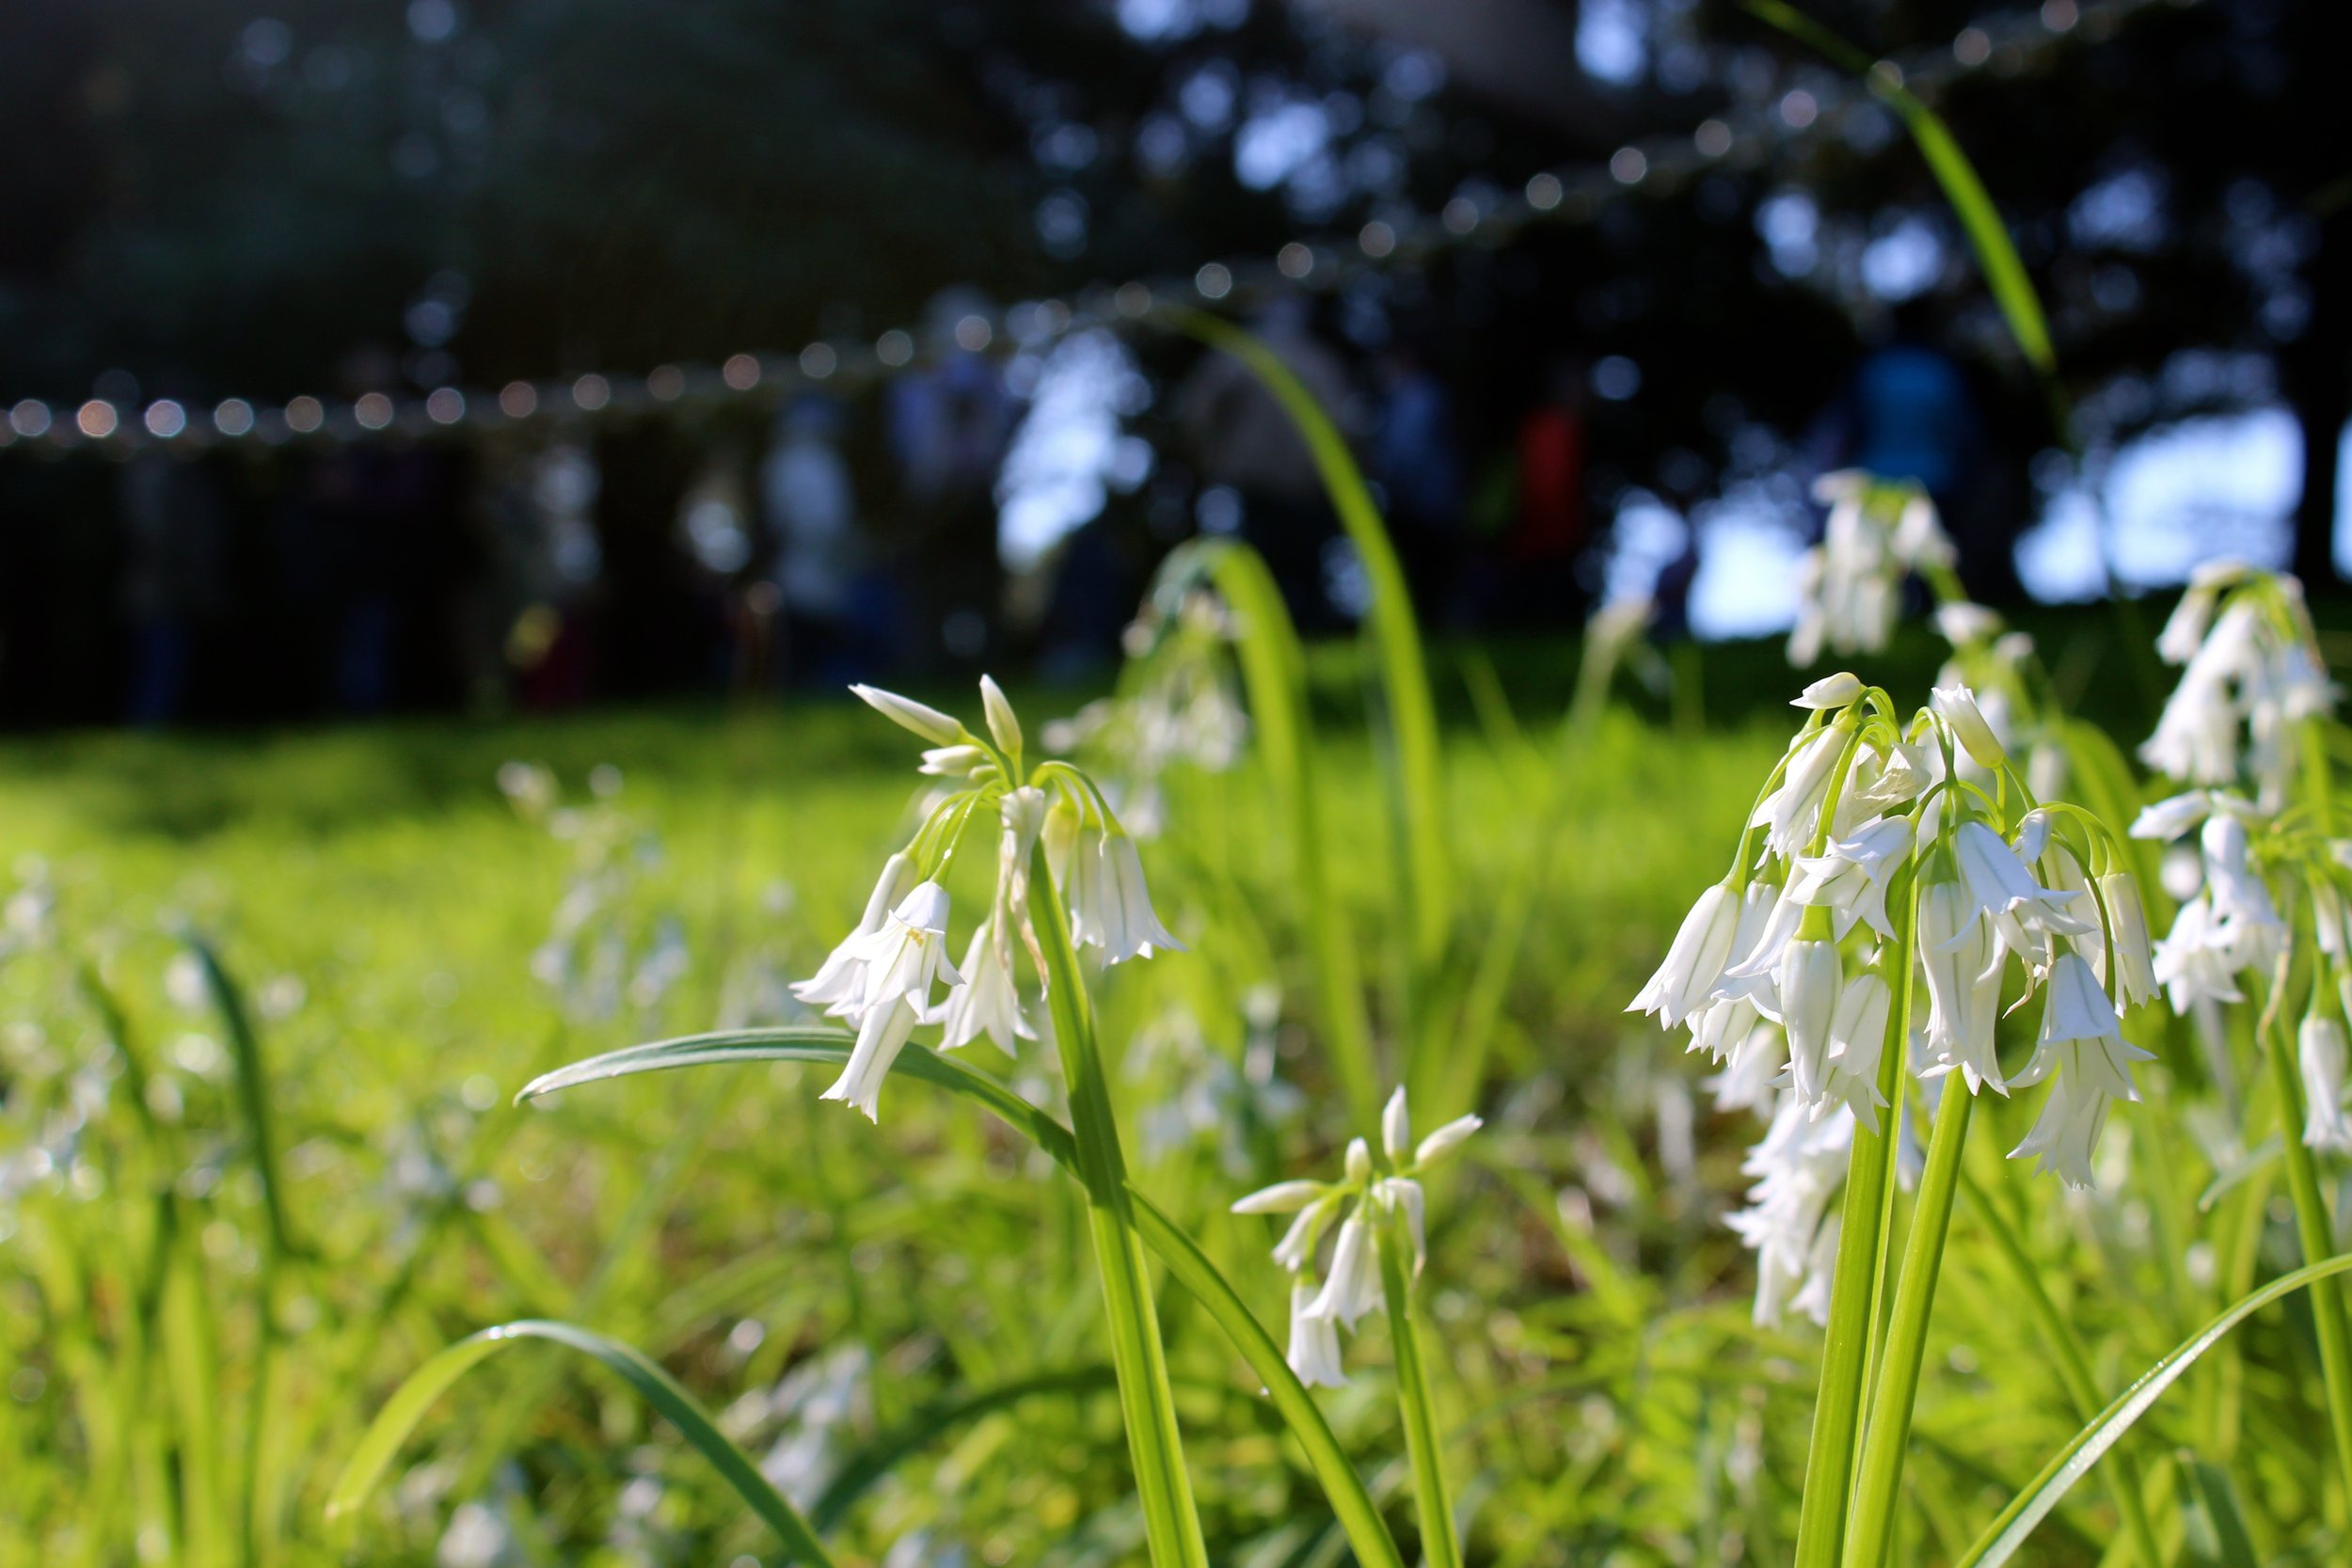
Wild onion basking in the sun.
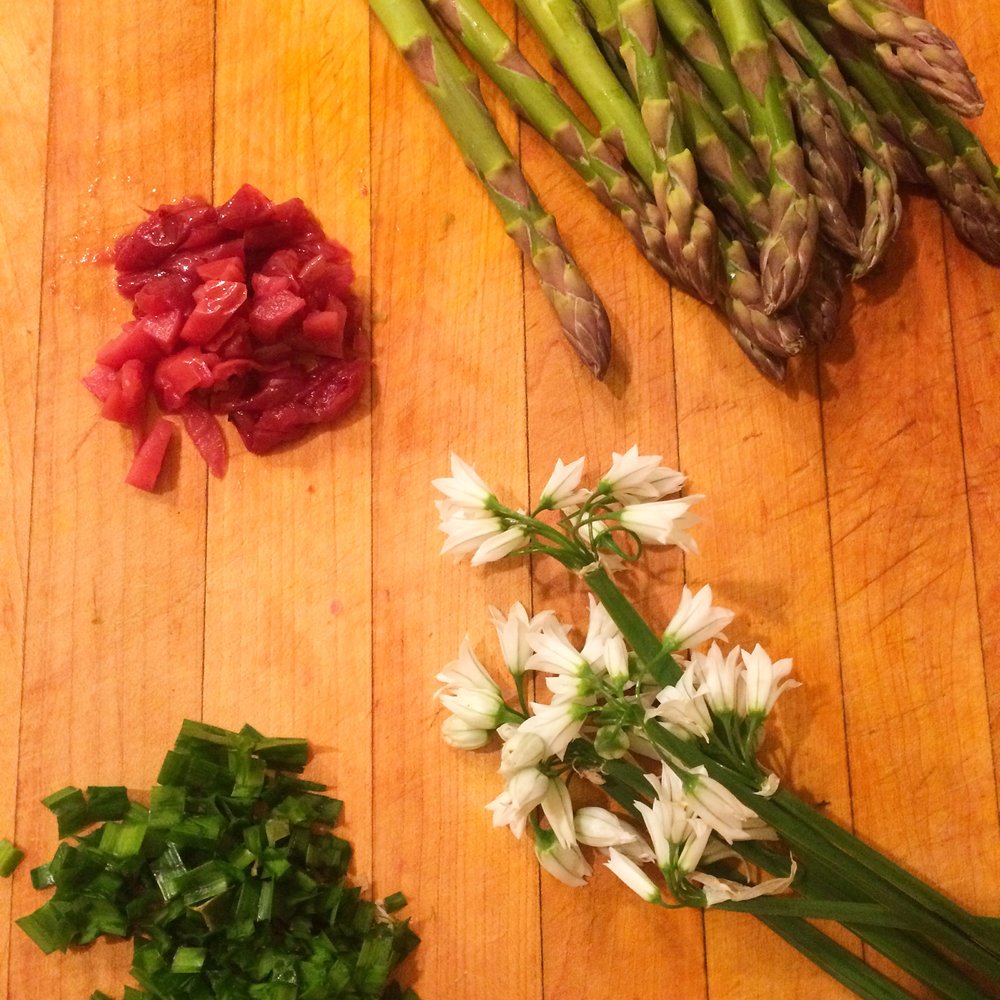
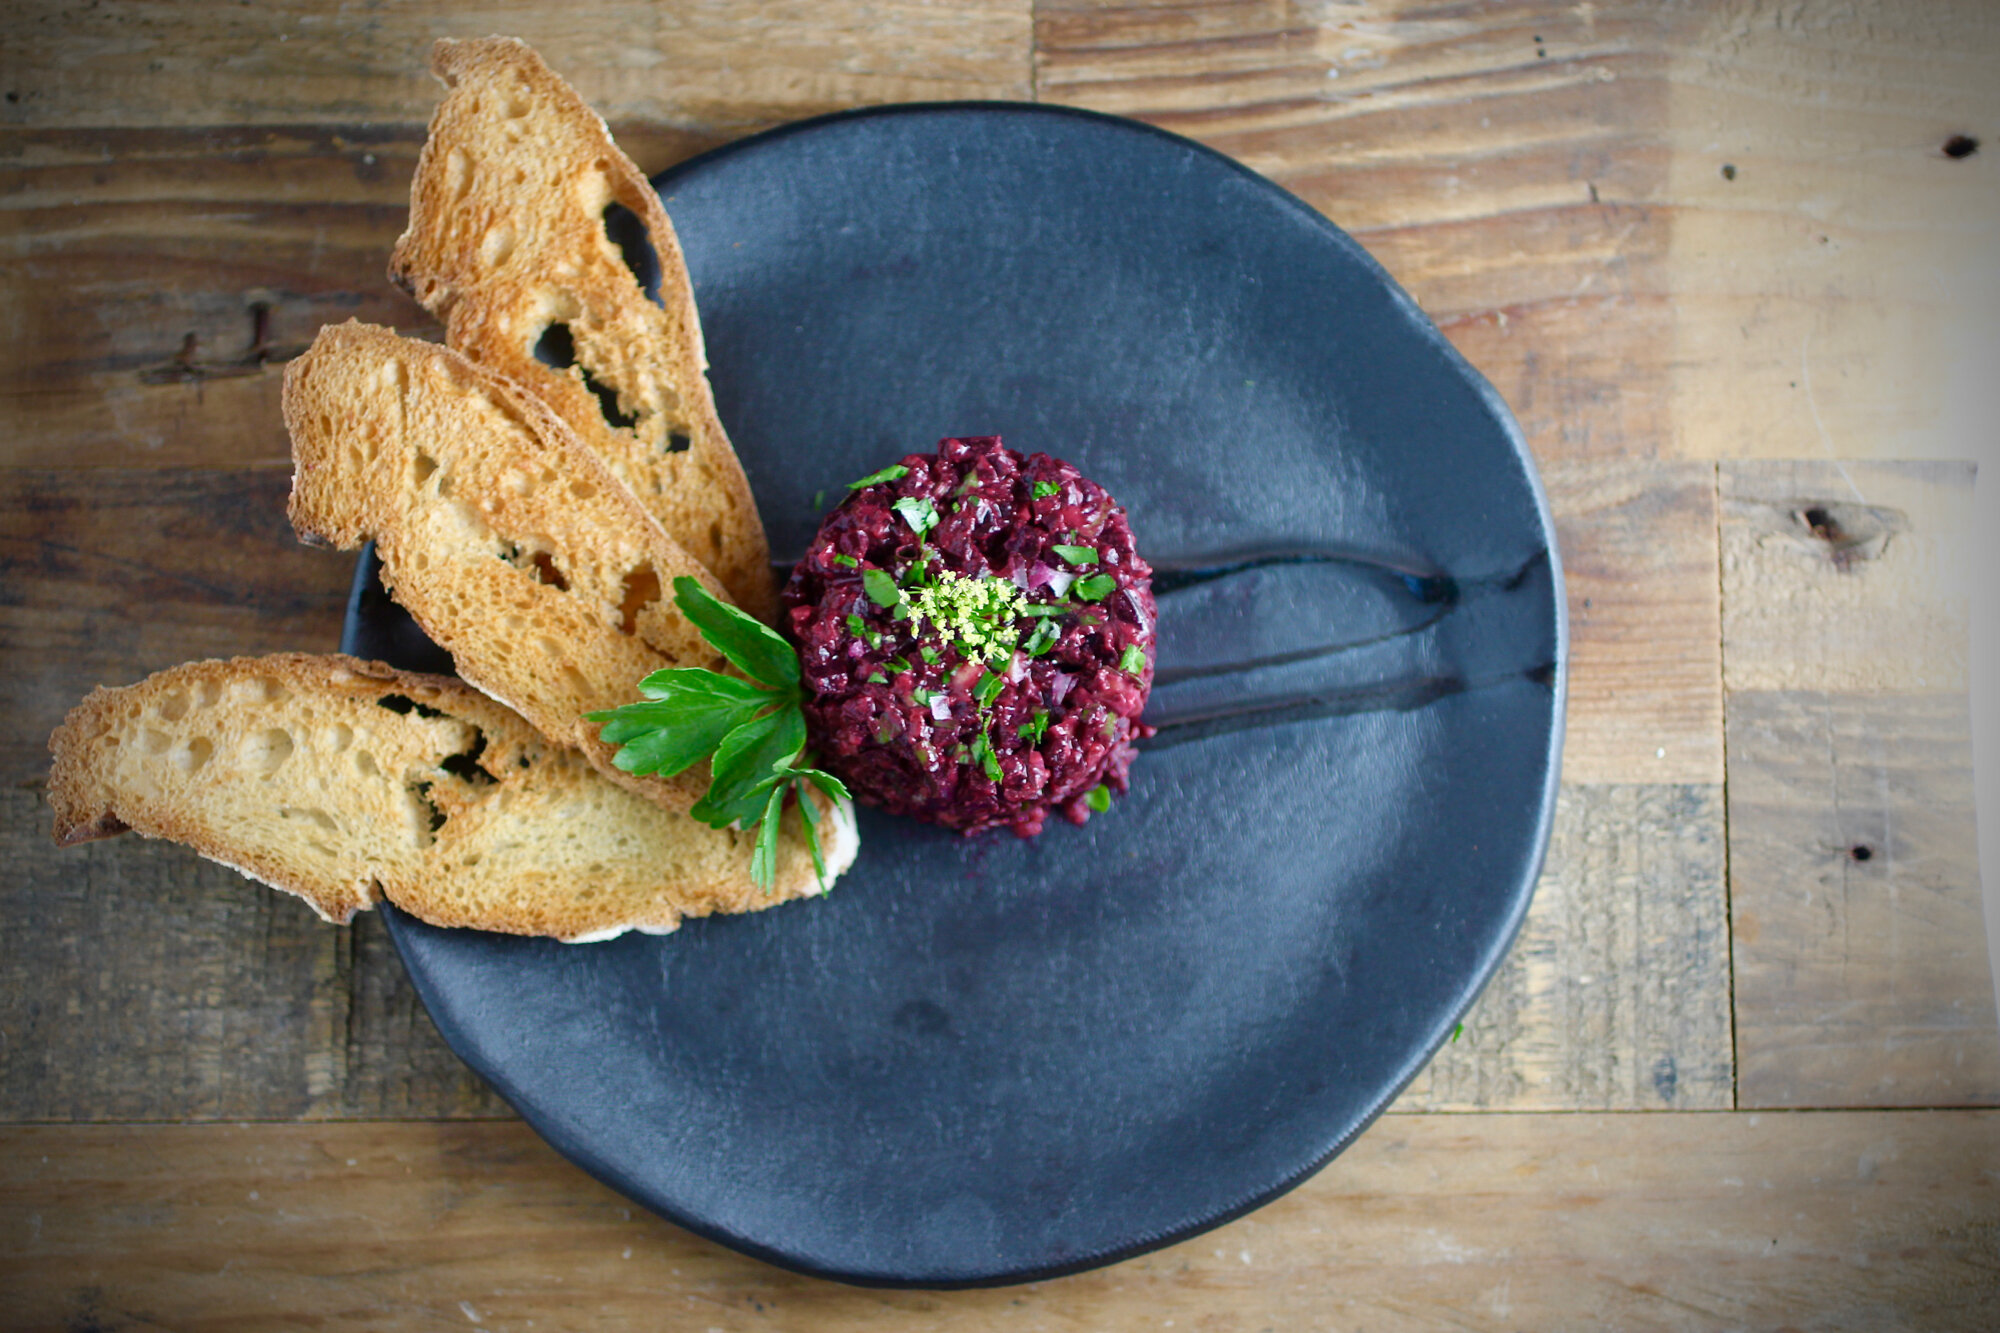
Beet tartare with shallot, capers, and dijon mustard
Plant-based spin on a classic with or without faux egg.

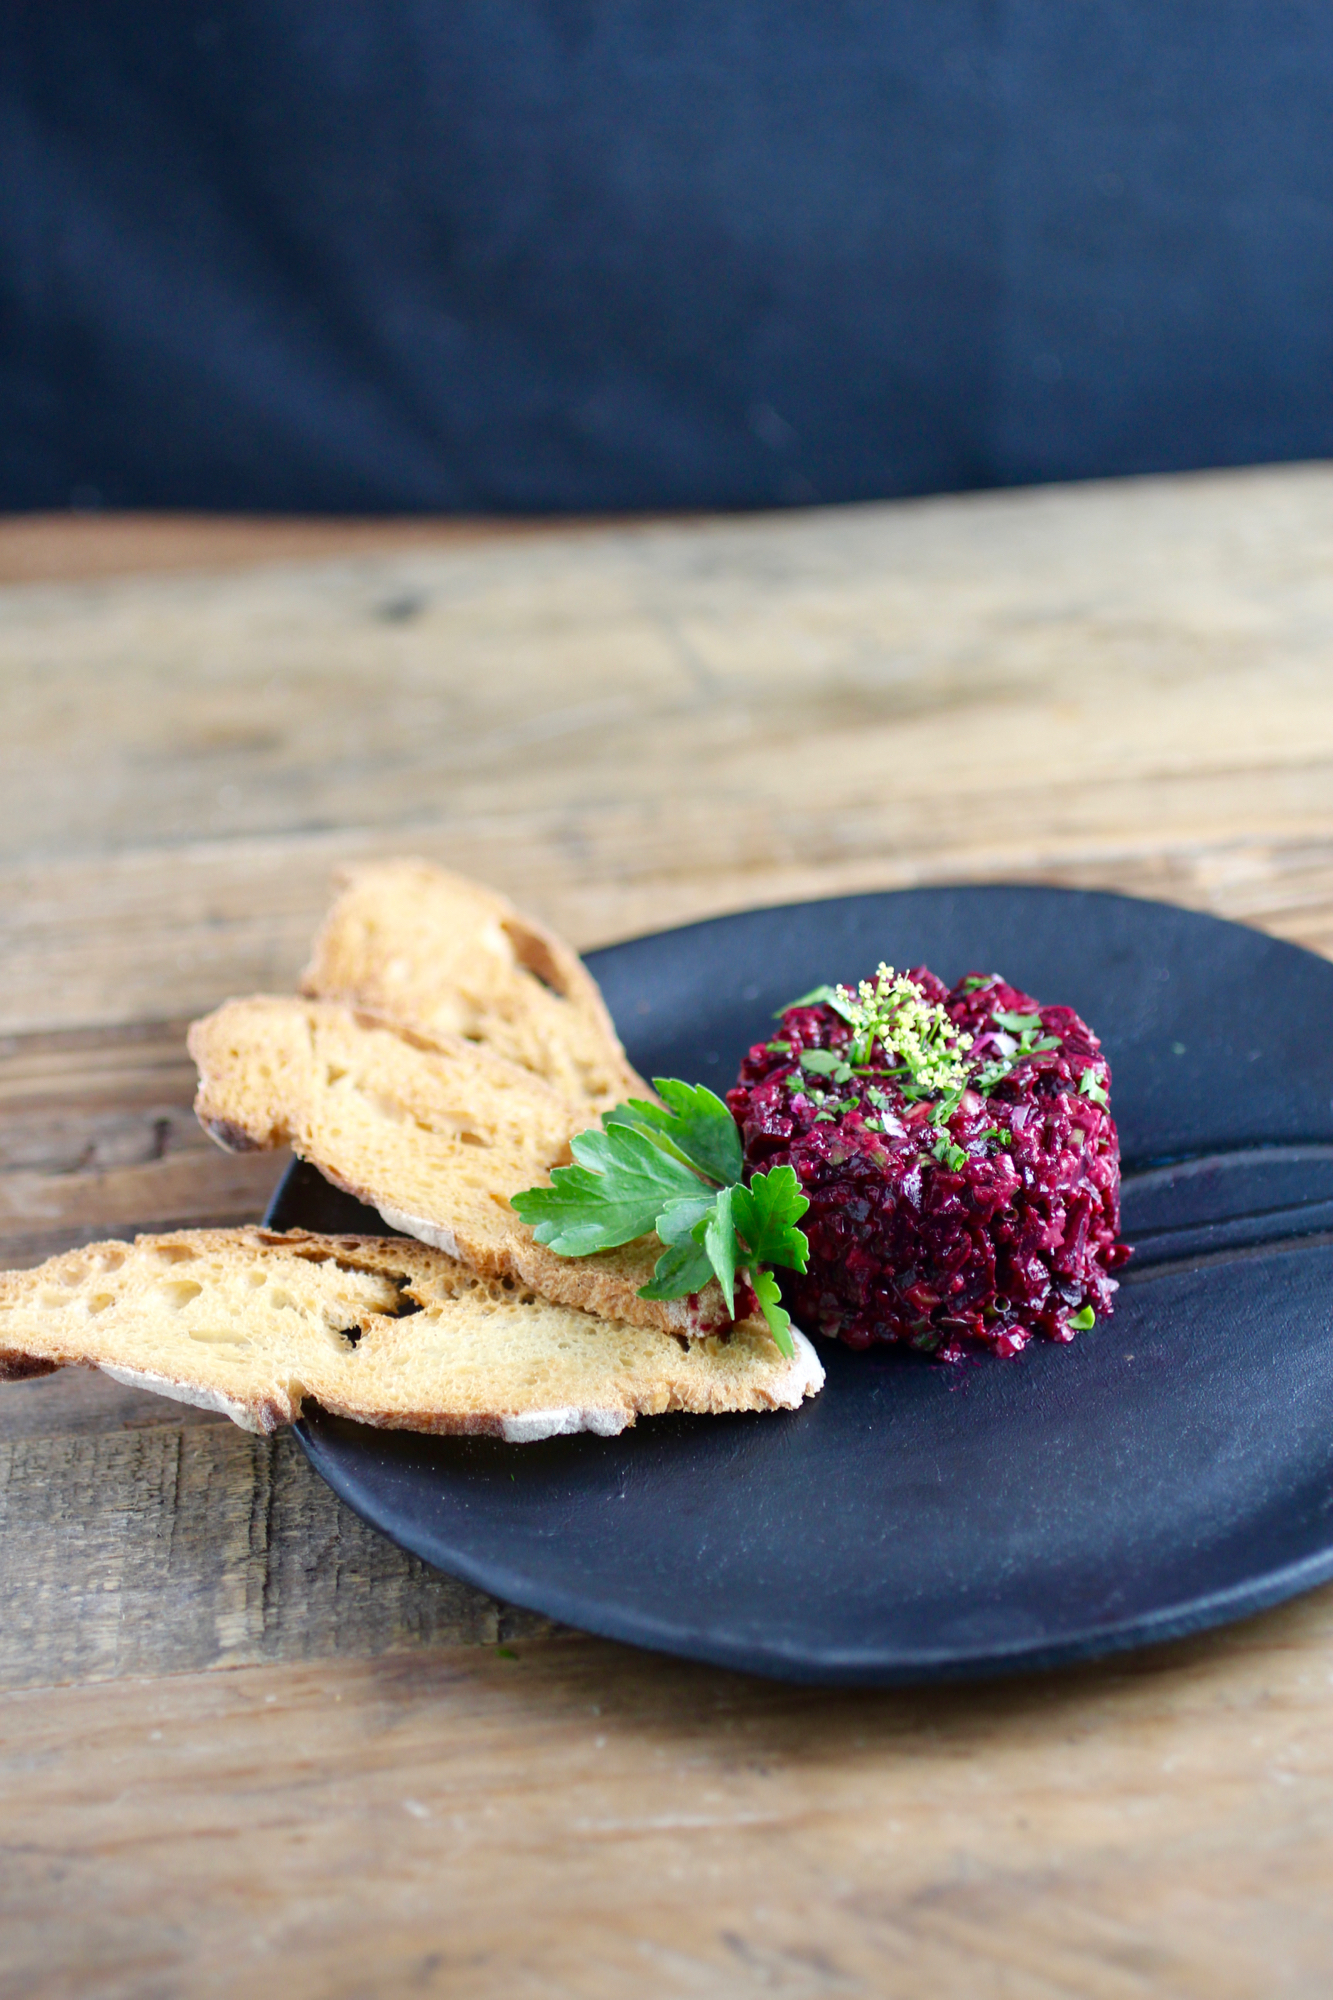
Beet tartare served with baguette crisps, but you can use any edible vehicle for the tartare of your choosing.
There's something special about classic beef tartare done right. I'm kind of a sucker for tartare when I'm at a restaurant that I know has good meat and will prepare it properly. Usually, I'm with someone else and we'll share it in addition to a few salads or other things to help balance out the meal. BUT, in the interest of plant-forward innovation, I thought I'd try to replicate tartare using beets instead of beef and making the whole dish entirely from plant-based ingredients. Crazy? Maybe.
There were some challenges with mimicking the luscious quality of the raw beef, but the combination of miso and olive oil comes pretty close and the miso has the additional bonus of providing umami flavor that you get from meat in the beef version (double score!) If you do eat meat, another great option is to make a tartare with both beef and beet (I've done a 1:1 ratio and it was very successful) to keep some of the beef flavor and texture, but still make your tartare more plant-forward. Other classic ingredients are added to this recipe such as shallots, capers, parsley, and Dijon mustard, but you can play around with these as you like!
Traditionally, beef tartare is served with a runny egg yolk on top that is mixed in to the cubed steak before eating. You could top this with a real egg yolk and it would be delicious, but I was in an experimental mood and decided to try out making a faux egg from chickpea flour, flax, miso, water, and tumeric. The flax, chickpea, and water provide texture while the miso flavor, and the turmeric color. It's pretty fun, but, you know, not a real egg yolk. In my opinion, nothing you can make in a home kitchen comes close to an egg if you want all of the egg-like properties. Using flax and other substitutions works great for many baking or binding applications, but if you're looking for a runny egg yolk there's nothing like the real thing...eggs are just magical. However, you can serve this with or without an egg/faux egg and it's still delicious. Great appetizer for your vegan friends (or self) and can easily be gluten-free if served with GF crackers, endive, or the like. Recipe below serves 6 and can be stored in the refrigerator for a few days without diminishing (too much) in quality.
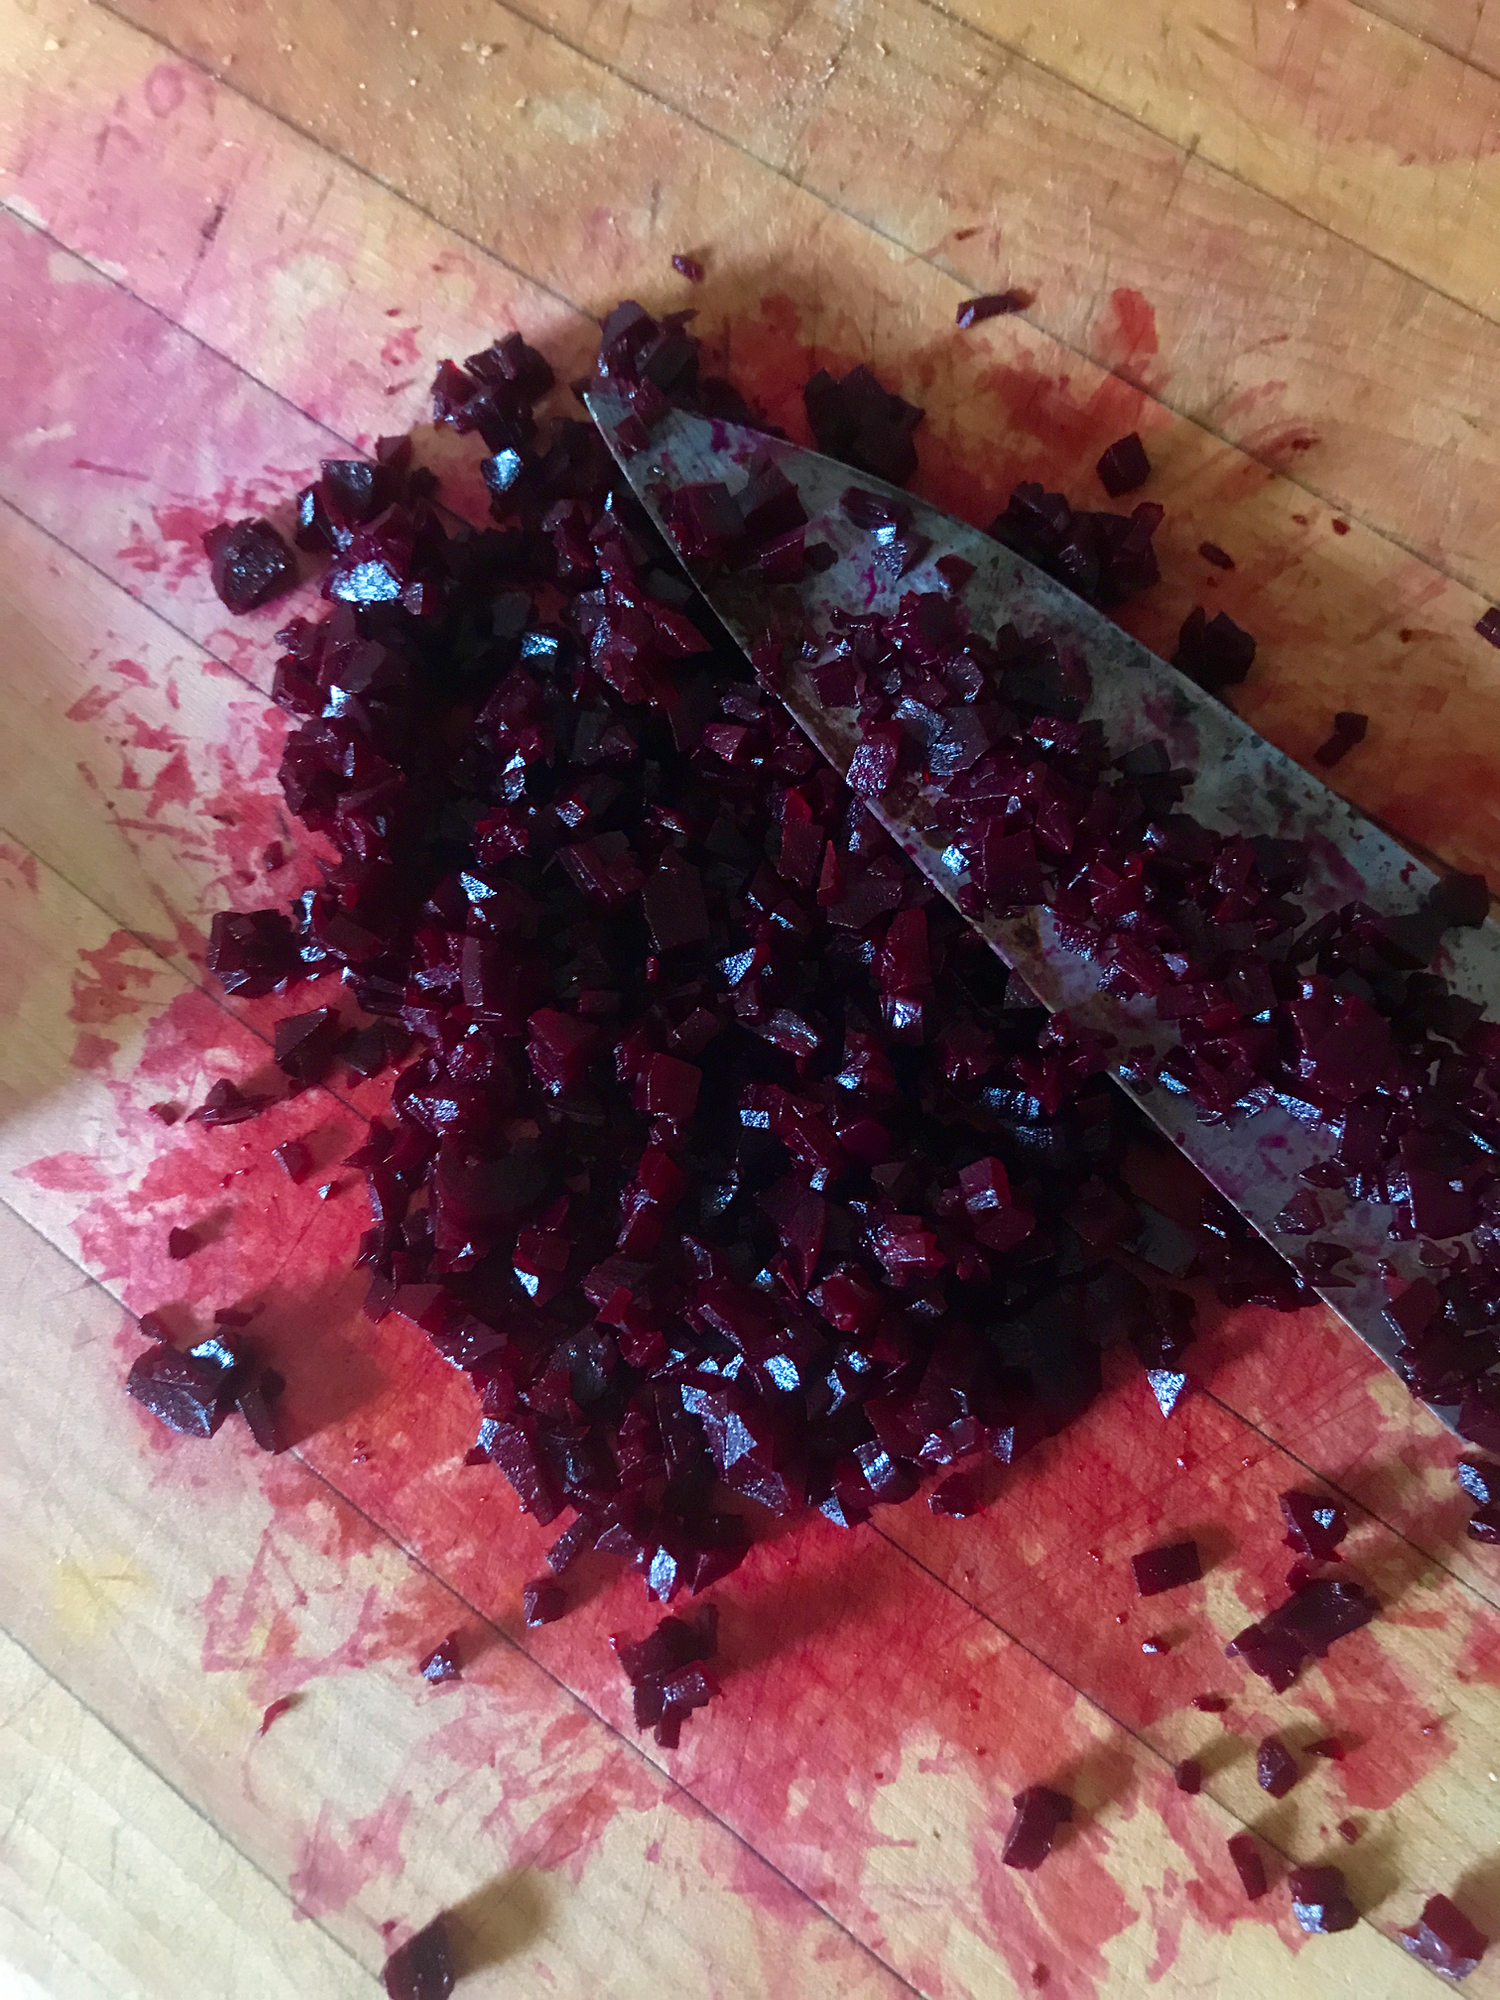
Finely mincing beets - it's not blood, it's beet juice! Be careful, it stains.
- 2 medium beets, about 6 ounces
- 2-3 teaspoons olive oil
- 2-3 teaspoons white miso
- 1 tablespoon minced capers (I used California capers)
- 2 teaspoons minced shallot
- 2 tablespoons minced parsley
- 1 tablespoon minced chives (optional)
- 2 teaspoons Dijon mustard
- Squeeze of lemon juice or dash of red wine vinegar
- Salt and cracked black pepper, to taste
- 1 egg yolk or faux egg, for serving - recipe below (optional)
- Baguette crisps (I used this recipe), crackers, cucumber, or endive, for serving
To Prepare
- Mince beet into fine cubes using knife and add to medium bowl.
- Mix in 2 teaspoons olive oil, 2 teaspoons miso, capers, shallot, 1.5 tablespoons parsley, chives (optional), mustard, and squeeze of lemon. Stir in salt/pepper to taste and more olive oil and/or miso to desired flavor and texture.
- Mound onto serving plate and top with egg yolk/faux egg yolk (optional). Sprinkle with salt and reserved parsley and serve with baguette crisps or crackers.

Beet tartare with faux egg. Not perfect, but kinda works!
Faux egg yolk - makes 1 faux egg yolk (if using for above recipe, you may want to double the below to allow for creation of a larger "yolk" if needed)
- ½ tablespoon chickpea flour
- ½ tablespoon ground flaxseed
- 1 teaspoon white miso
- 1 tablespoon water
- ¼-½ teaspoon turmeric
- To prepare: Whisk all ingredients except turmeric then whisk in turmeric to create desired color.

Spreading beet tartare on baguette crisps. The above is 1/2 of the recipe.

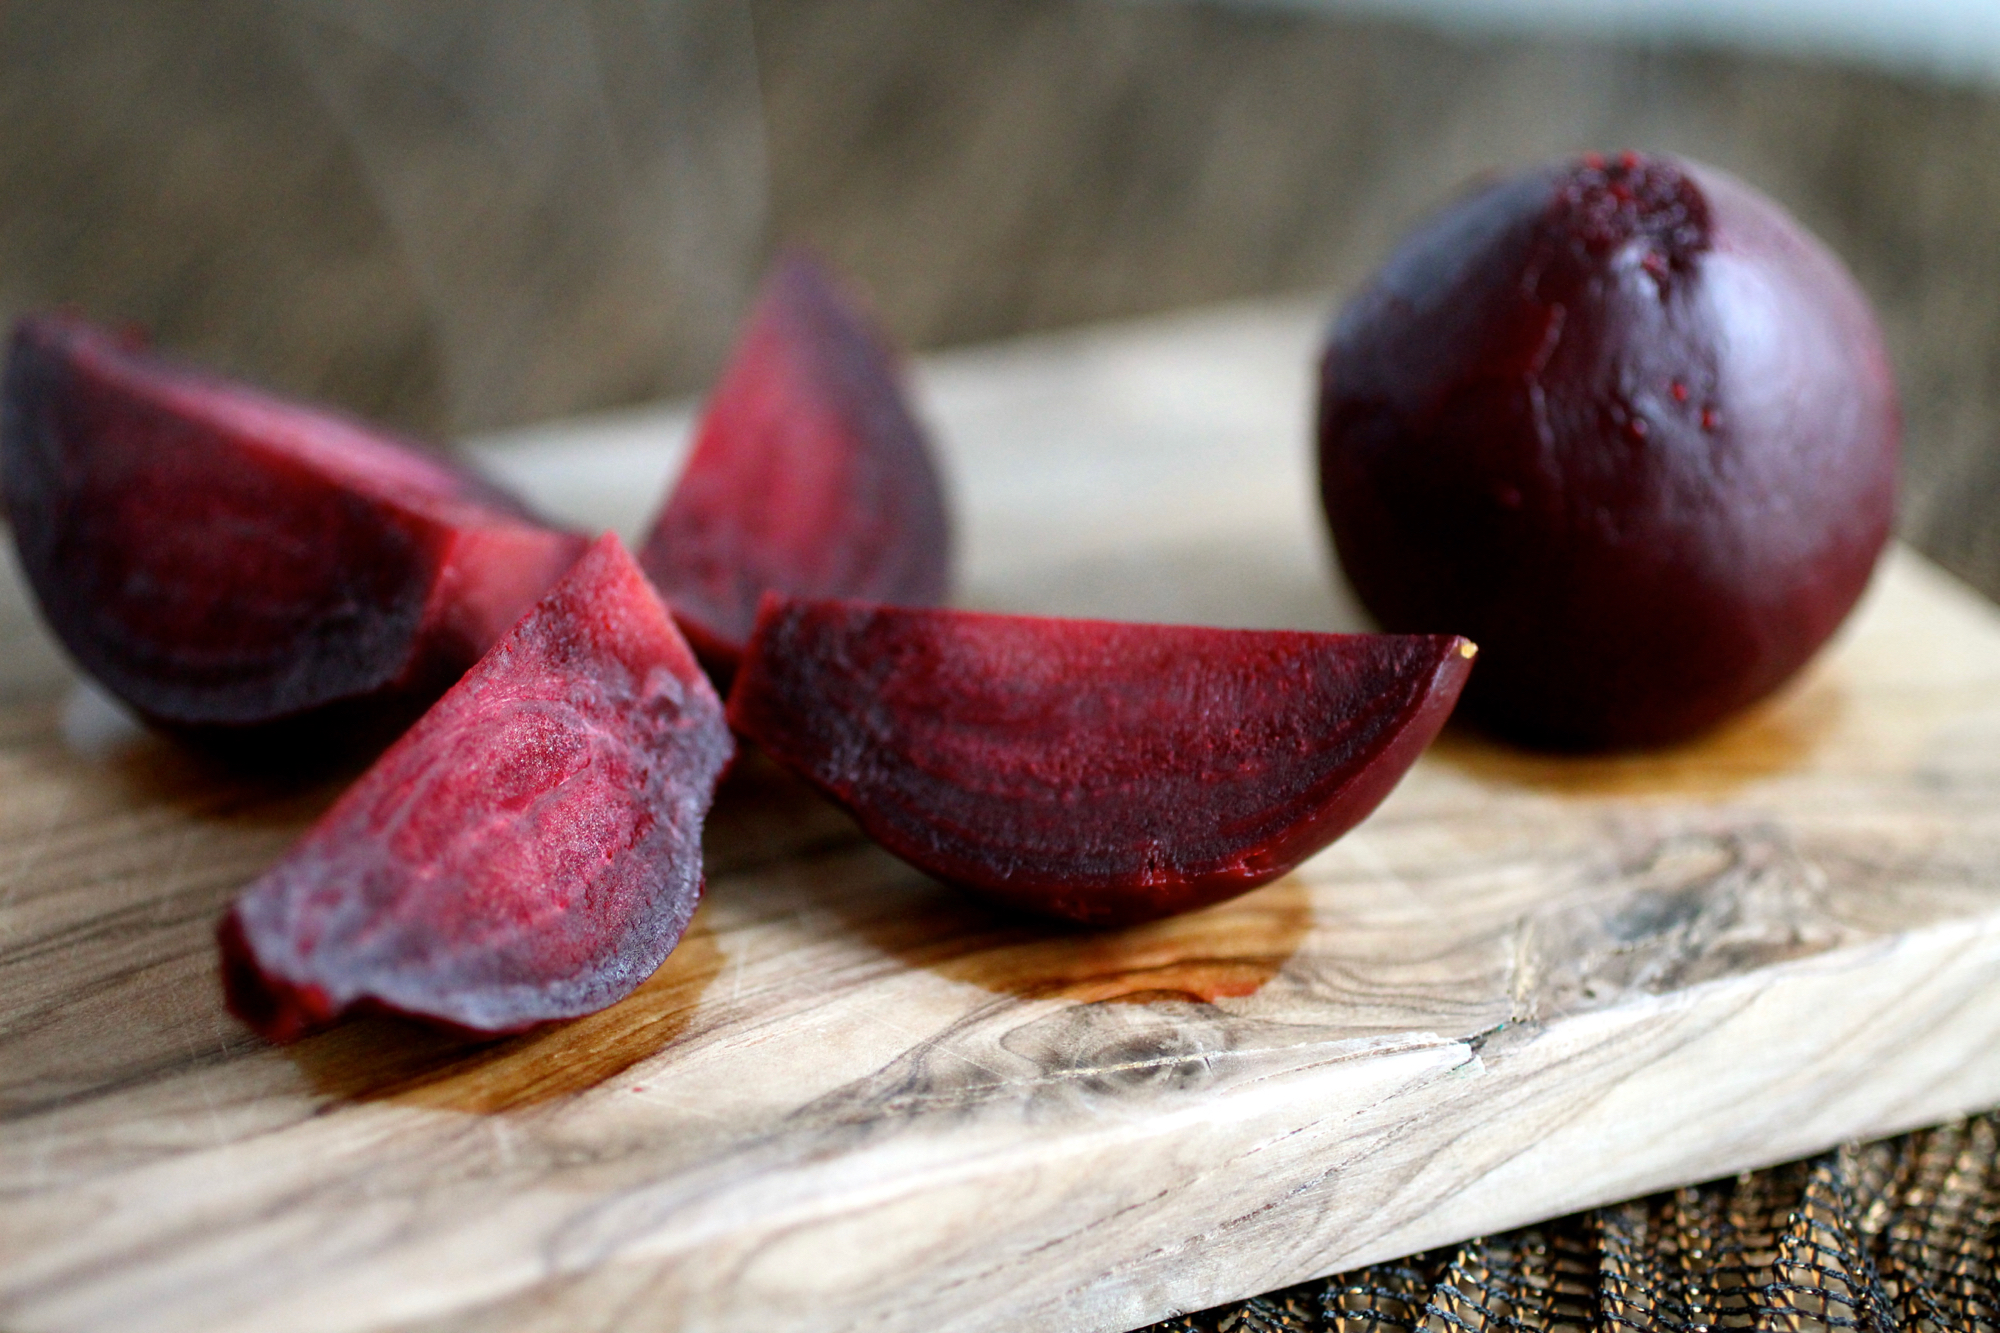
Beet and lemon zest hummus
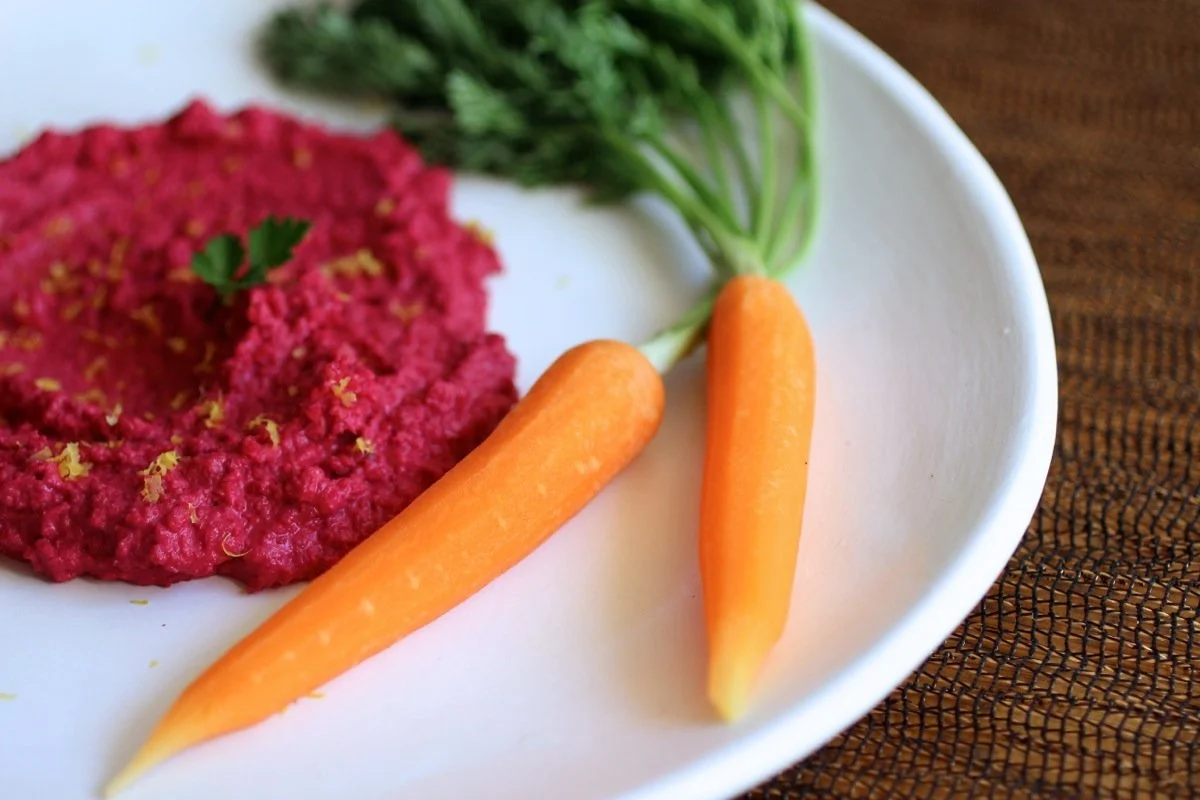
Let's face it - hummus is an easy crowd pleaser. It's vegan, gluten-free, nut-free and dip-able, so ever since it's widespread usage in the U.S. you'll be hard pressed to find a party table absent of the chickpea-tahini spread. Variations on hummus, while not as common, are similarly appreciated and, with its bright eye-catching presence, this variation brings the party (my kind of party). The flavor is similar to classic hummus, but lighter and brighter with the beet and lemon zest. A more classic Middle Eastern take on this spread, lebna bil schwendr, includes yogurt and beet instead of chickpeas and tahini. Serve with crudités, crackers, toasted pita, or as a sandwich spread. Makes 2 cups.
1 large or 2 small beets, about 4 ounces, scrubbed clean
1 cup cooked chickpeas
Zest of one lemon, about 1 tablespoon
Juice of one lemons, 2-3 tablespoons
2 tablespoons tahini
1/8 teaspoon salt
Up to 1/4 cup extra virgin olive oil
1-3 tablespoon(s) water
Fresh ground black pepper to taste (optional)
Cut tops off beets and place into a small saucepan. Cover with water, bring to a boil, and cook until tender, about 15 minutes. Slide skin off of beets while cooling under cold running water. Chop and add to food processor.
Add chickpeas, lemon zest, lemon juice, tahini, salt, and 2 tablespoons olive oil. Blend until smooth. Drizzle in more olive oil and water until desired consistency is reached. Incorporate black pepper to taste. Hummus will keep in the refrigerator for up to one week.
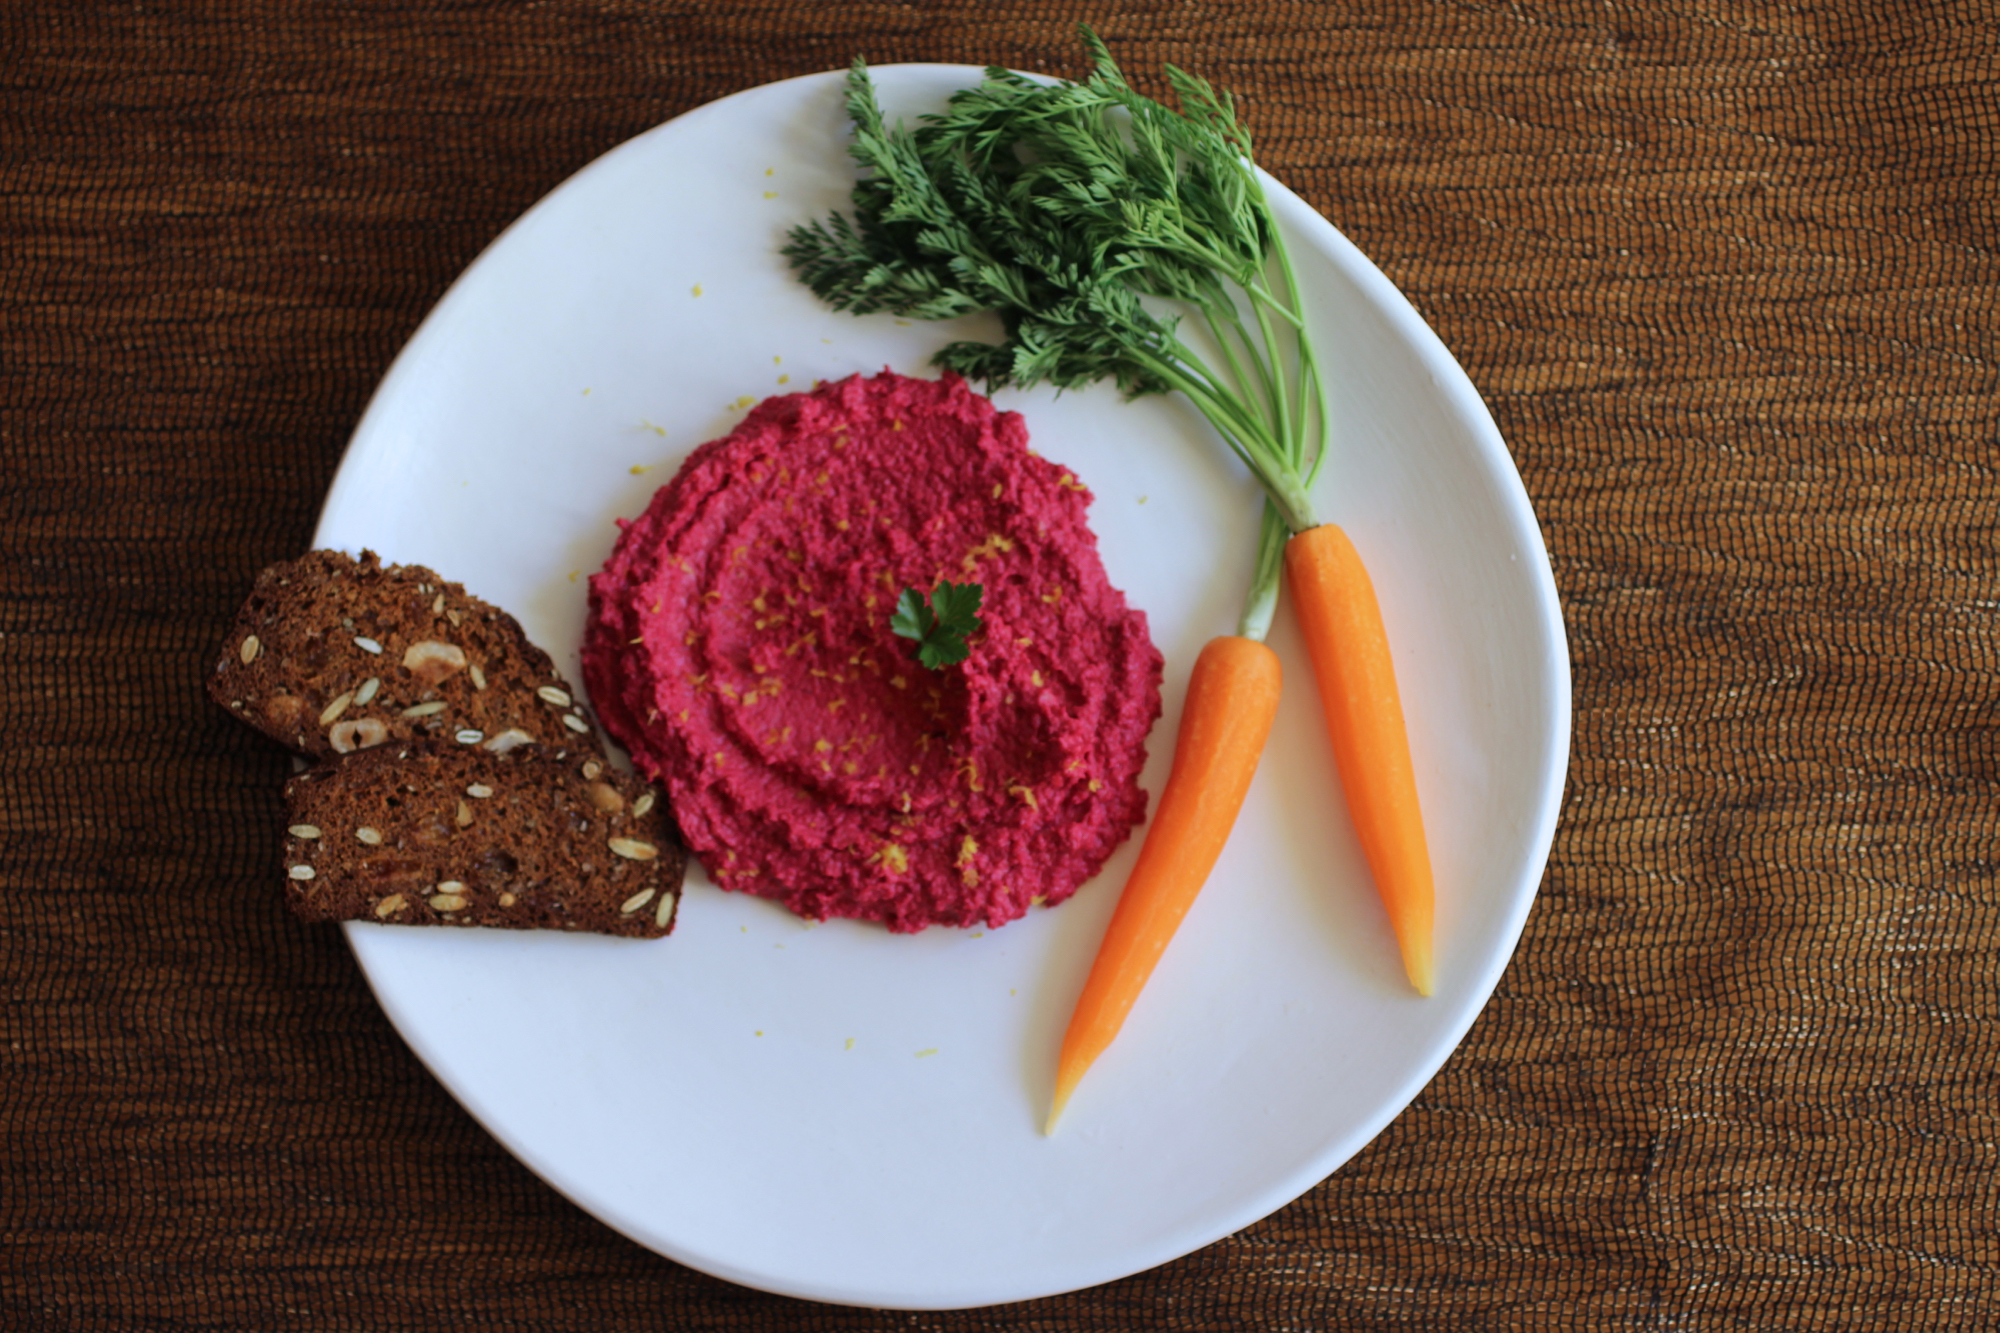
There are many ways to eat this hummus!