

Spiced elderberry cordial
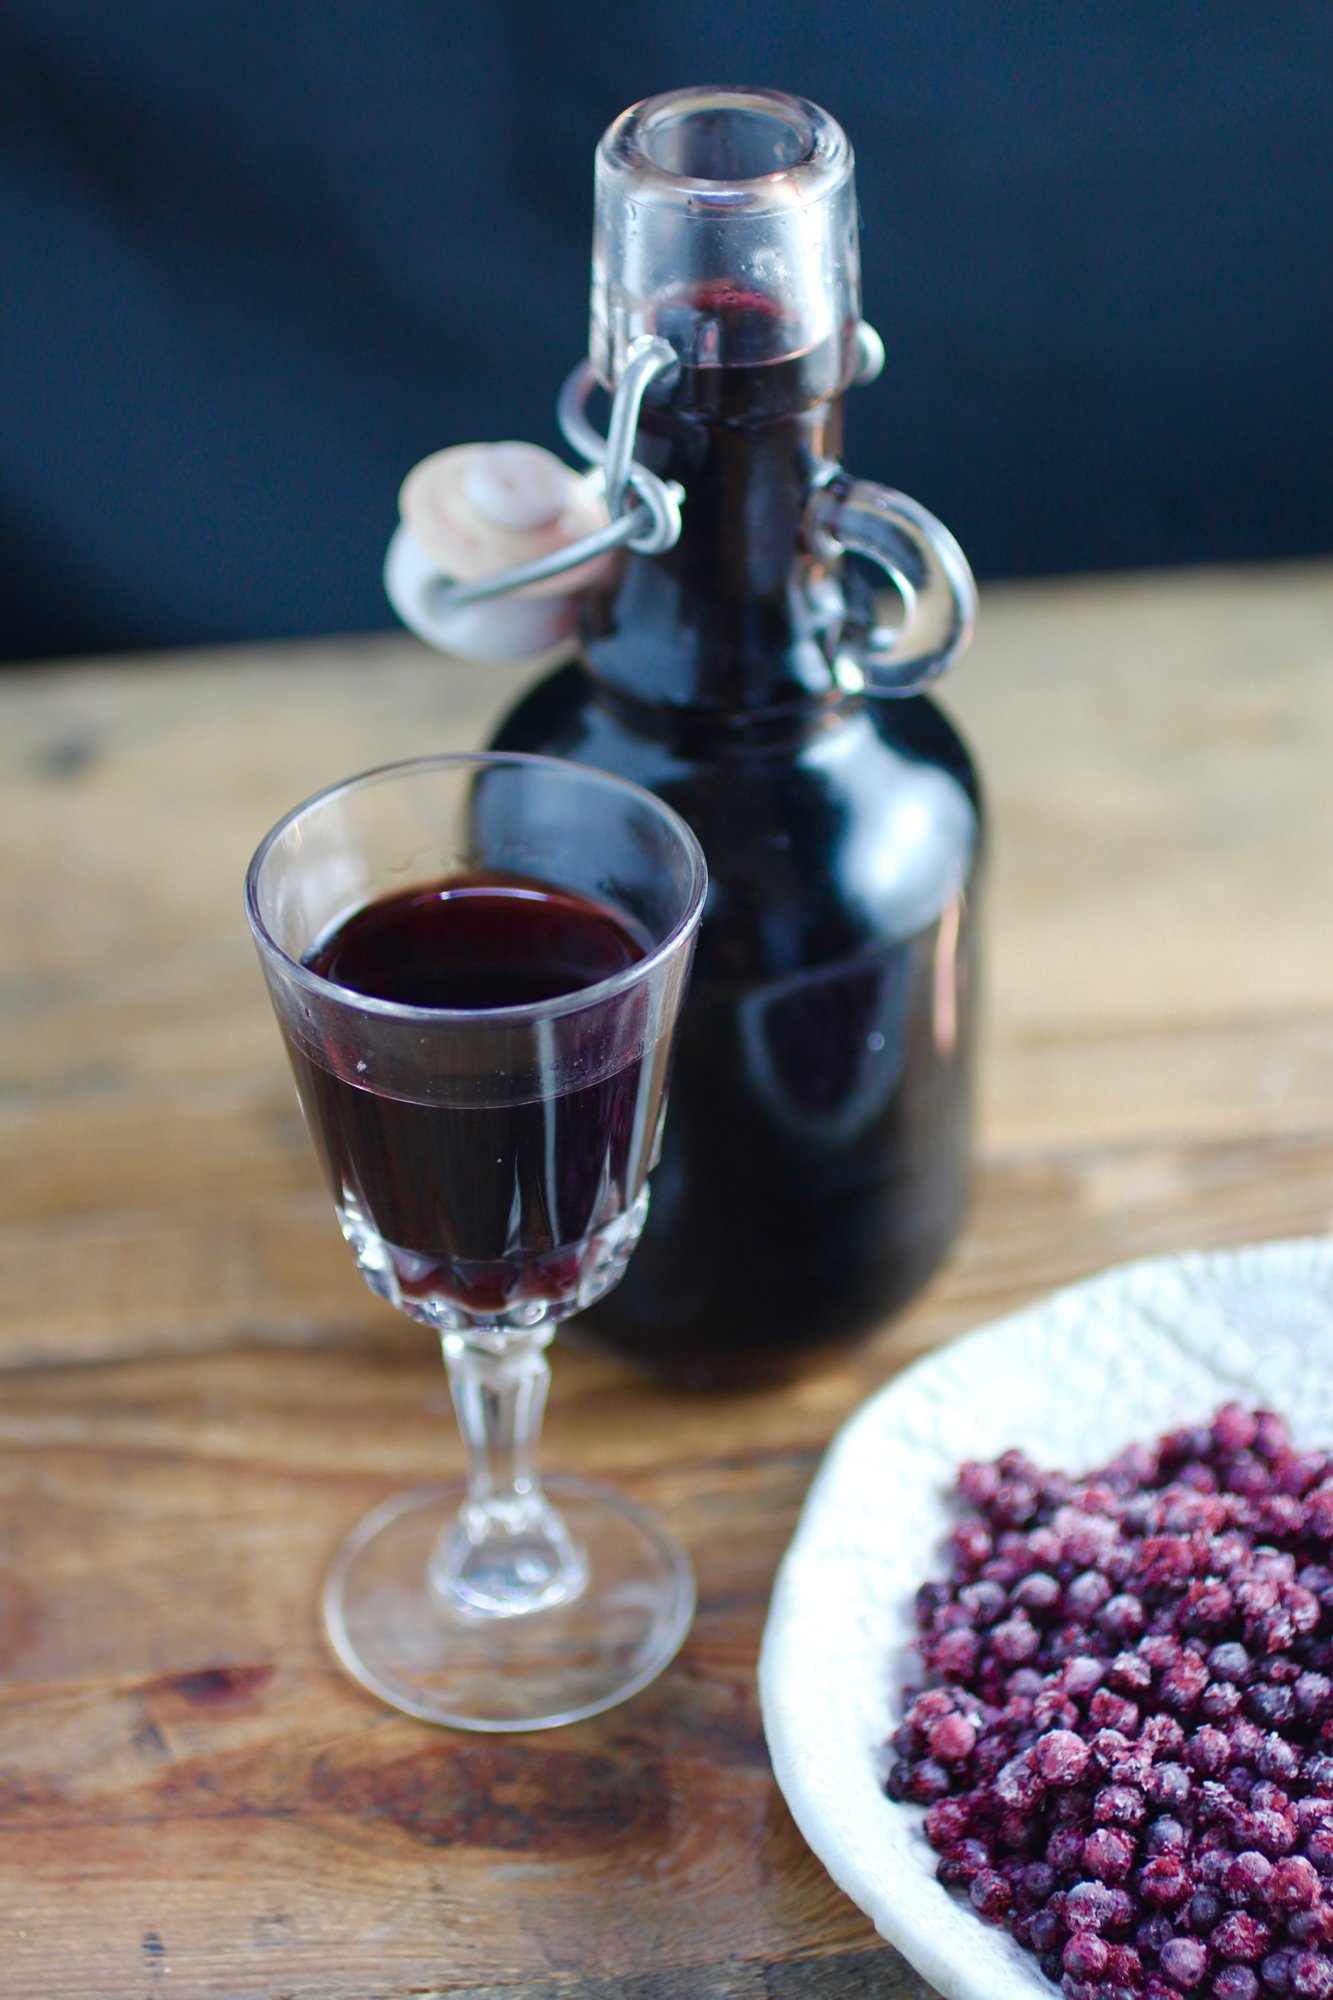
Unlike elderflower cordial, elderberry cordial is a stronger, thicker syrup containing alcohol that is used in both medicinal and culinary applications. The syrup is sometimes taken regularly for cold and flu prevention (there is limited peer-reviewed, but much anecdotal evidence suggesting the berries enhance immune response), to top pancakes, or, as I particularly enjoy, with champagne for an “elderberry kir royale”. Feel free to experiment with the spice blend, add other ingredients such as citrus peel and herbs, or keep it simple with just the berries.
1 1/4 cups dried elderberries or 2 cups fresh
1 cinnamon stick, crushed
1 star anise
About 3 cups brandy
Honey, to taste (maple syrup or other sweetener can be substituted for honey)
Place elderberries, cinnamon, and star anise into a clean quart-sized glass jar. Add brandy to fill the jar and cover with a lid. Label the jar with contents and the date. Set aside in a cool, dark place for 3 to 4 weeks.
Strain cordial through cheesecloth over a large bowl. Squeeze contents of cheesecloth to release remaining liquid into the bowl then discard solids.
Add about 1/2 cup sweetener, such as honey, for every 1 cup liquid (or to taste). Stir to dissolve. Using a funnel, pour cordial into a clean bottle (or several clean bottles) and seal with cap or cork. A cordial using fresh
A cordial made with fresh elderberries will last about a year, whereas a cordial made with dried berries will last for 2-3 years and improve with age. Store in a cool, dark place and use as a cold and flu preventative, over desserts, or in beverages.
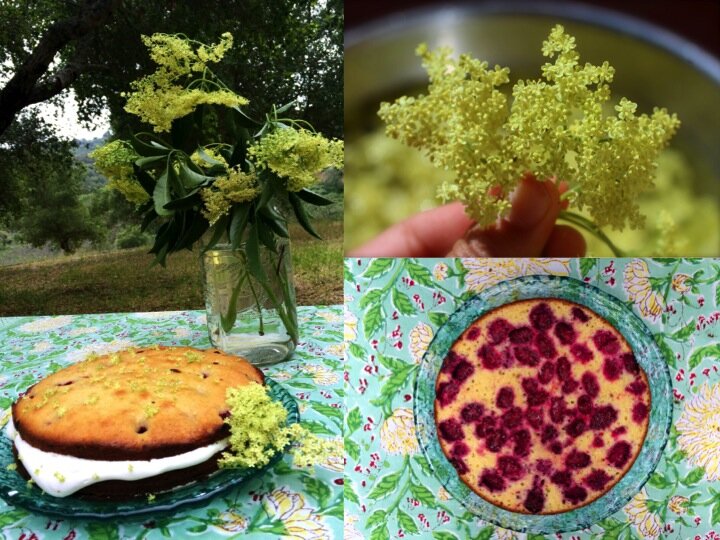
Classic Elderflower Cordial & Elderflower berry birthday cake
Bring the spring to any beverage or dessert.

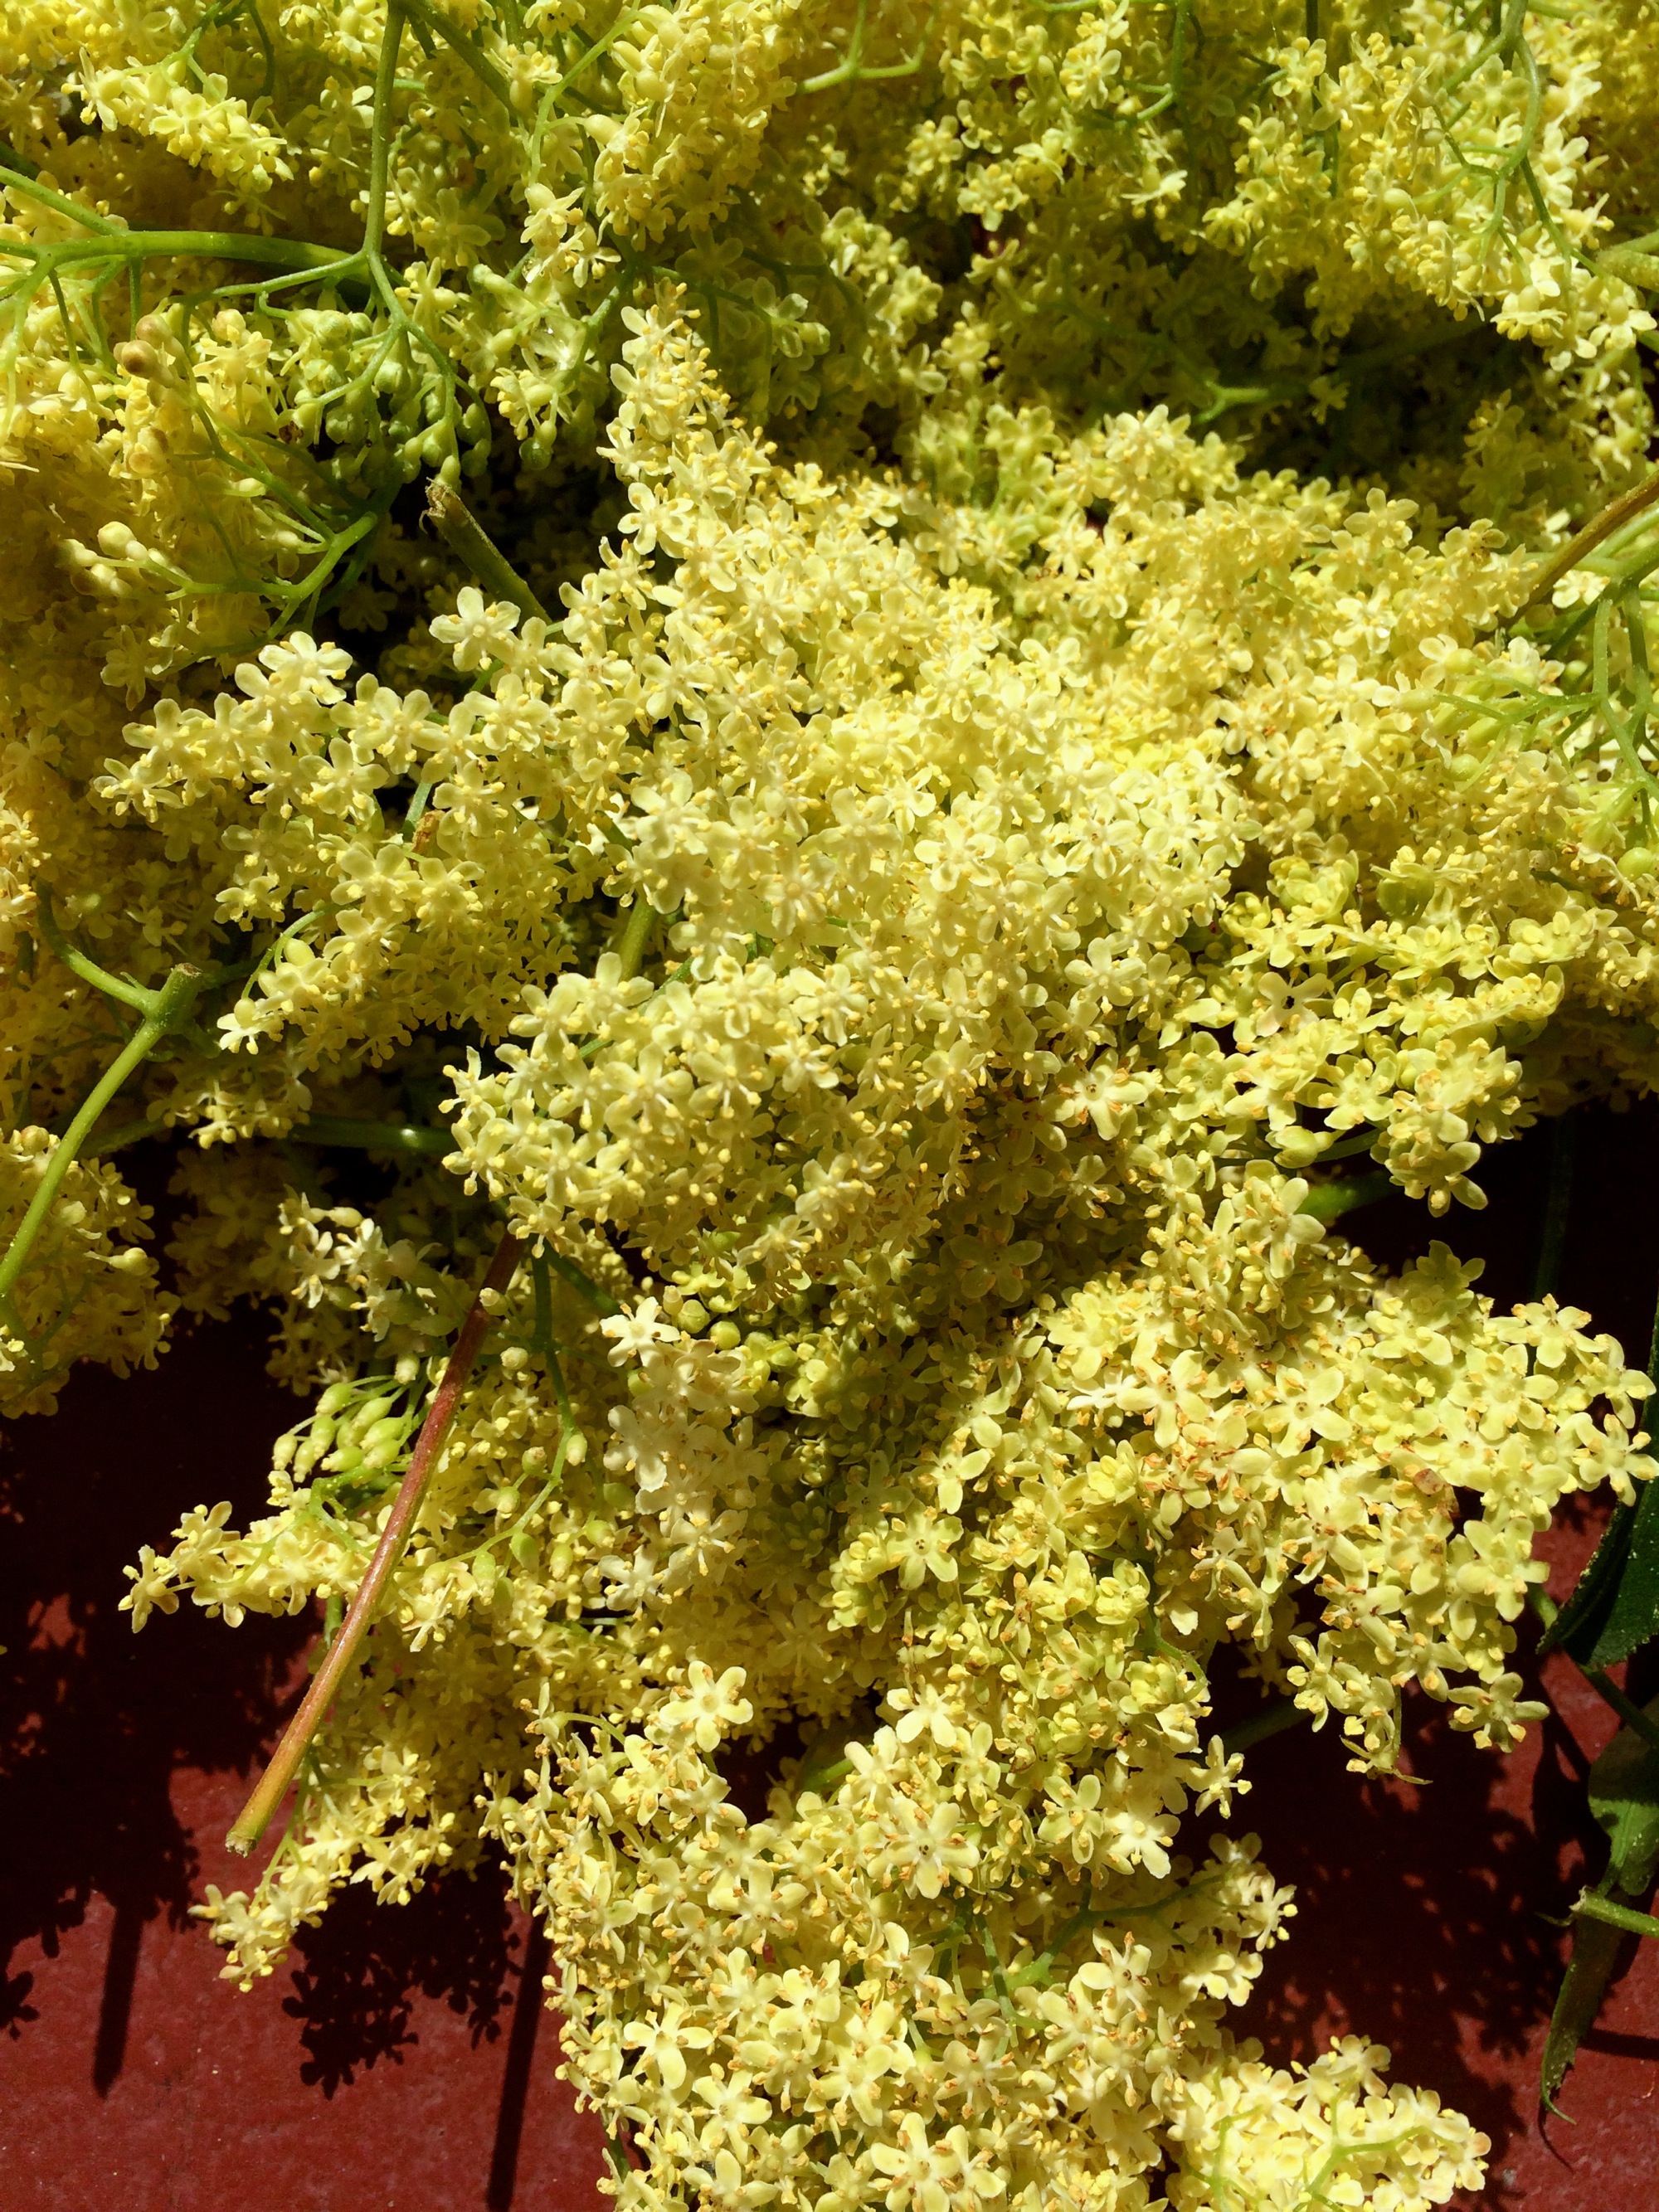
Any search for the culinary uses of elderflower will pull up elderflower cordial. By cooking the flower head in what is essentially a diluted simple syrup, you can pretty easily preserve its fragrance for future use. Which is great, because elderflower is an amazing, special plant that deserves to be savored. The most common way to enjoy elderflower cordial is by using it in cocktails (gin, elderflower, and lemon, is a tasty simple classic) or adding a bit to sparkling wine or even sparkling water for a nice kid-friendly afternoon refreshment. I also love drizzling elderflower cordial over any dessert for a quick and easy way to make that dessert oh-so-special (such as for my huckleberry-elderflower birthday cake below).
Elderflower cordial: Makes about 1 liter.
20 medium elderflower heads (about 2-3'' across)
Grated zest of 2 lemons
Juice of 2 lemons
4 cups water
3.5 cups sugar
Note: Some recipes call for citric acid (about 1 teaspoon for this batch), which helps the cordial keep for longer.
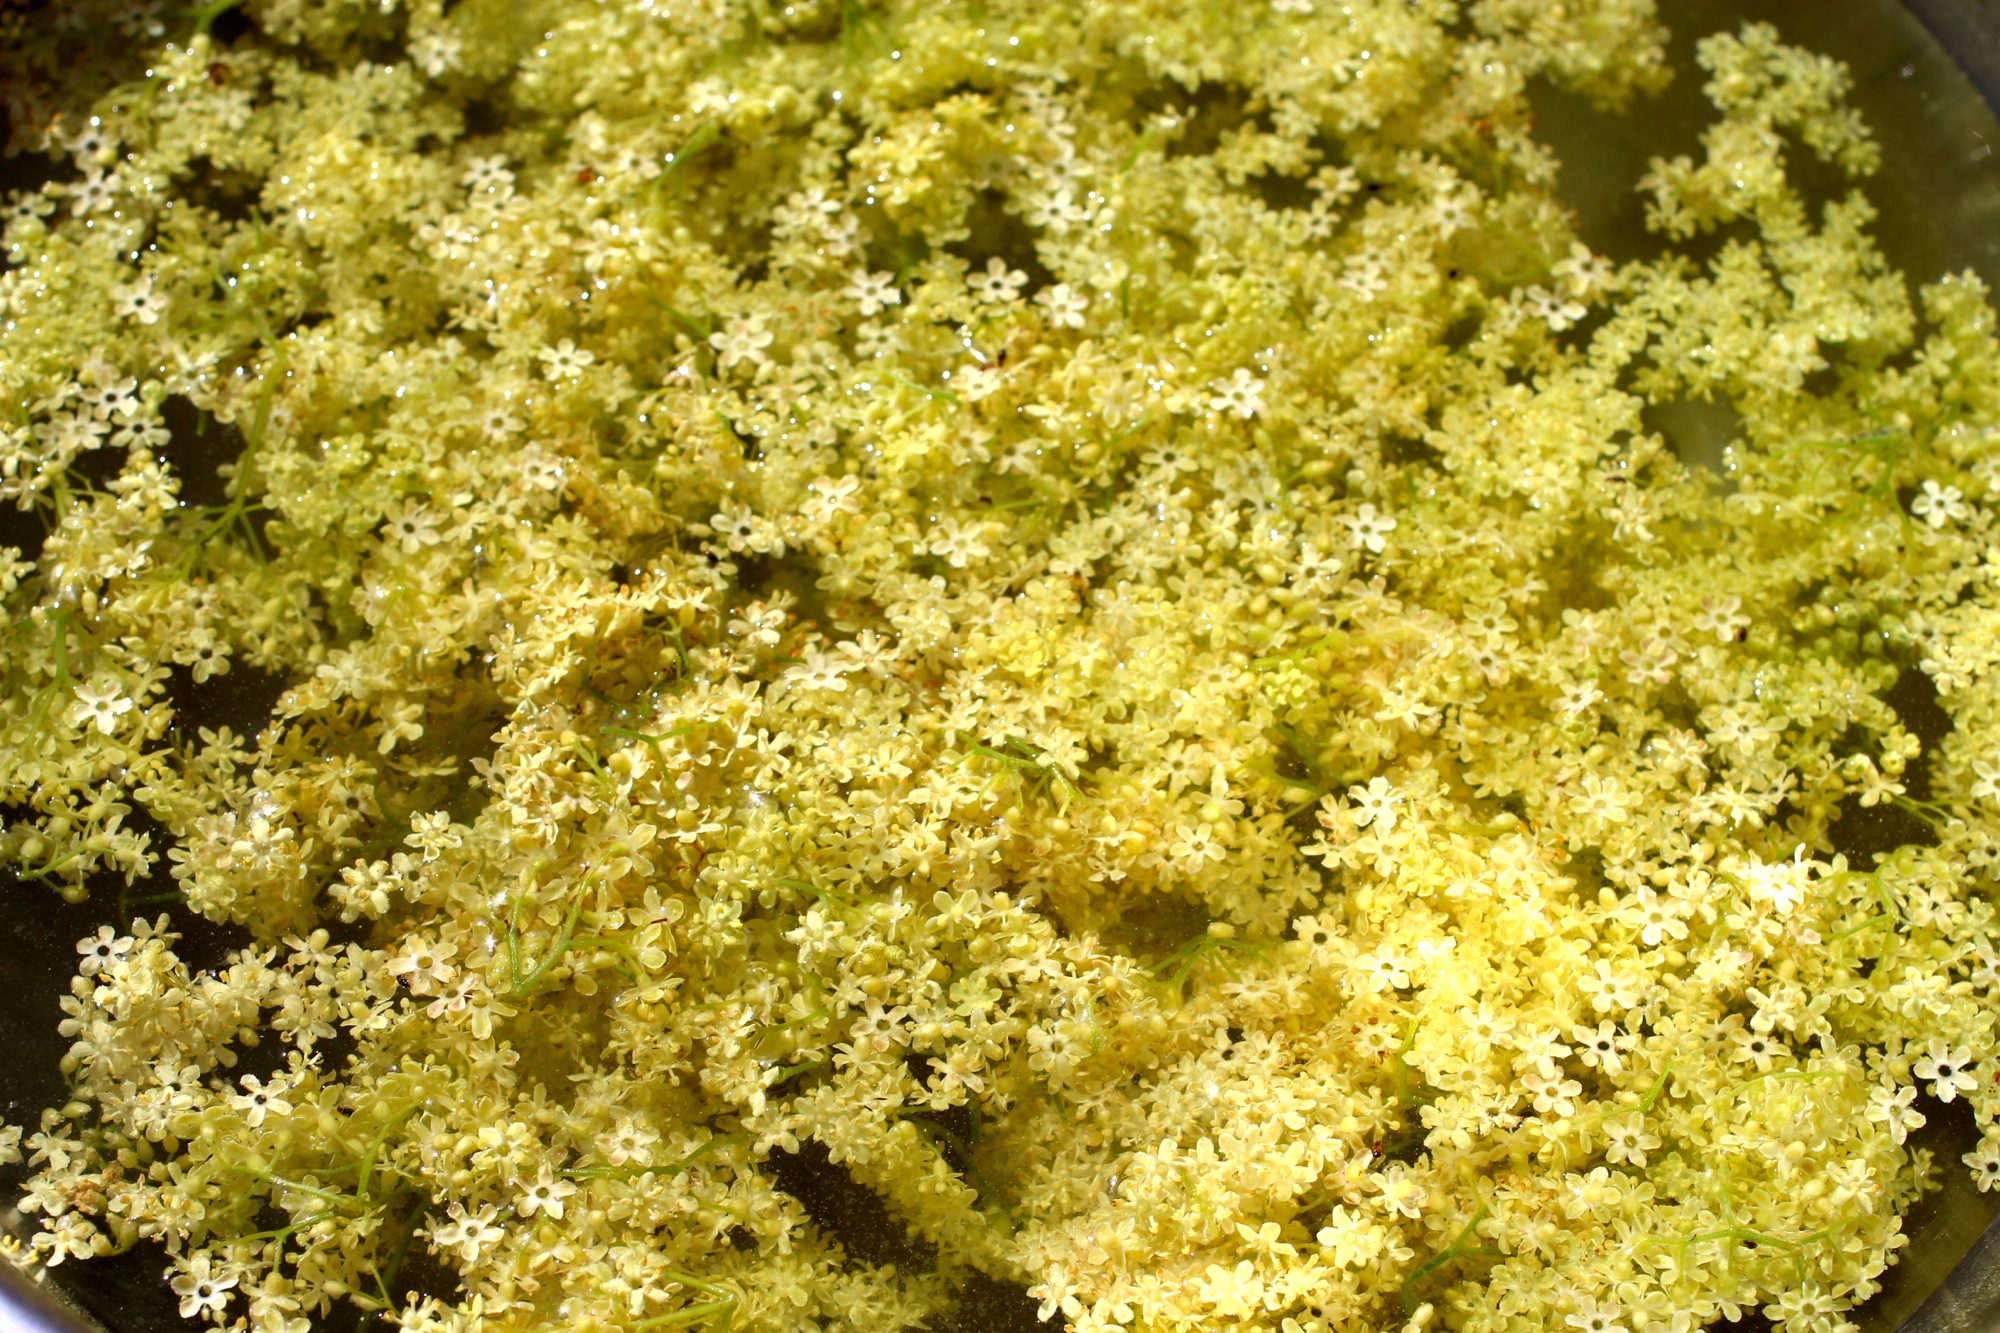
Infusing water with elderflower essence.
Inspect the elderflower heads carefully and remove any insects. Remove flowers from most of stems (especially the large ones), wash by quickly submerging in cold water, and drain. Place the flower heads in a large bowl together with the lemon zest.
Bring water to the boil and pour over the elderflowers and citrus zest. Cover and leave overnight to infuse.
Strain the liquid through cheesecloth and pour into a saucepan. Add the sugar and the lemon juice. Heat gently to dissolve the sugar, then bring to a simmer and cook for 2-3 minutes.
Use a funnel to pour the hot syrup into sterilized bottles and seal with a sterilized cap or cork. Bottles can be sterilized by washing with soapy water then plunging into boiling water for 5 minutes and allowing to air dry.
Allow to cool then store in the refrigerator or freezer. Cordial will keep in the fridge for 2 weeks and in the freezer for 1 year. I like to freeze the cordial in smaller batches so I can use it as needed.
Elderflower-Mulberry Birthday Cake: Serves 12.
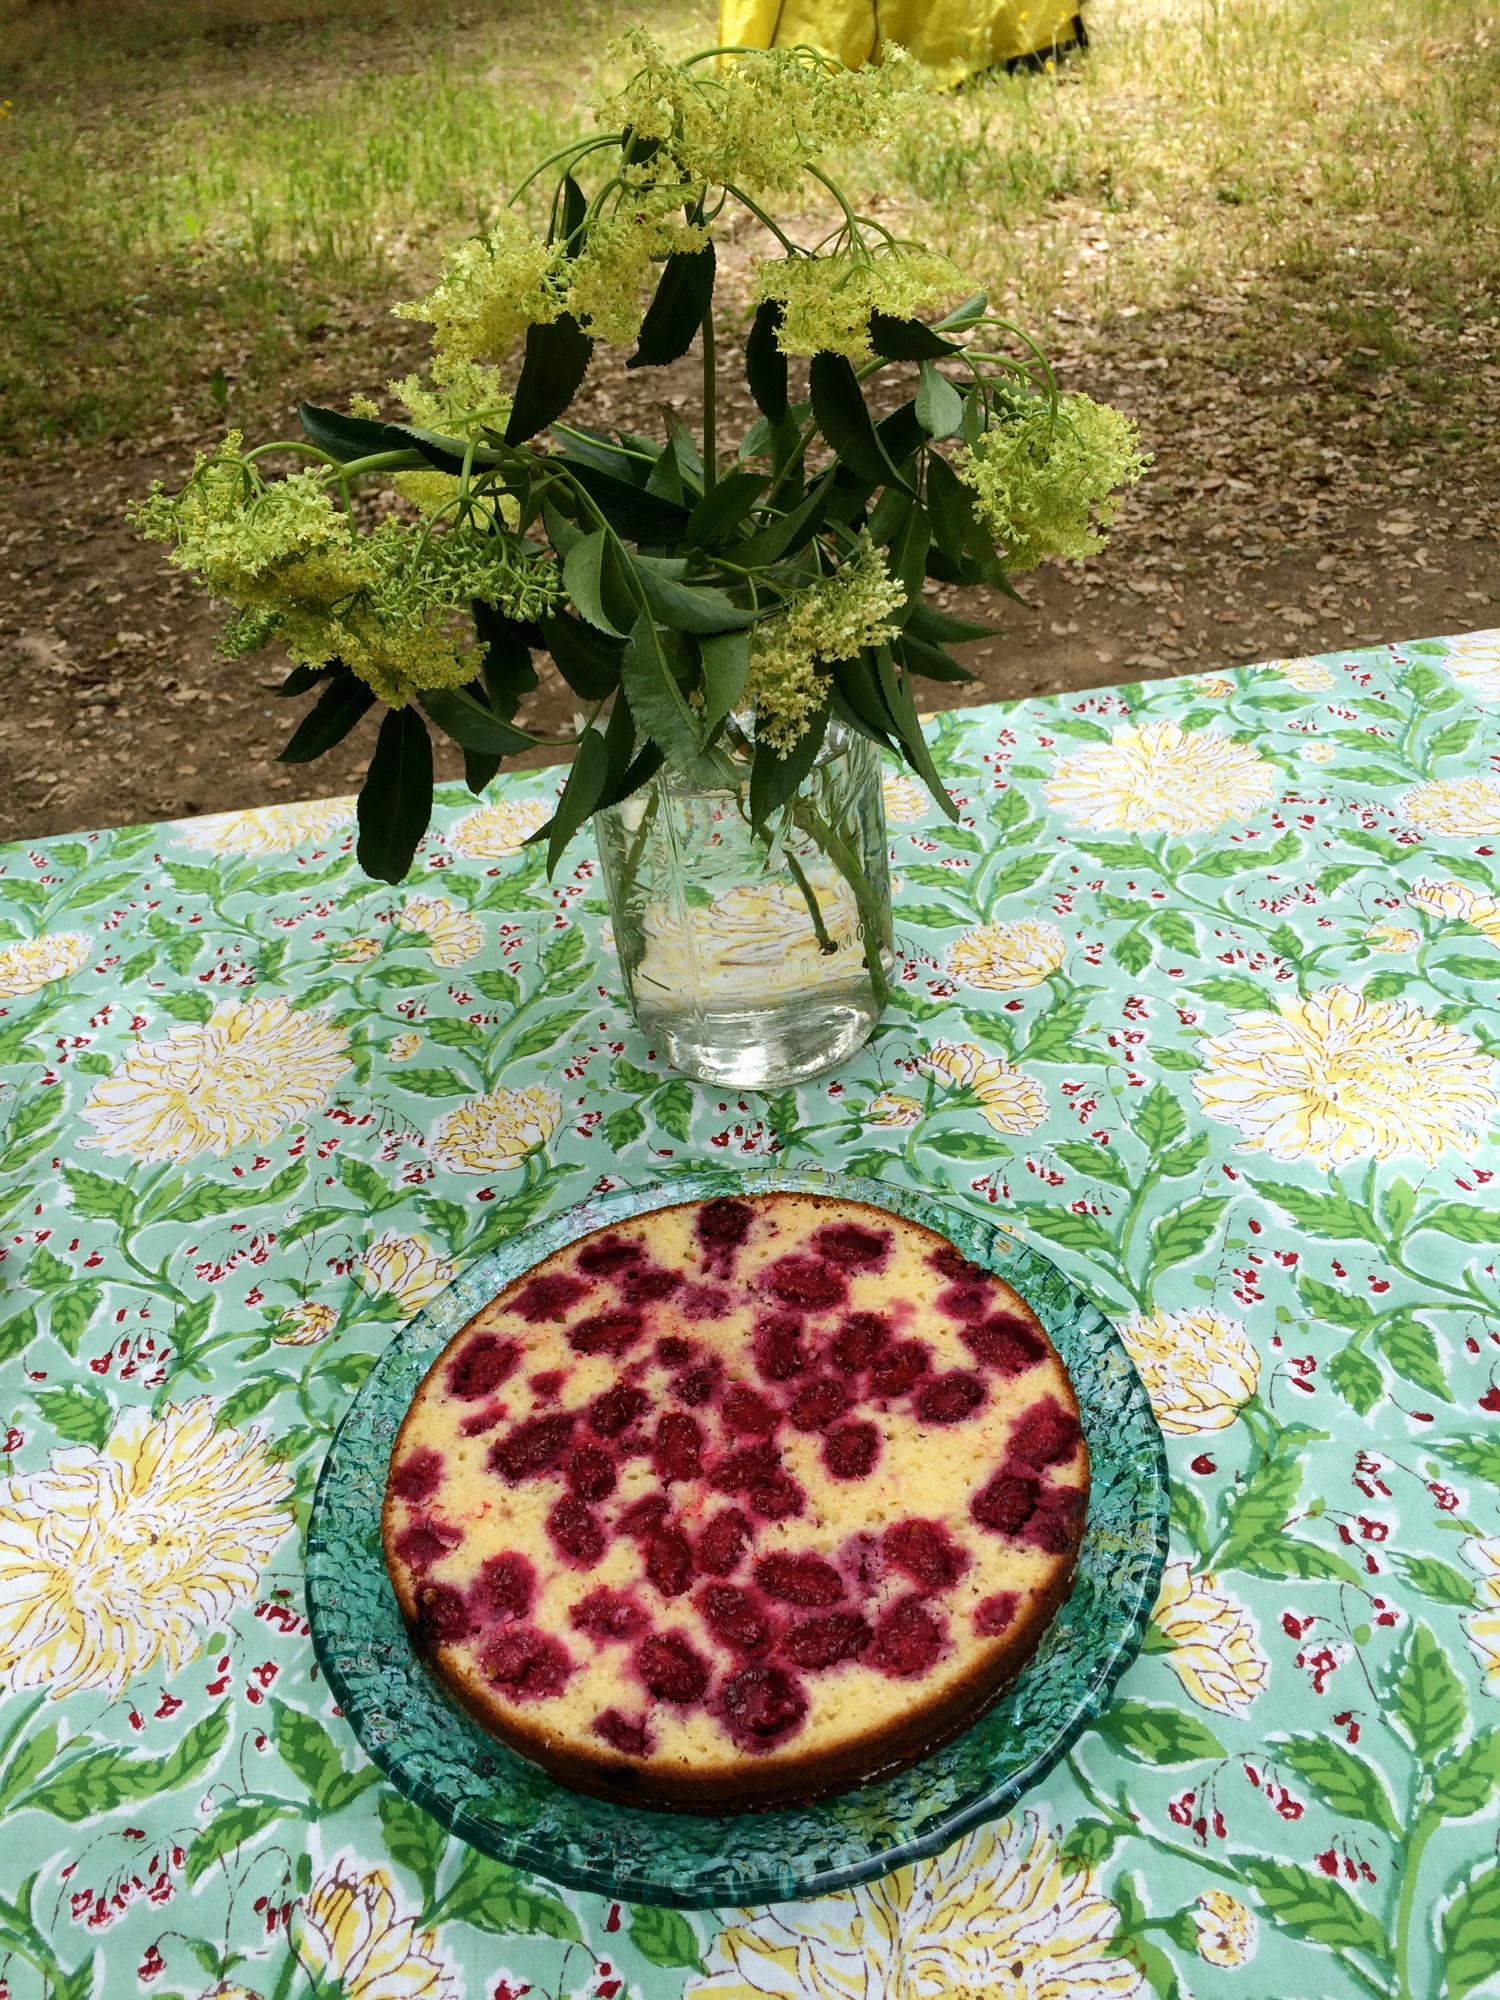
Bottom half of the cake has been drizzled with cordial and is about to be spread with tart whipped cream.
For my birthday last weekend, I had an inkling to make a cake infused with elderflower cordial, but had a hard time deciding exactly what else to include - apricots and almonds? loquats and honey? lemon and poppyseed? Spring is a fun time to daydream about desserts! While walking through my surprisingly abundant neighborhood however, I was lucky enough to stumble upon some mulberries, which helped to complete my vision. My birthday party was a campout and the cake held up nicely for several hours, even though I was impatient and made the tart whipped cream earlier than necessary:) My photos do not show the final spread of whipped cream on the top, as it was too dark for photos when I added this piece.
1/2 cup plus 5 tablespoons unsalted butter, room temperature
3/4 cup plus 2 tablespoons granulated sugar
4 eggs
2 tablespoons yogurt
3 tablespoons plus up to 3/4 cup elderflower cordial
1 cup all-purpose flour
1/2 cup almond meal
2 teaspoons baking powder
3/4 teaspoons salt
2 cups fresh mulberries, washed and dried
3/4 cup whipping cream
1/2 cup crème fraîche
1/2 teaspoon vanilla extract
Grease a 9-inch springform pan and preheat the oven to 350 degrees F.
Cream the butter and 3/4 cup sugar in a mixer until they’re light and fluffy. Beat in the eggs one at a time then incorporate the yogurt and 3 tablespoons of the elderflower cordial.
In a separate bowl, mix together the flour, almond meal, baking powder, and salt and slowly whisk this into the wet mixture in 3 batches. Once its fully incorporated, pour half of the batter into the greased springform pan, then spread mulberries evenly over the top, followed by remaining batter and bake for 1 hour. Cake is done when a toothpick comes out clean. Remove from oven and allow to cool.
While cake is baking, beat whipping cream until almost stiff, continue beating as you add in 2 tablespoons sugar and vanilla and then lightly whisk in crème fraîche.
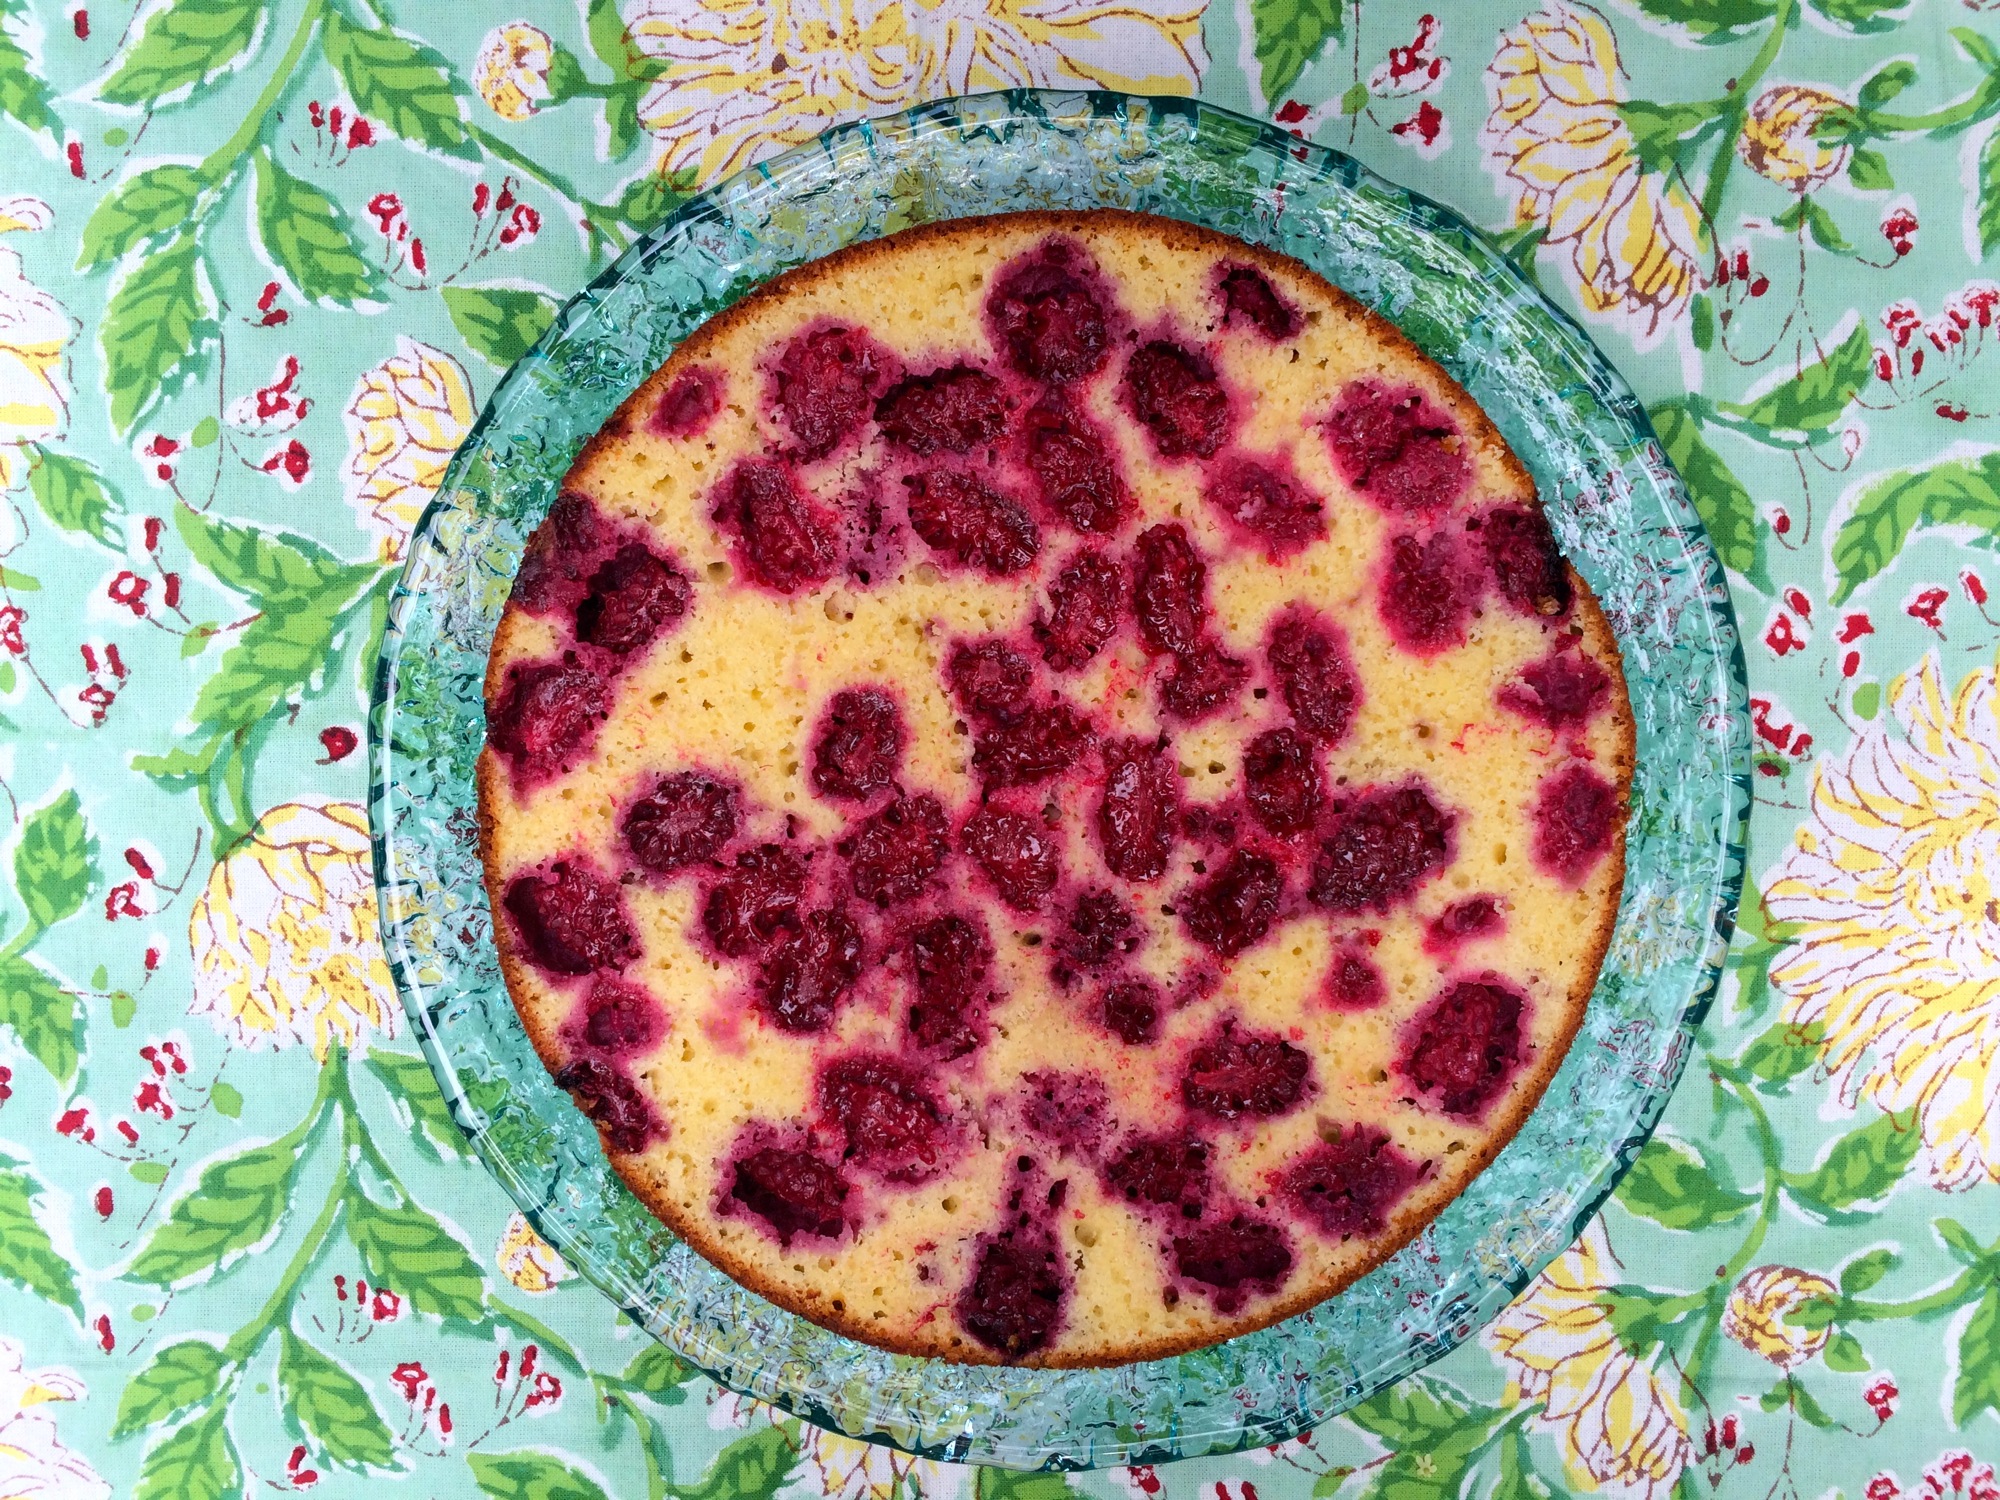
The gorgeous mulberry layer is revealed!
Once cake has cooled, cut in half to make two layers using a large serrated knife. You should be cutting right through the berry layer and at this point, you will be able to see all of the beautiful mulberries hiding inside.
Drizzle up to 1/4 cup of elderflower over the bottom layer and top with half of the tart whipped cream, followed by the other half of the cake. Drizzle up to another 1/4 cup of elderflower (for both of these, it depends on how sweet/moist/elderflowery you want the cake) and spread the other half of the whipped cream over the top. Top with a sprinkling of fresh elderflowers if you have them and drizzle each piece of cake with a little more elderflower cordial before eating.

This version is before the addition of the final tart whipped cream layer.

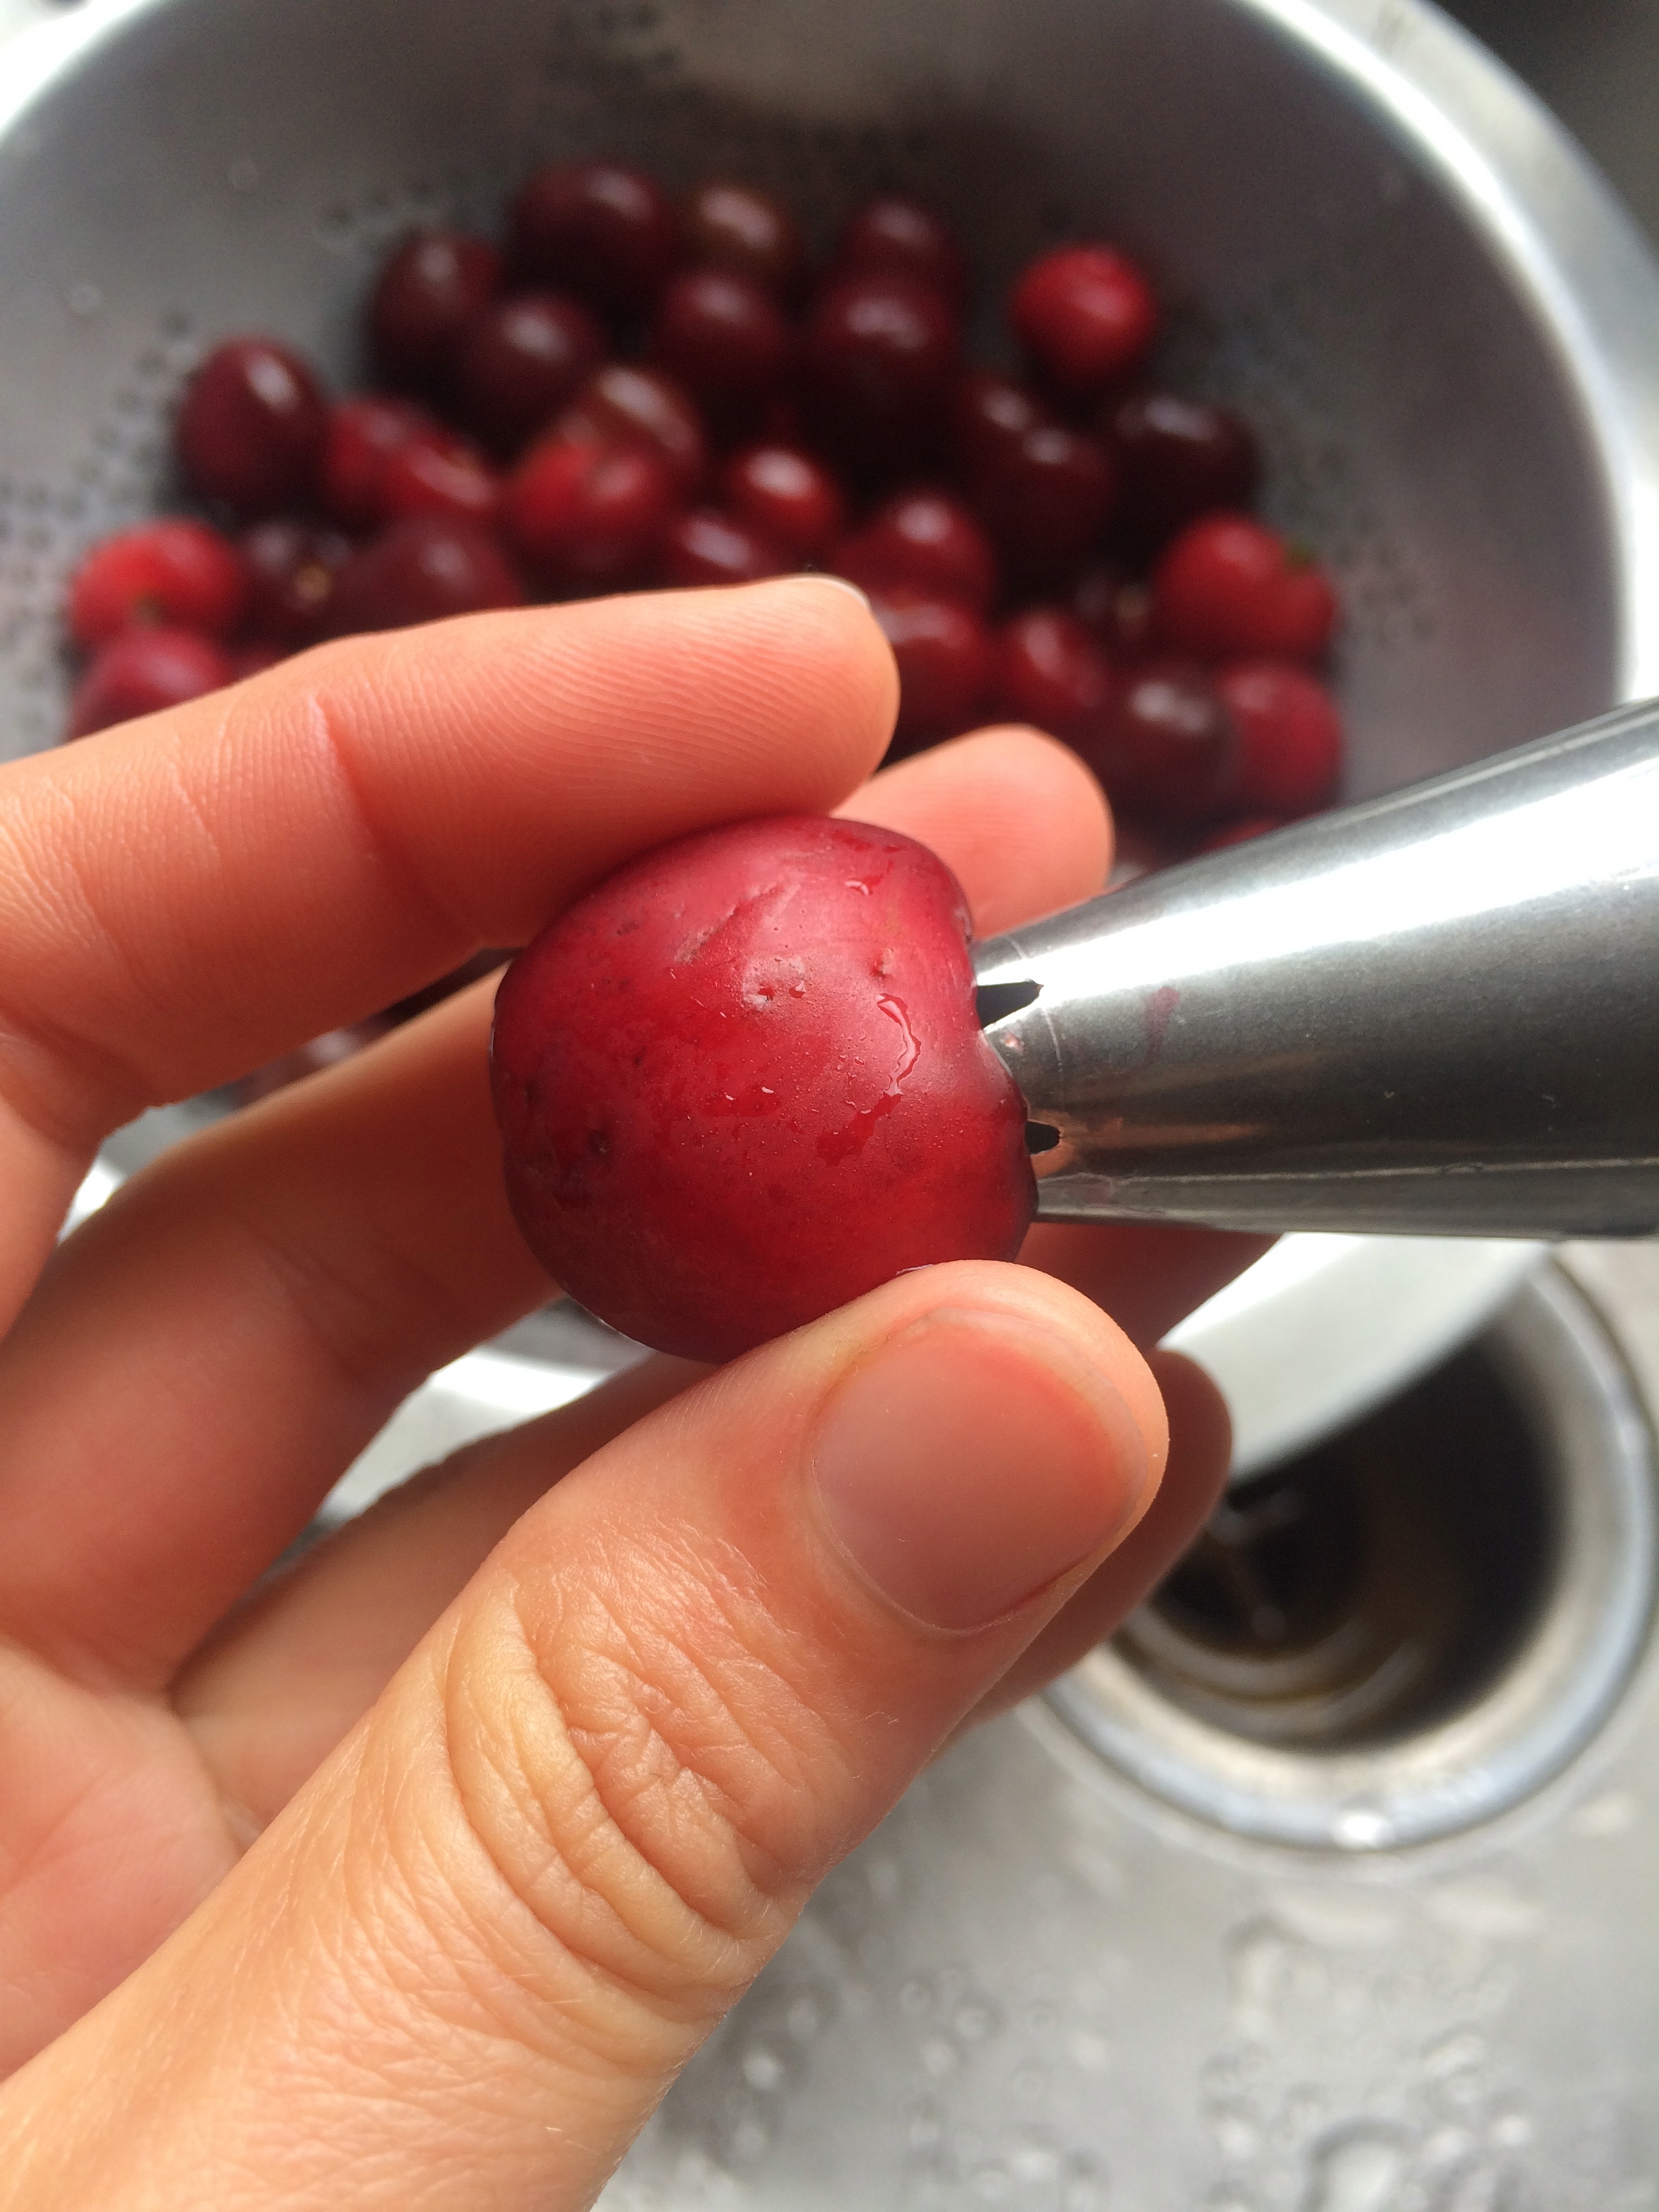
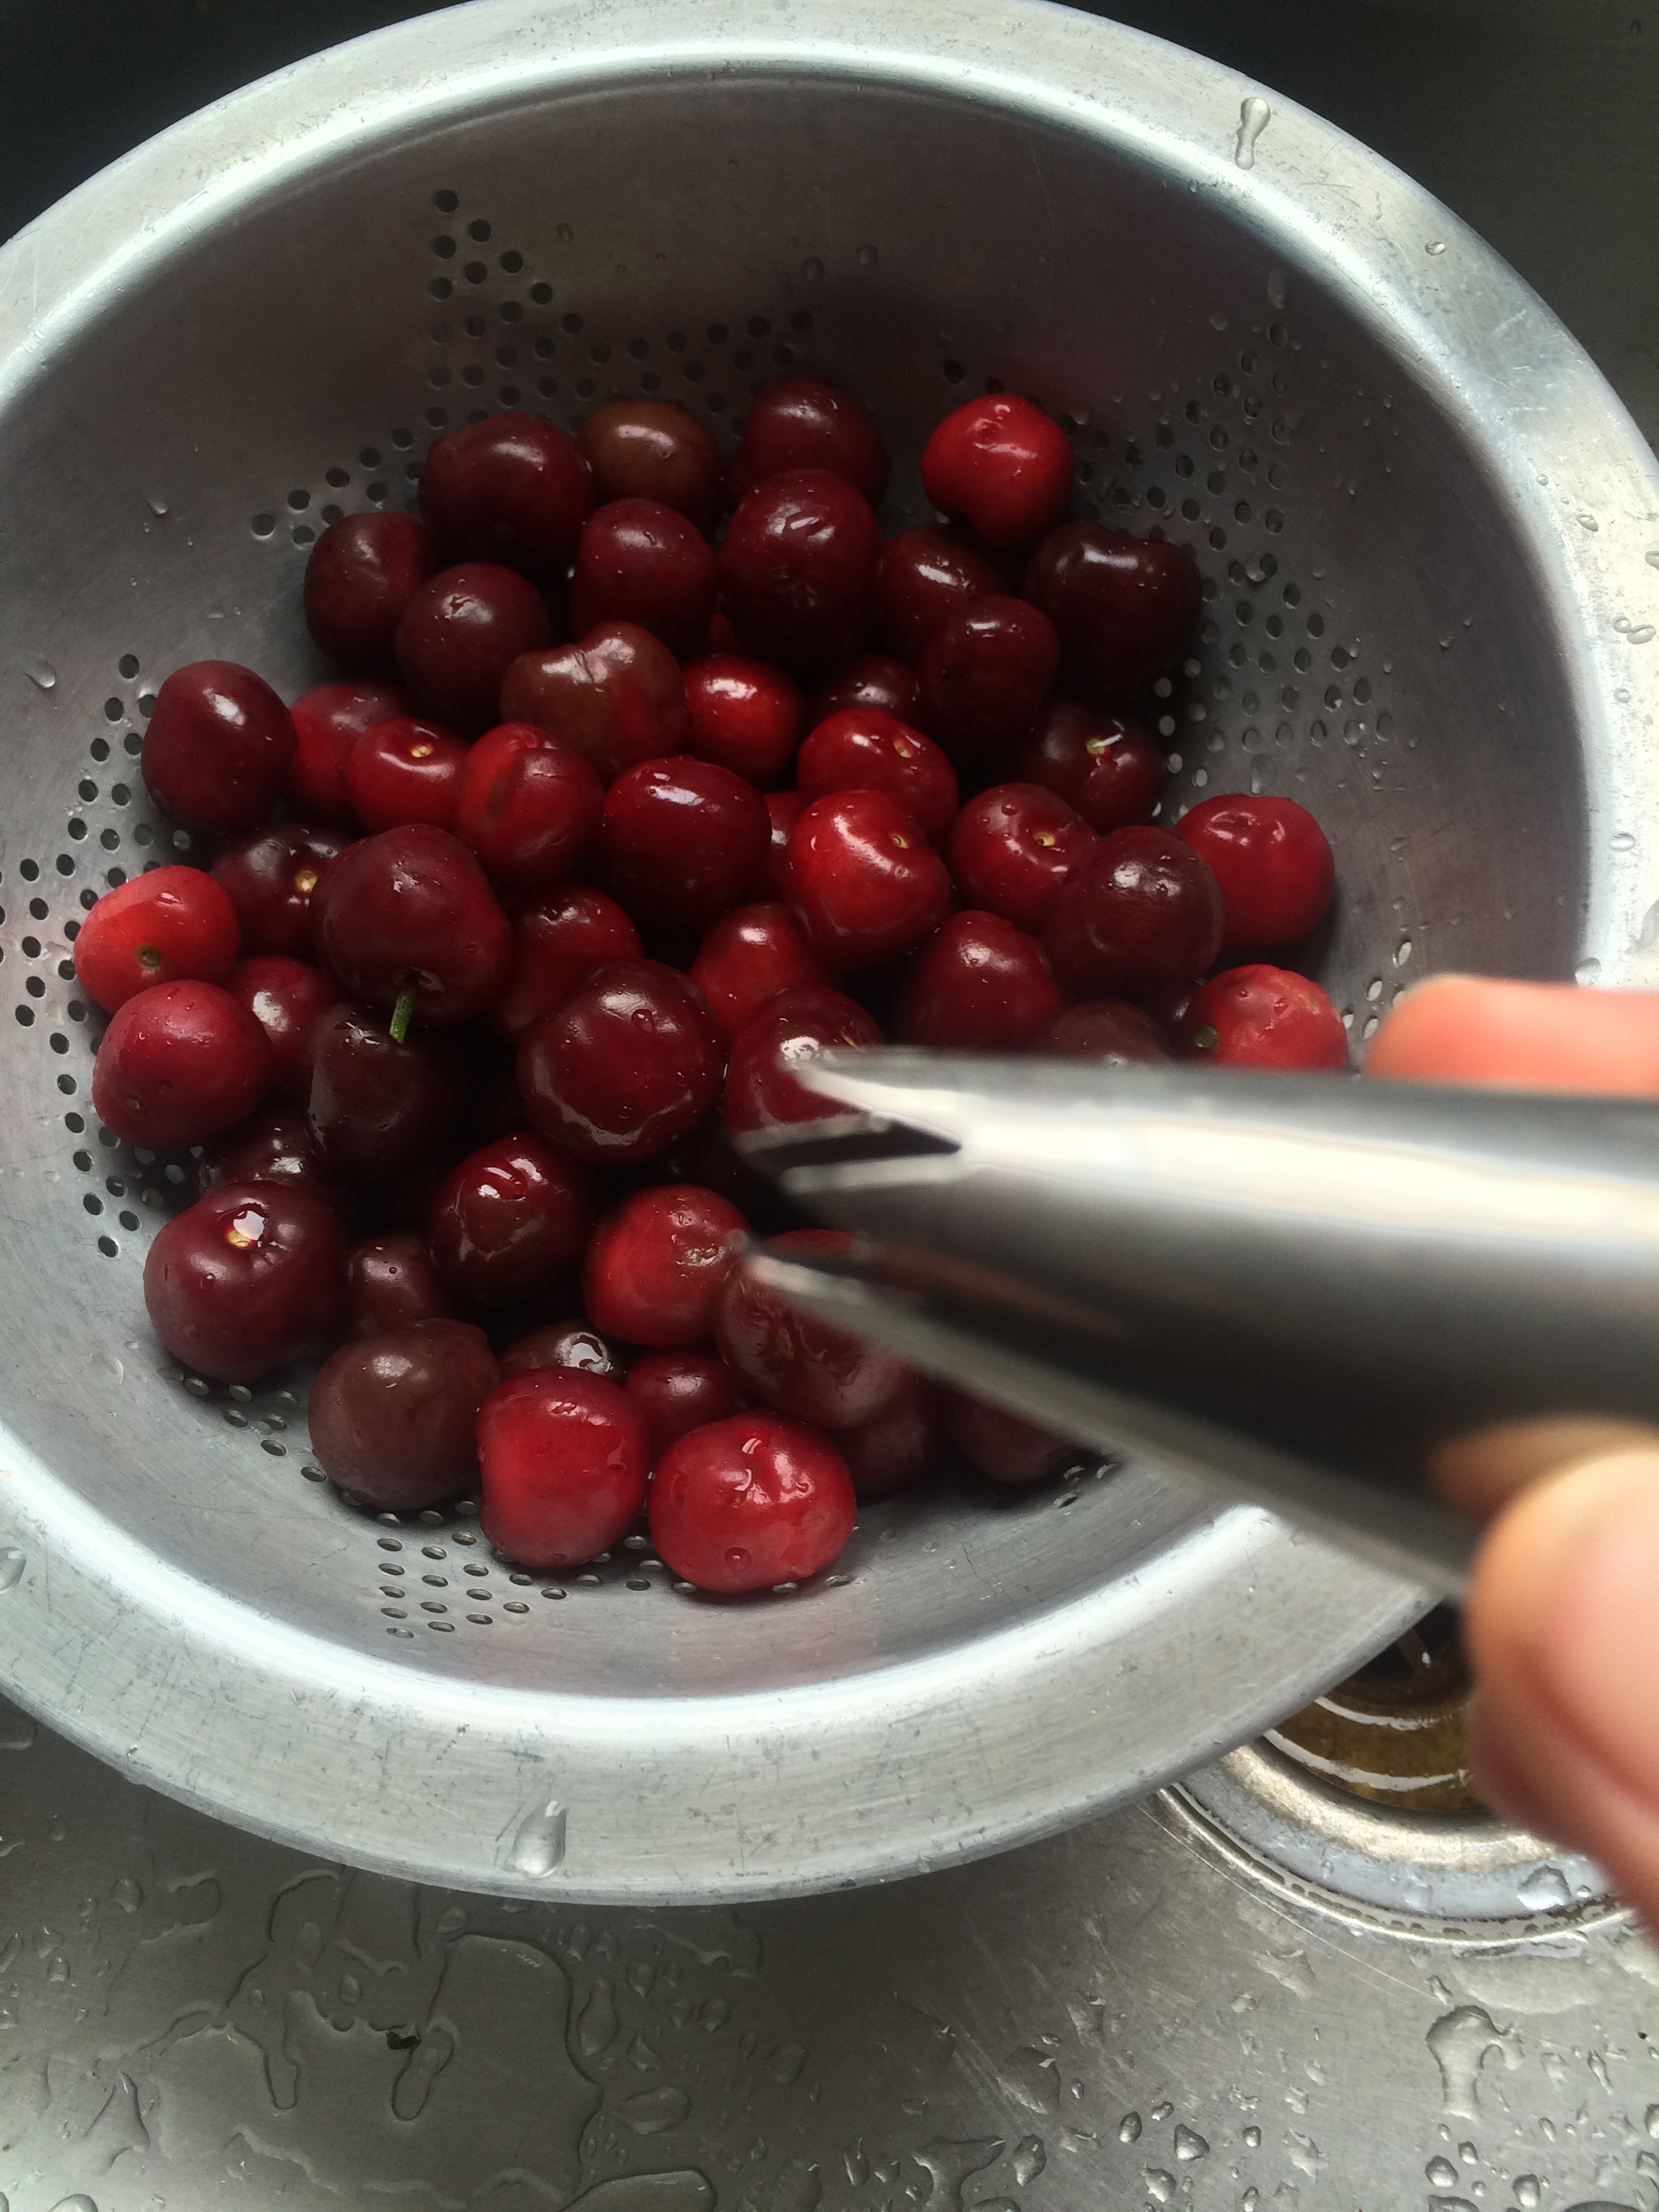
Pit Cherries Like a Boss
A star pastry tip comes to the rescue.

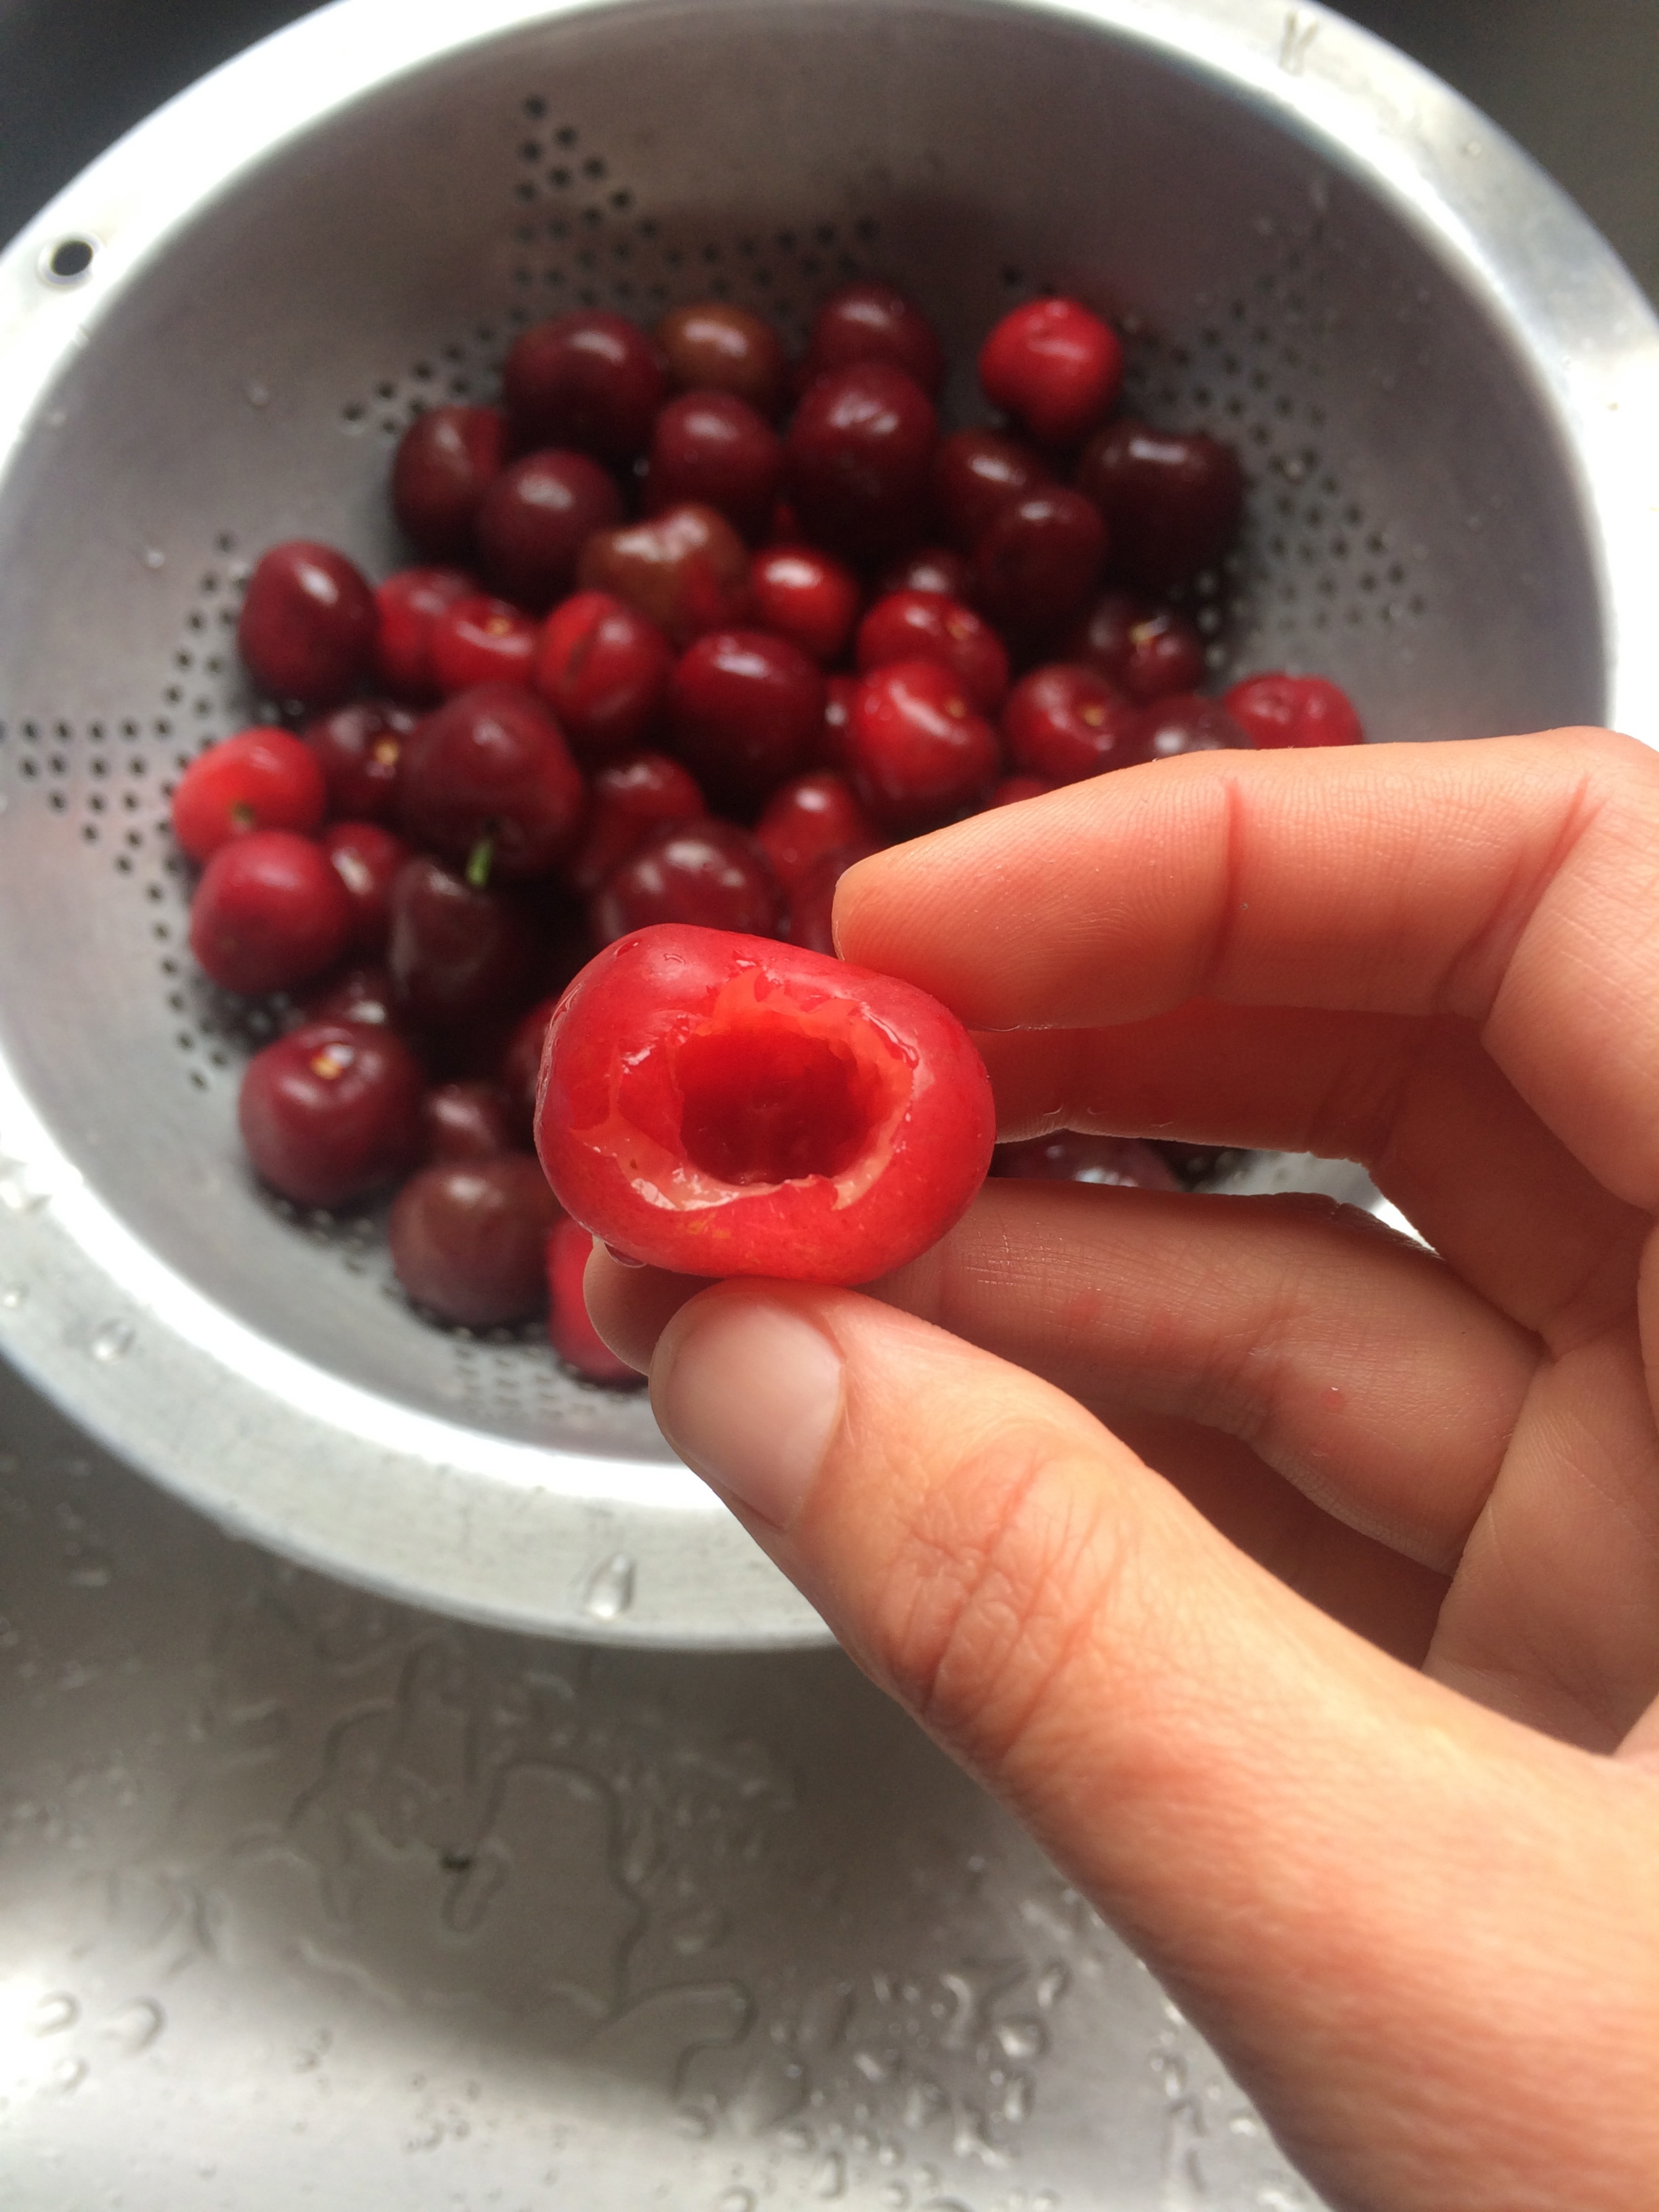
Perfectly pitted without special equipment.
There you are, delicious and coveted cherry recipe in hand requiring pitted cherries (perhaps pitted brandied cherries, cherry fennel clafoutis, or cherry jam) and you without a cherry pitter. Worry not! If you have a large star pastry tip (I have Ateco 824) then you have a cherry pitter. The bonus is that you don't have to buy a special tool that you'll only use 1-2x per year and, no joke, this actually works better.
Step 1: Twist pastry tip into cherry around pit.
Step 2: Remove pastry tip along with pit.
Step 3: Discard pit and repeat with a new cherry.


The Celery Sour cocktail
No, really - tastes like celery.
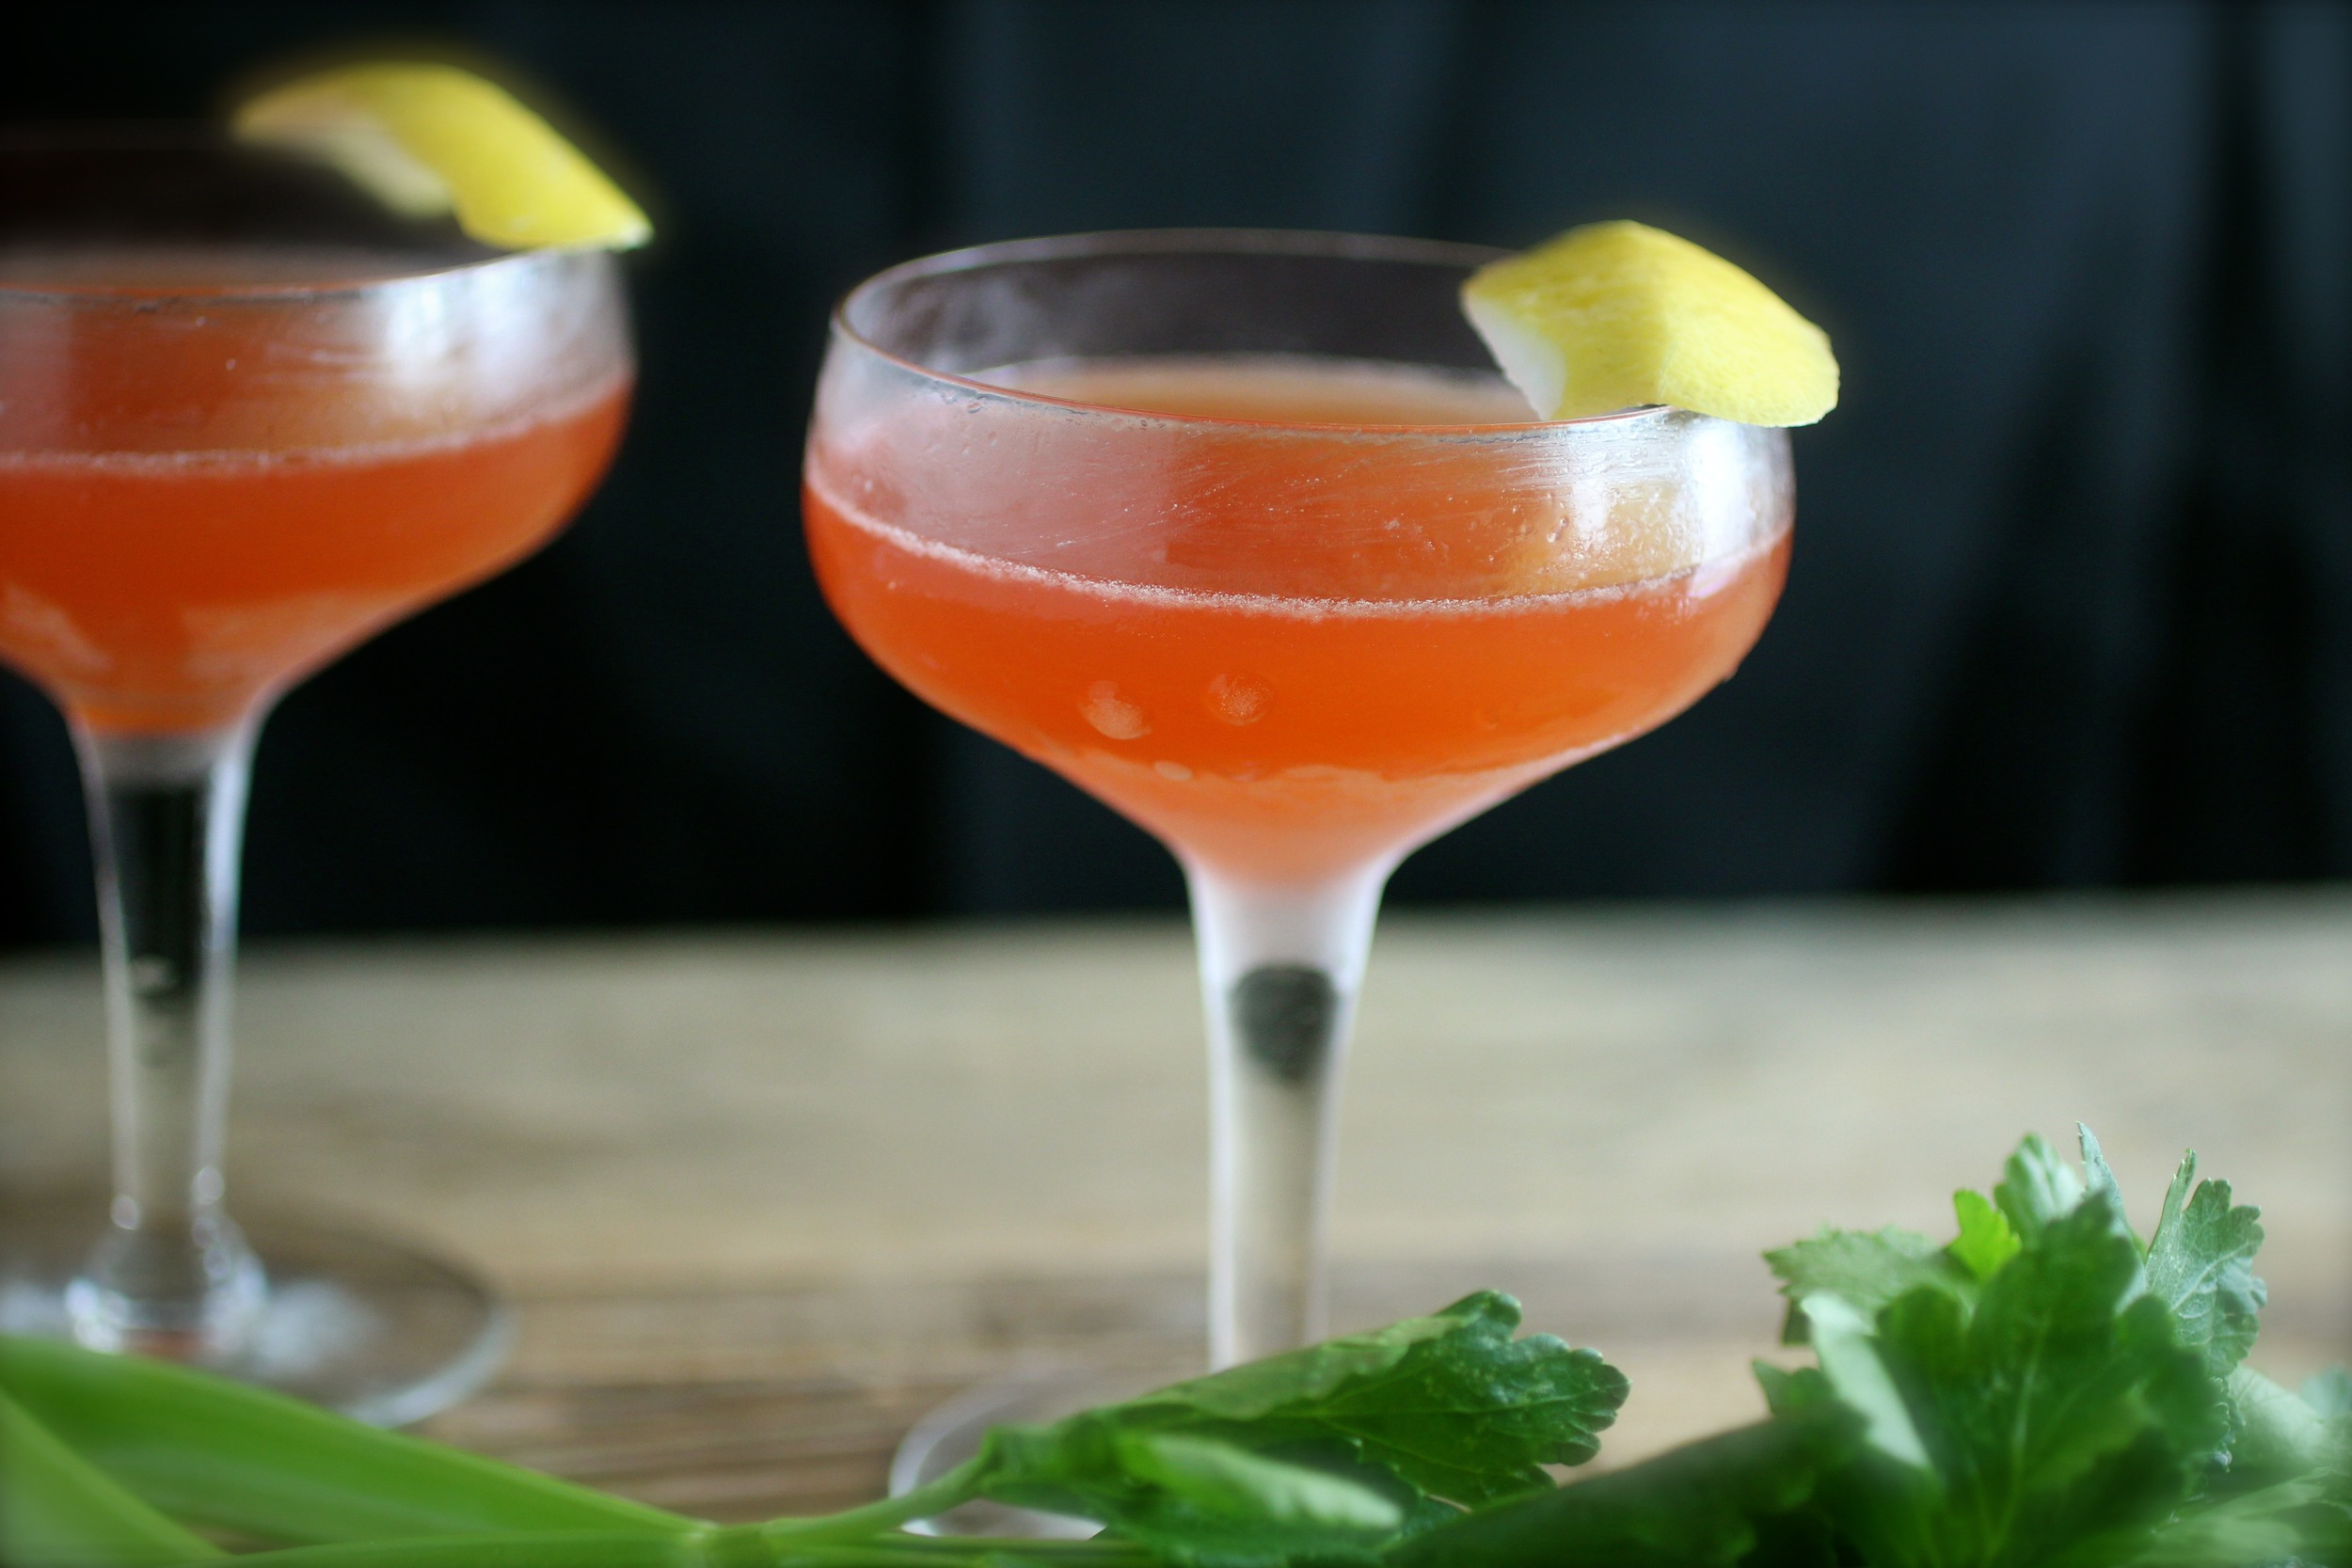
This drink is crazy, in a good way. You take all of these ingredients that are tasty on their own, but sound really weird together (when was the last time you mixed Fernet with elderflower liqueur?) and they combine into an entirely refreshing drink that, yes, tastes a bit like celery. This cocktail is why I bother with cocktail recipes. Enjoy!
1-1/4 ounces (5 parts) gin, preferably St.George Spirit's Terroir gin
1 ounce (4 parts) St.Germain or other elderflower liqueur/cordial, such as this homemade elderflower cordial
3/4 ounce (3 parts) fresh lemon juice
1/4 ounce (1 part) pastis, such as Ricard
1/4 ounce (1 part) Fernet Branca
2 dashes of Peychaud's bitters
Lemon peel (garnish)
Shake all ingredients apart from lemon peel and serve up in a pre-frosted coupe. Garnish with lemon peel.
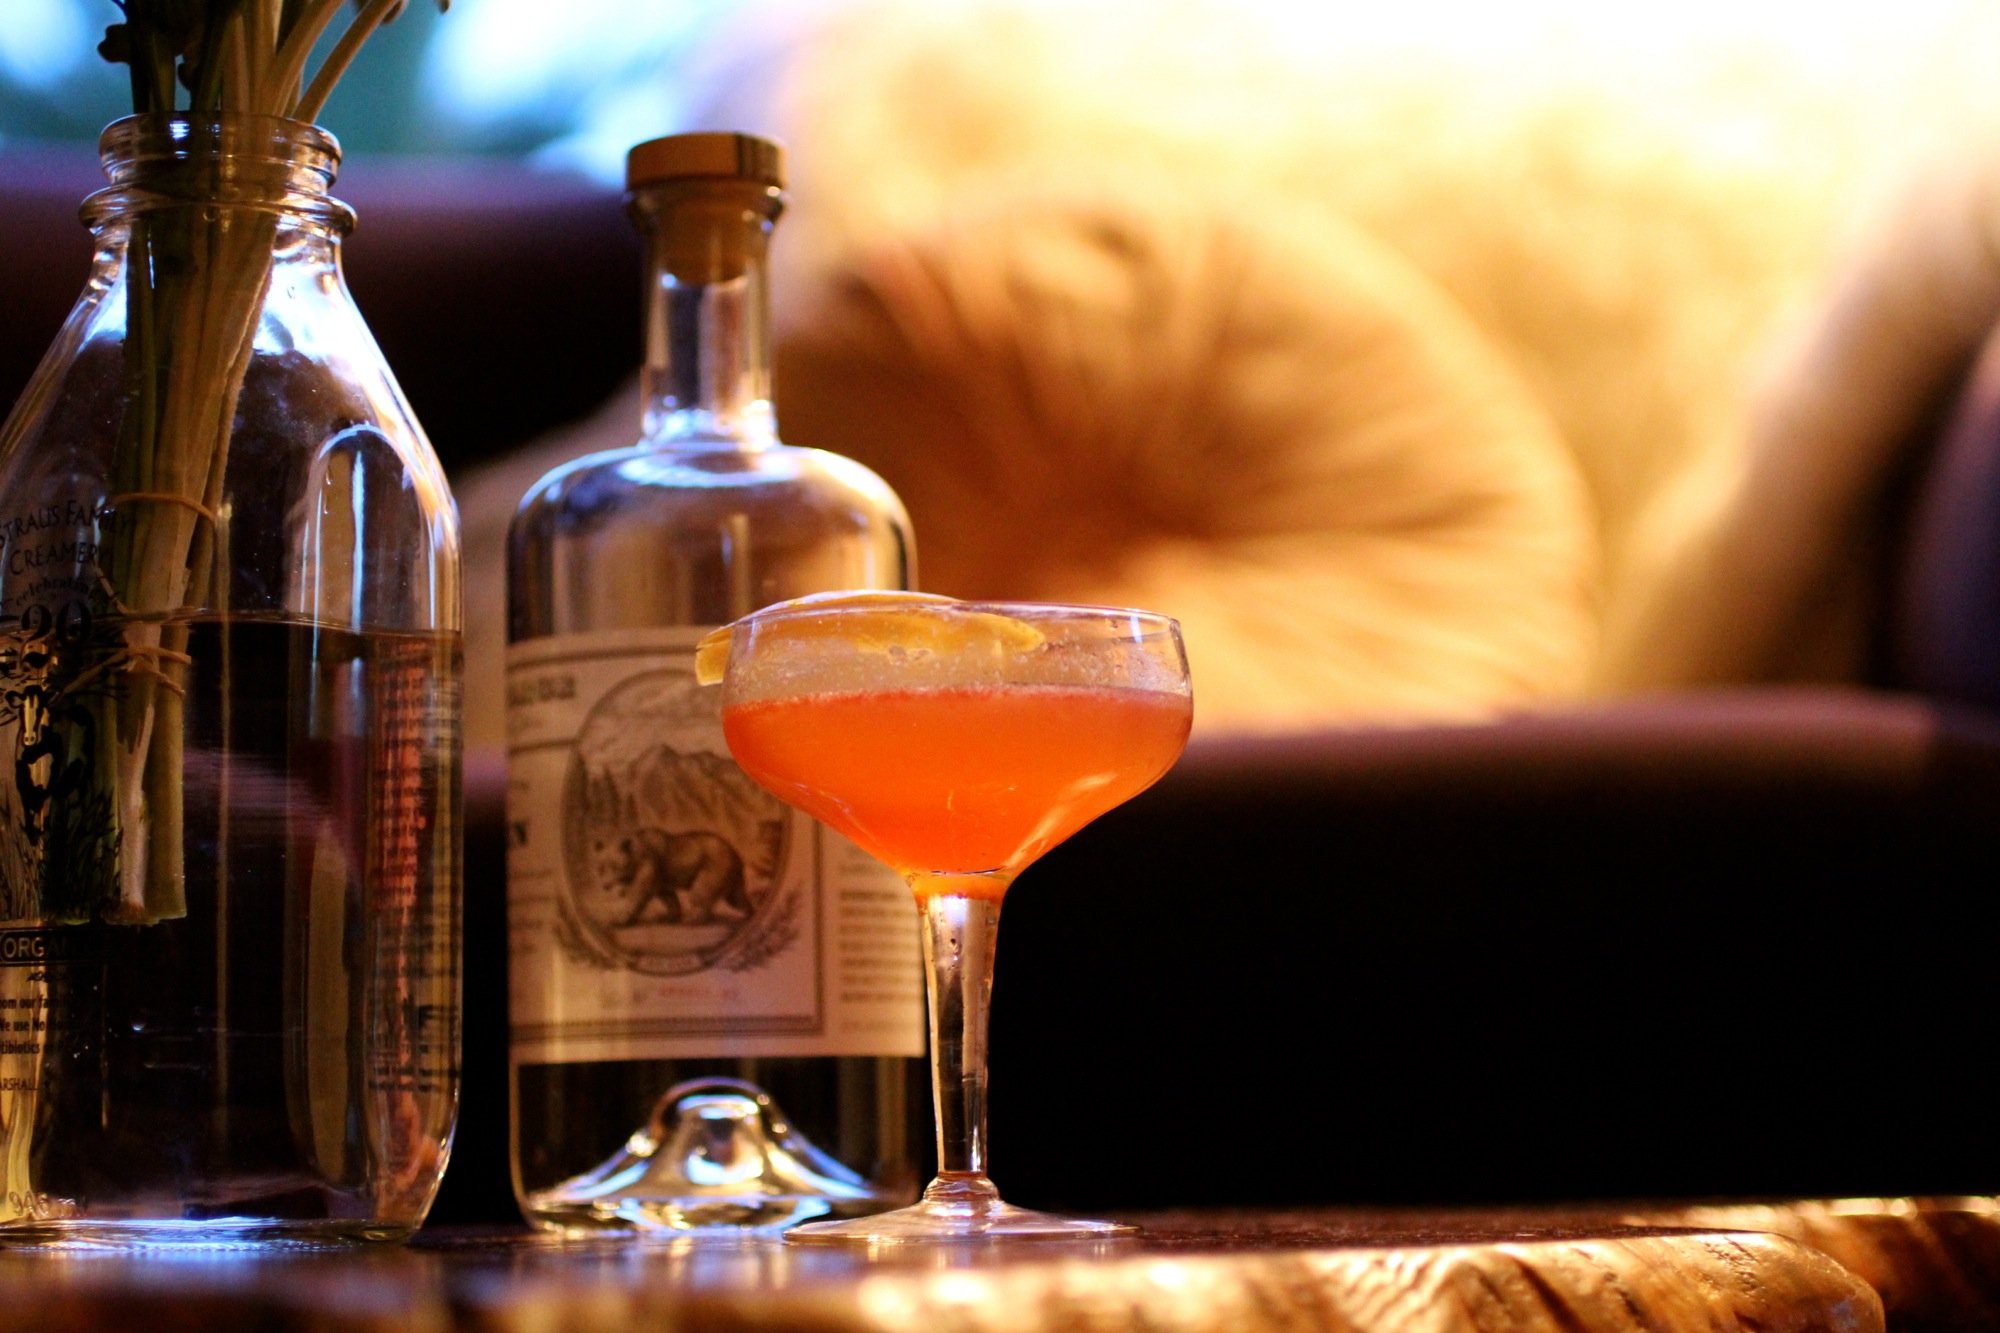
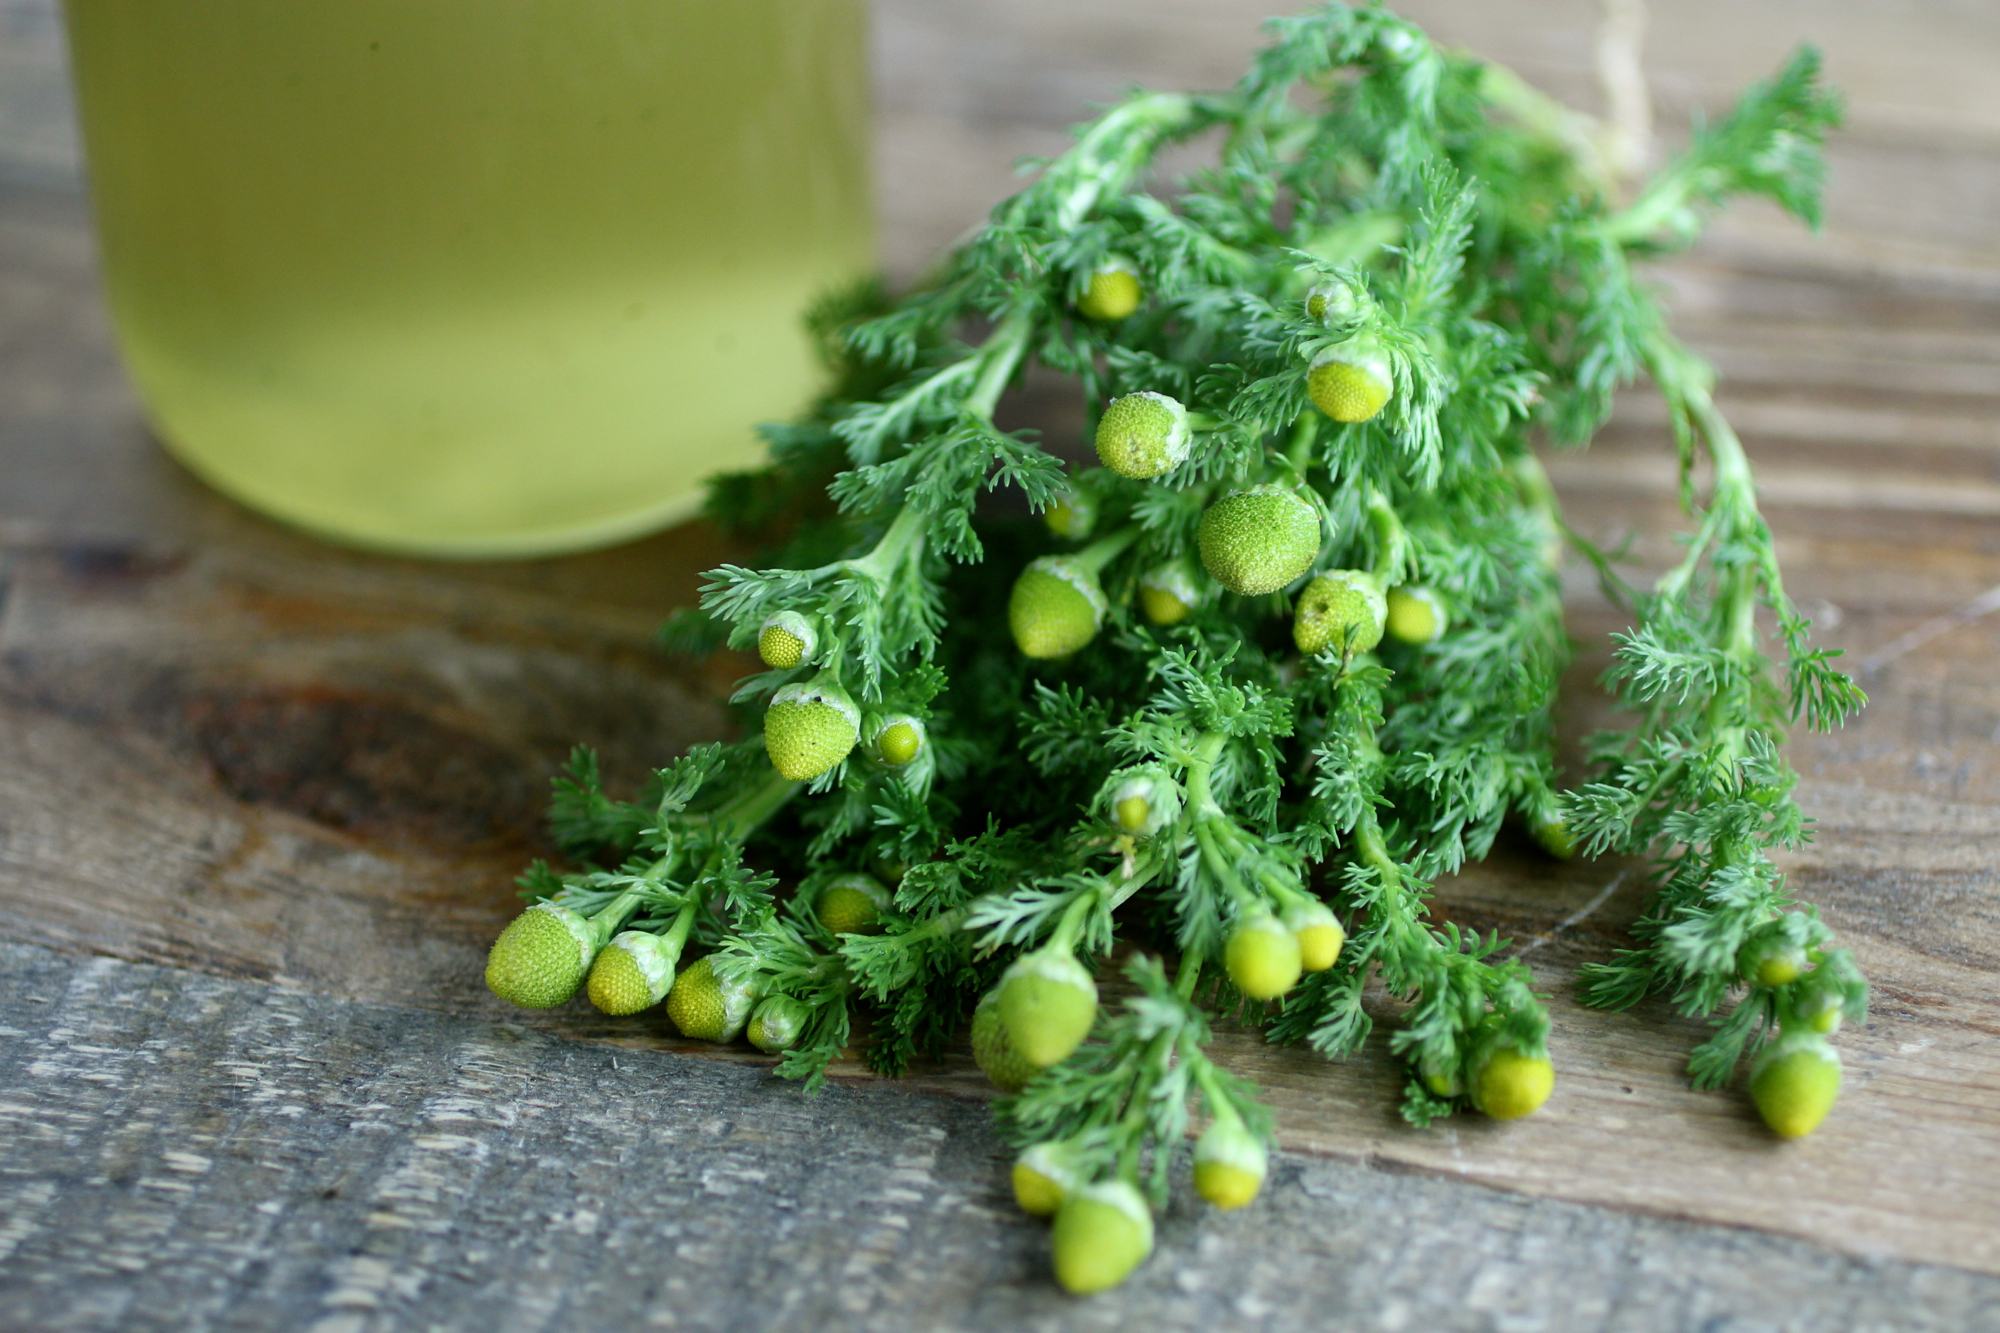
The Schoolyard cocktail
Gin, wild chamomile, and lemon.

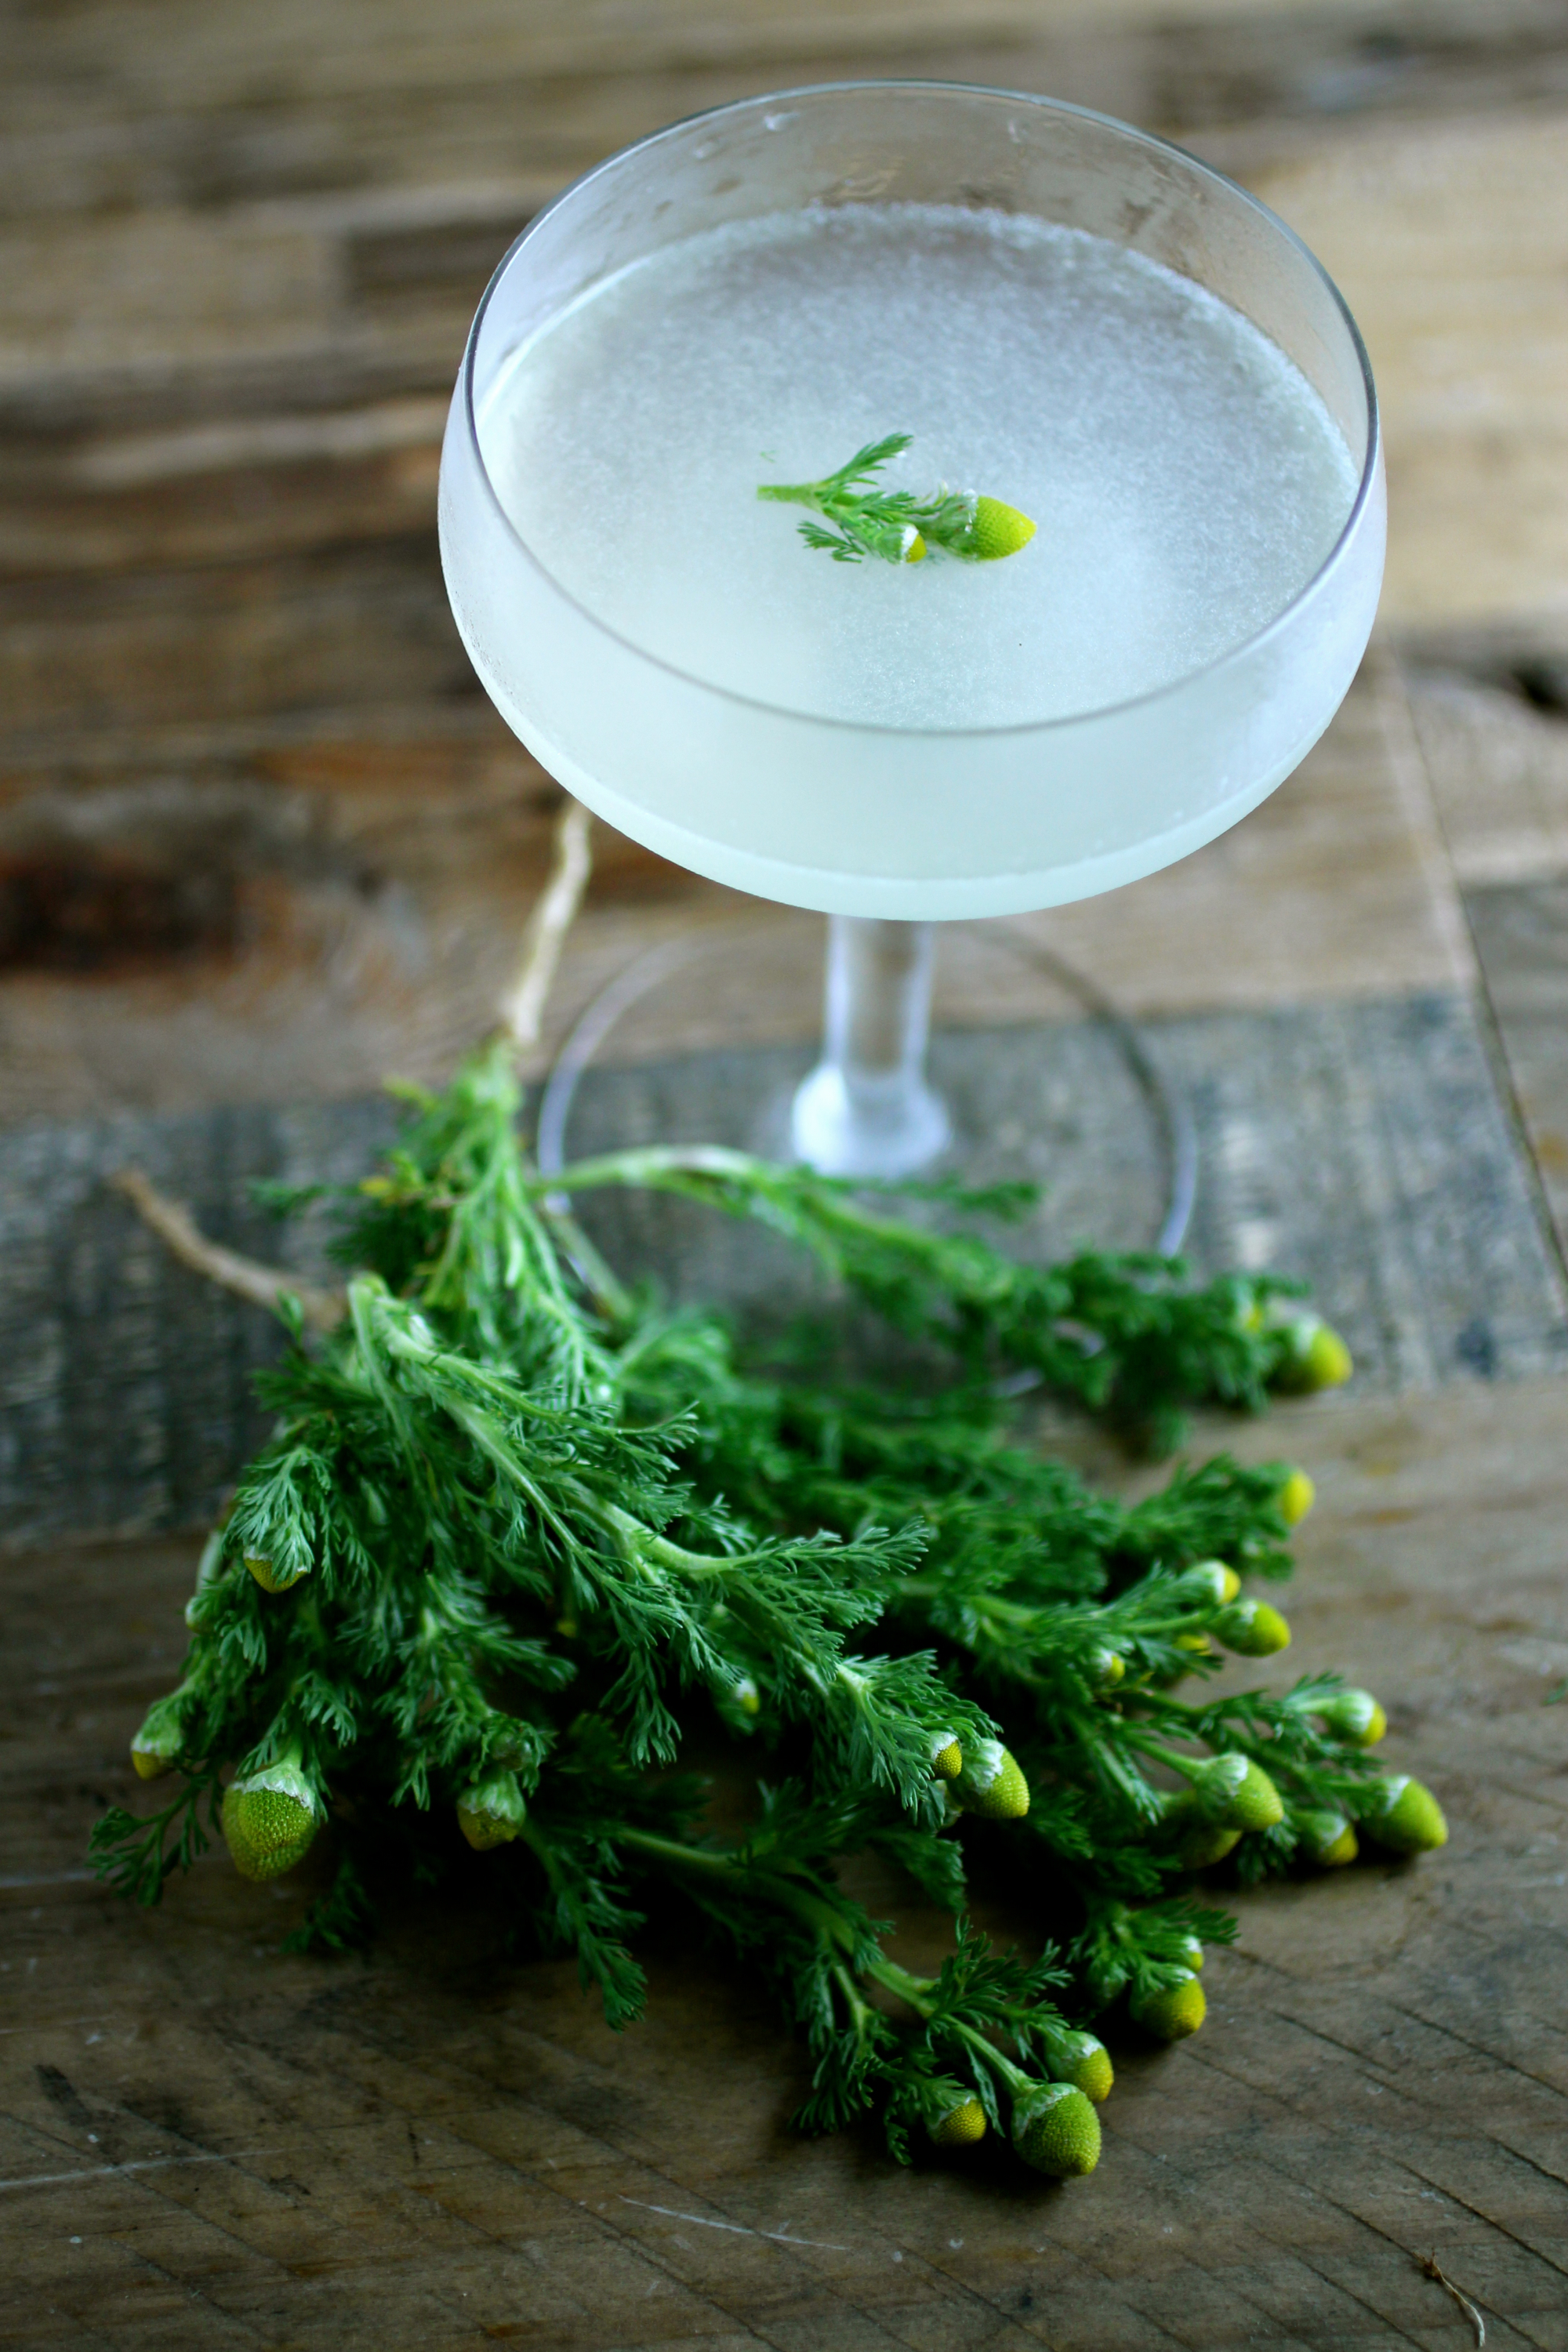
As I mentioned in another post with more general information about wild chamomile, I used to smell and sample wild chamomile (Matricaria discoidea), otherwise known as "pineapple weed" on the schoolyard, hence the name for this drink. Now I forage it where I can (which is pretty much everywhere in the spring and early summer), wash it, and make a wild chamomile simple syrup with it to be used in cocktails. I played around a bit with this cocktail, including other liquor such as Salers or adding grapefruit bitters, but ultimately it was best to let the wild chamomile syrup shine by keeping it simple. Recipe below is for one cocktail.
1.5oz gin (Bar Hill gin or St.George Terroir would both be good choices)
0.5oz meyer lemon juice
Pineapple weed for garnish
Shake and serve up with pineapple weed flower.
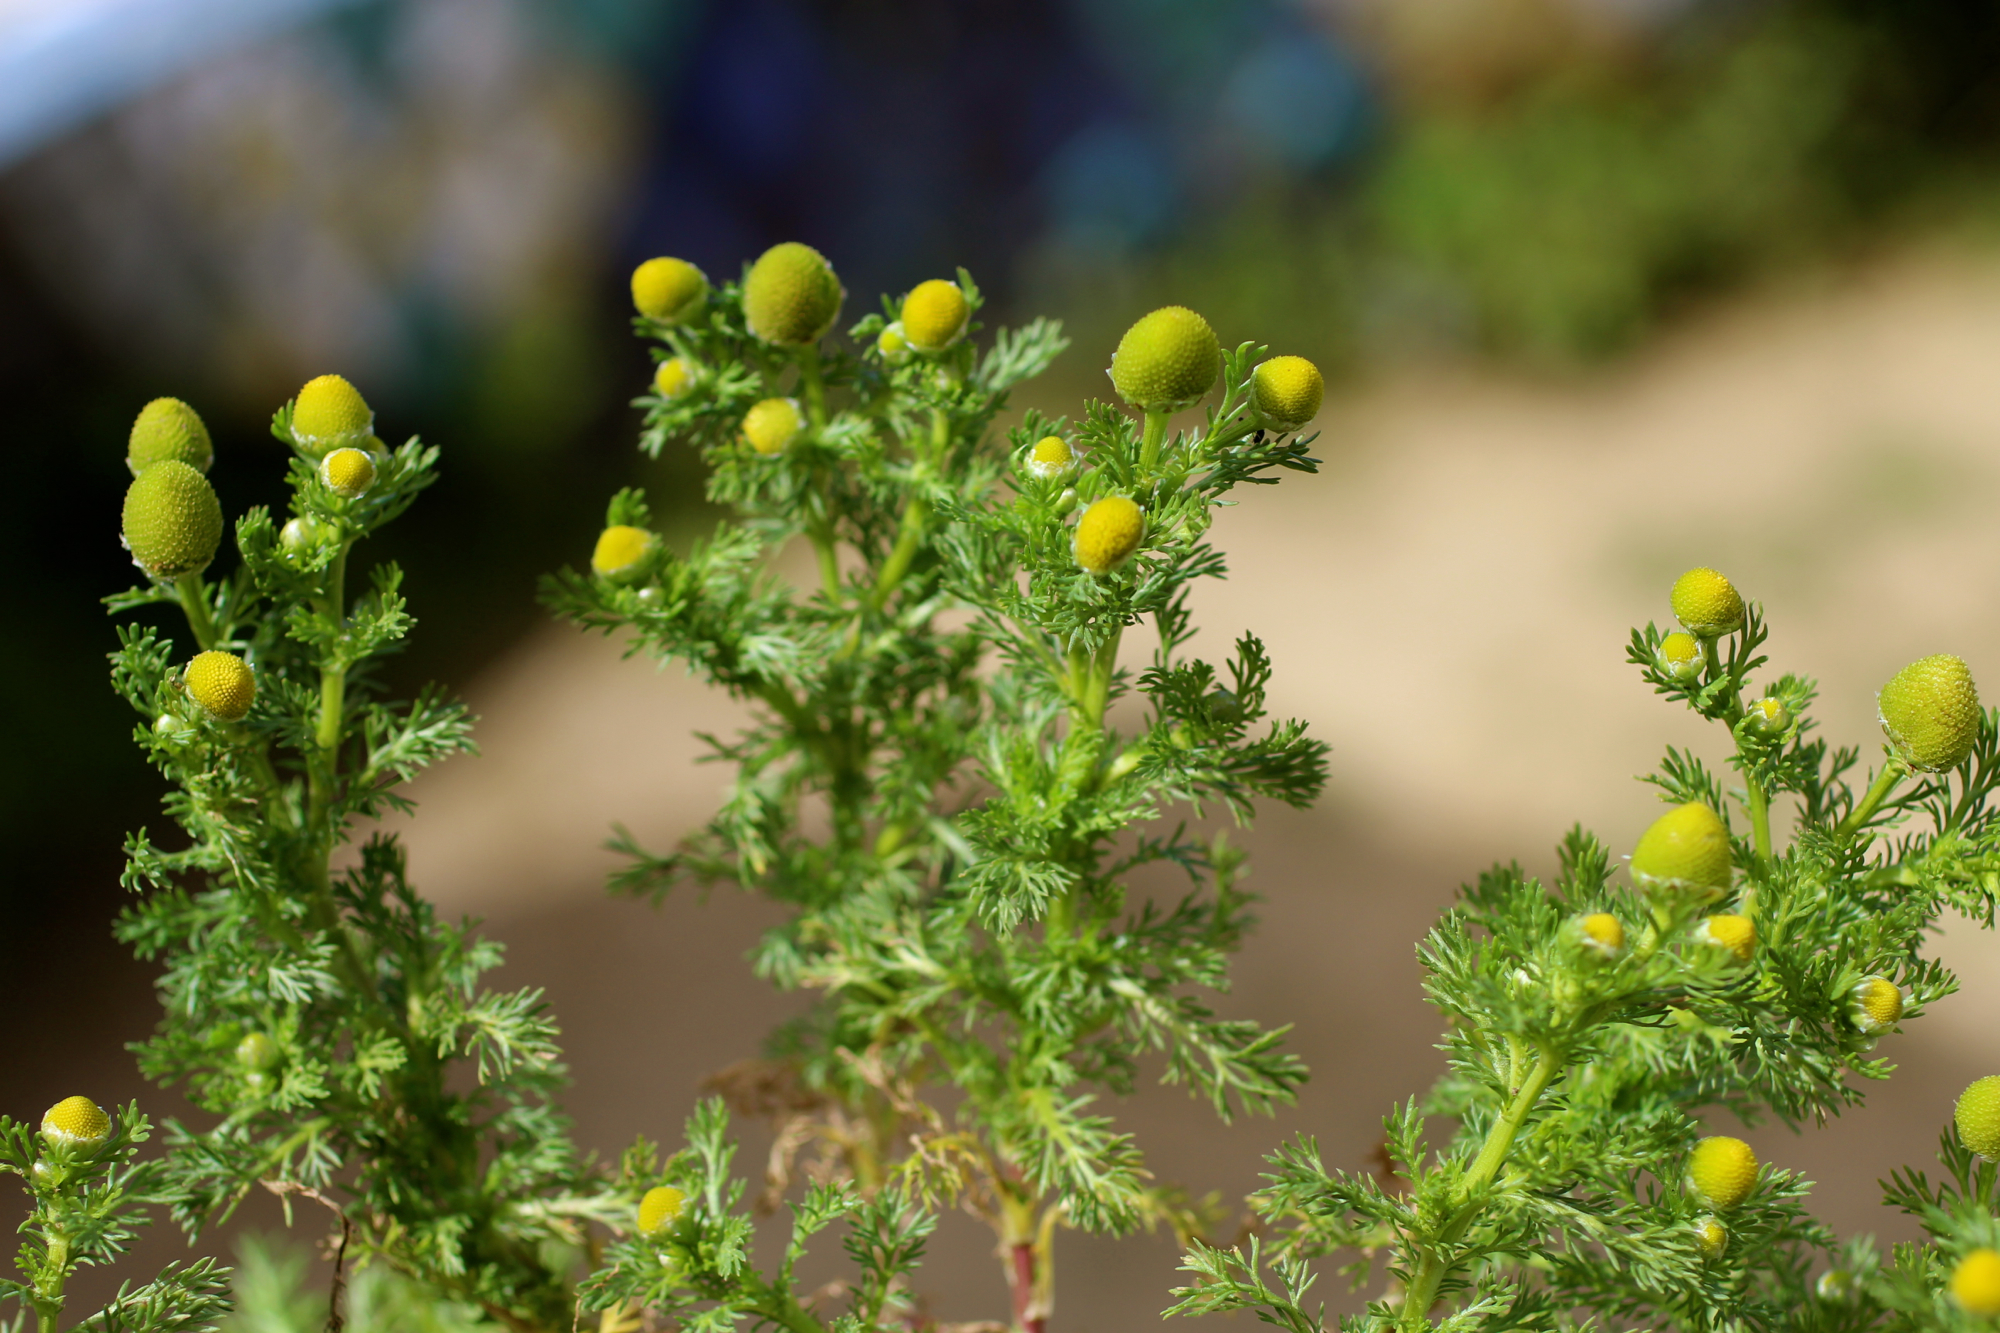
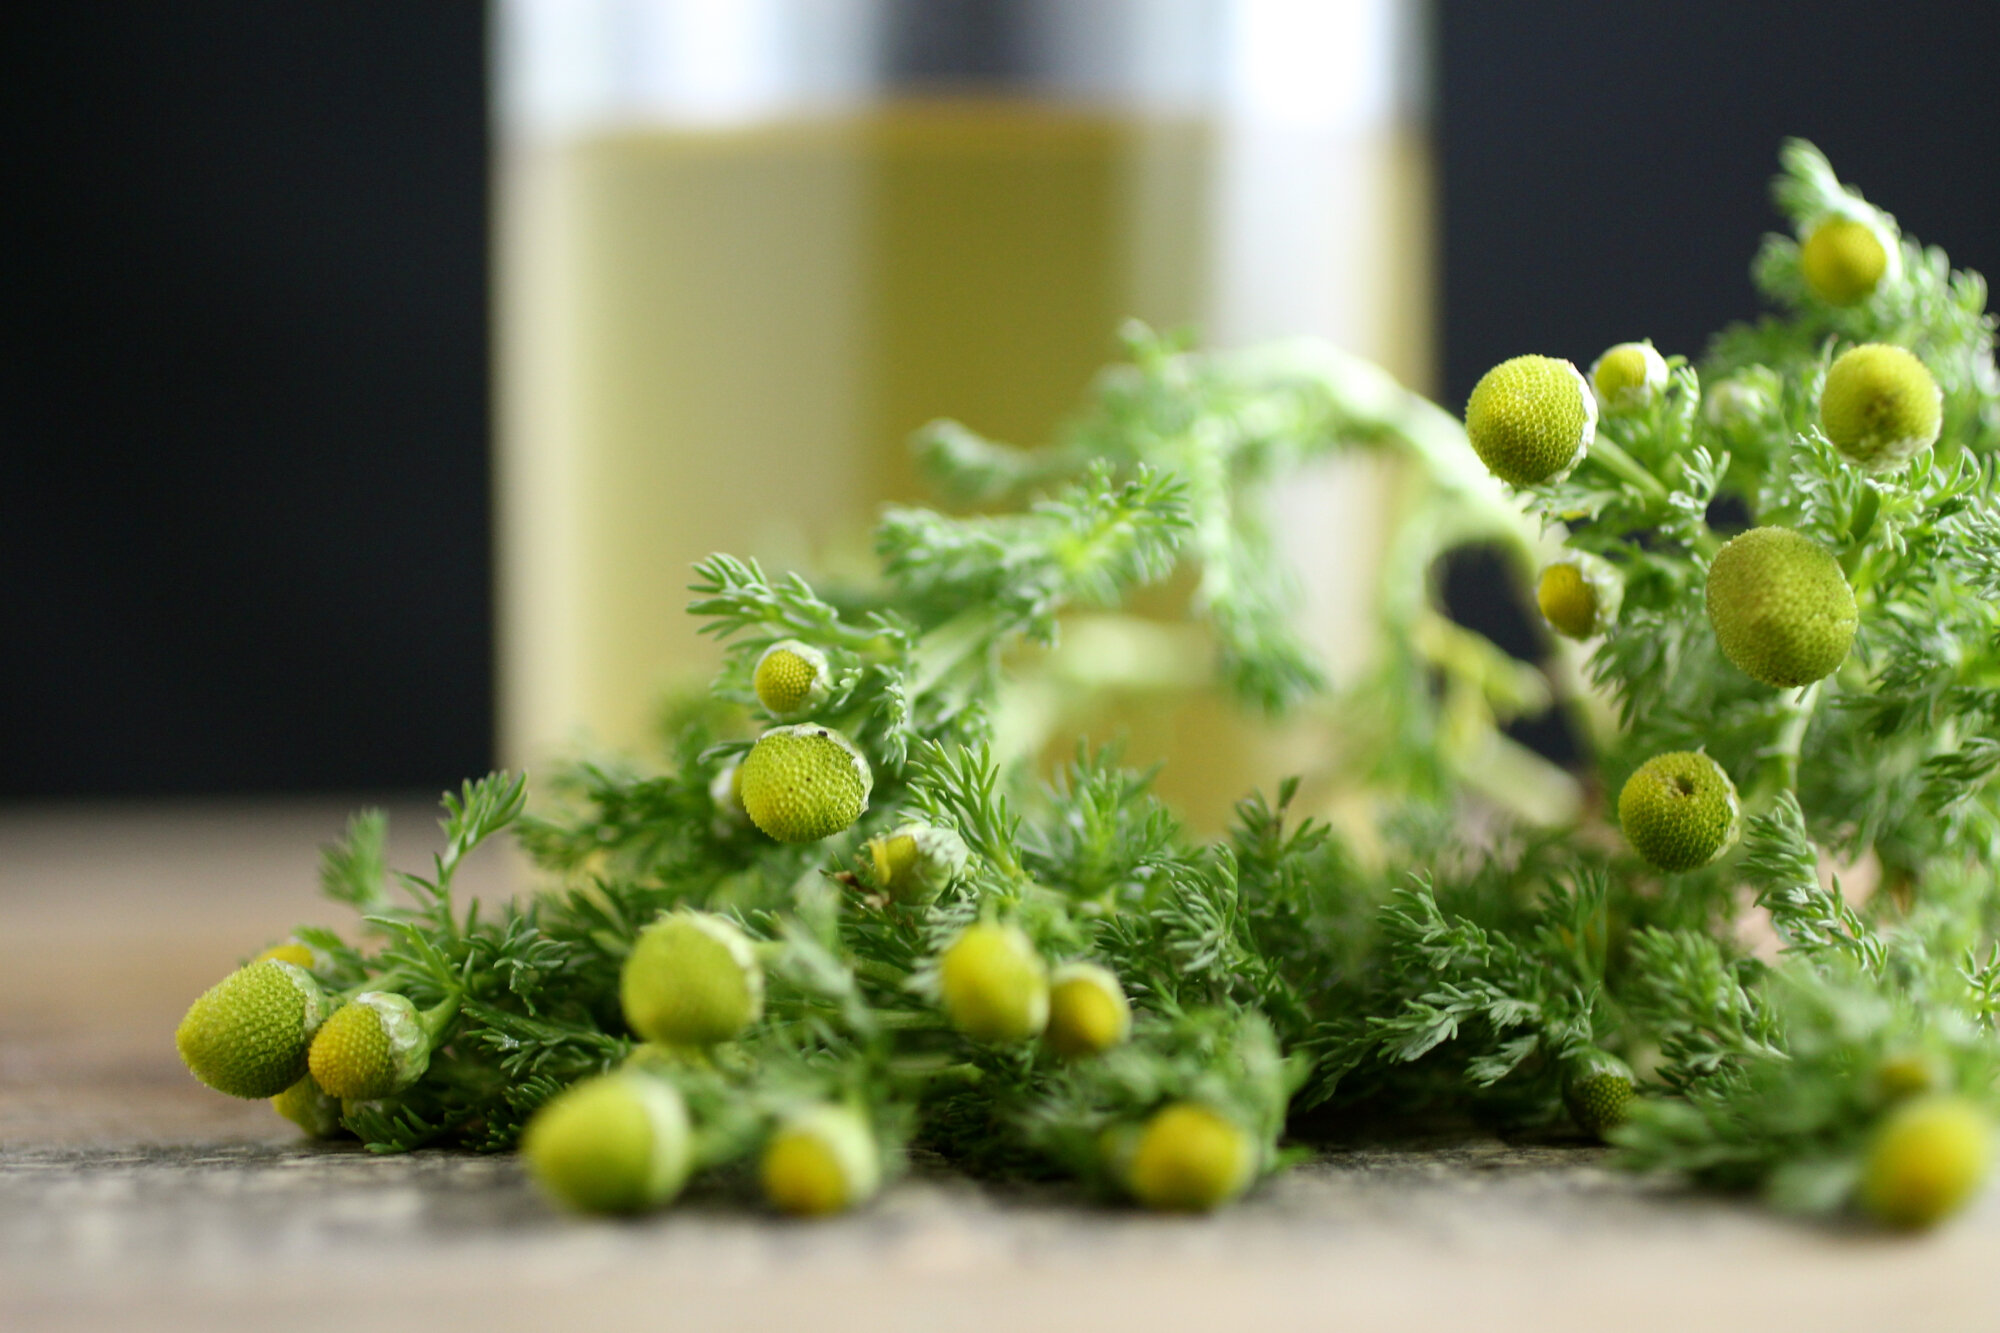
Wild Chamomile Simple Syrup
Cocktail flavor from between the cracks.


Wild chamomile, or pineapple weed grows almost everywhere and is very distinctive.
Wild chamomile, Matricaria discoidea, has a wonderful fragrant aroma that makes for great cocktails. Learn more about this edible weed here. One simple way to incorporate the flavor into cocktails is by infusing a simple syrup with the flowers and leaves of the weed. Not only is this syrup fantastic in cocktails, such as The Schoolyard, but it's also lovely in lemonade, ice tea, drizzled over ice cream (or made into ice cream or gelato), cakes, tarts, etc. Below recipe is for about 1 cup of simple syrup.
1 cup washed pineapple weed flowers and tops of leaves: Flowers can be removed from the weed using scissors, some of the top leaves around the flowers are okay, but you want to make sure it's mostly flowers.
1 cup sugar*
1 cup water
Combine sugar, water, and pineapple weed in a small heavy saucepan.
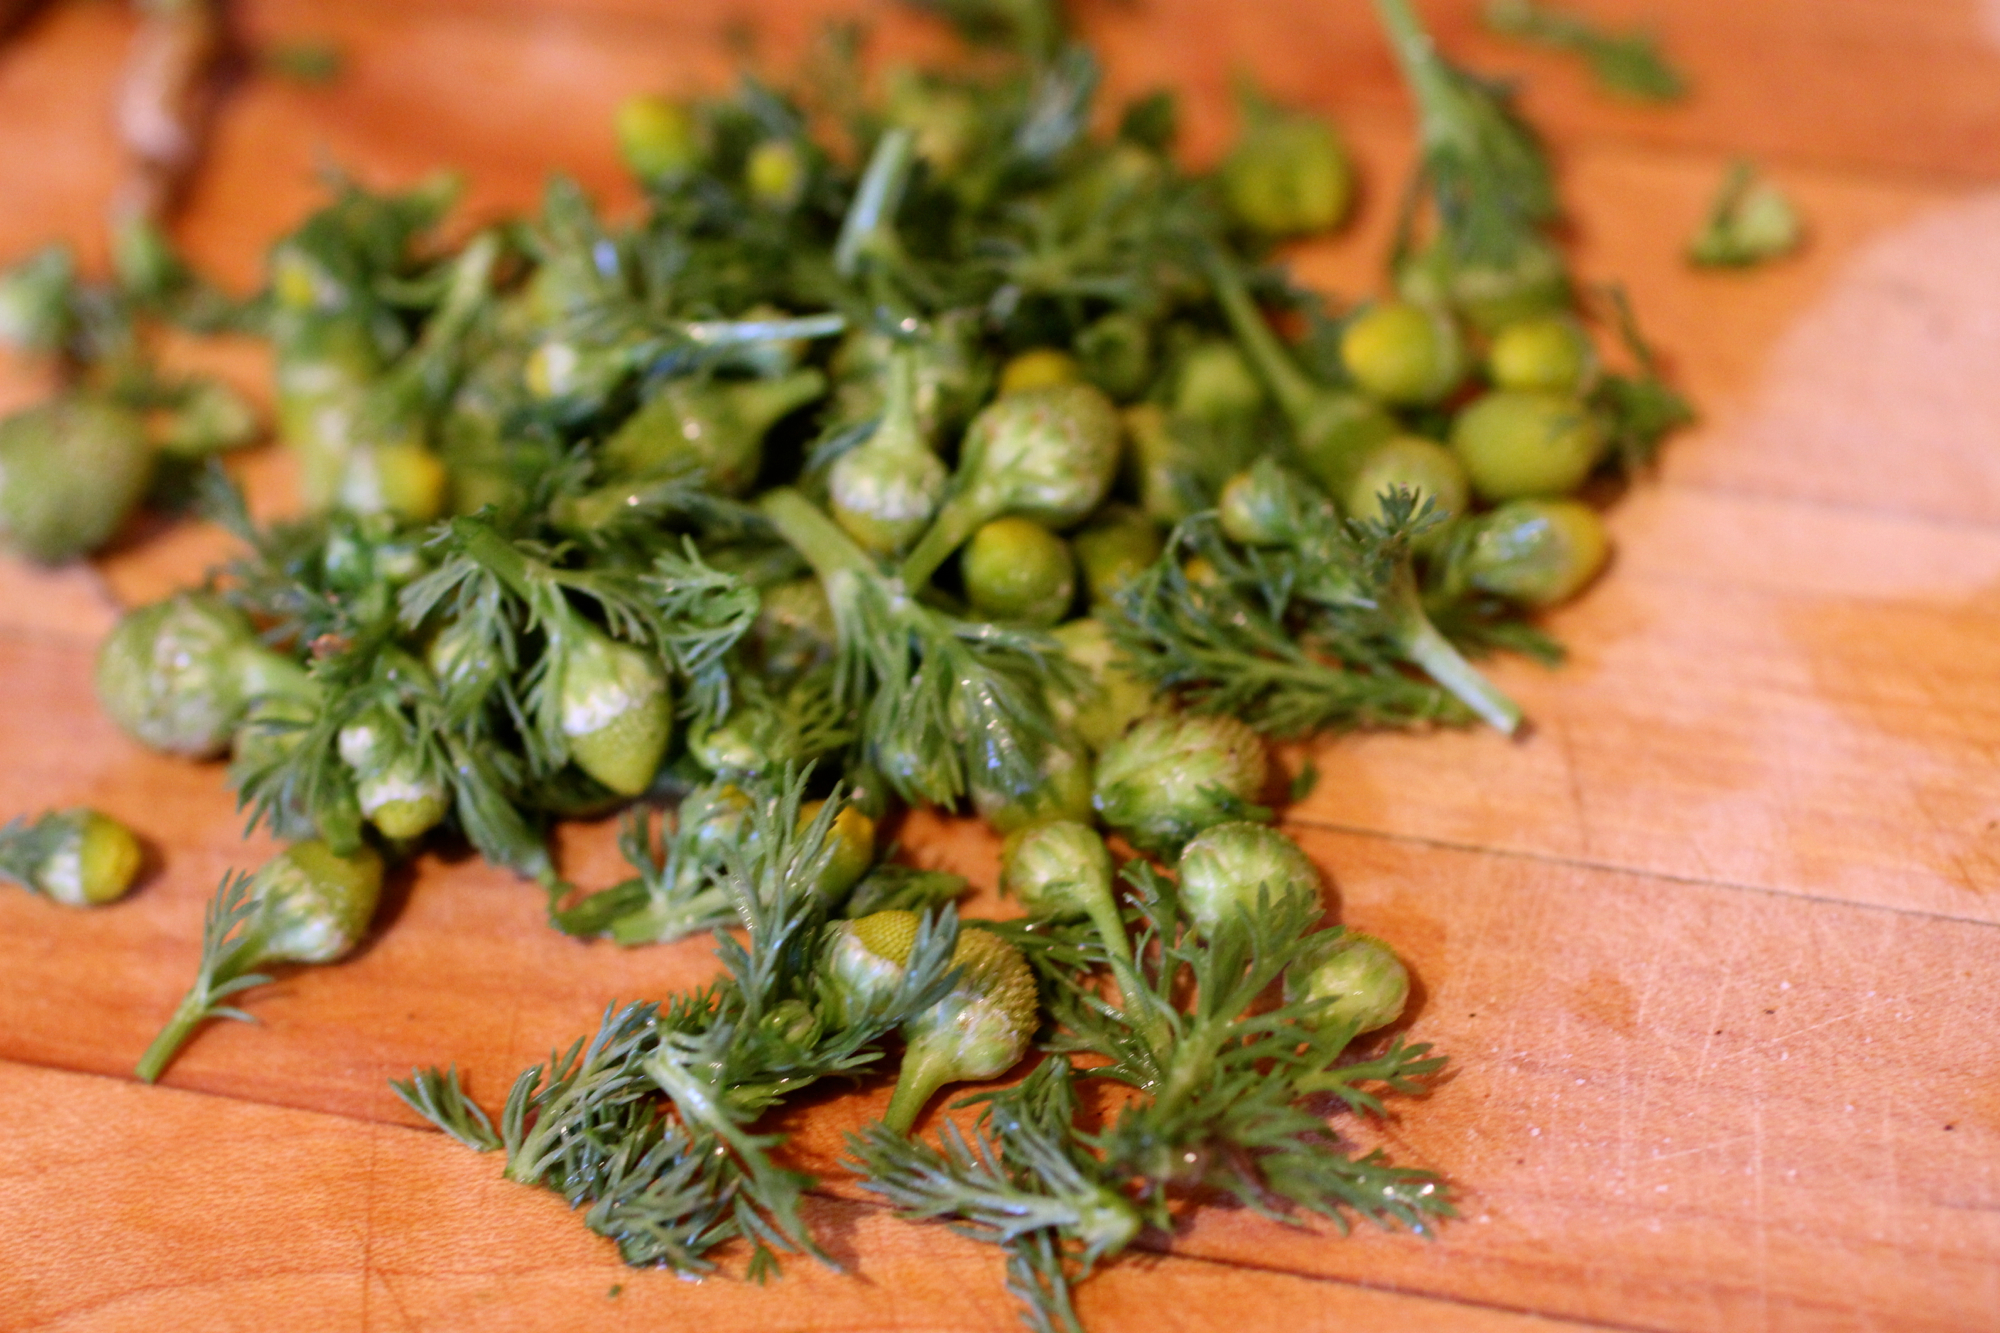
Use scissors to easily cut off pineapple weed flowers and leaves.
Bring to a simmer, stirring occasionally, for 5 minutes. Remove from heat. Let the syrup cool completely, then squeeze as much juice as possible from flowers, pour through cheesecloth into a jar or resealable container. Simple syrup will last 1 month refrigerated.
*You can also make a 2:1 (sugar: water) simple syrup that will last up to 6 months refrigerated. This 2:1 syrup is sweeter than most, so you will need to add less to recipes.

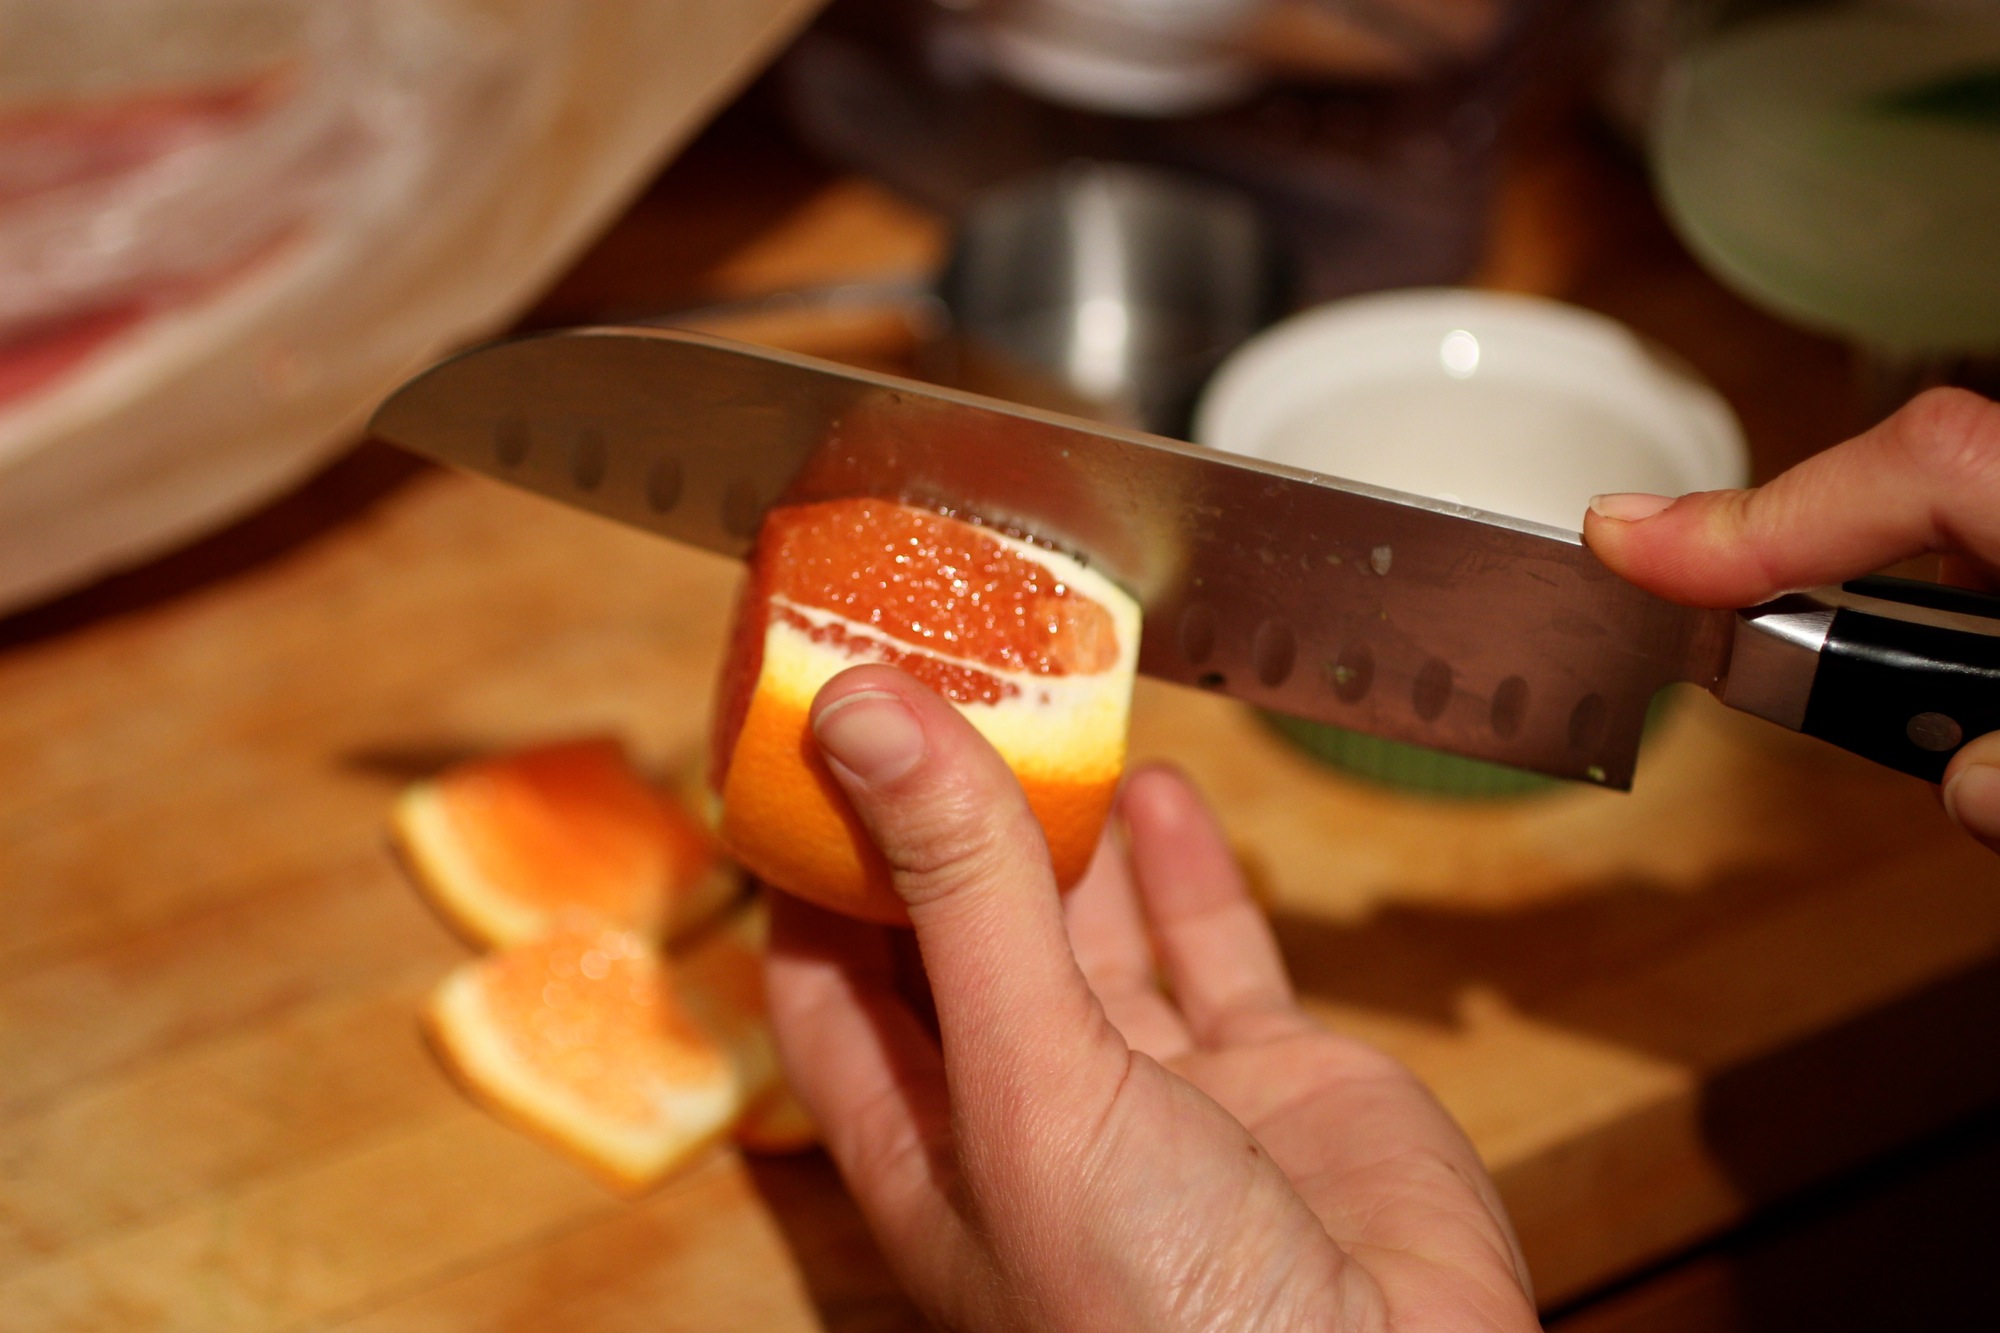
Segment Citrus "Like a Boss"
A mature approach to citrus in salads.

Update: I just found out when I made an olive oil cornmeal cake with blood orange that this technique has a name - supreming. Who knew!
A good salad in a restaurant will have something that's lacking in a salad made at home. This something is love - enough love for a salad that you'll put in a little effort. Now, I'm not naming any names, but I'm sure we've all been there - salad as an afterthought. Of course, there's always room for a simple green salad with any meal, but sometimes you want to "get a little fancy".
One trick for doing so that I picked up while working at restaurants is segmenting citrus like a boss. By using this simple technique, your citrus segments reveal only flesh, rather than the surrounding pith and are colorful, shiny, and juicy. Here's what you do:

Cut peel off of citrus fruit.
Cut away the peel from the citrus fruit by slicing off each end and cutting down the edge of the fruit to reveal the flesh.
Cut out segments from pith around edge of the fruit.
As you get toward the end, it can be difficult to segment them perfectly, but don't worry, you can slice through the pith at this point. I also like to squeeze the juice from the edges and remaining pith into the salad dressing.
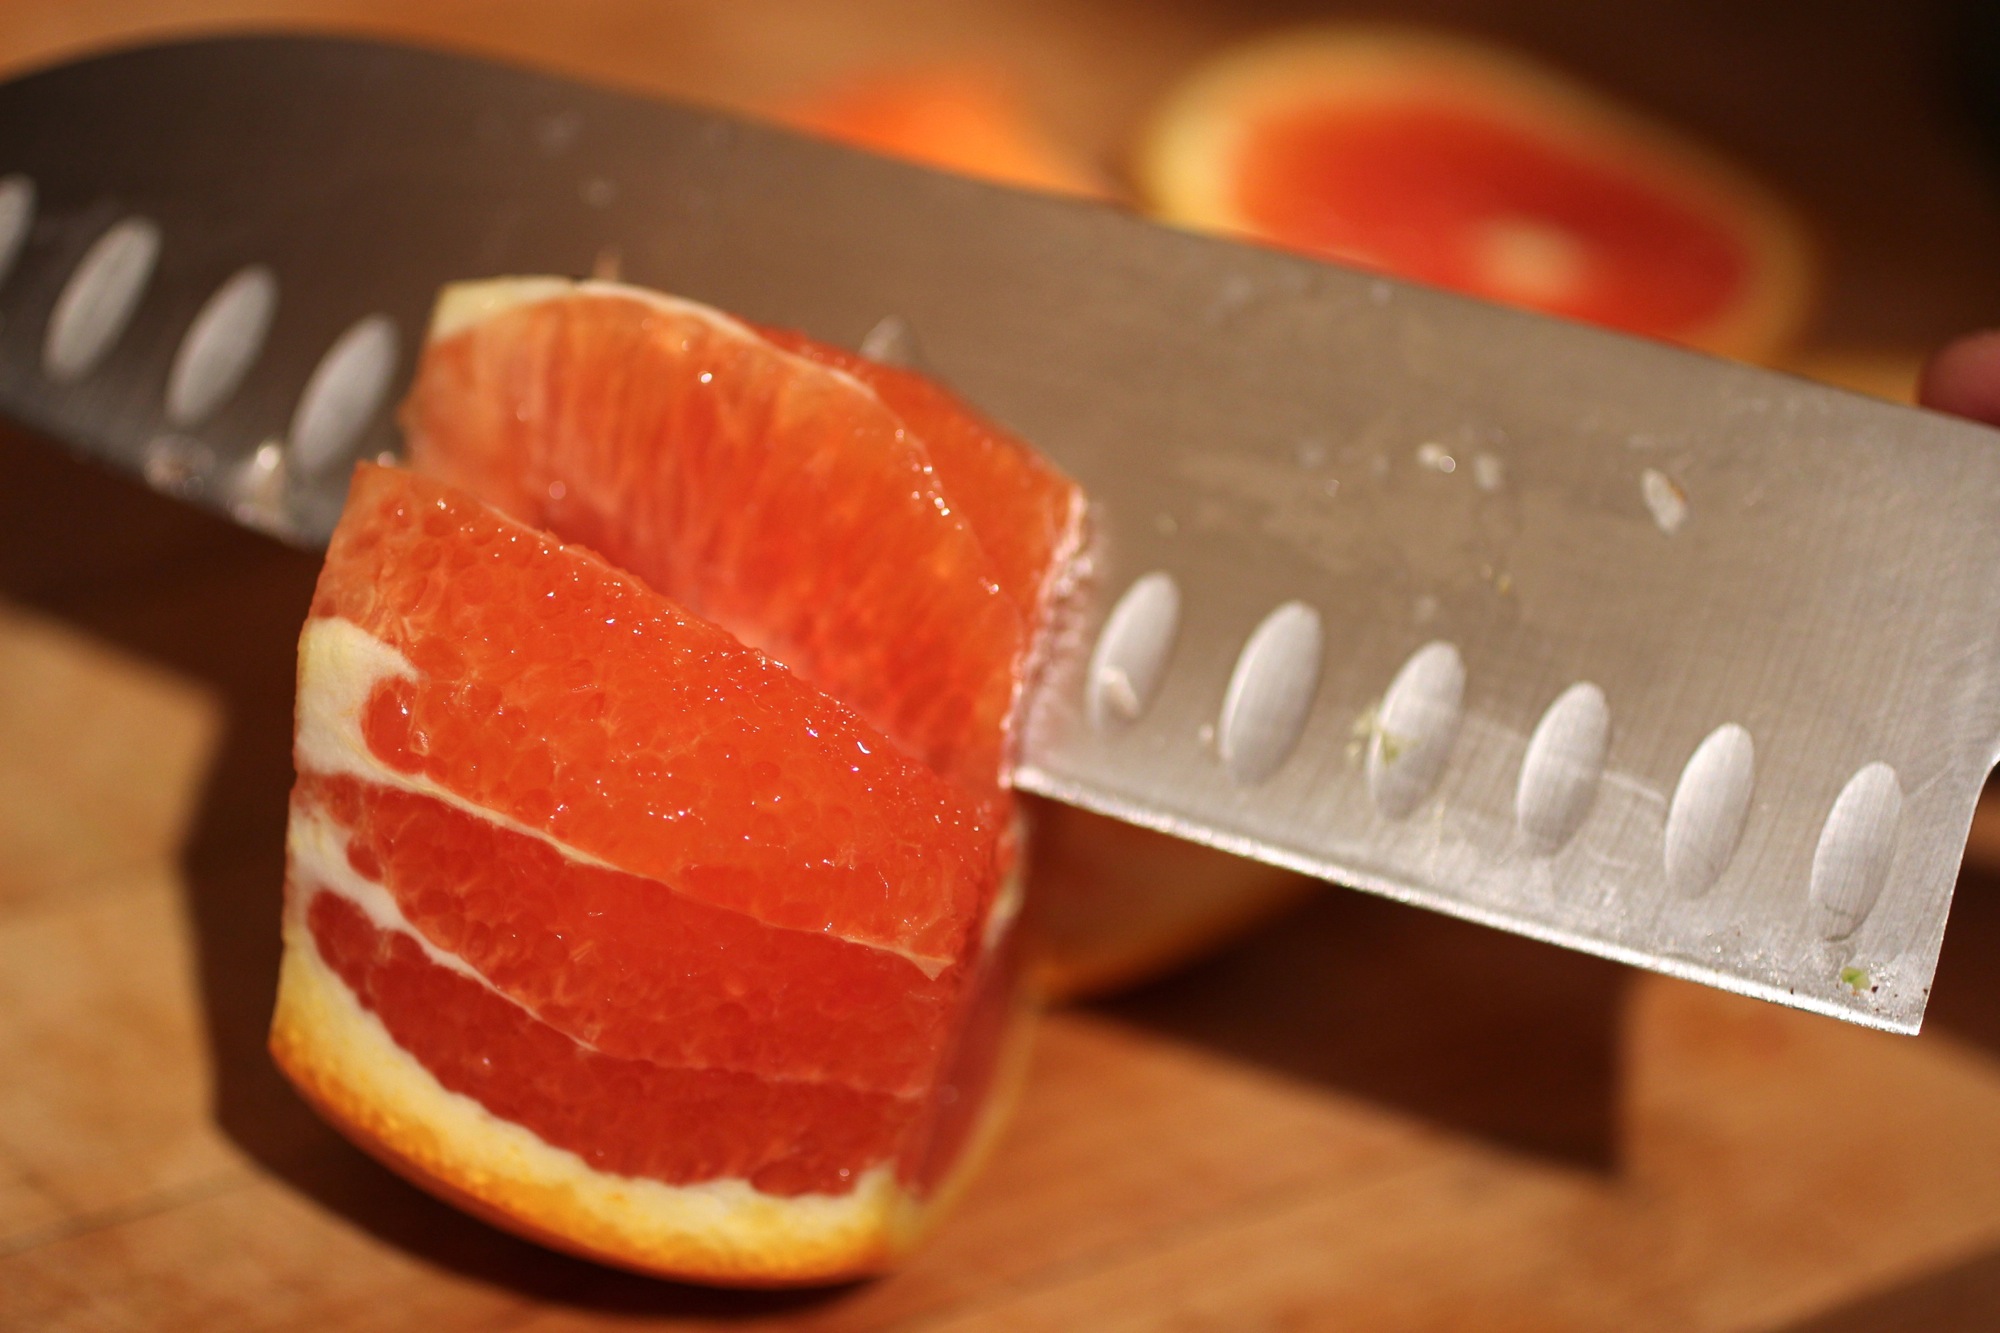
Cut into flesh to remove segments.
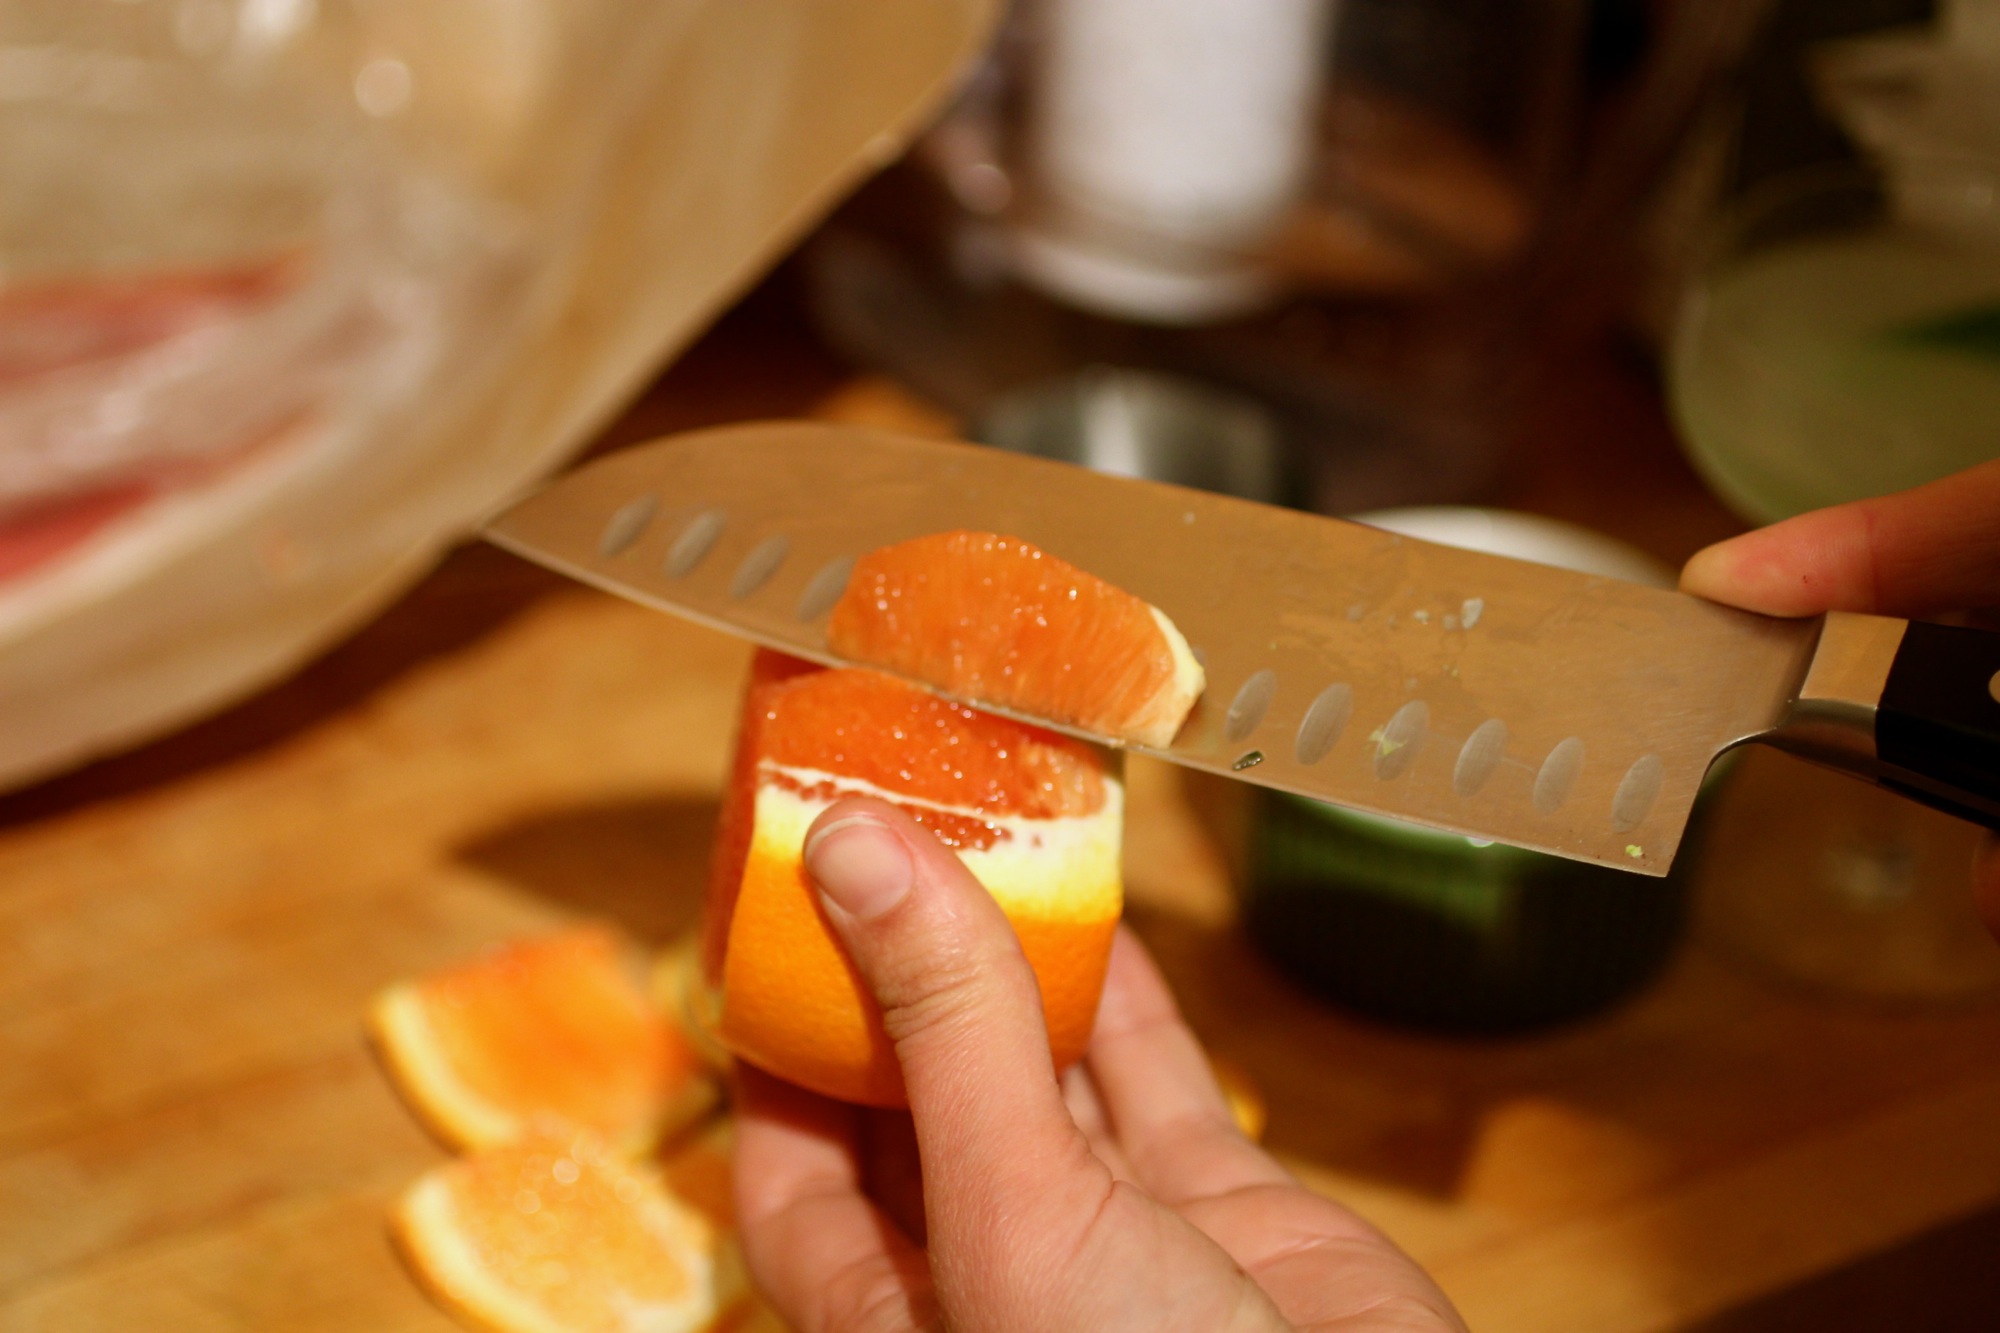
Removing beautiful segment.

Ashes to Ashes cocktail
A delicious way to ease into a meal that is lightly boozy without being boring or too sweet.

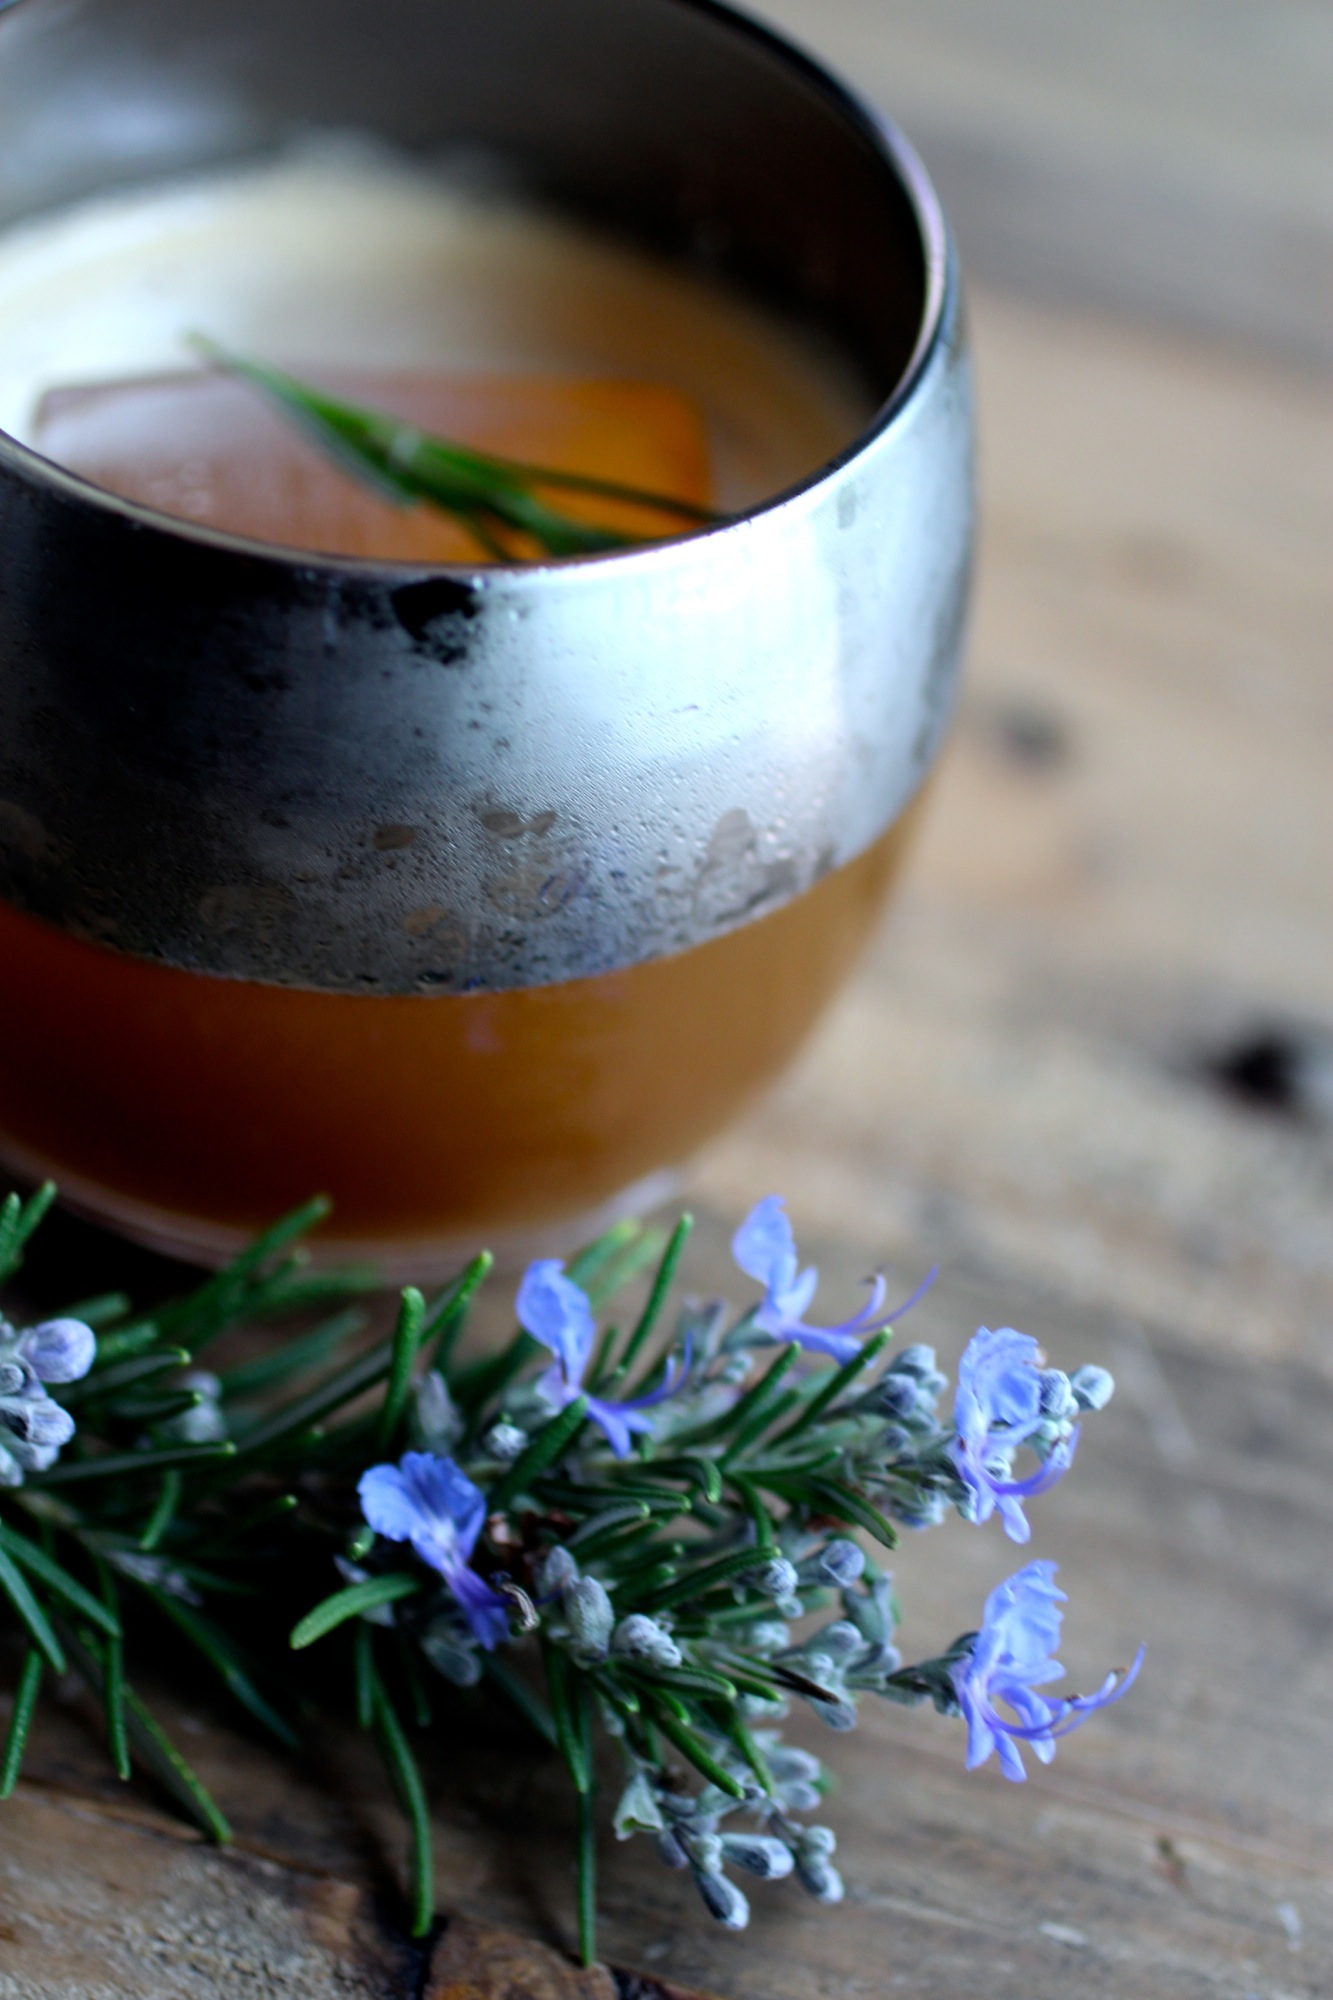
My usual go-to cocktails fall in the "highly alcoholic" arena because that's typically what I'm looking for, but sometimes you want to start out a little mellower. Unfortunately, it can be hard to find a drink that is lower in alcohol without being sweet or tasting watered down. This combination of fernet, rosemary honey, and lemon does a great job of whetting the palate without making you feel like your missing out.
I came across this combination at a.kitchen + bar in Philly where my friend I used to work with at the Nordic Food Lab is now cheffing. The food and a.kitchen is delicious, but a little intense, so starting with this light herbal aperitif was definitely the way to go (before drinking wine, of course). We requested the recipe and have had a fun time recreating the drink at home using foraged rosemary that is beginning to flower, making for an even more appealing garnish.
1.5 oz Fernet Branca
0.75 oz rosemary honey syrup (see below)
0.5 oz lemon juice
0.25 oz ginger syrup
Sparkling water
Fresh rosemary sprigs for garnish
Shake all ingredients apart from sparkling water and rosemary garnish, double strain, then top with sparkling water to fill glass (adjust water according to taste). Garnish with rosemary.
To make honey-rosemary syrup (you might as well make a batch of it for future drinks!):
Simmer 2 parts honey to 1 part water with 1 rosemary spring for about 10 minutes. Remove from heat, cool, then remove rosemary.

Royal Pomme Punch
Nothing says party like punch.

Retro punch is the best way to throw a classy party without having to play bartender. Be aware - punch disappears faster than you would expect and is very strong. I love this punch, and all old-school punches, because they use interesting blends of ingredients and usually contain bubbly, so you know it's a party! This one is great for the winter (and Winter Solstice parties) because the blood orange keeps things bright and festive, while still being dark and cozy. I usually double the below recipe for parties, but one batch will serve about 15-20 people.
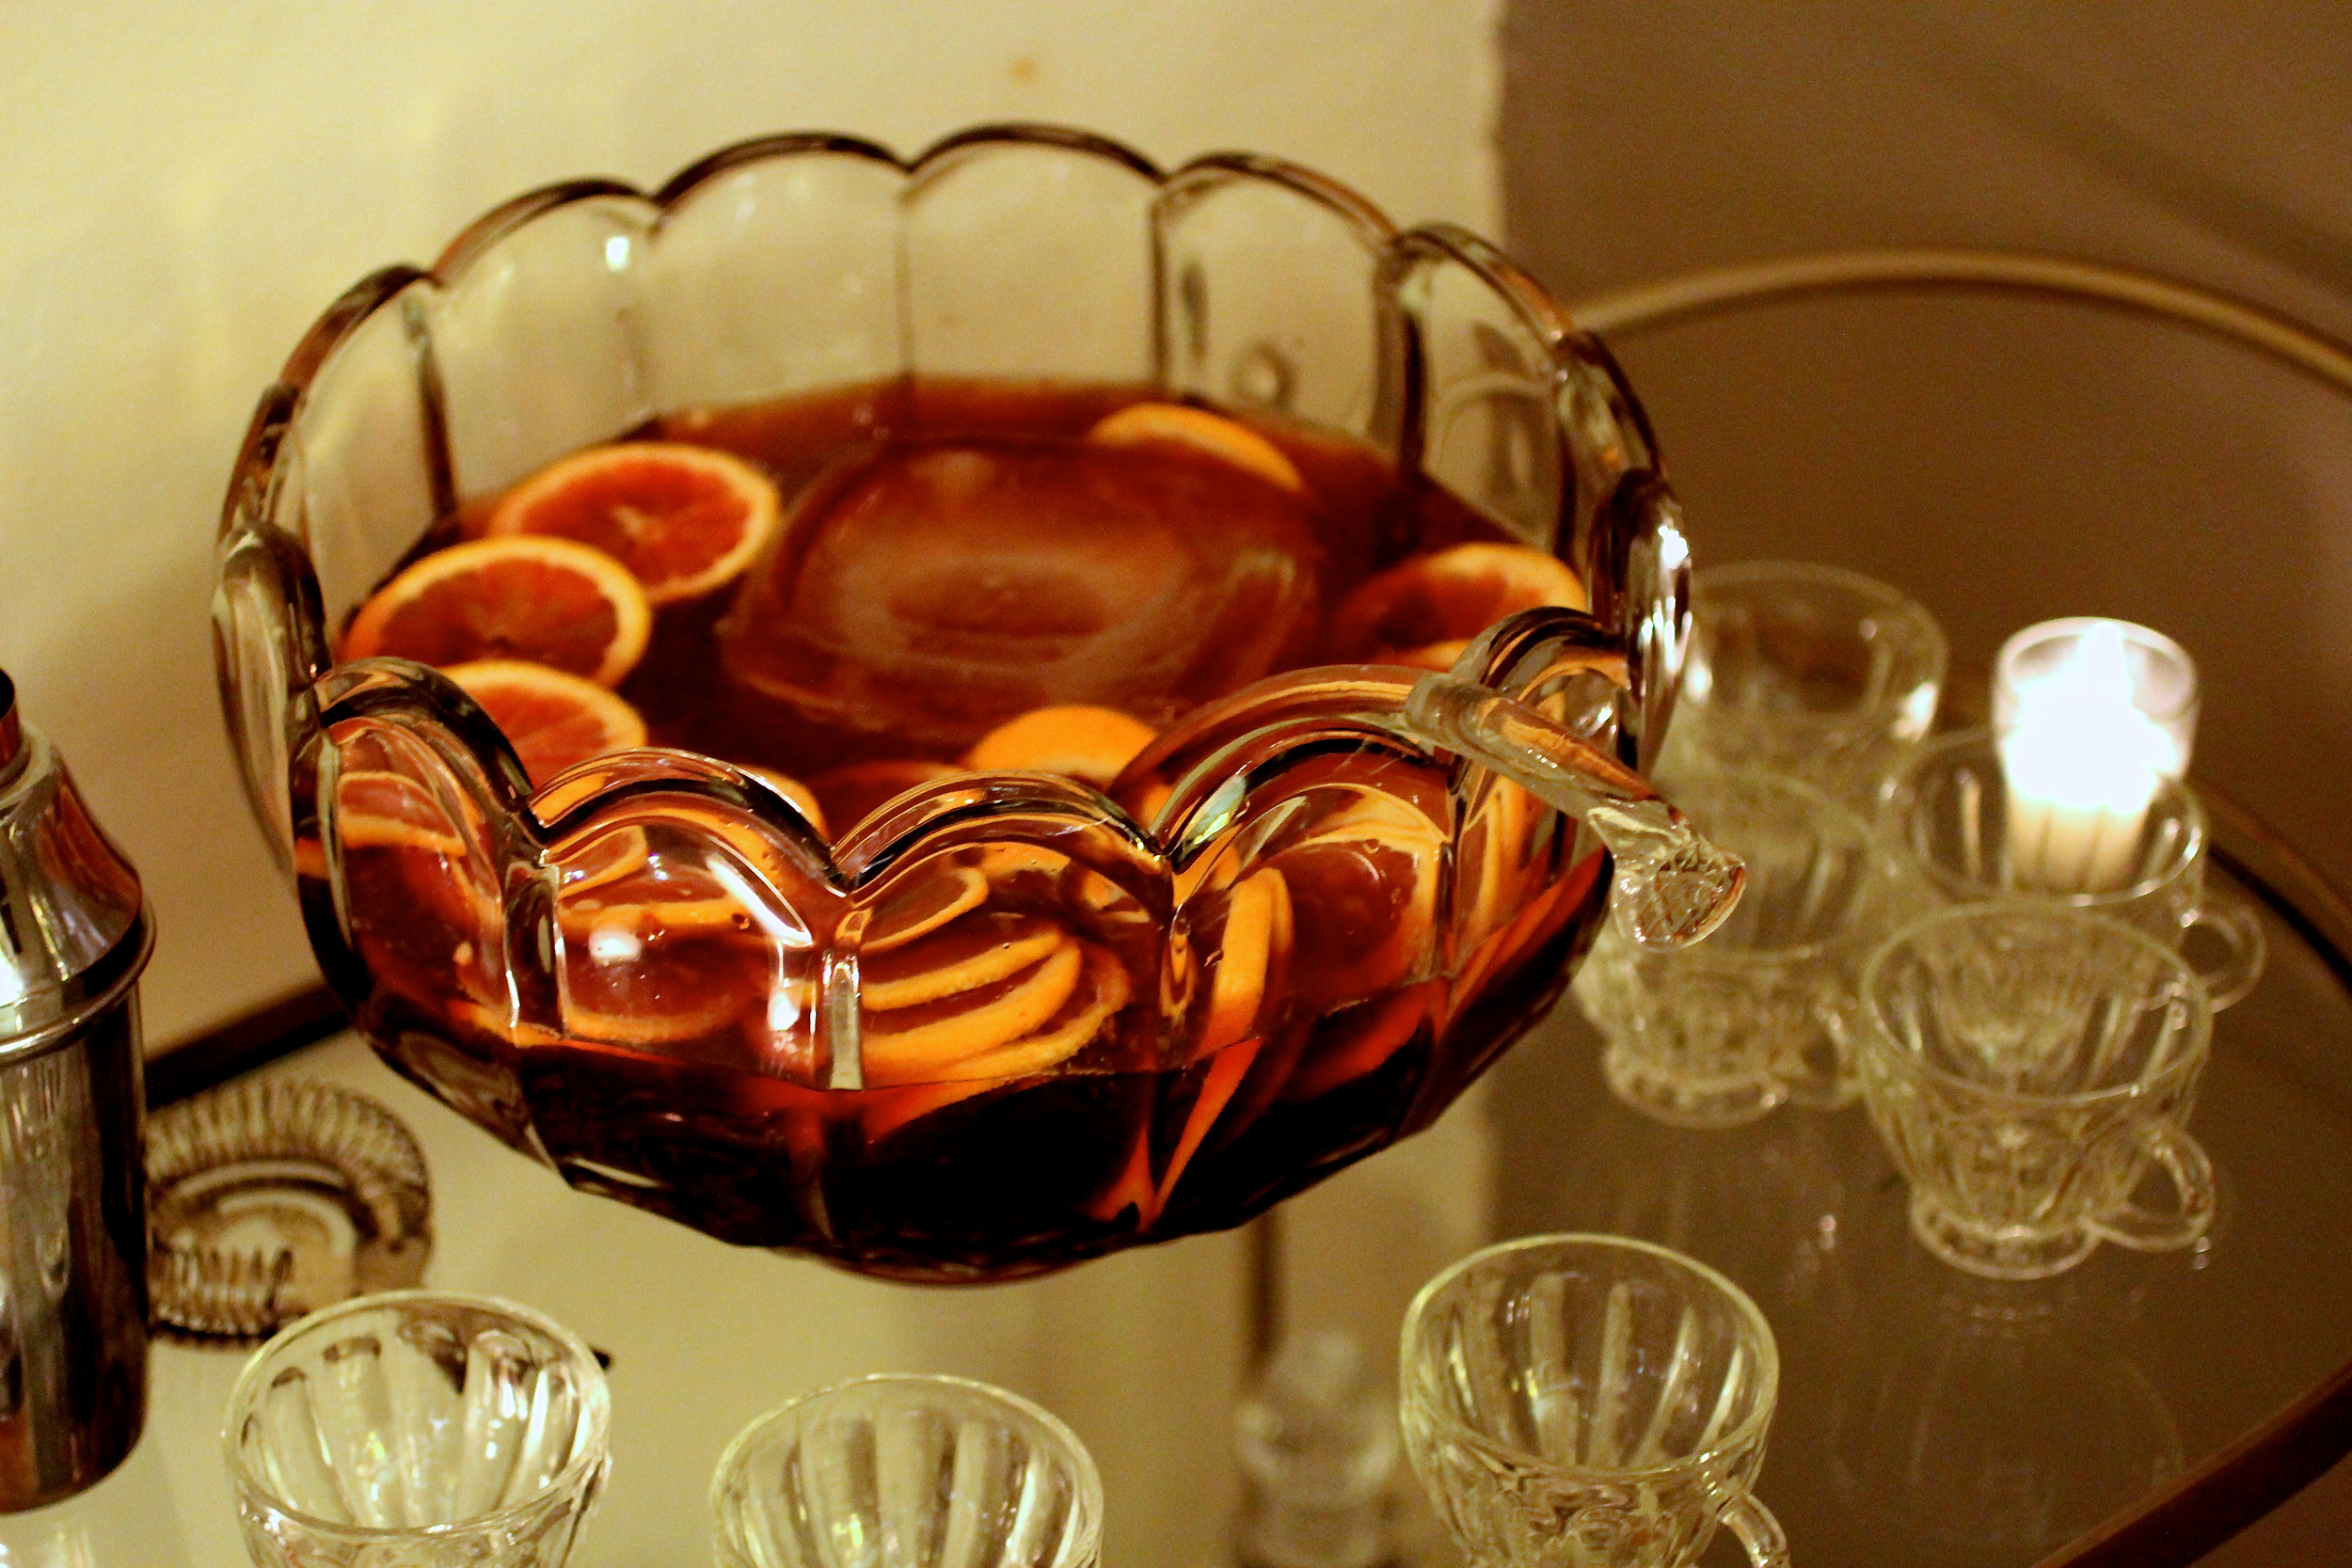
12 ounces (350 mL) apple brandy or apple jack, such as Laird's Apple Jack
500mL (about 3/4 bottle) Dubonnet rouge
1/4 cup fresh blood orange juice
3 blood oranges, sliced into rounds
1 bottle of champagne or other sparkling wine
20 dashes of Angostura bitters
After mixing, throw in a giant ice cube for extra classiness. A giant ice cube can be made by freezing water in a square tupperware container overnight. You might want to store a back up of all the ingredients except champagne and bitters to allow for easier refill (your guests will love to watch you dash in the bitters).
Enjoy and be careful - again, it's strong and tasty!
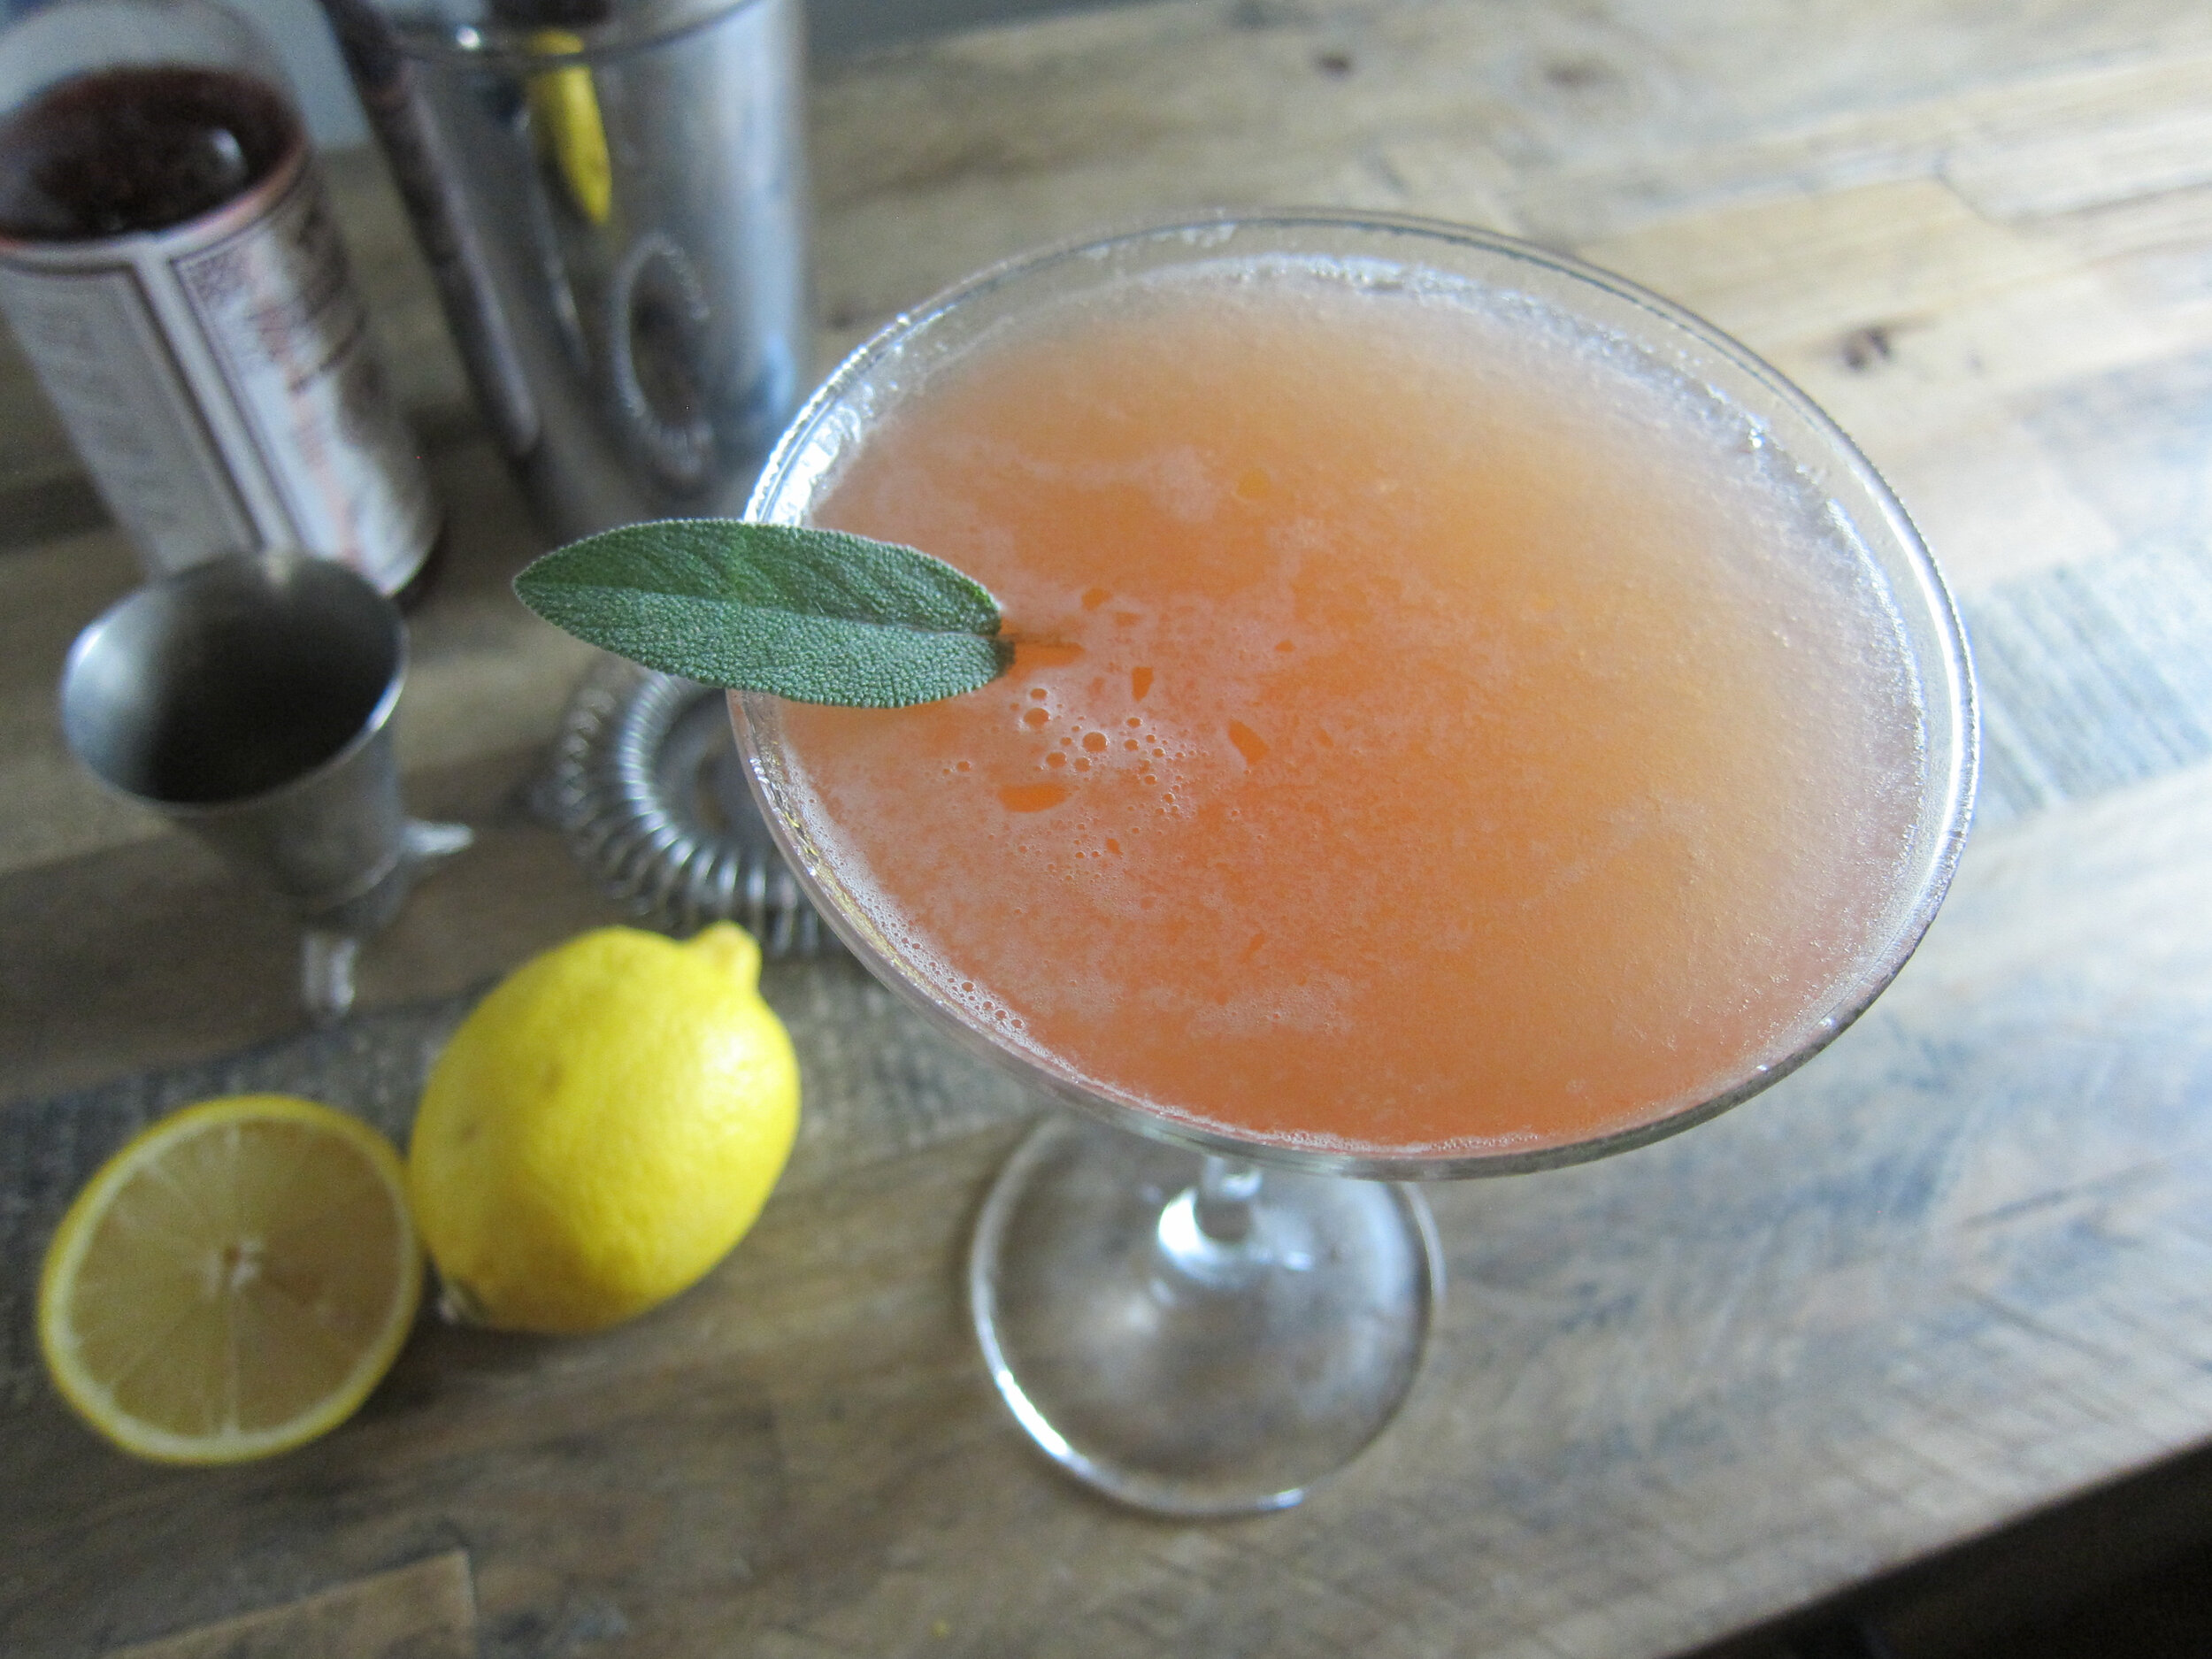
The New Rider cocktail
Sage, ginger, and rye help make this cocktail bright-yet-warm.

When I lived in the lower Mission in San Francisco, I had a friend several blocks away and our halfway point happened to be Beretta. This busy Cal-Ital establishment is frequented for pizza, but we usually just went for the cocktails and my favorite standby was the The New Rider. There's just something about this drink - somehow, it manages to be classic, yet still unique, bright, but cozy and it always seemed to be exactly what I wanted. In light of that, I set about making it at home. With some help from the Beretta bartender and using what we had available we came up with something that if not exactly like The New Rider at Beretta, it definitely is good enough!
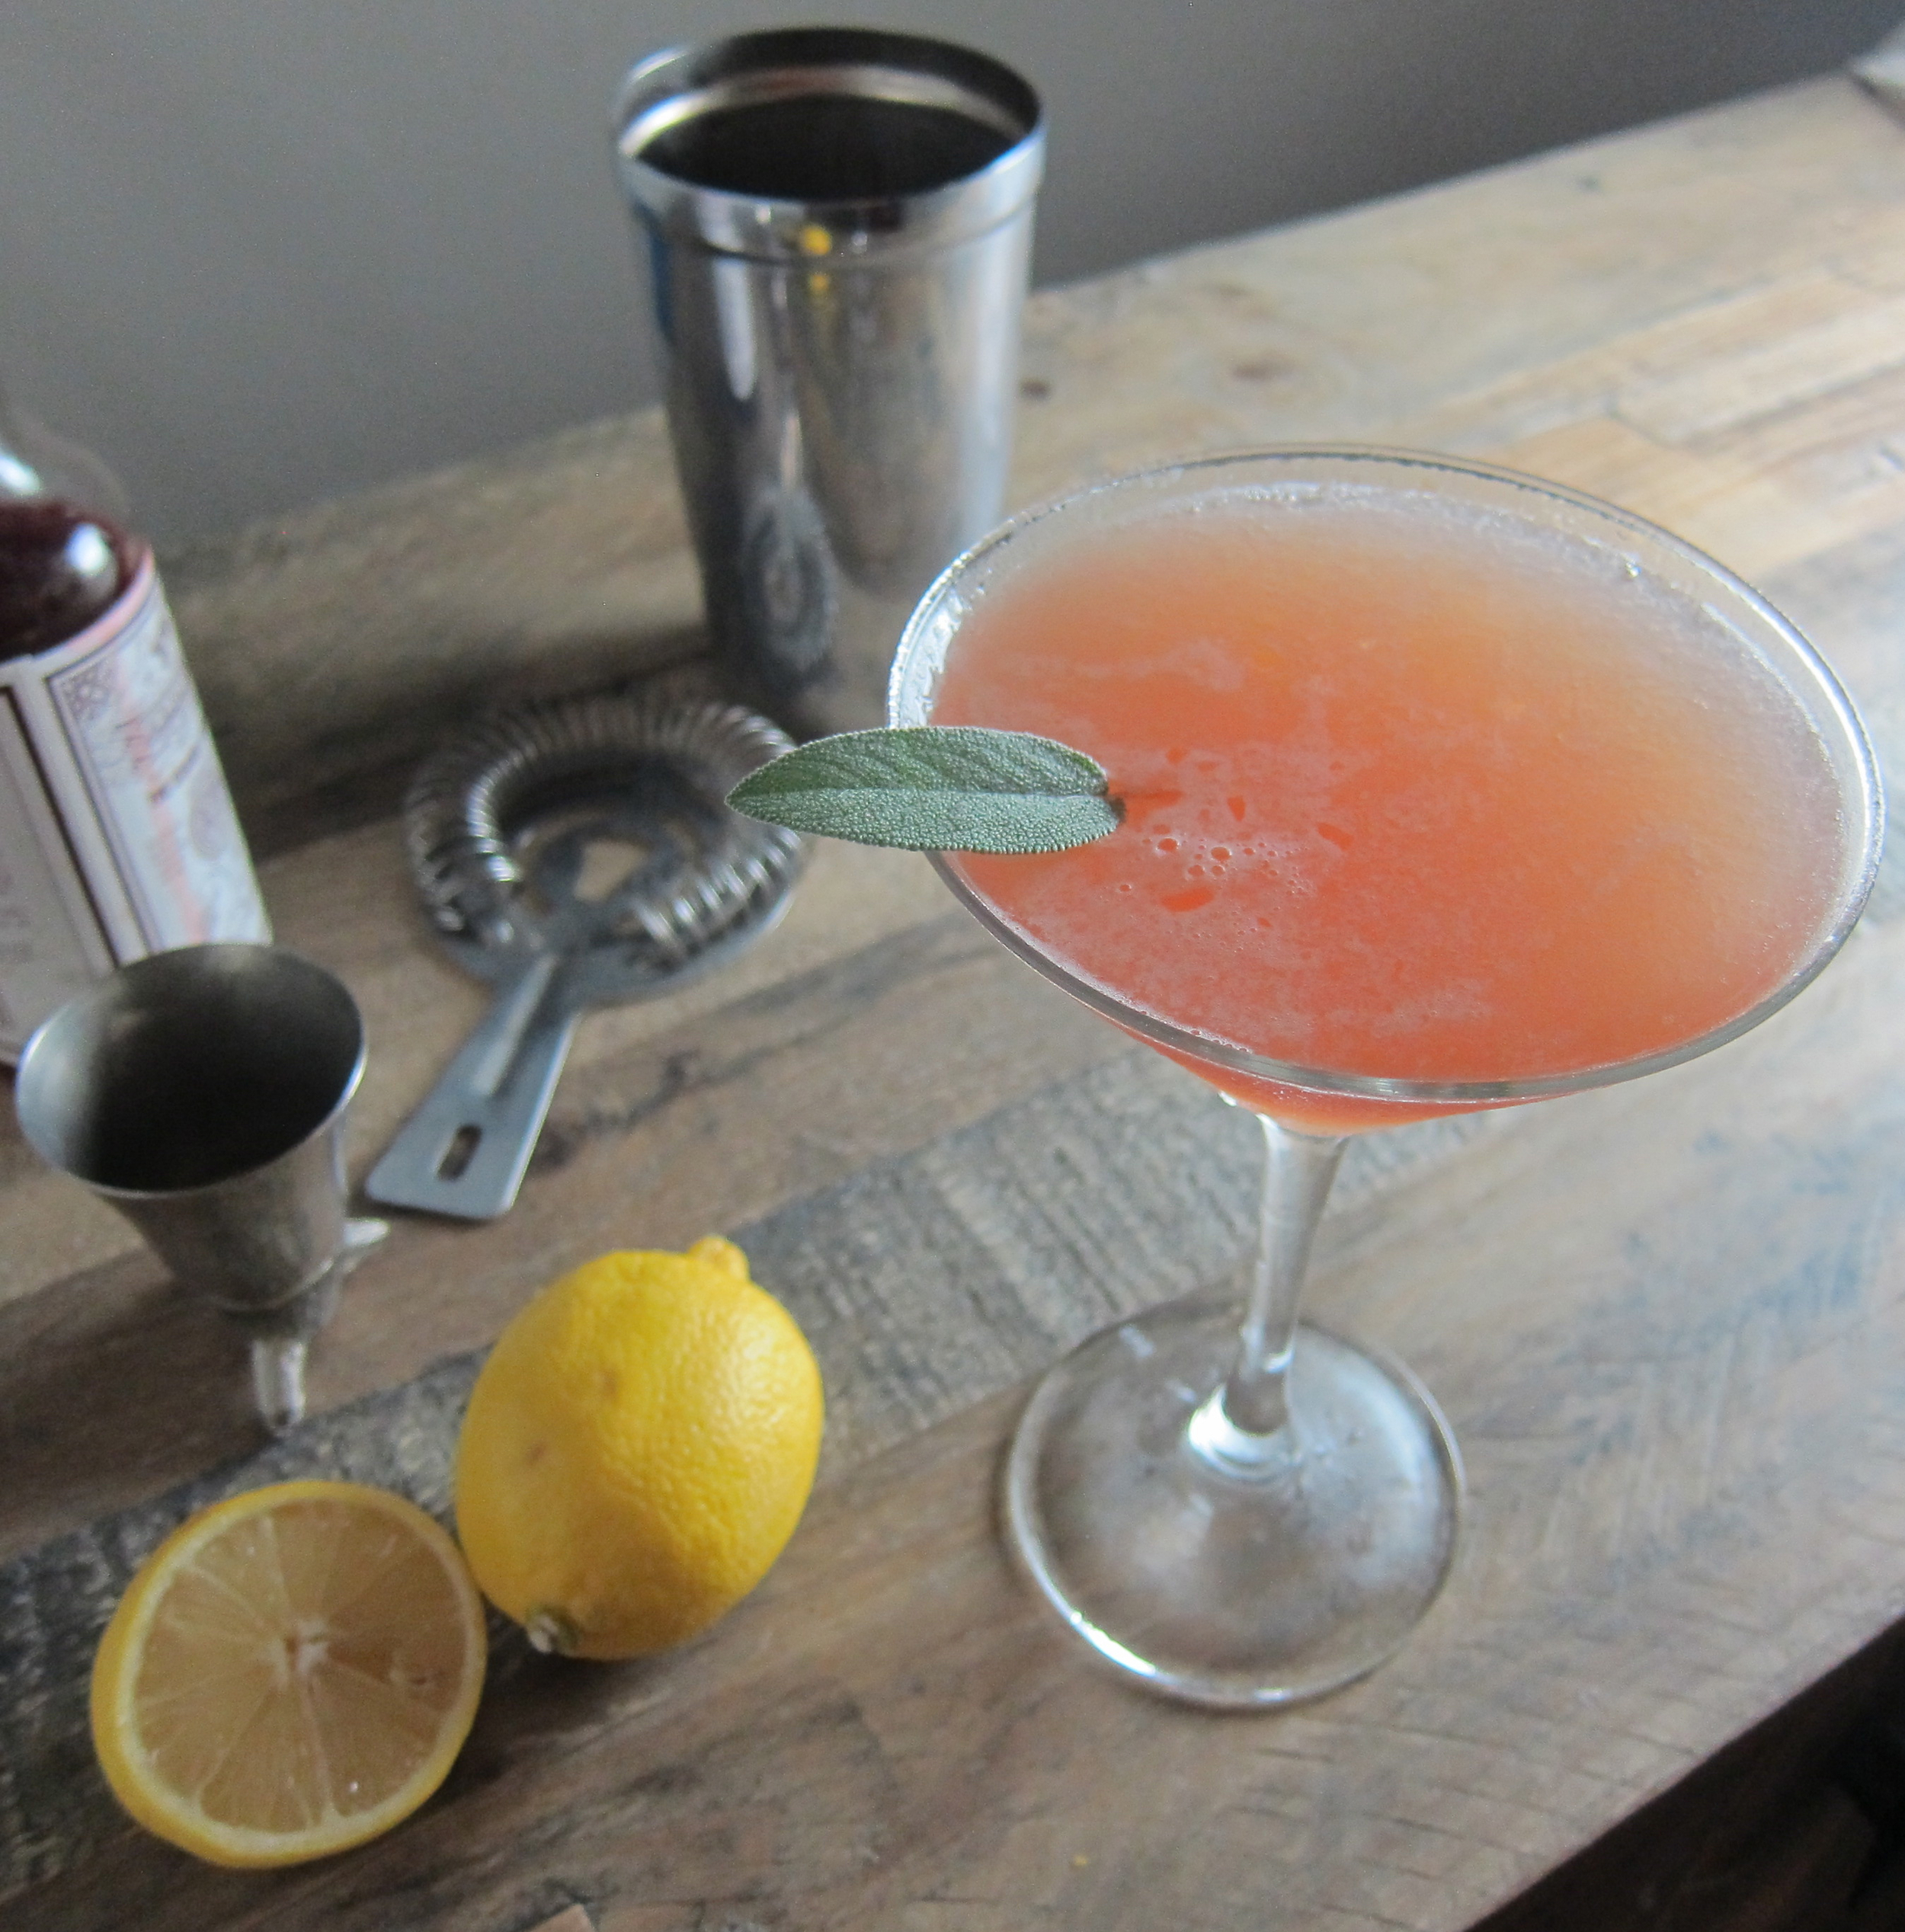
3 parts rye
1 part fresh lemon juice
1 part Grand Classico or maraschino
1 part ginger syrup
2 dashes Angostura bitters per cocktail
1 large sage leaf per cocktail
Shake all ingredients except sage with ice. Serve up with a large sage leaf that has been slapped between your palms (this part is very important - get into it!)
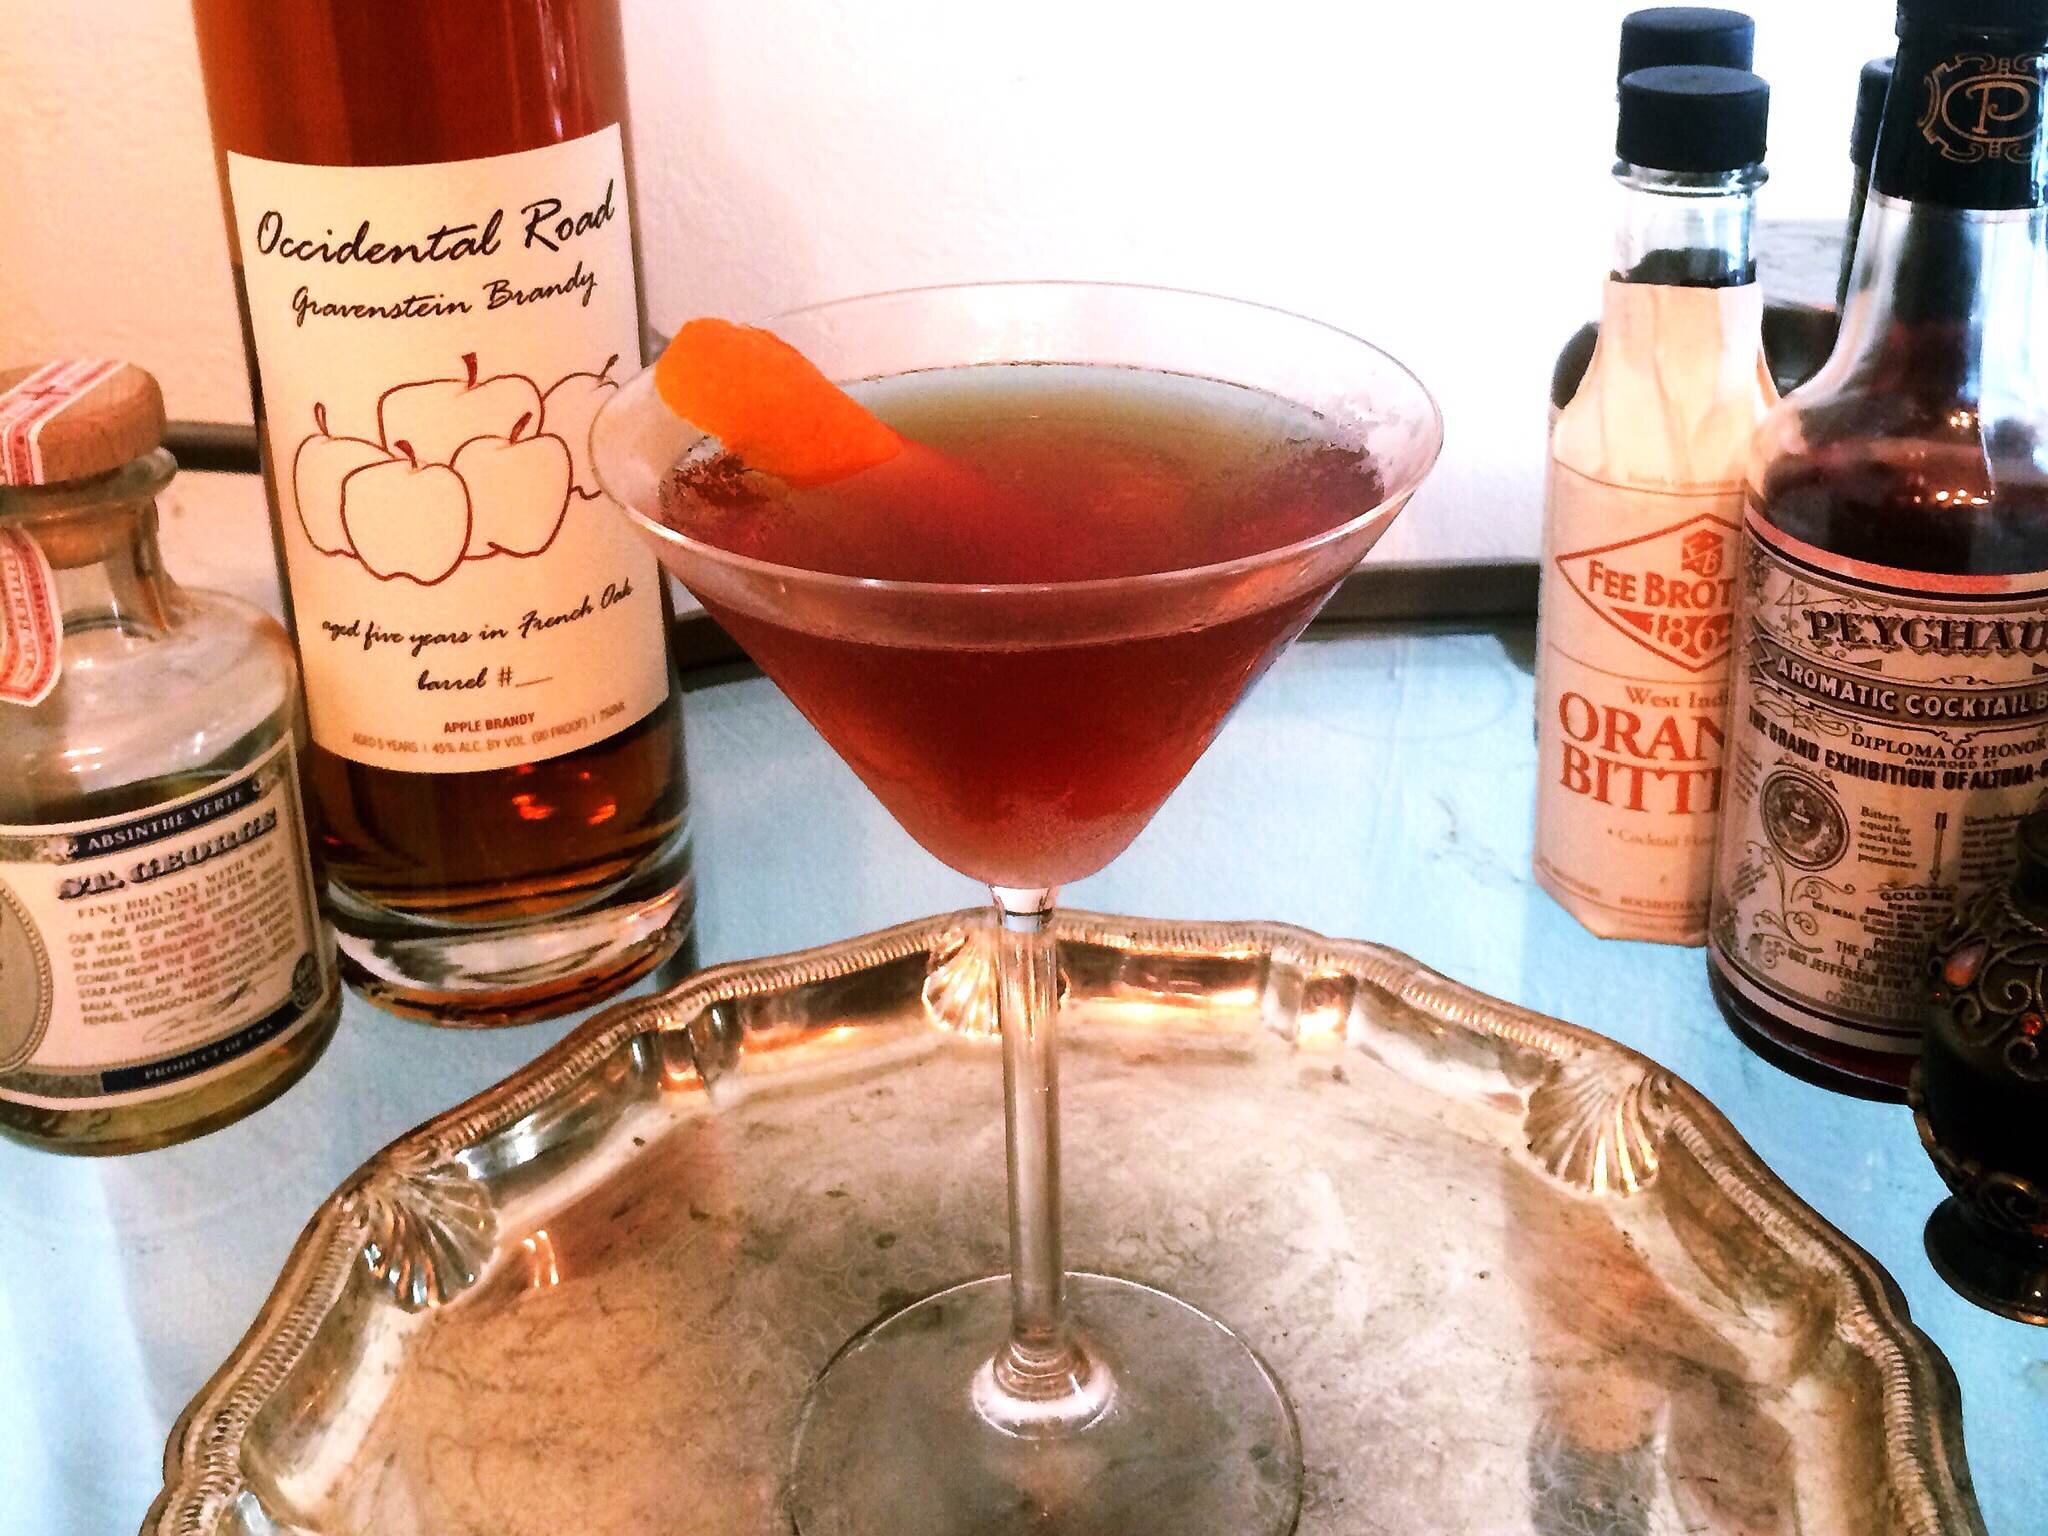
Harvest Moon cocktail
Not too sweet, apple brandy can't be beat

It's apple season and nothing says happiness like a seasonal beverage to warm you up. I knew I wanted something with apple brandy tonight since a friend recently gave me some bottles made with local Gravensteins so I turned to the PDT Cocktail book and started scanning. Few resources have been so consistently reliable; it has a lot of spirit forward options and the sweetest drinks are never too sweet (I save my candy for dessert). Then I flipped the page to the Harvest Moon. Eureka.
I'm a big fan of Manhattans and Neil Young so this drink did the trick.
Ingredients
1.5 oz. rye whiskey
1 oz. Lillet Blanc
1/2 oz. Green Chartreuse
1/2 oz. apple brandy
3 dashes of Angostura bitters
Stir ingredients with ice and strain into a chilled coupe. Garnish with an orange twist.

House Brandied Cherries
What life can be like.


Brandied Cherries - If life is a bowl of cherries, I hope I have the opportunity to brandy some of mine. Every year around June or July, I can't help but make a jar or two of these preserved morsels. Although fresh cherries are hard to pass up, it's worth it a few months later when you have a rich taste of summer for your cocktails.
Once brandied, the cherries are good for 6 months in the refrigerator, but don't expect them to last that long. After all, there’s always a manhattan to make for someone or ice cream that needs a unique and boozy topping. Below recipe makes about 2 pint jars.
About 1lb fresh cherries, washed, stems removed (you can also remove pits, but I find they have better texture/flavor with pits intact)
1/2 cup water
1/2 cup sugar
2 tsp fresh lemon juice
1/2 vanilla bean pod
1 to 1-1/2 cups brandy
Peppercorn or other spices (optional)
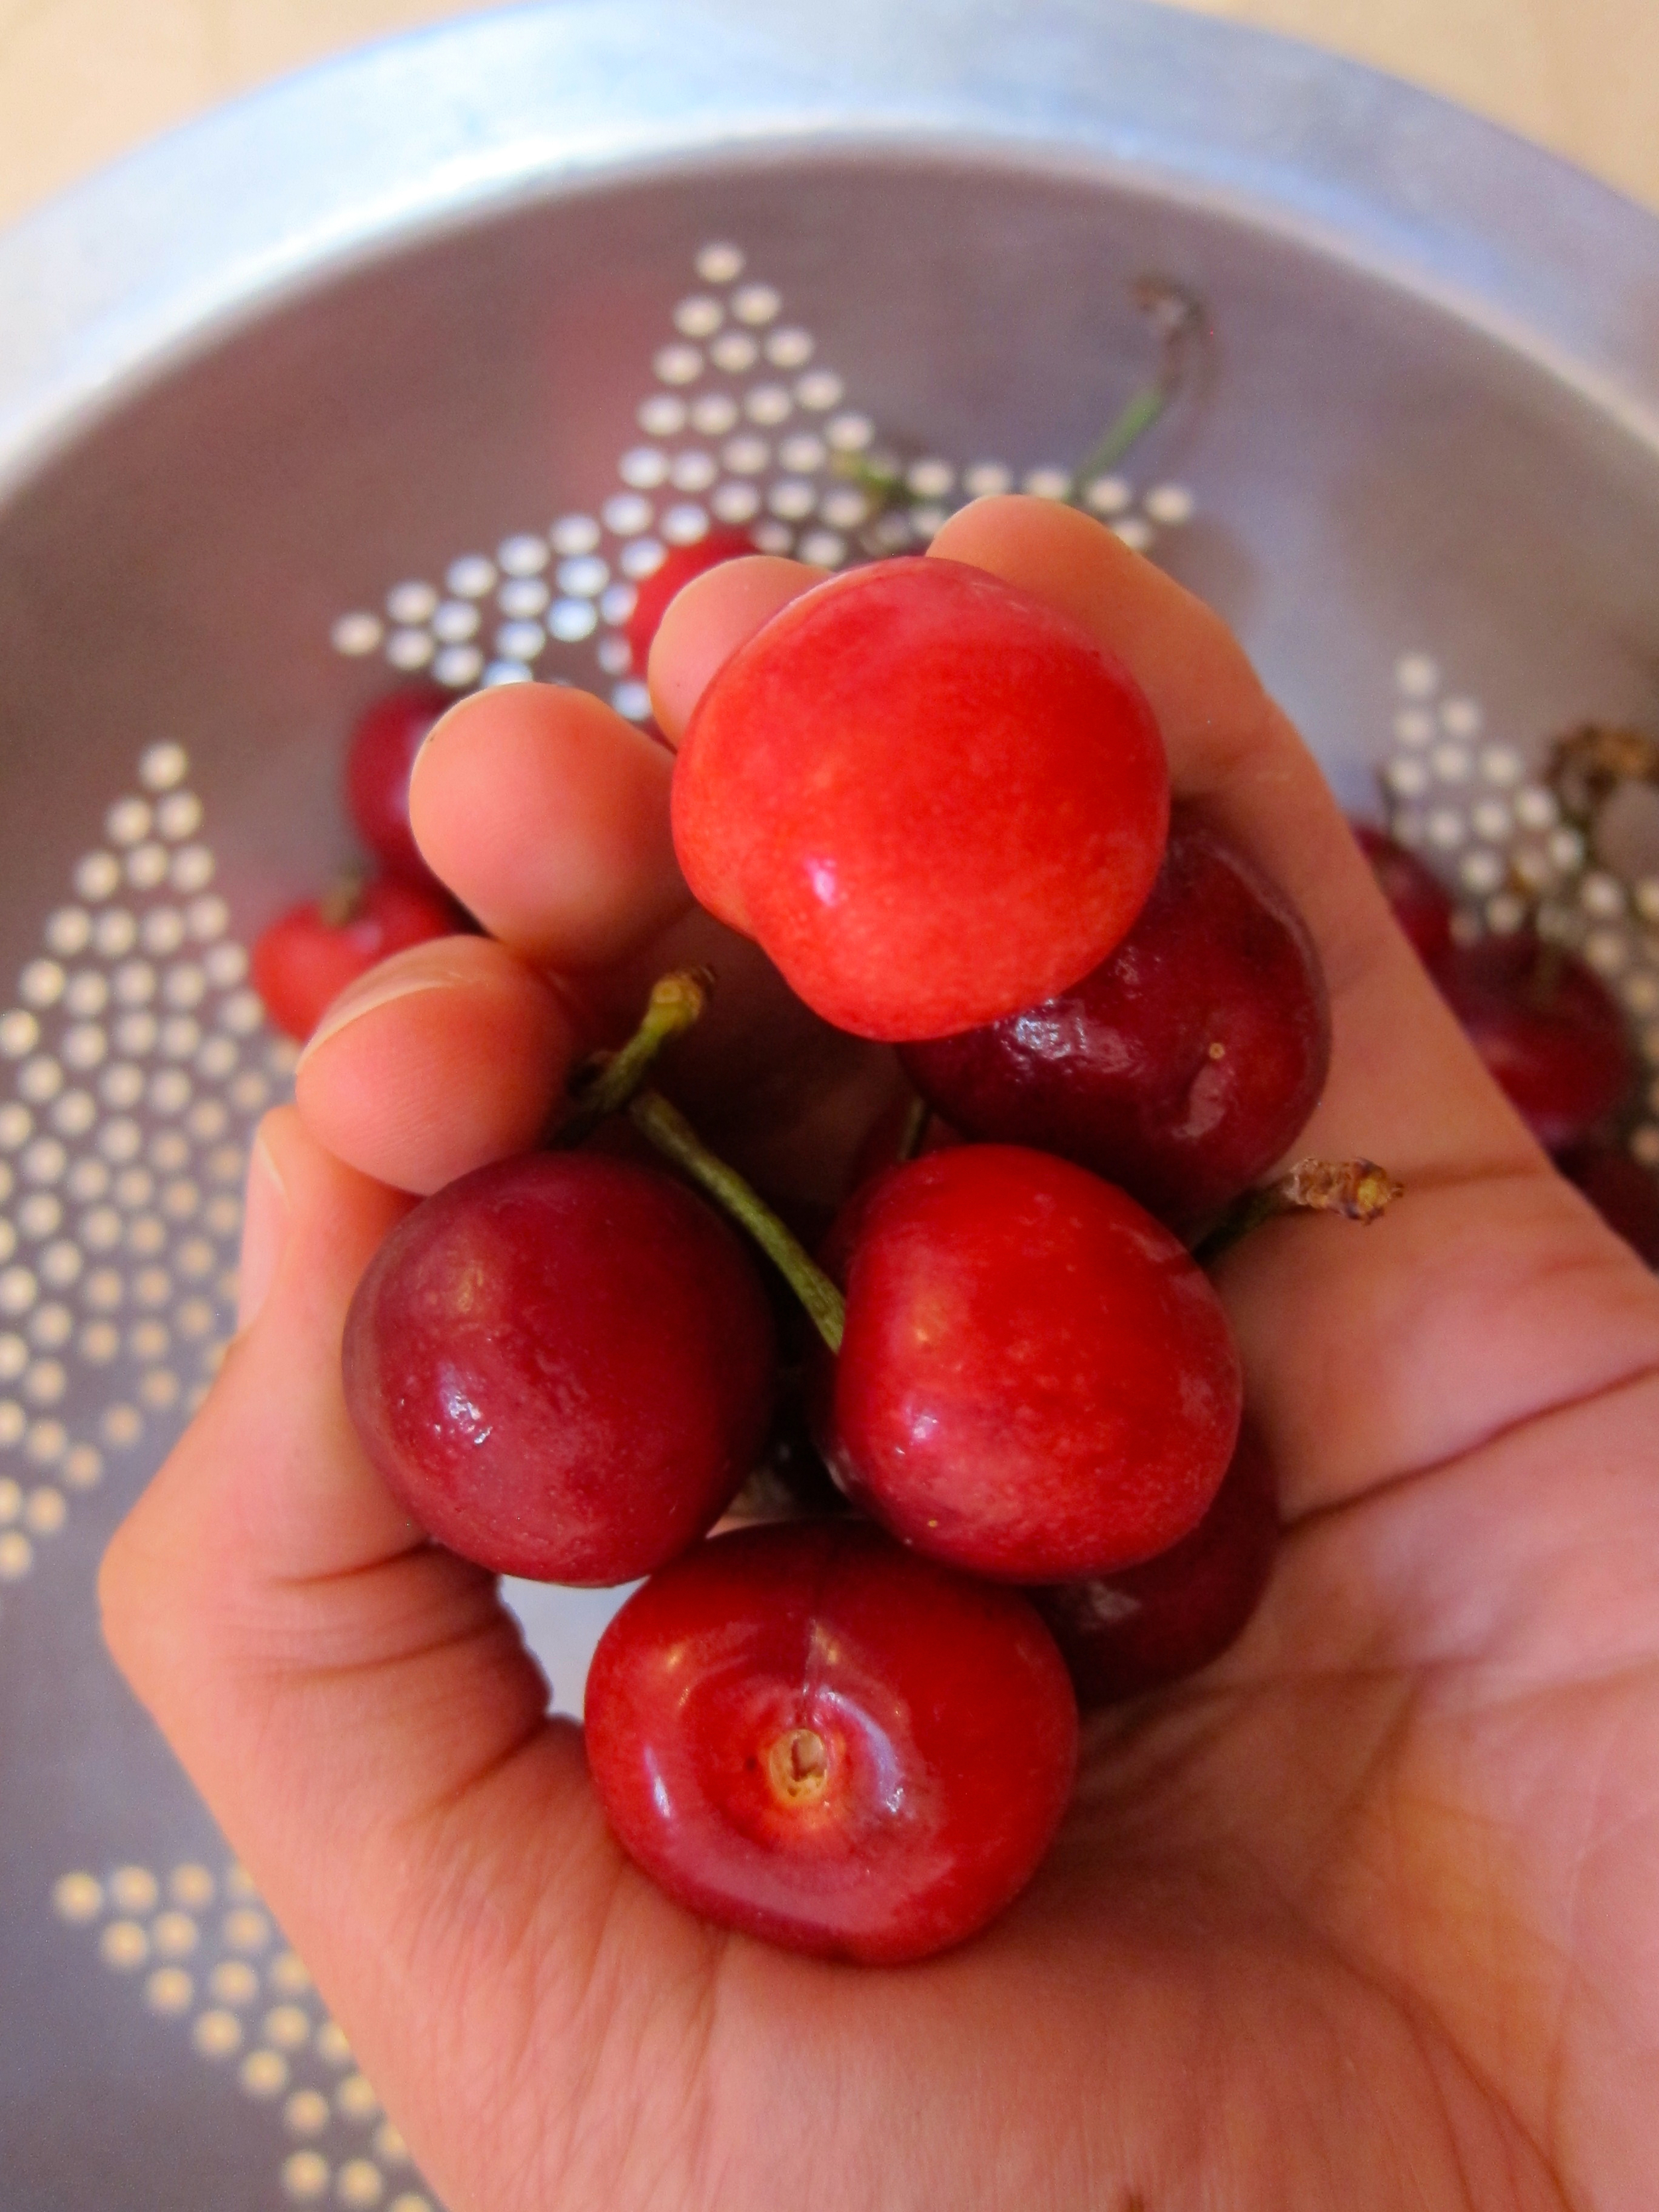
Heat water, sugar, lemon juice and vanilla bean (scrapings and pod) until simmering. Add cherries and simmer 3 minutes.
Remove from heat, add 1 cup brandy and allow to cool for 5 minutes.
Transfer to clean jars, top with remaining brandy to cover cherries (if needed), and place in refrigerator uncovered until completely cool. Once cool, top with jar lids. Cherries may be eaten after 24 hours and will keep about 4-6 months refrigerated.

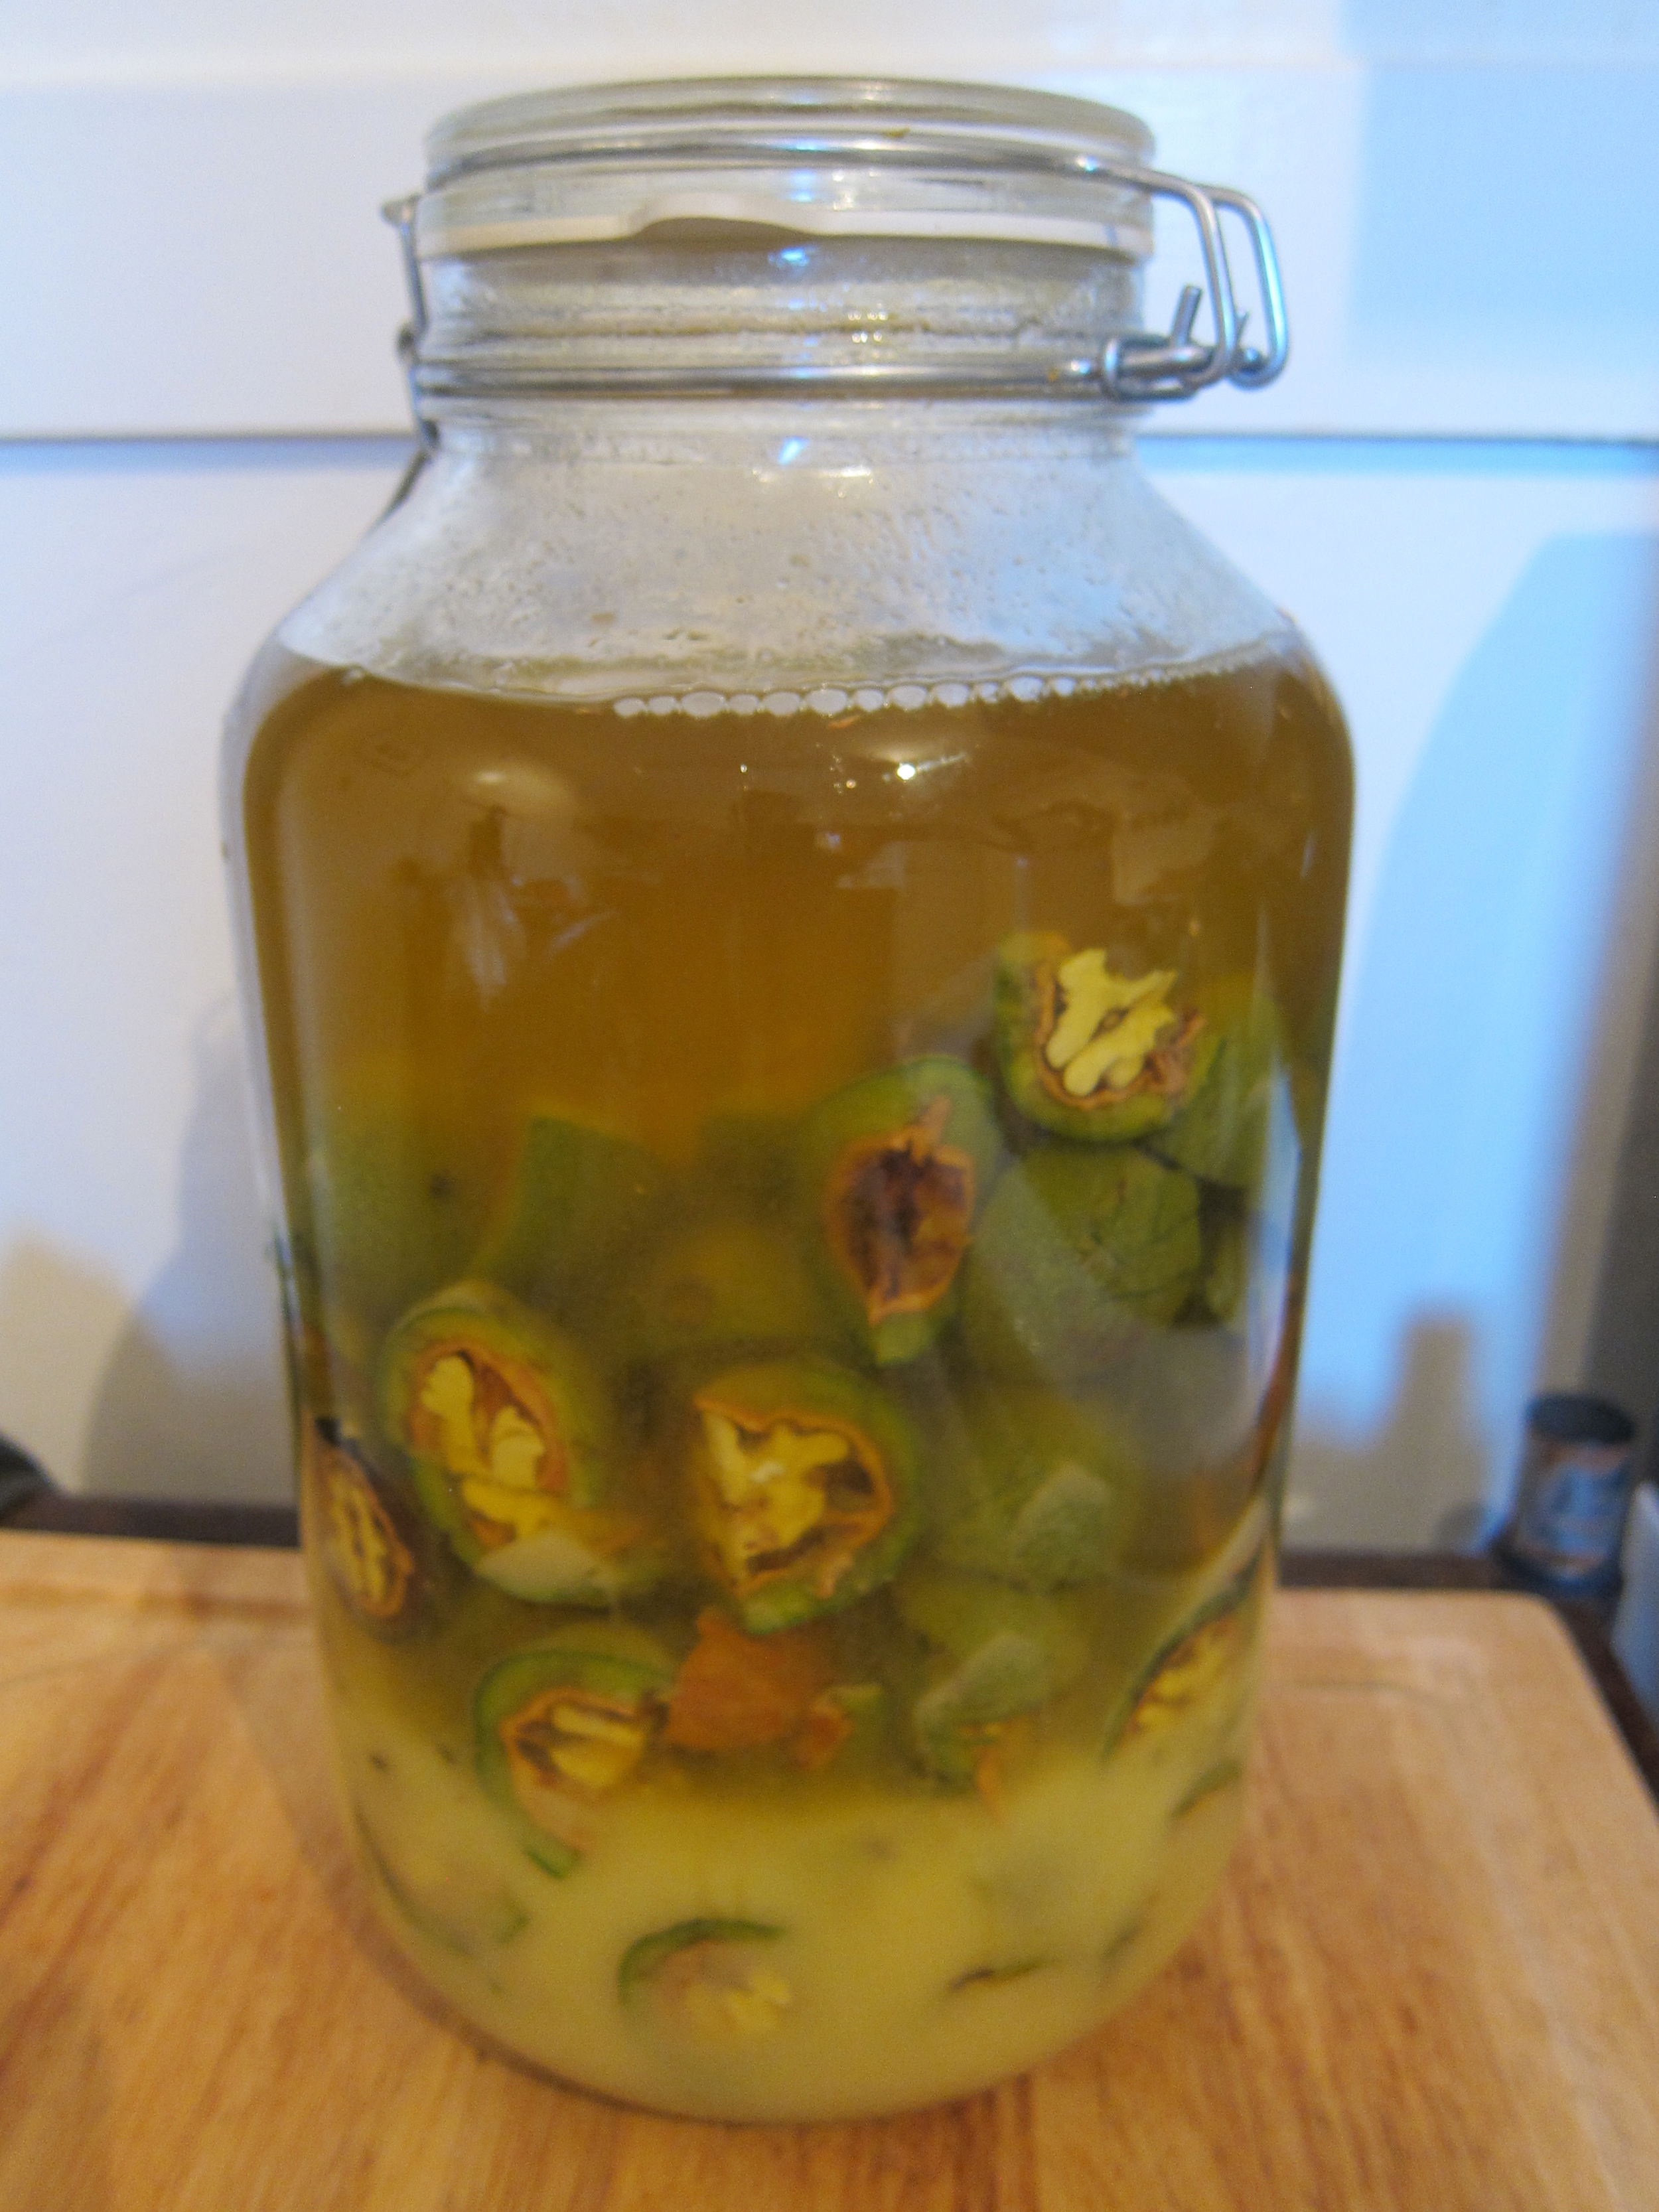
Homemade Nocino
Italian green walnut liqueur.

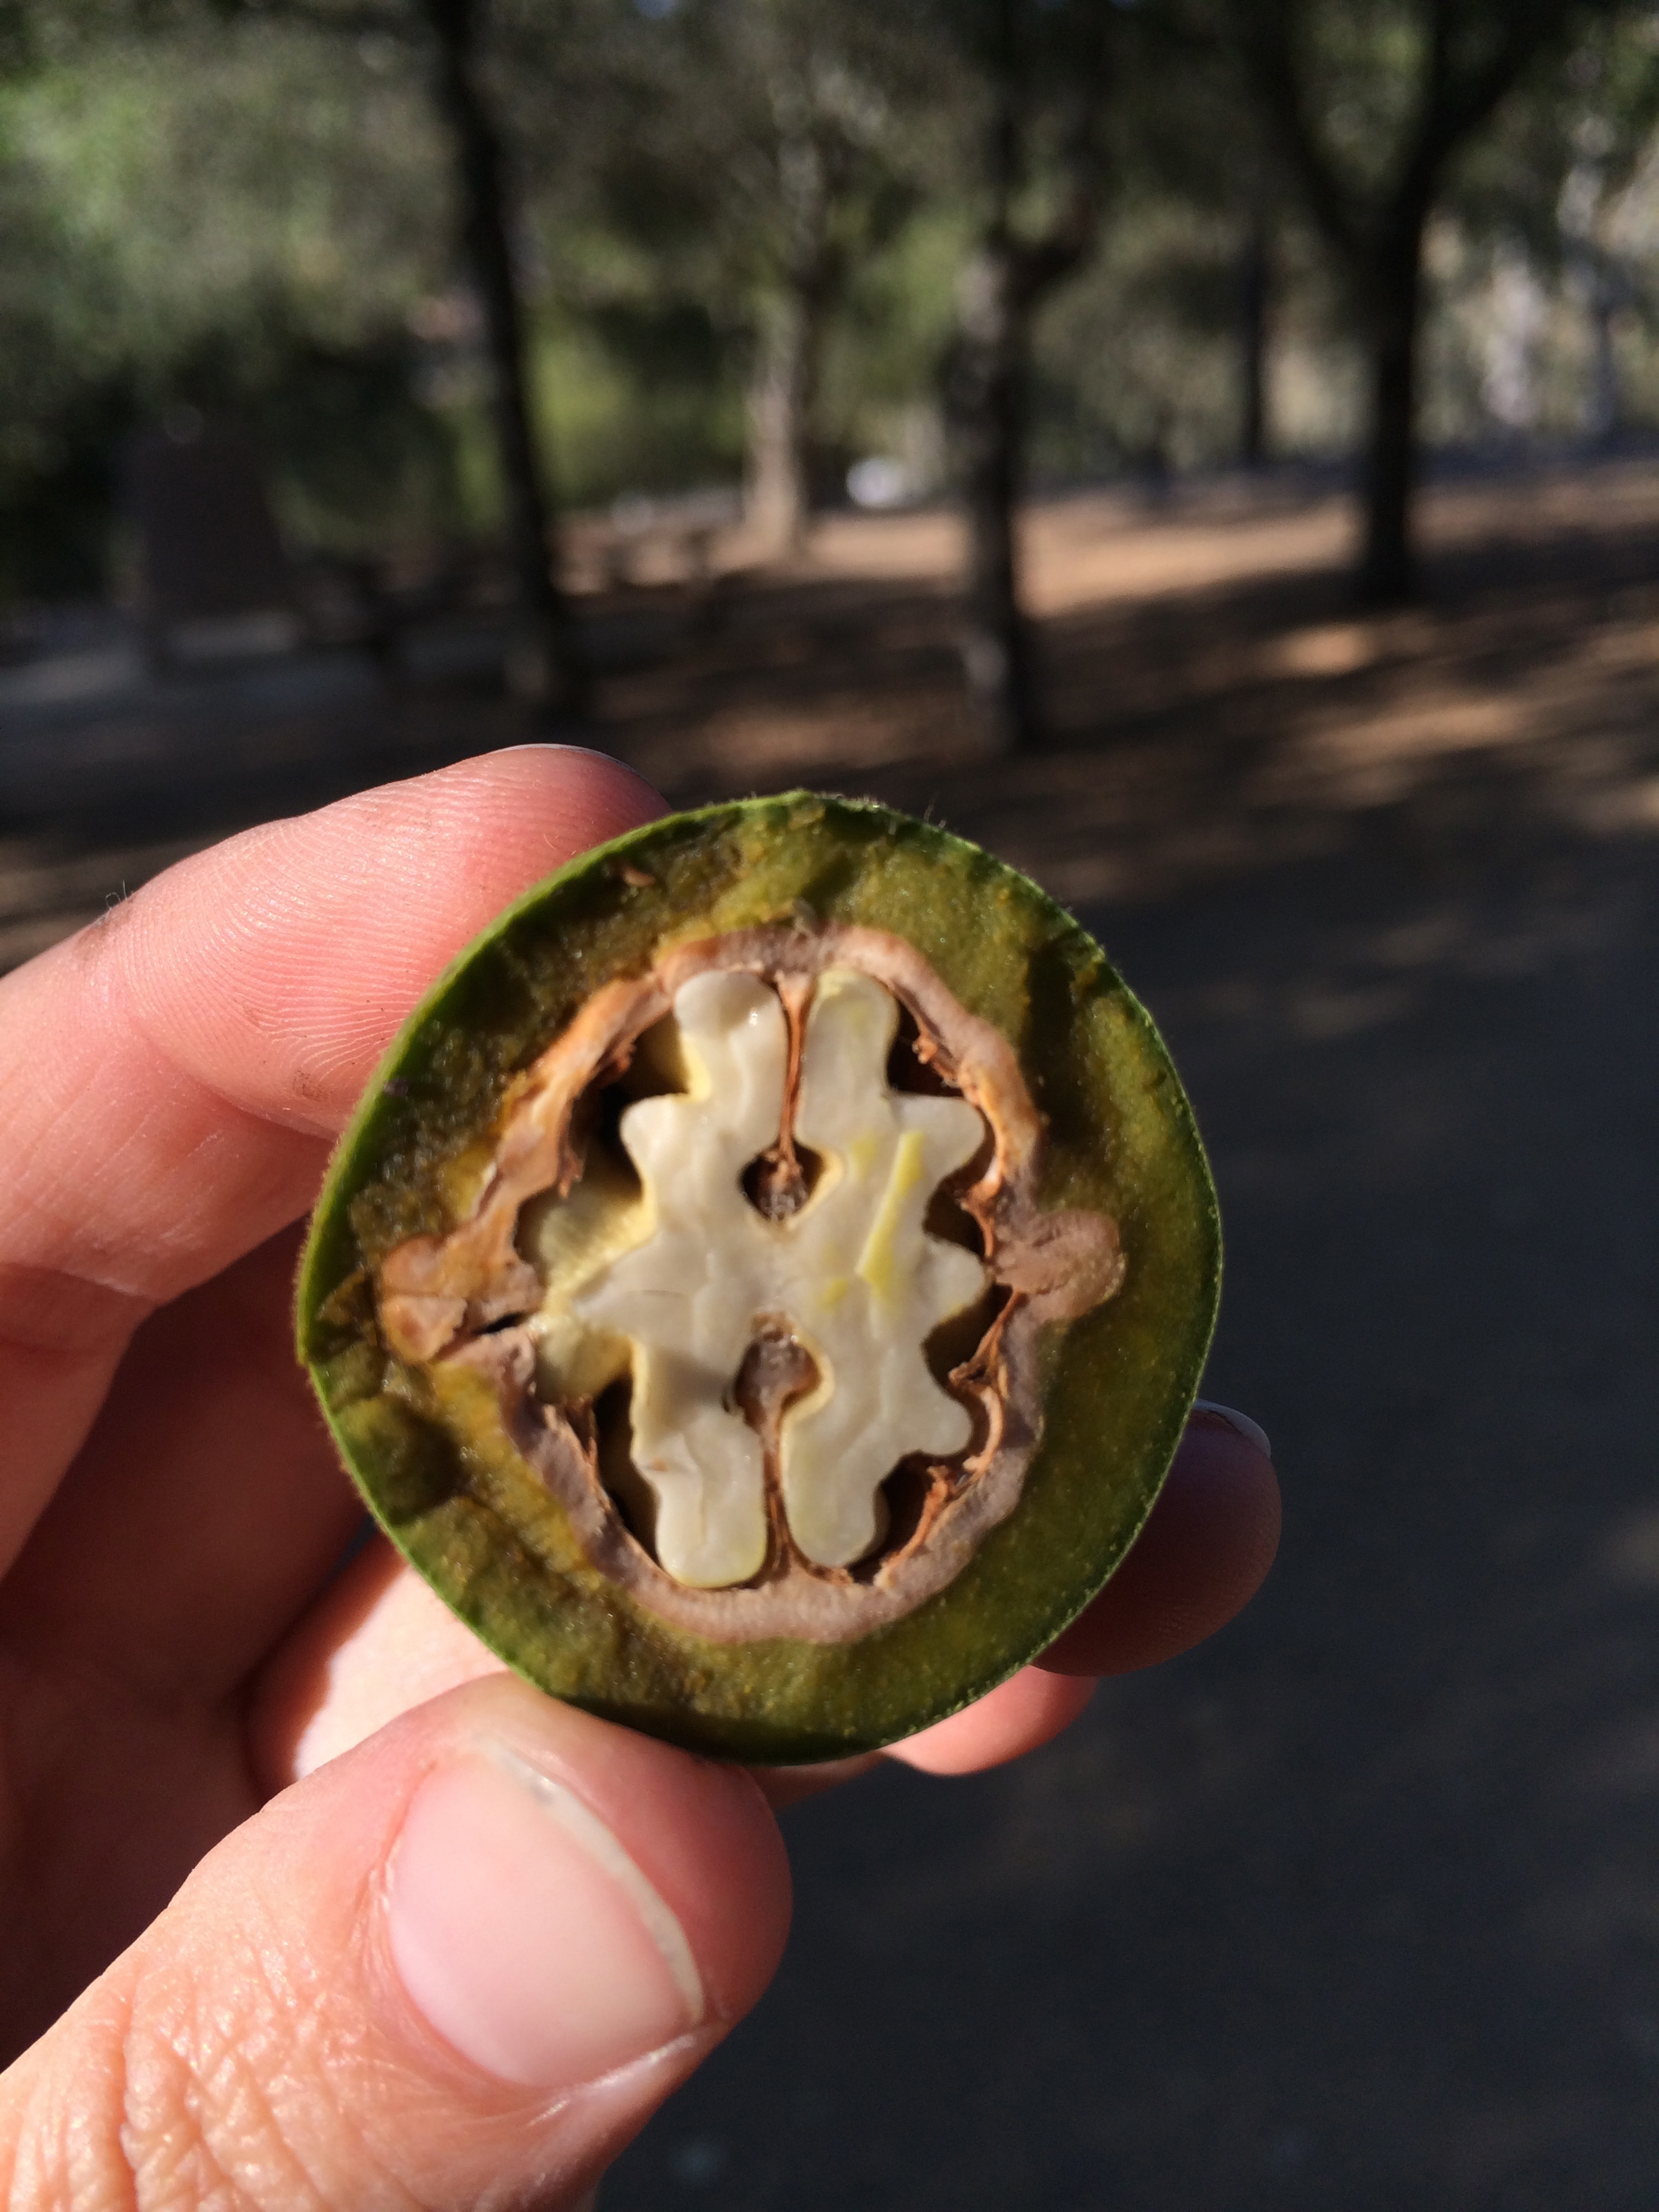
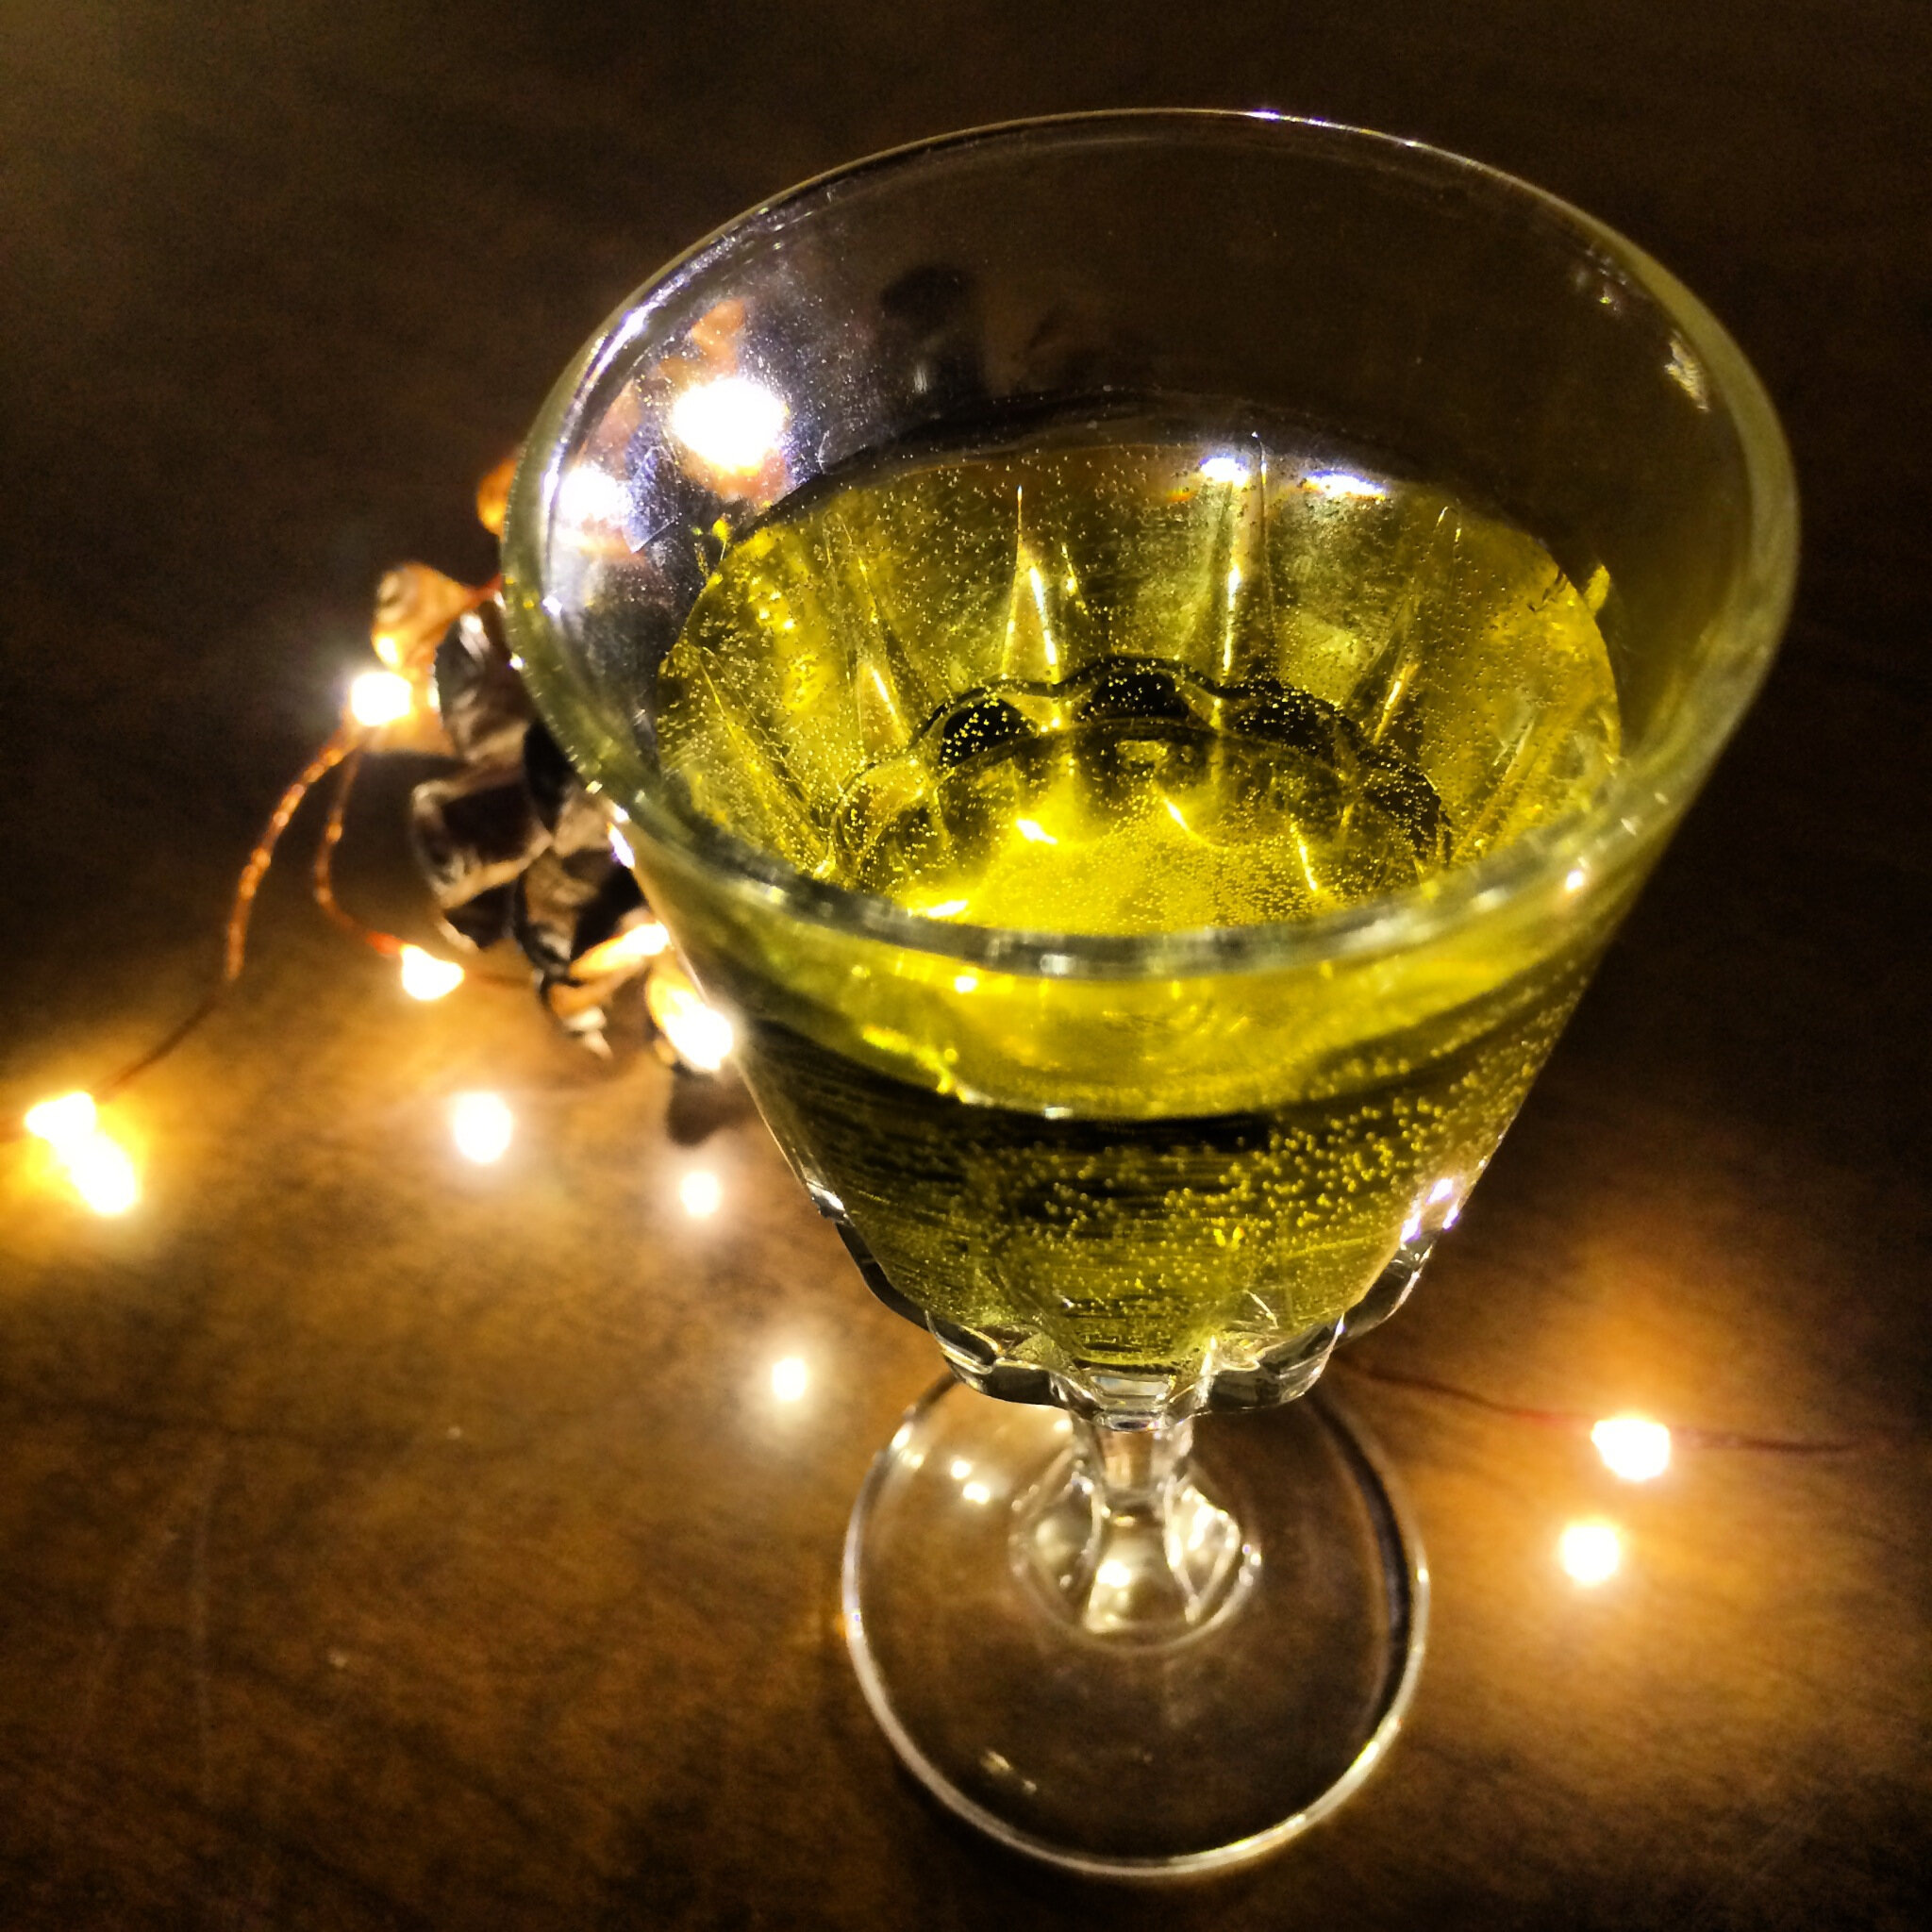
Nocino is an Italian liqueur made from fresh green walnuts that are cured in a sugar and alcohol solution. I first discovered this "black gold" while dining at Flour + Water in San Francisco and have been making it each season for the past three years since. The amazing think about nocino is by adding incredibly tannic walnuts, clear sugary alcohol is magically transformed into a thick, luscious, nearly black liqueur.
Making nocino requires a few steps and a lot of patience, but the results are worth it! I love it on it's own after dinner, but have also used it in in cocktails and to top ice cream (with crushed toasted walnuts as well, of course).
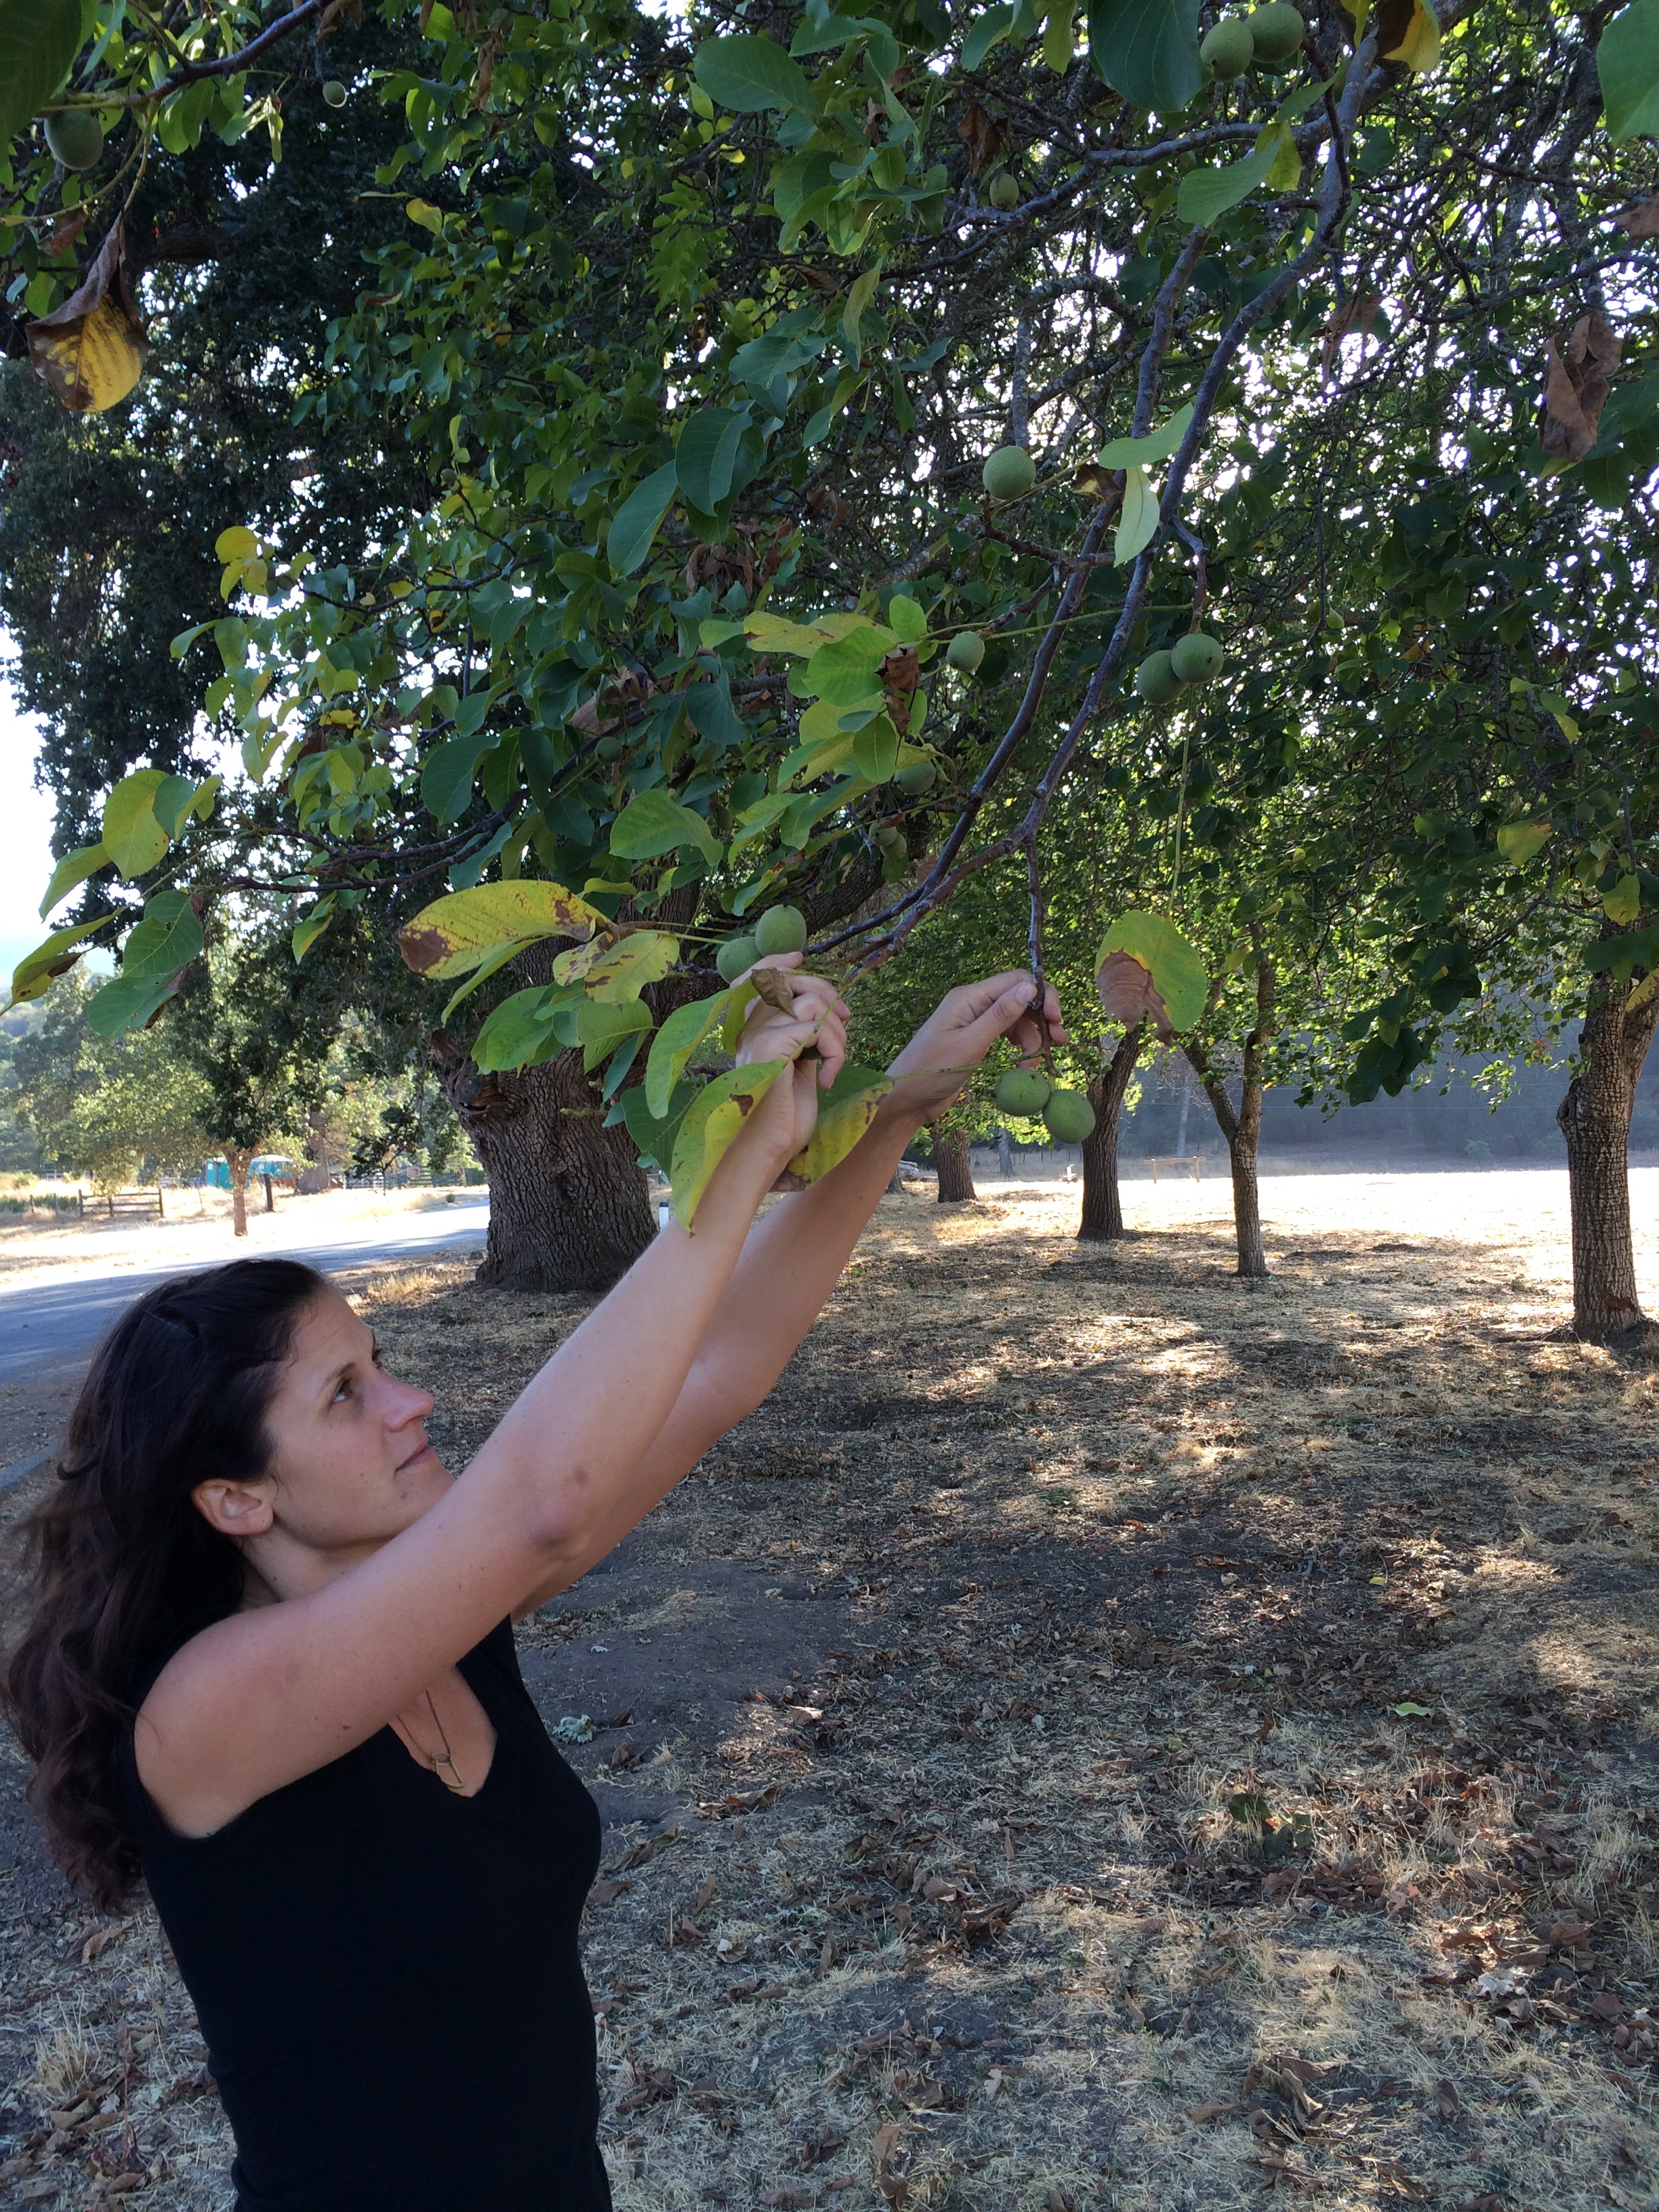
The green walnuts you're looking for are only available in May/June (traditionally harvested on June 24th, the day of St.John the Baptist, by virgins) and quite hard to come by. The first time that I made nocino I was able to find some through the Capay Valley Farms CSA I started up at work, but the last two years I went ahead and foraged them.
The most recent batch that we made was using walnuts picked in September, which is much later than desired (oops - too many food projects!) The walnuts were very hard to cut through because the shell had begun to harden and we're not sure how this is going to affect the flavor of the nocino, but we went ahead and made it anyway. We'll see in 6 months - if it's anything like the last couple of batches, it will be more than drinkable! As the recipe is written it makes about 2 liters of nocino, but the recipe can be multiplied as necessary for the amount of walnuts that you have on hand. Remember that green walnuts stain - if you're concerned with having inky looking fingers for a week, be sure to wear gloves.
“Walnut trees grow in hot, dry climates. Look for them if you’re camping in the South Bay - that’s where we found them, but we’re not going to reveal our source!”
“I like to keep my nocino pure, in order to be able to taste the walnutty goodness, but have tried vanilla bean and it was a nice addition, especially if you’re planning on using nocino for ice cream topping.”
4-1/4 cups granulate sugar
1.75 liters of Everclear (Vodka also works, but not as well)
50 green walnuts
Other ingredients- citrus peel, cinnamon sticks, pepper, vanilla bean, etc.
Wash 4 half-gallon mason jars well with hot soapy water, rinse, and air dry.
While jars are drying, quarter walnuts then divide into jars with 1/4 each of the Everclear and sugar. Screw the lids tightly onto jars and shake vigorously. Over time the nocino liquid will darken. It happens quite fast and it's pretty impressive! Allow jars to sit for 6 weeks in a cool dark place, shaking occasionally to dissolve sugar.
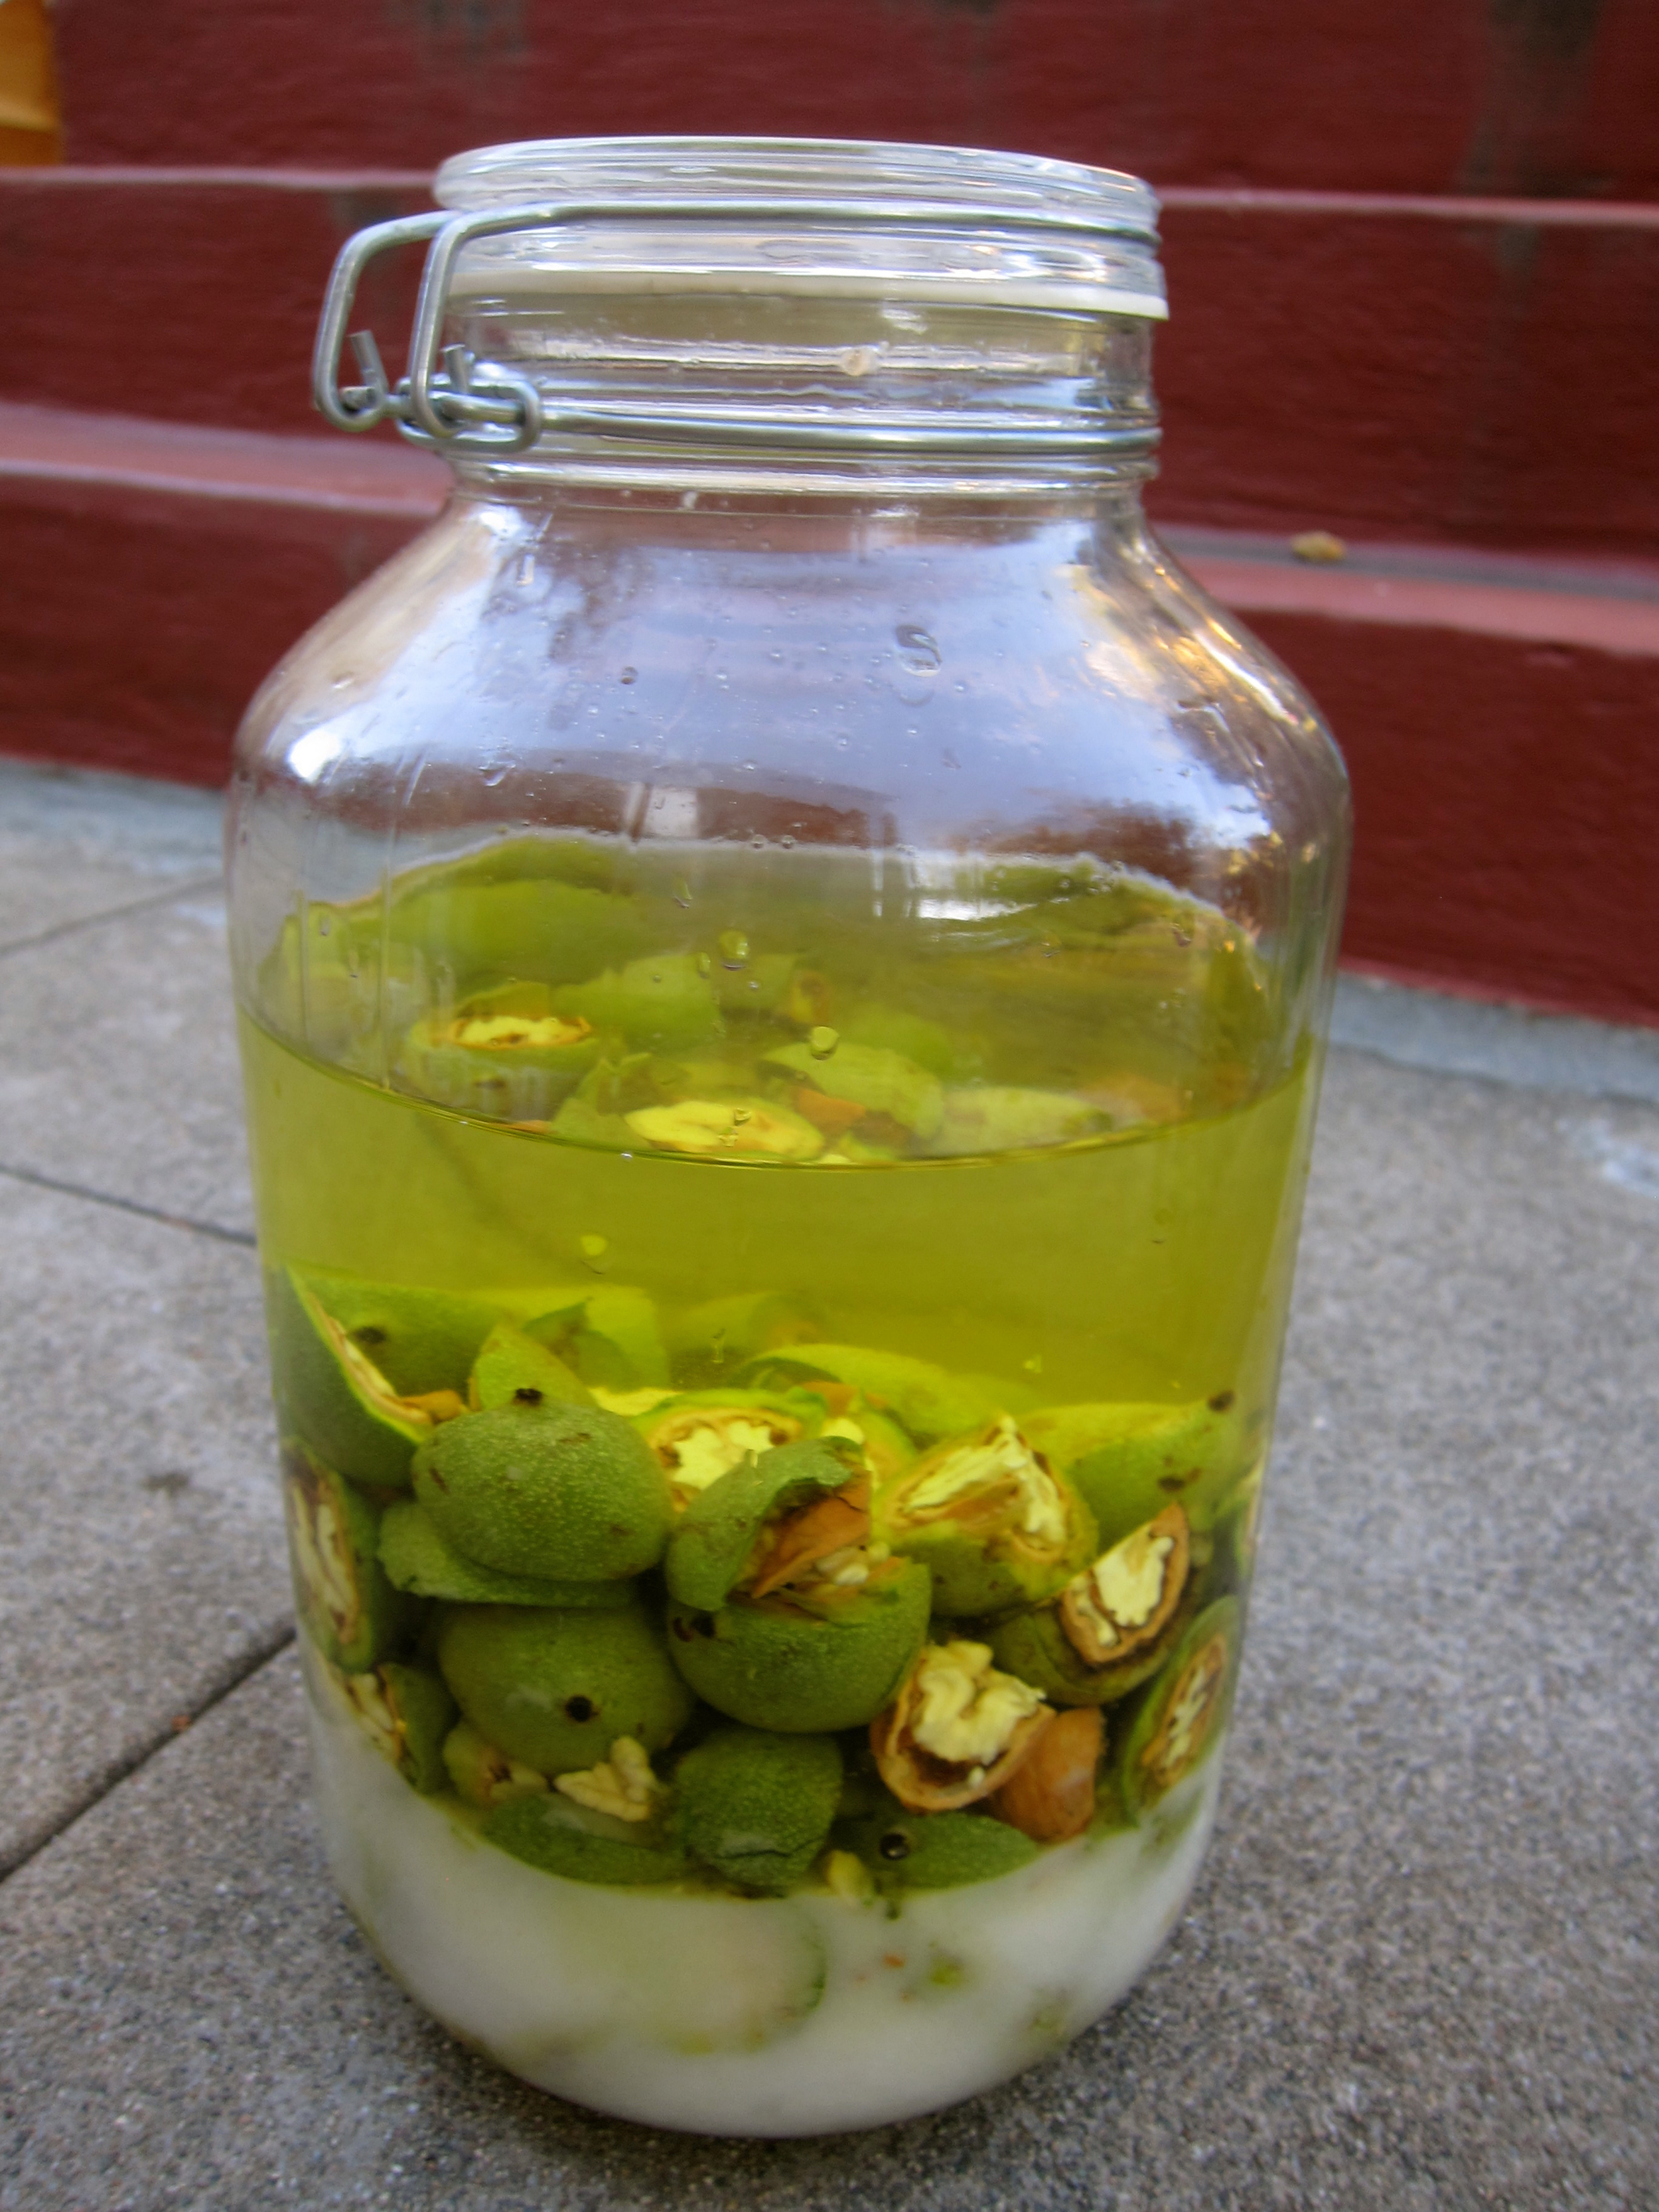

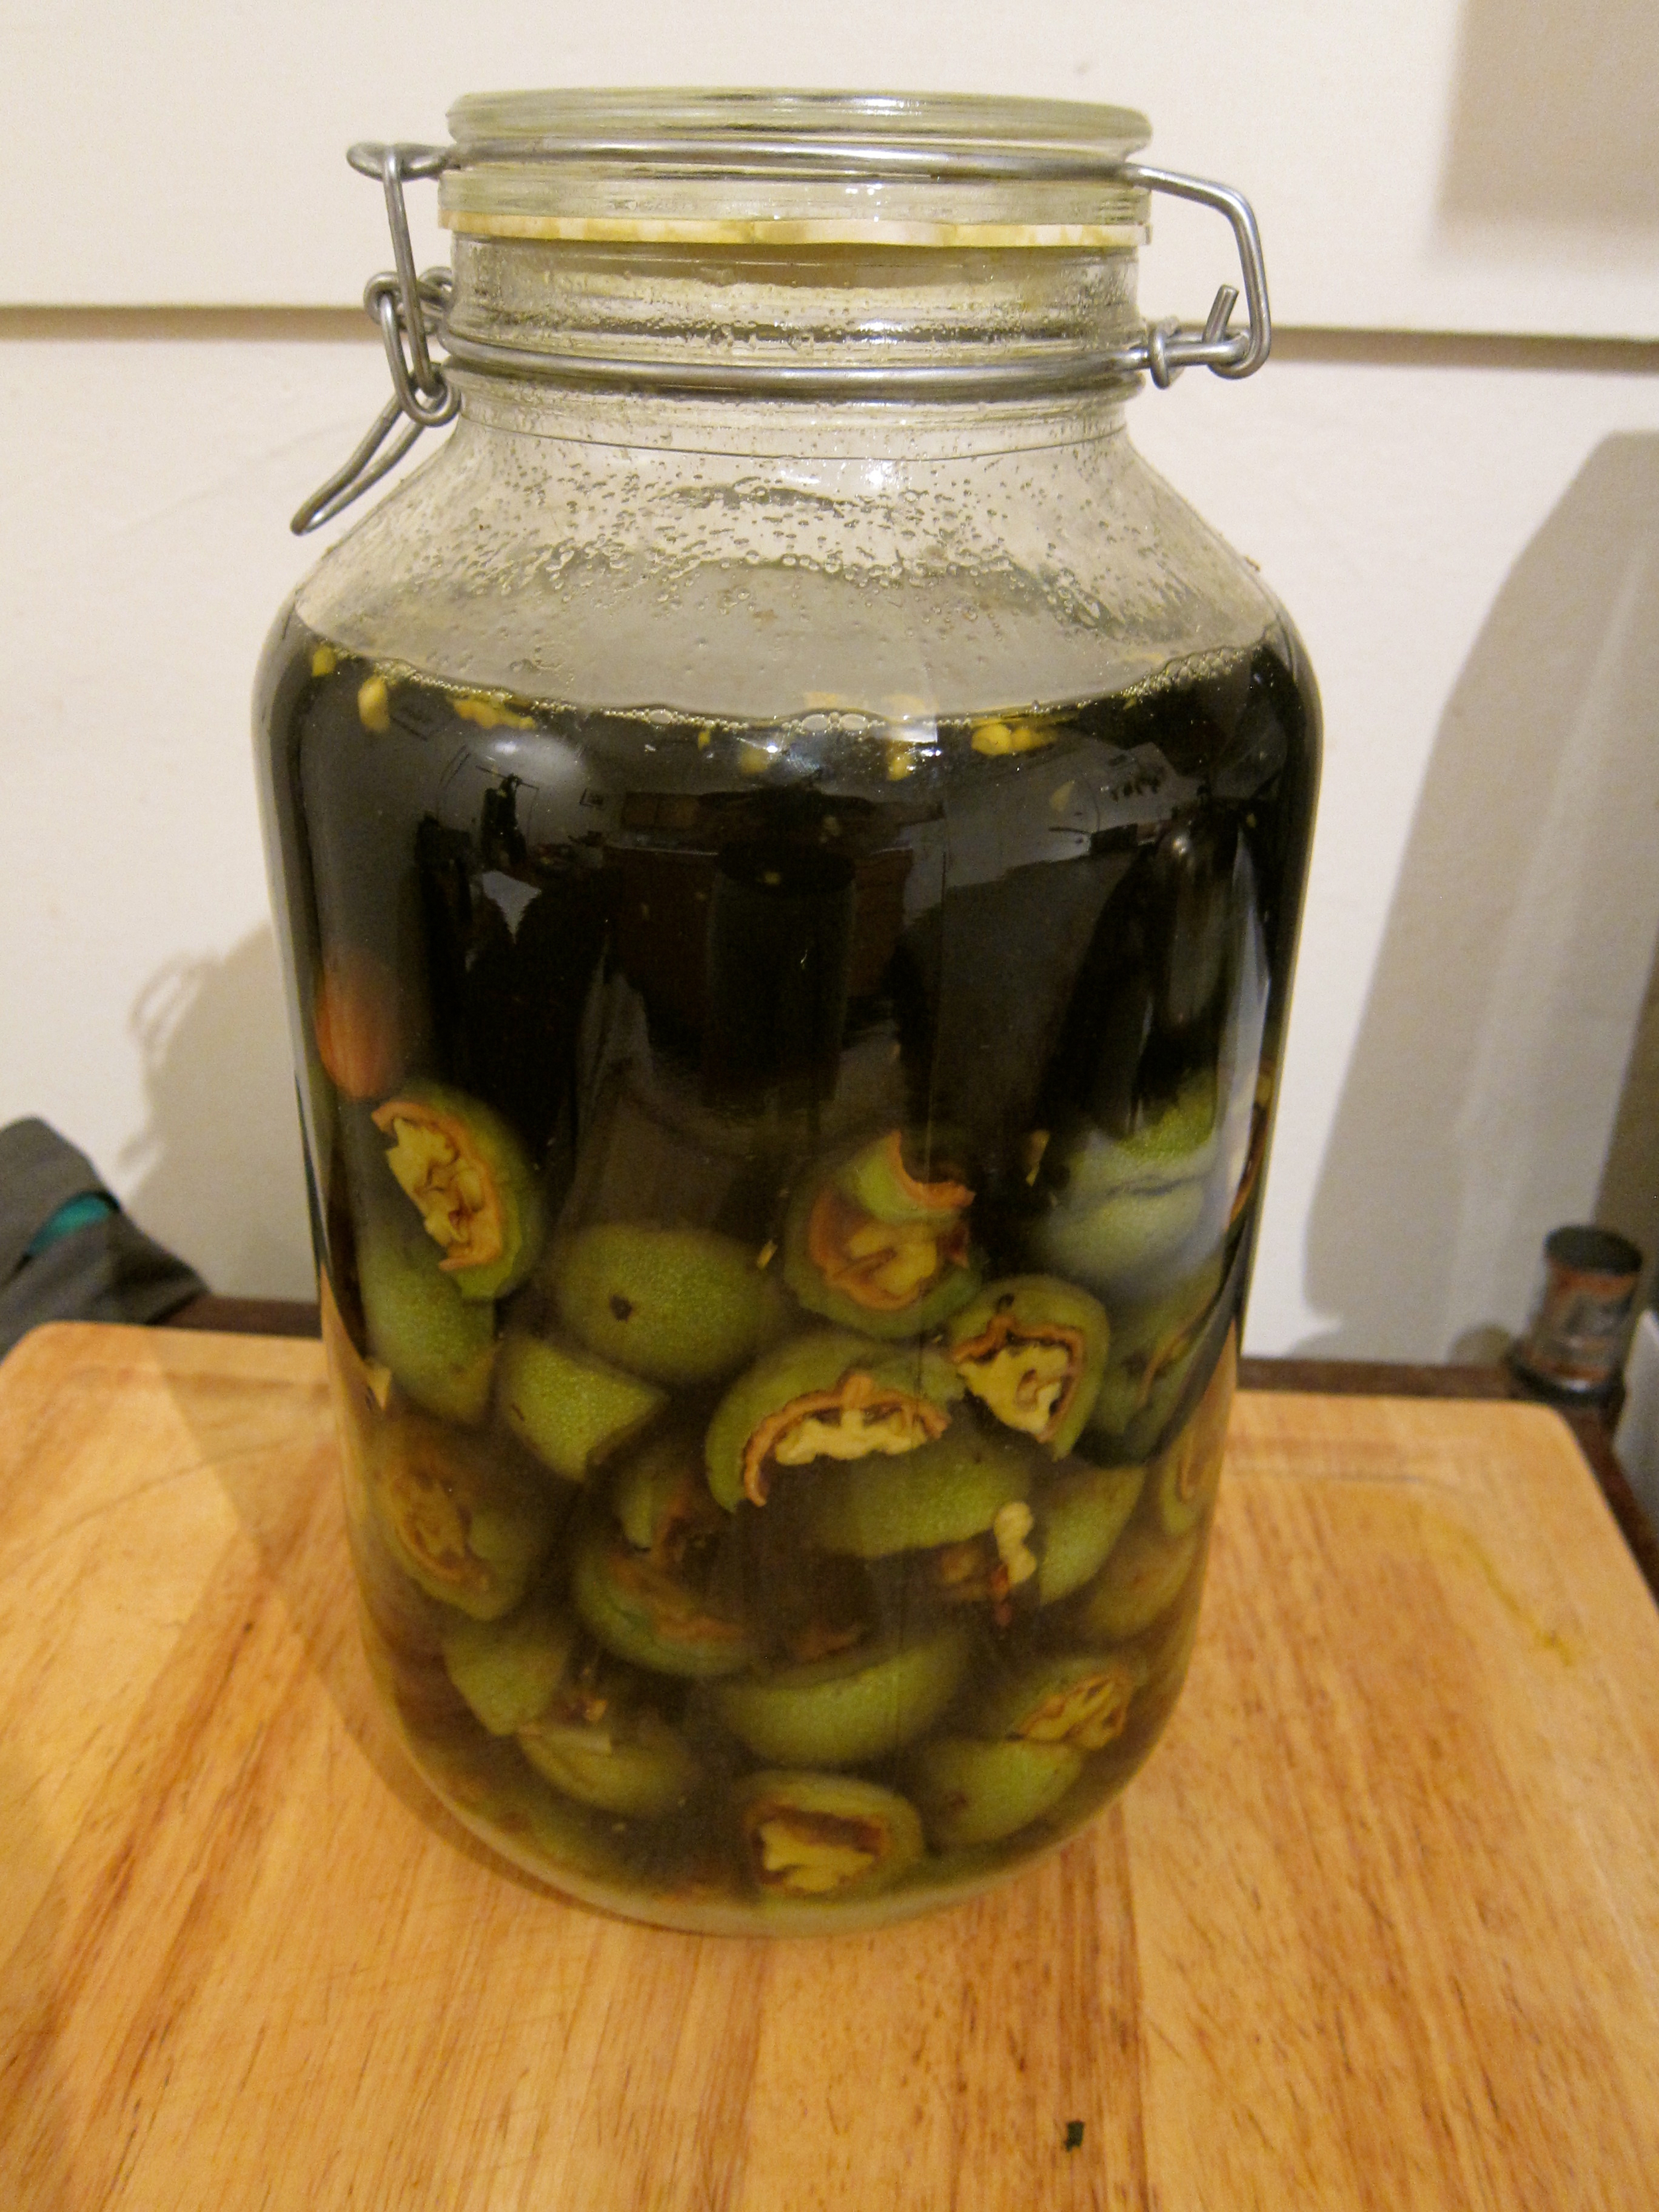
Using a cheesecloth or fine mesh strainer, strain the liquid and discard the walnuts. Add any other ingredients of your choosing (vanilla bean, orange peel, etc.) and pour nocino from the jars into smaller bottles. Close bottles and let the liqueur marinate for another 6 months to 1 year. You can taste the nocino as it rests to learn about the flavor changes and begin drinking once it's to your liking.
If walnuts are harvested too late in the season, the shells will have started to harden.
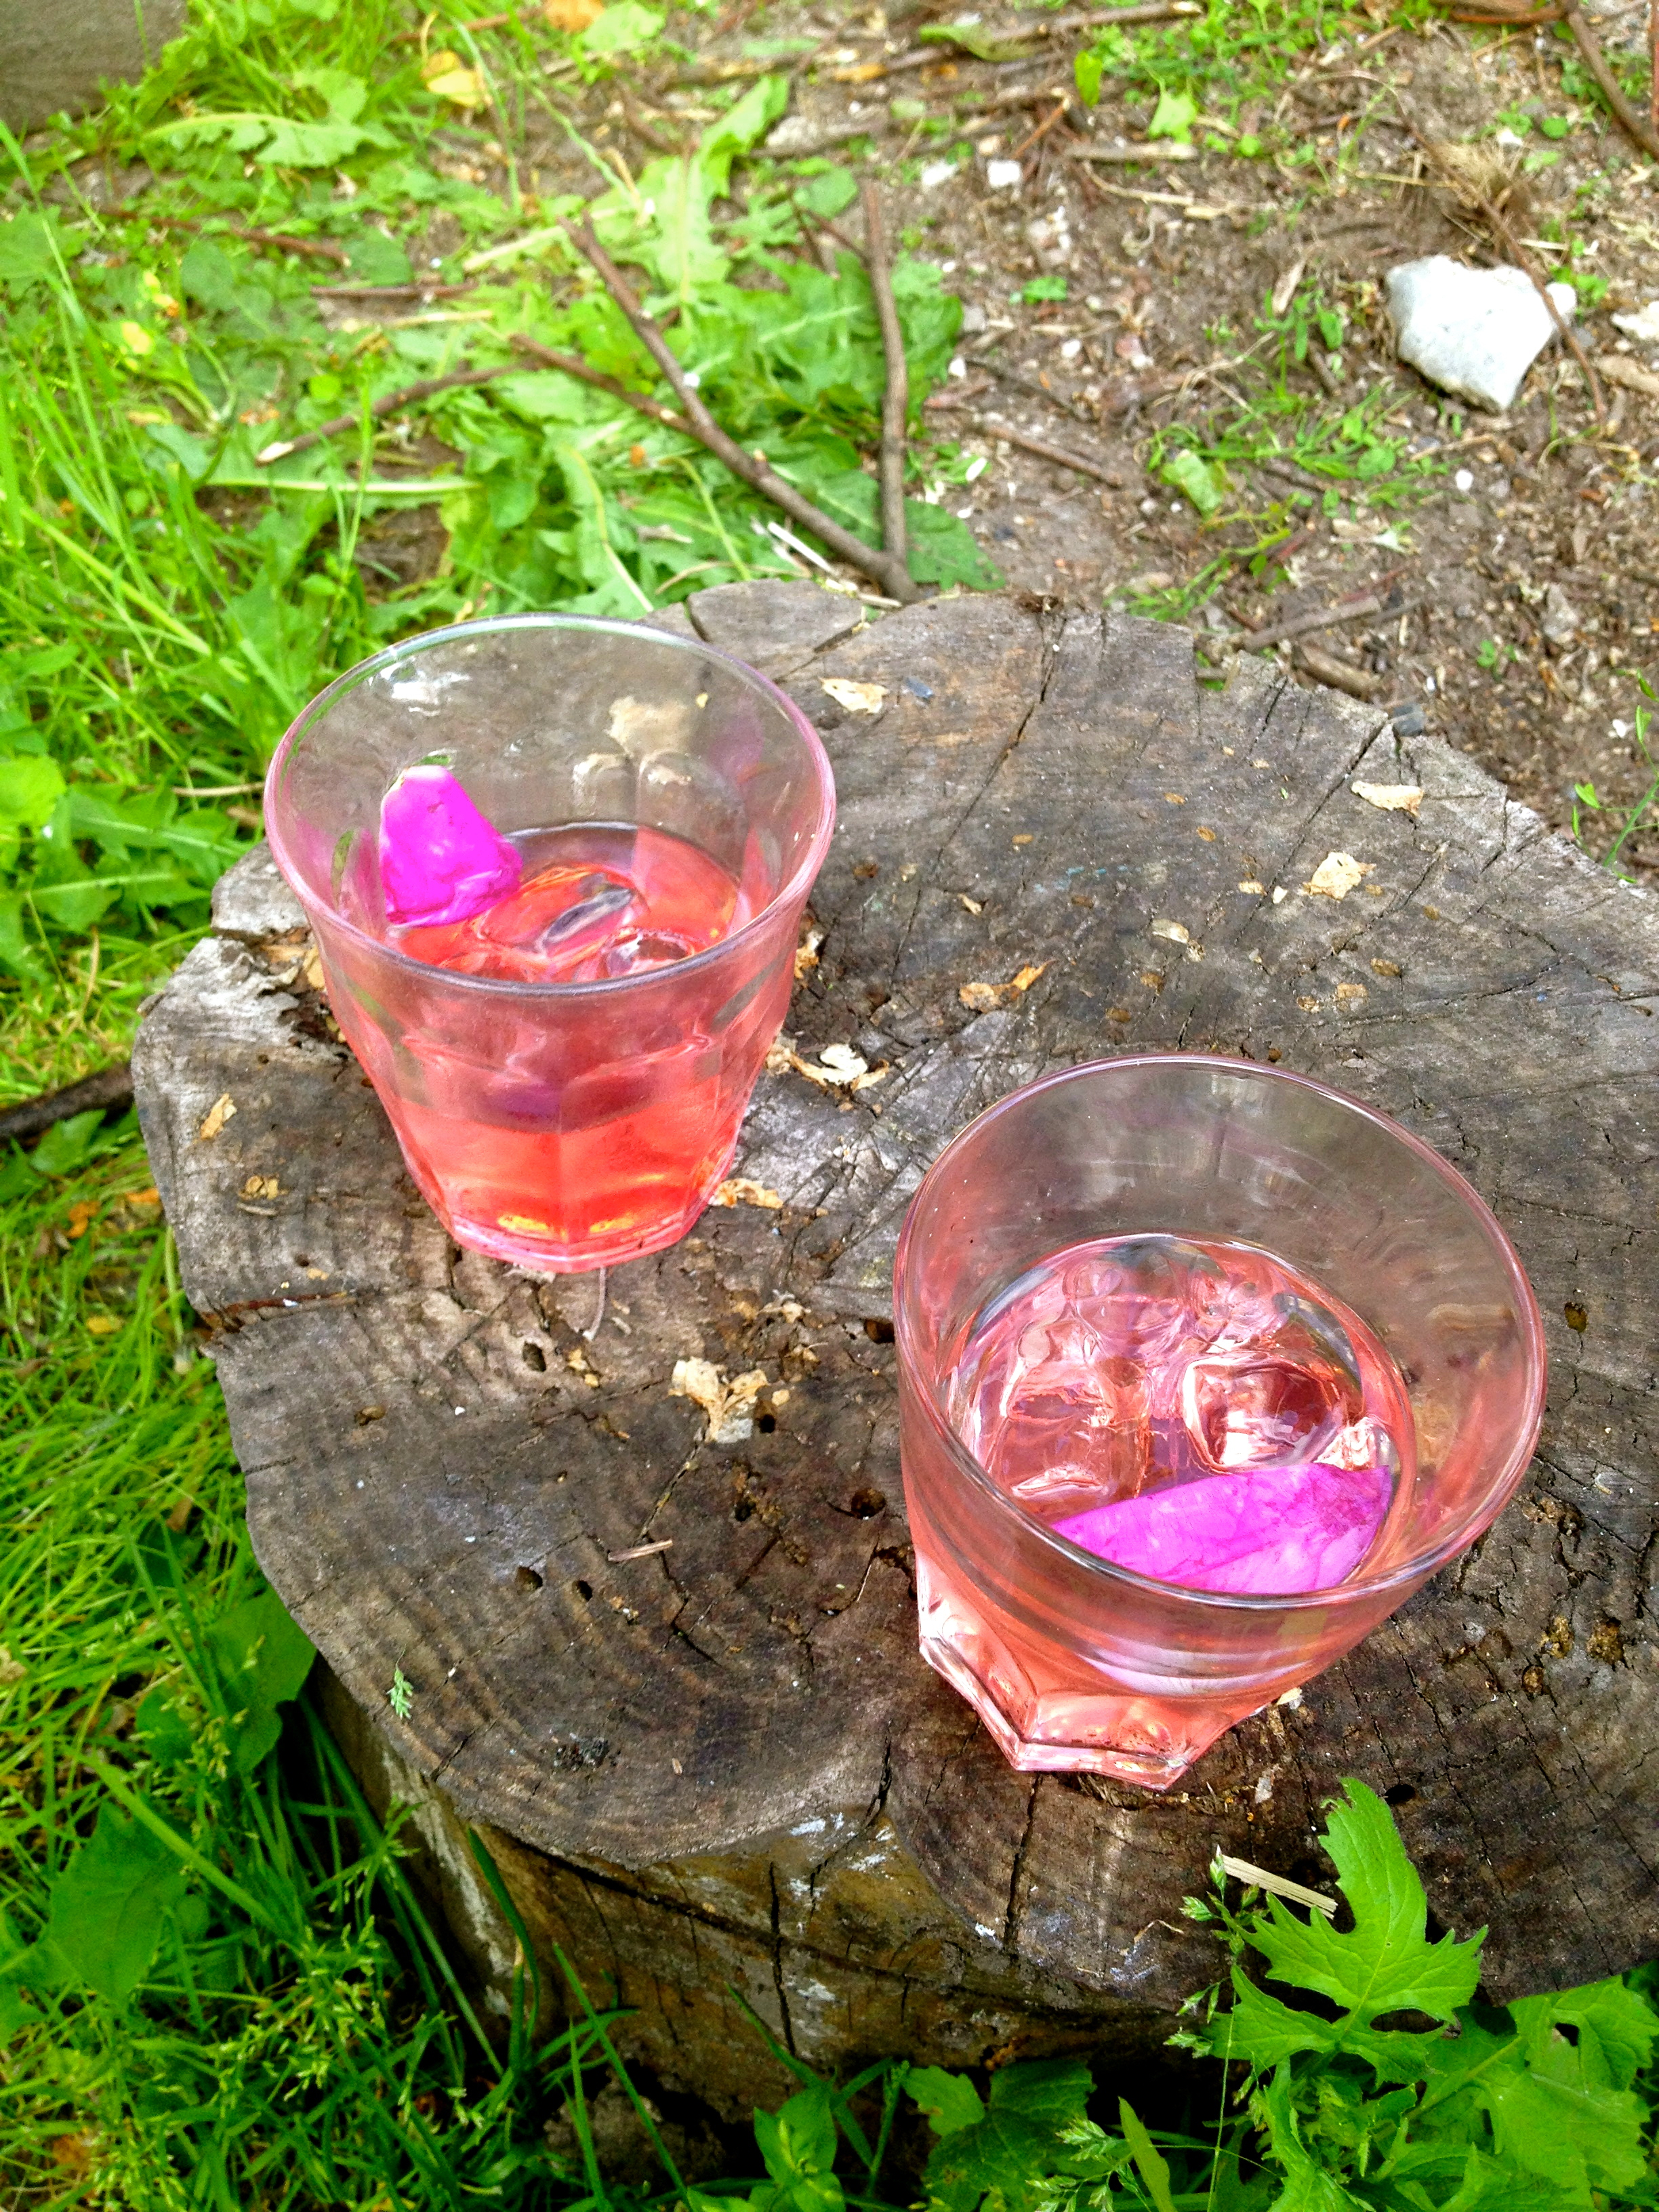
Dandelion Wine: Aged 6 months
Tasting summer.

Last June I made wine from foraged dandelion flowers that would otherwise be considered weeds. I read that in the darkest days of winter, some cultures will pull out the aged dandelion wine, usually on winter solstice, for a taste of summer. This idea intrigued me a sparked the impetus for a winter solstice party.
After 6 months, the wine had a beautiful golden color, lovely vegetal/pollen aroma and taste, and slight effervescence. Although it could use another few months of aging for a more balanced flavor, it’s definitely off to a great start. Until then!
Update in June 2014: I believe we waiting too long and the dandelion wine is now more of a vinegar! Noted for next time I make dandelion wine, at 6 months it tastes pretty good and should be tasted every month thereafter to determine when it's at its peak.
Full dandelion wine making process can be found here.

The Danish Summer cocktail
Not just for old Scandinavian men - but they'll drink it too.

Yes - Denmark does have a summer. It's similar to June in the Bay Area, but with about 4 hours of darkness and even more revelry on a warm, sunny day. This cocktail was created during my time at the Nordic Food Lab for a staff get-together (complete with amazing food, of course, including fire roasted mussels and pan au tomaquet with ample garlic) and was well-received. Most importantly, I received major cred from the native Danes of the house for using "old man alcohol", aquavit. Who knew? Guess it just runs in my blood!
“Rosa Rugosa, or beach roses, can be found on most coastlines. They have a vibrant pink color and a beautiful floral aroma.”
2 parts aquavit (I had Aalborg)
1 part cranberry juice (good quality, but the kind with added sugar, as this cocktail does require some sweetness)
1 part cold water
Cracked black pepper (okay, maybe that part's not Scandinavian)
Foraged beach rose (or other edible flower garnish)
Stir or shake aquavit, cranberry, and water and pour over ice. Grate black pepper over each drink and garnish with beach rose.
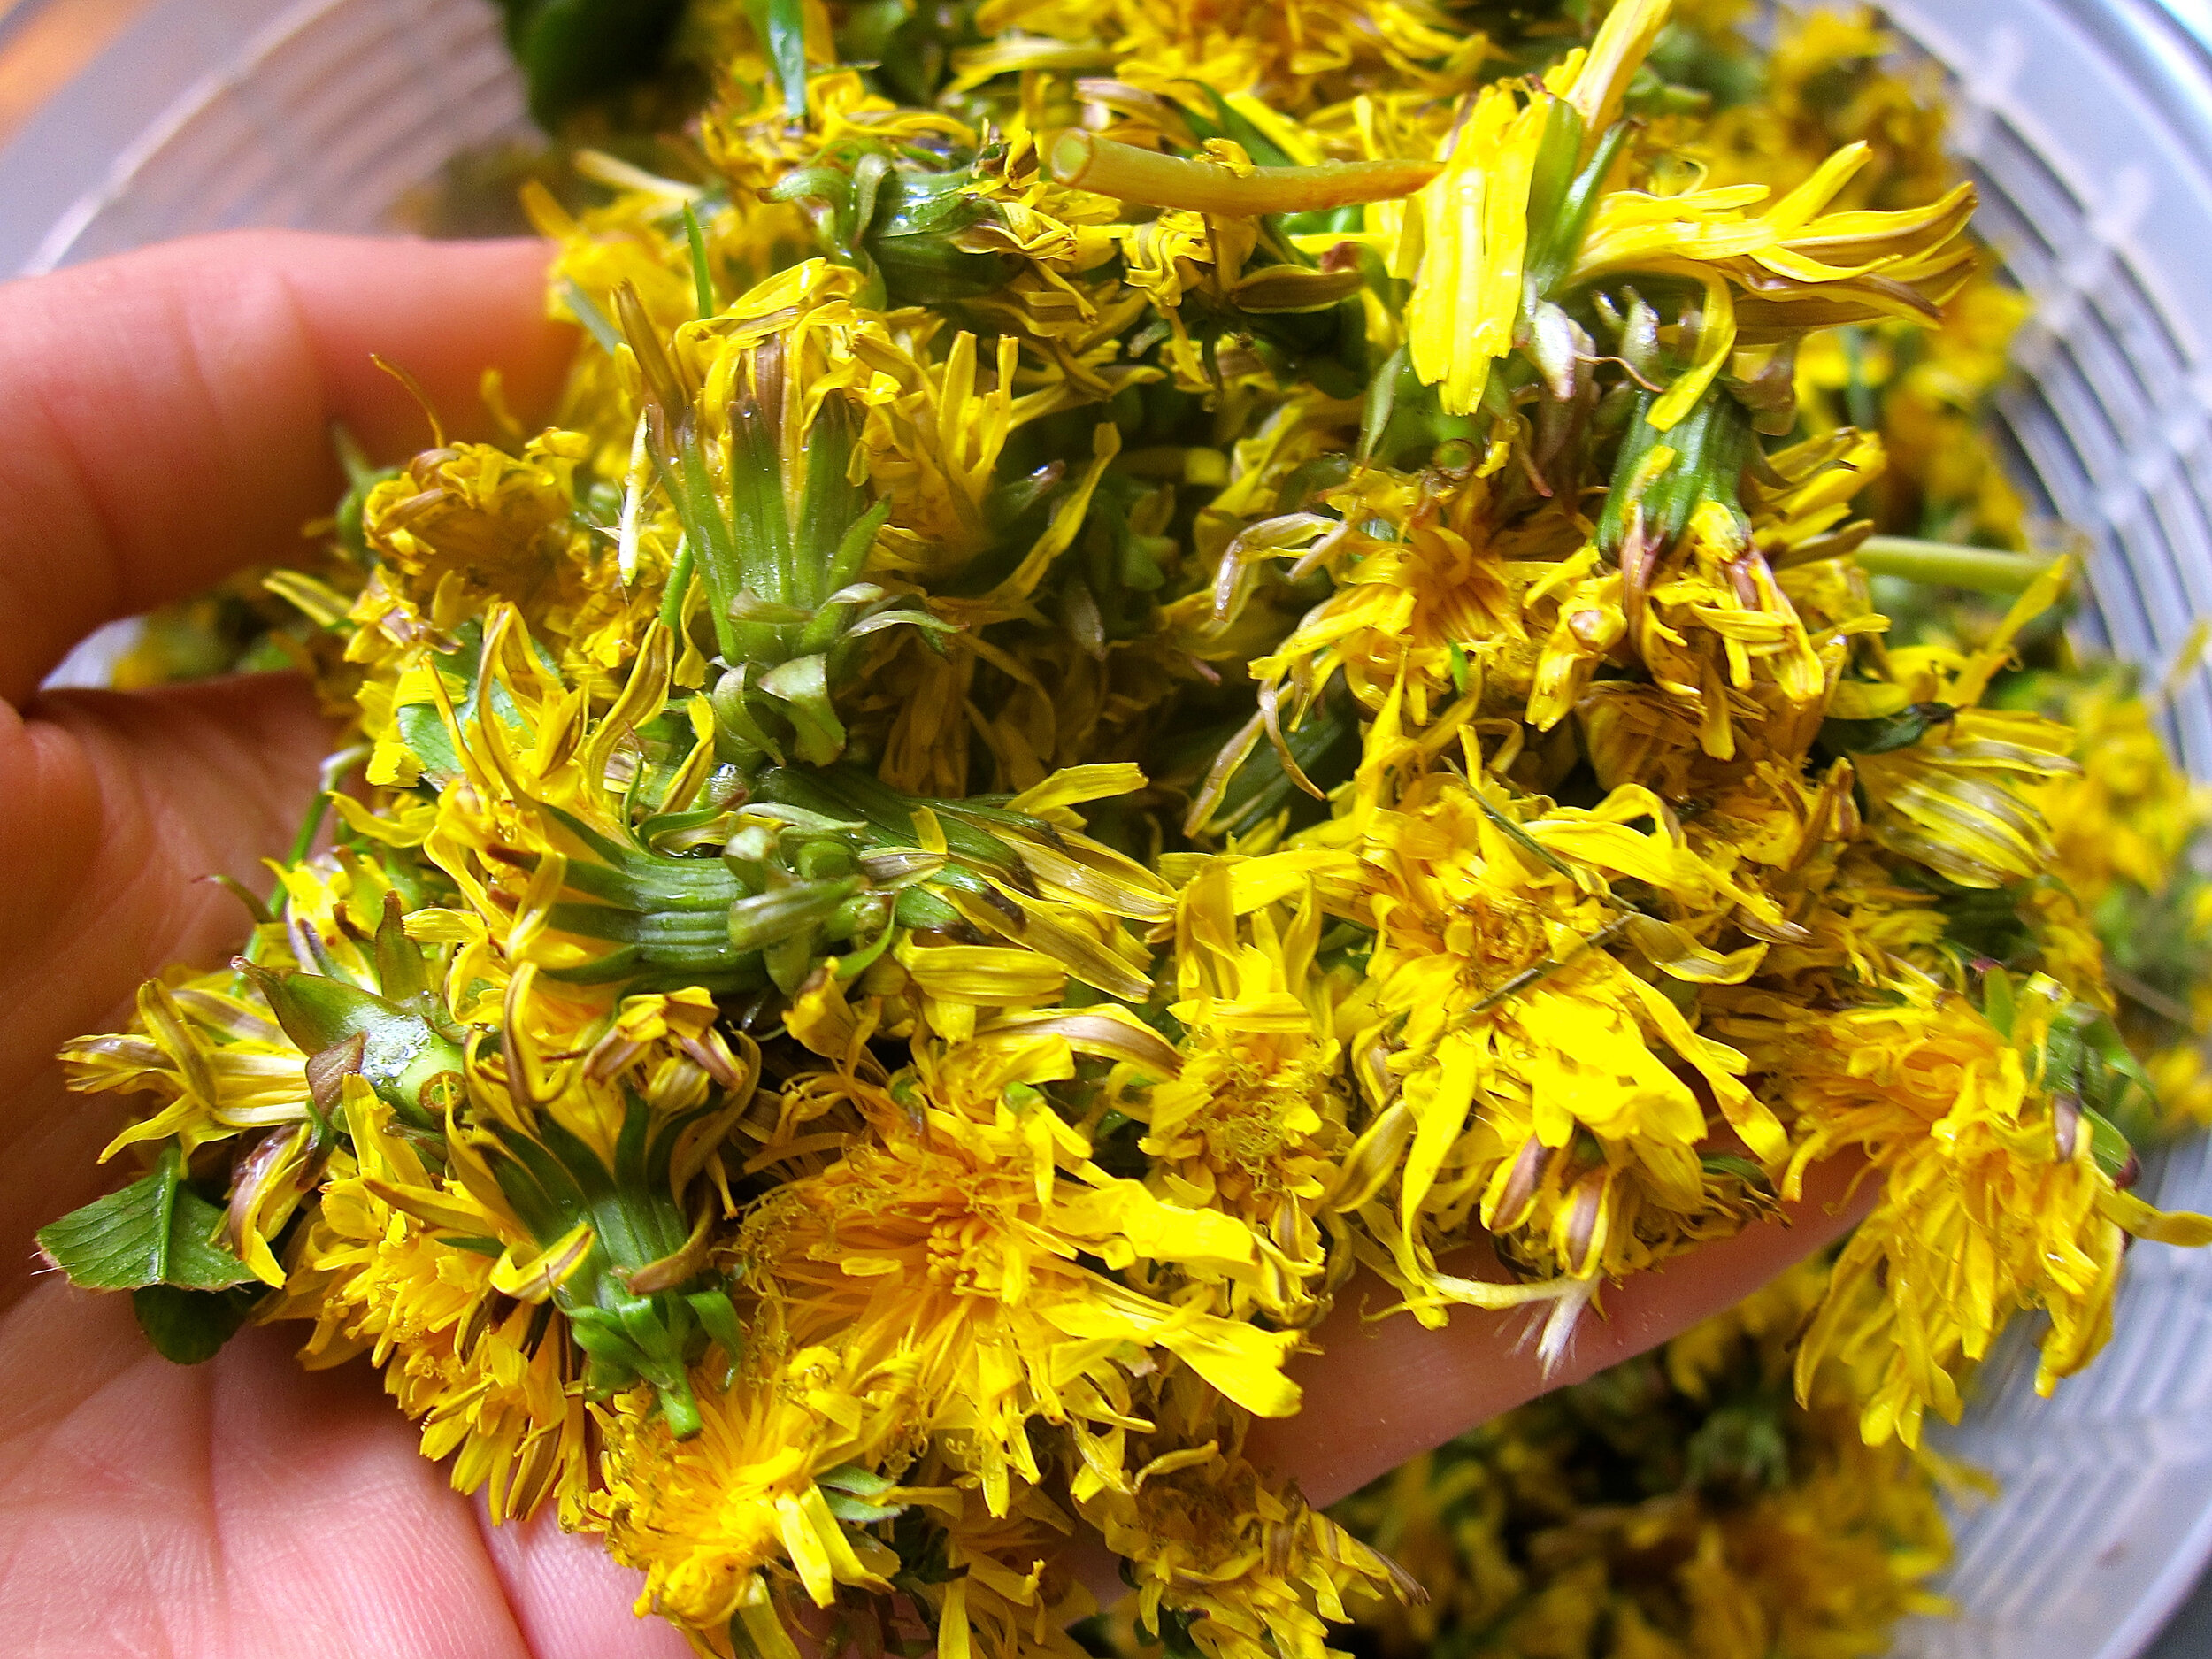
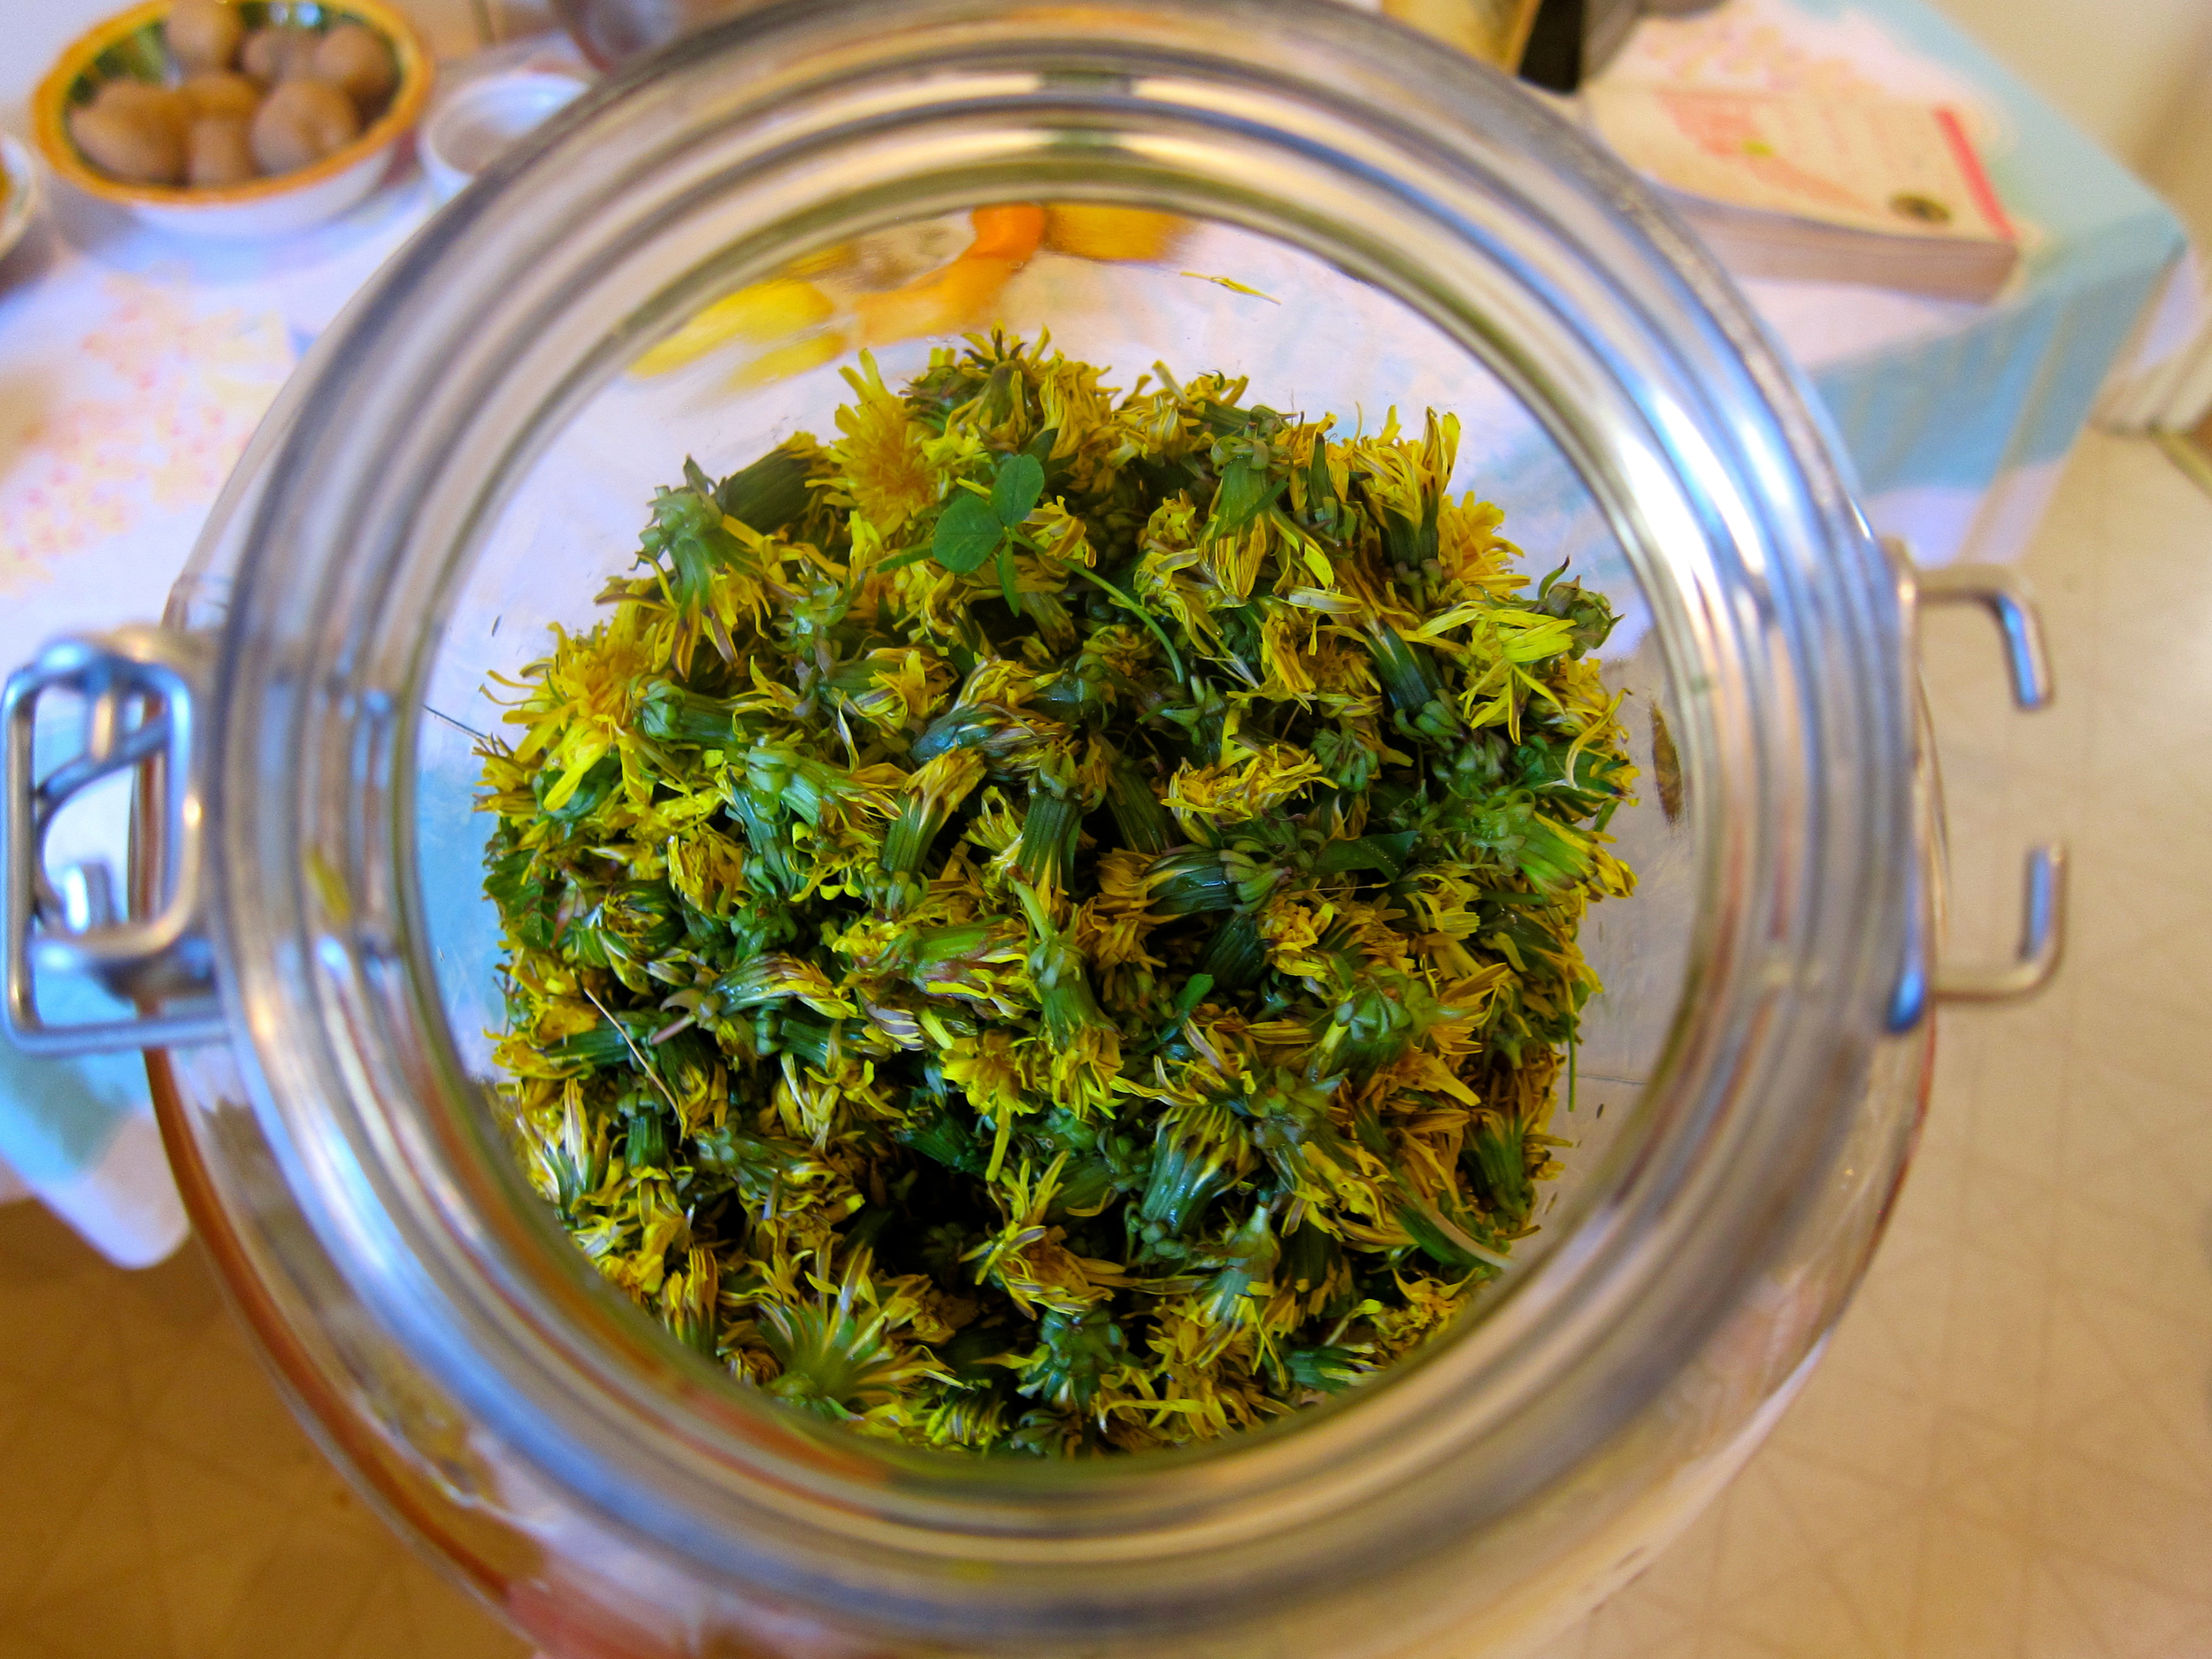
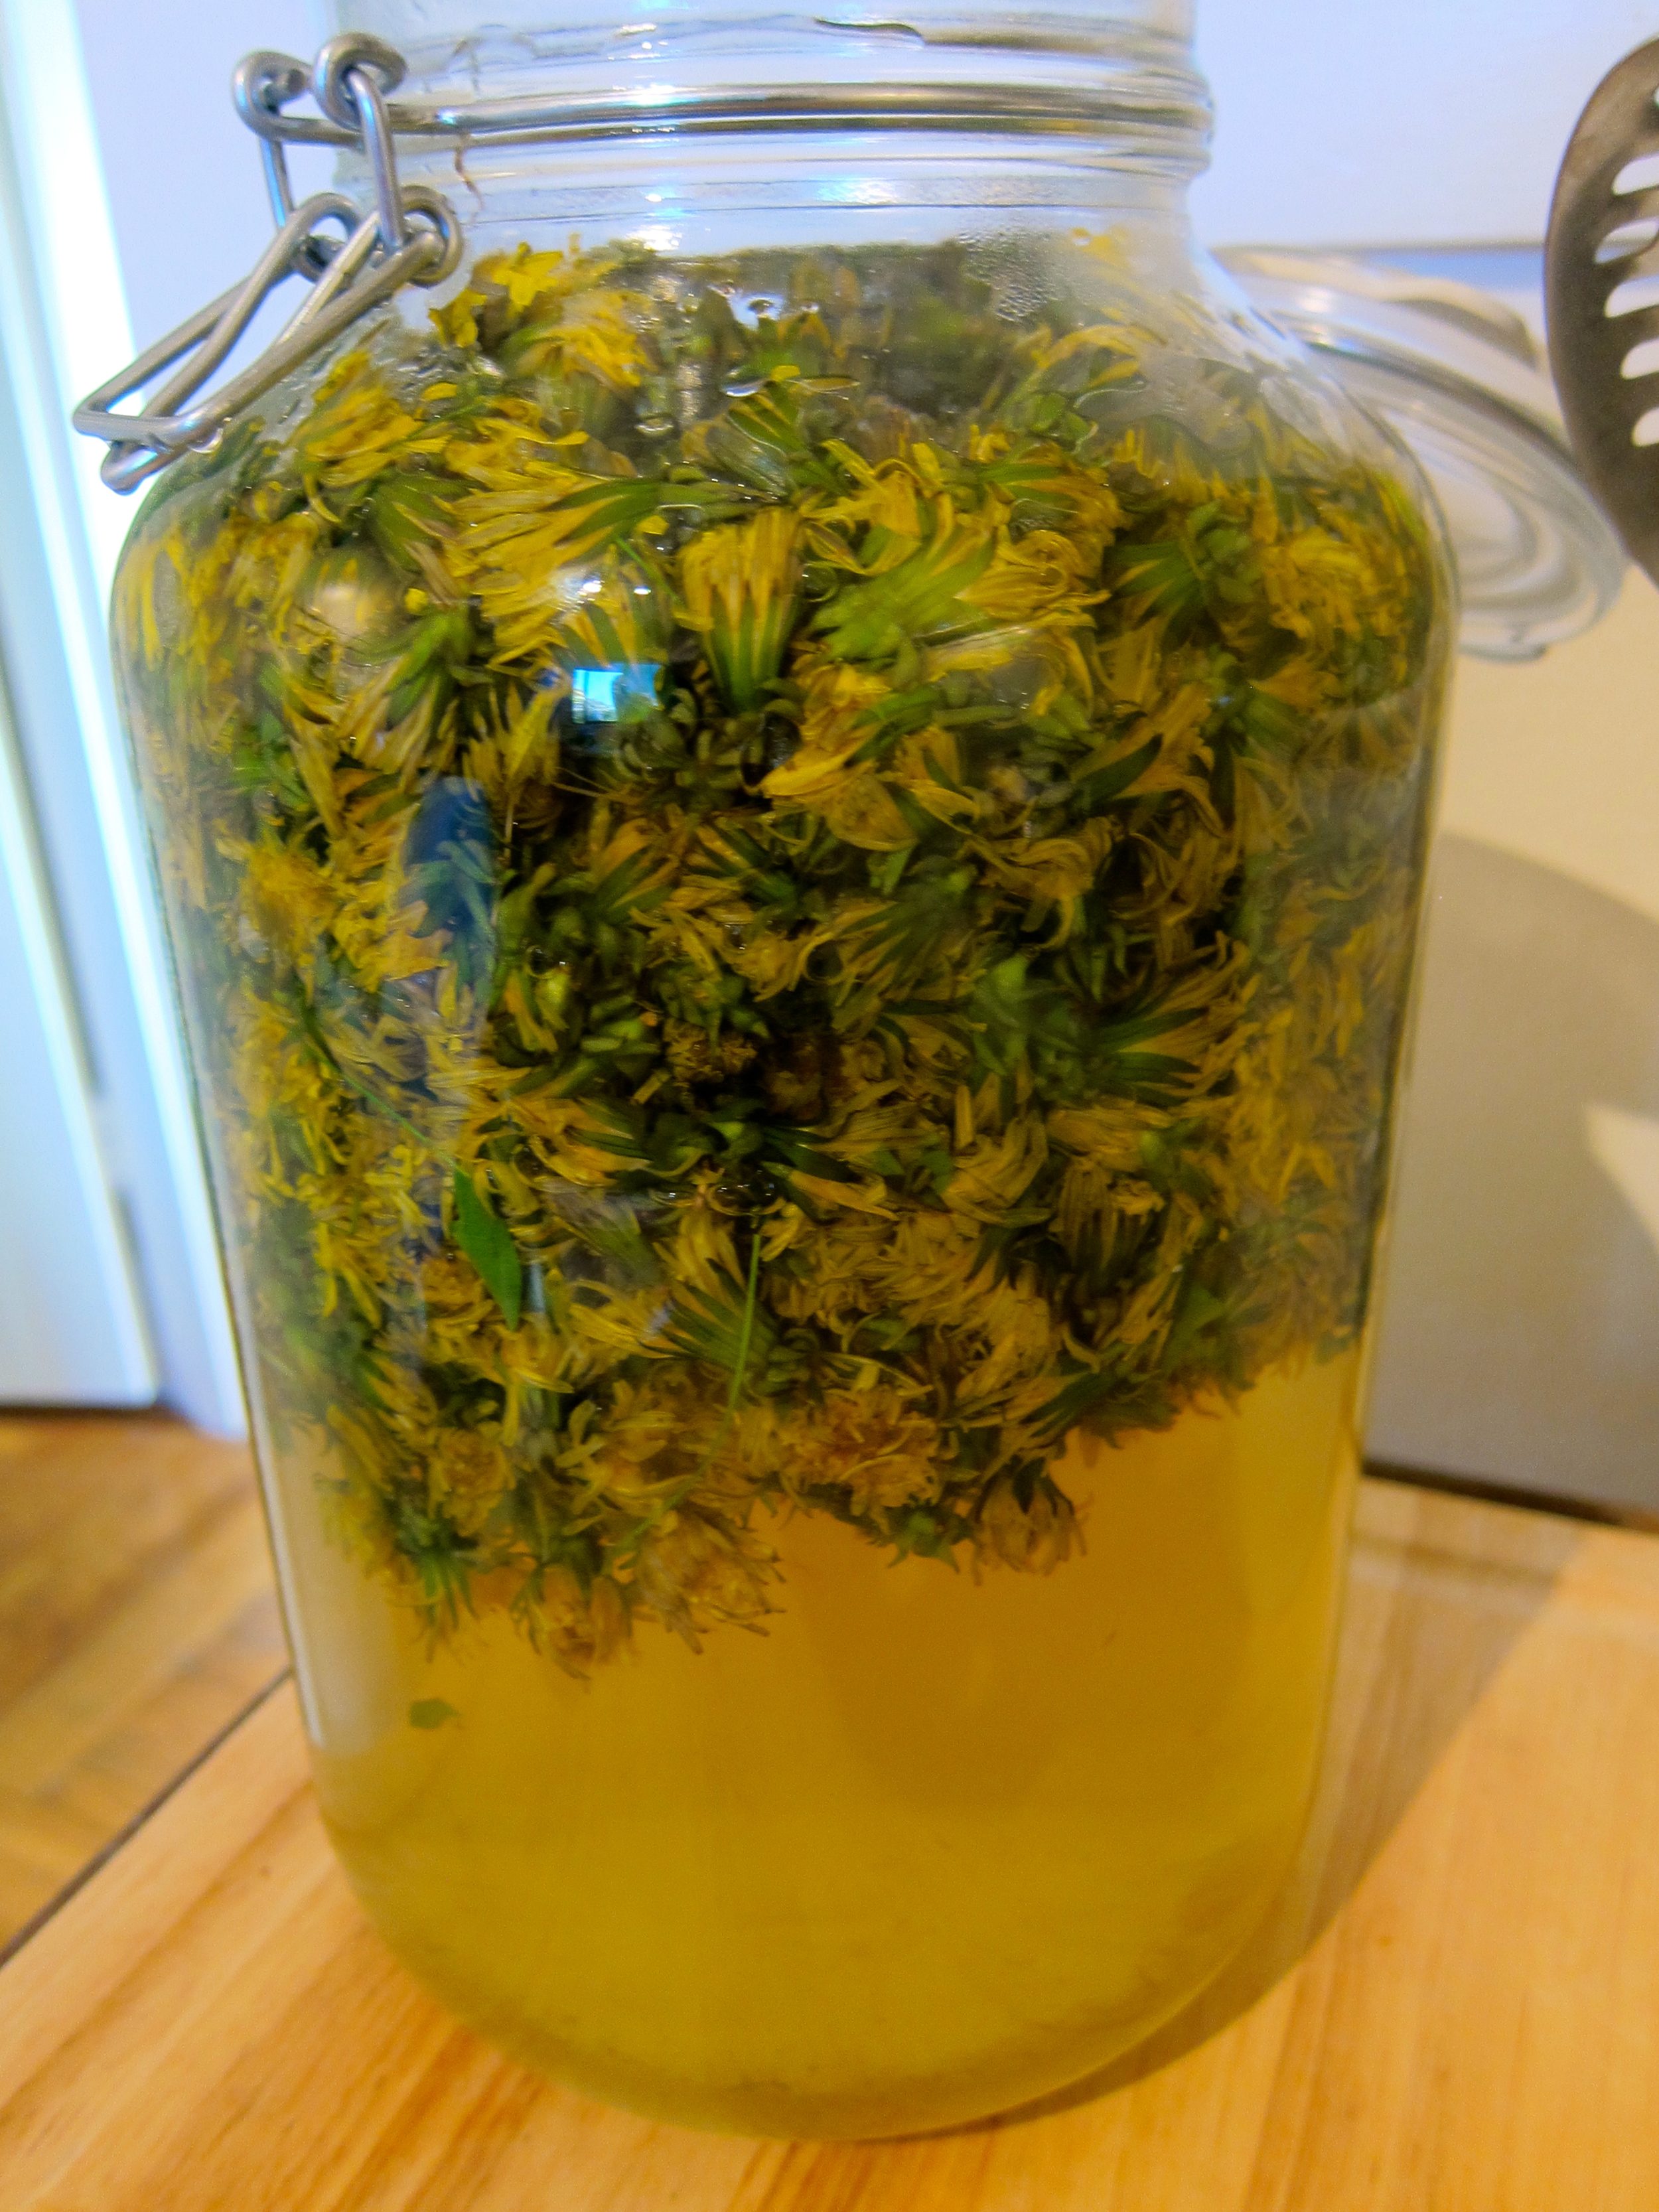
Dandelion Wine
A classic method for preserving a taste of summer.

I told someone that I had made dandelion wine and they said, “that’s really a thing?”. Yes, it’s a thing. I have always wanted to make dandelion wine - not sure where the desire came from (maybe because how even the sound of it delightfully rolls of the tongue?), but it aches all the same. So finally this spring I set forth on the task and have several delicious looking bottles put up to age from 6-12 months. My plan in to try them in 6 (because I won’t be able to resist) and drink some with others on the Winter Solstice.

1 gallon dandelion flowers, can leave ends of flowers on, but remove stems (your leg muscles may or may not be sore for a few days after this excursion)
2 cups turbinado sugar*
1 1/3 cup honey*
3-4 oranges
2-3 lemons
1-2 teaspoons/1/2 packet yeast (I used champagne yeast for dry, delicate flavor. Bread yeast is not recommended)
Few pinches of yeast nutrient (not necessary, but recommended)
*Sugar quantity will determine potential alcohol and potential sweetness, use more or less depending on your preferences.
Process One (2 days) - Make Dandelion Infusion
Boil 1 gallon of water, pour over dandelion flowers in glass or food-grade plastic container at least 1.25 gallons large.
Cover and let sit for 48 hours.
Strain out liquid, squeeze flowers to extract remaining liquid.
Process Two (2-3 weeks) - Fermentation
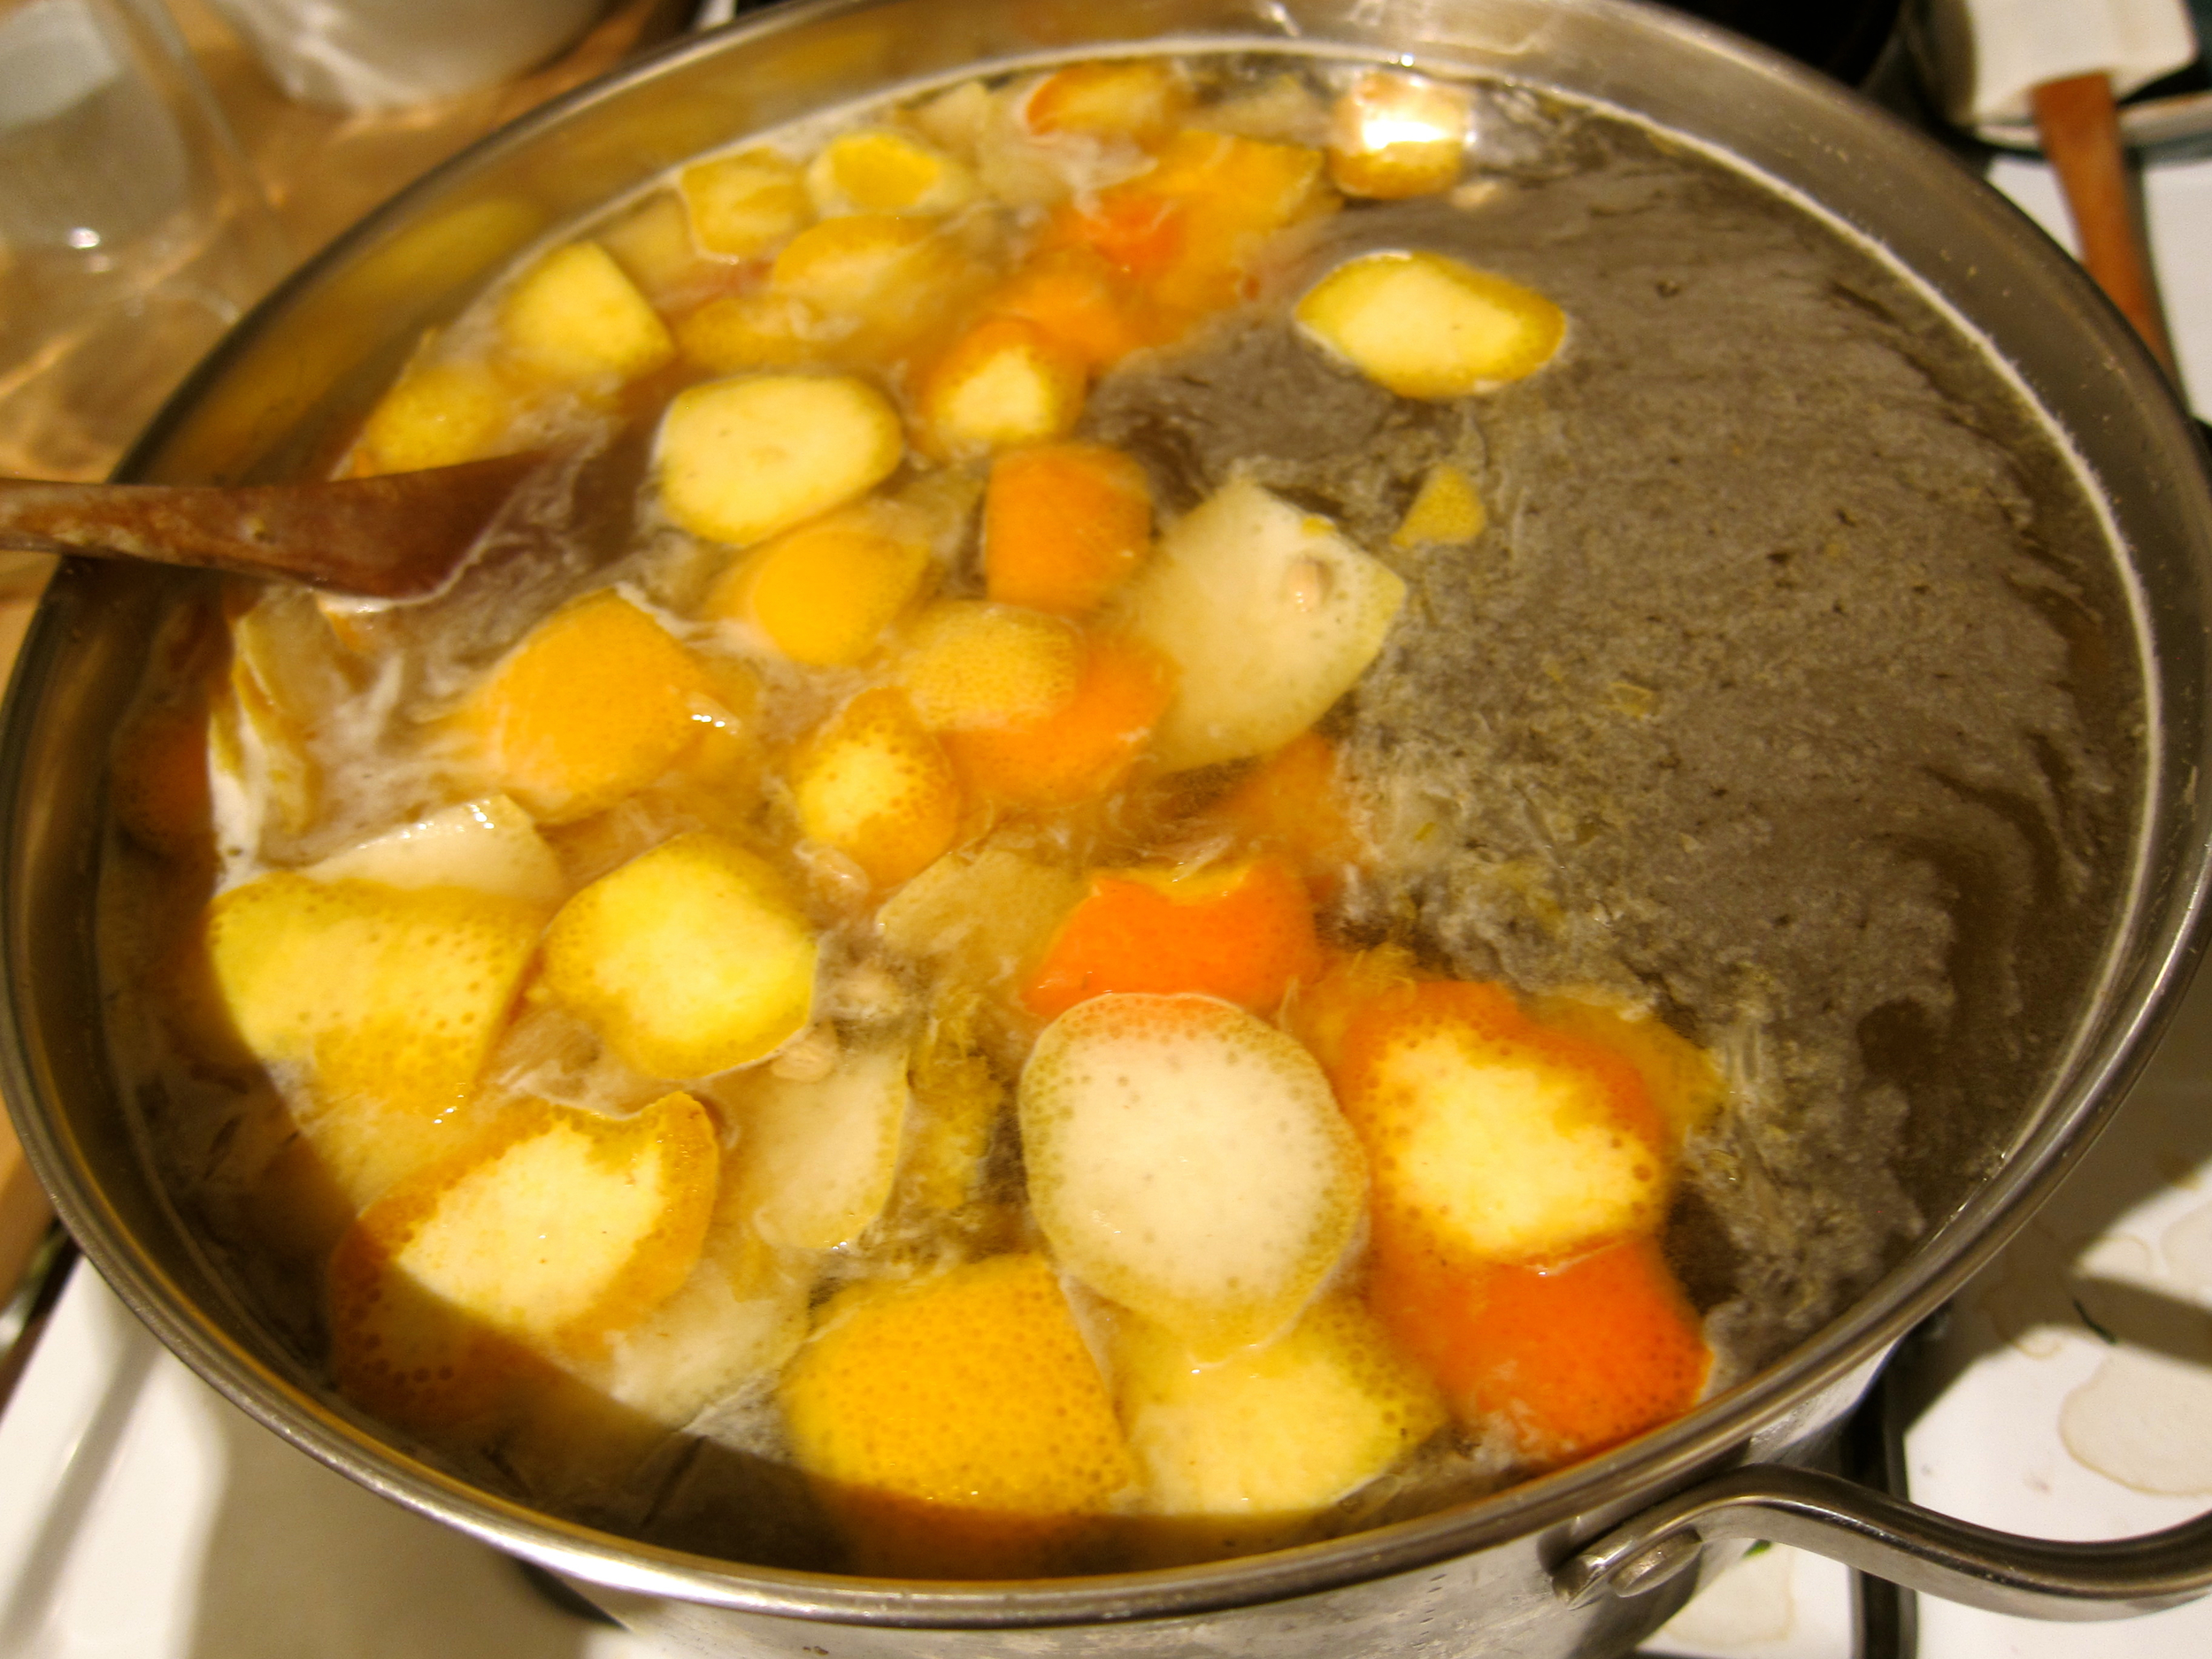
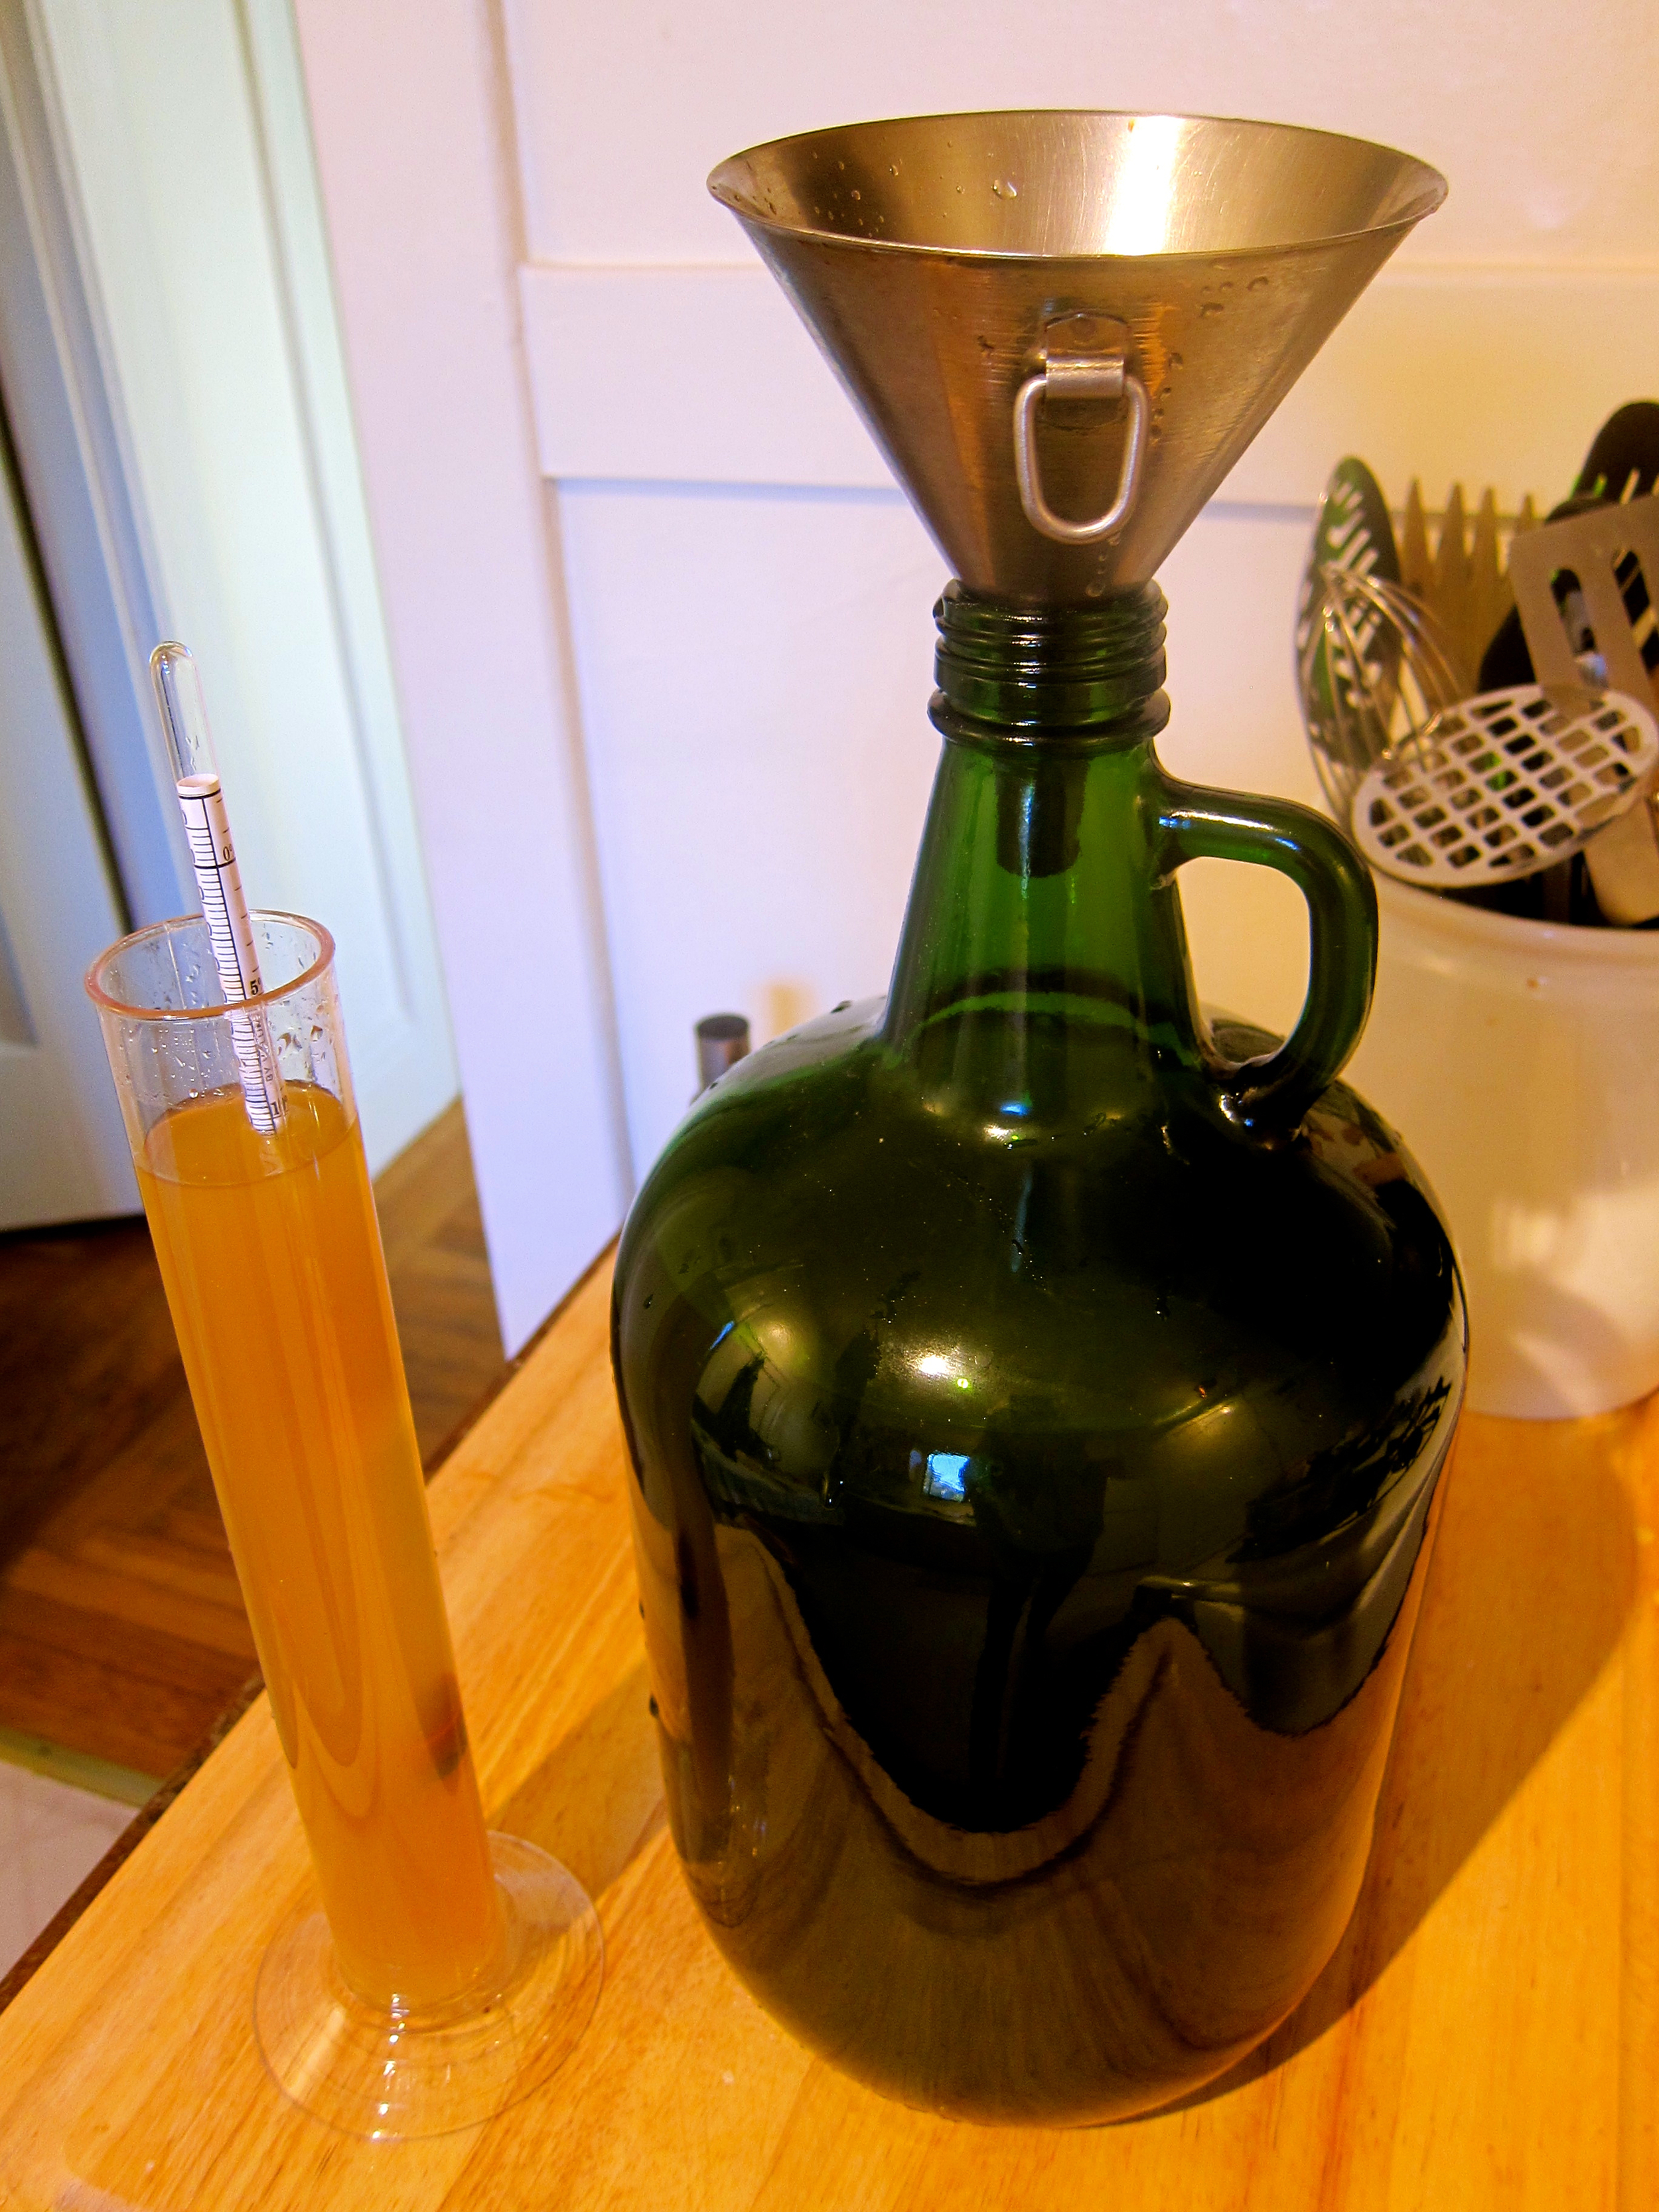
Heat dandelion liquid with sugar, honey, and the juice and skin from the citrus (cut the skin off and slice prior to juicing) for 30 minutes on medium heat, stirring occasionally to dissolve sugar. Cool to lukewarm.
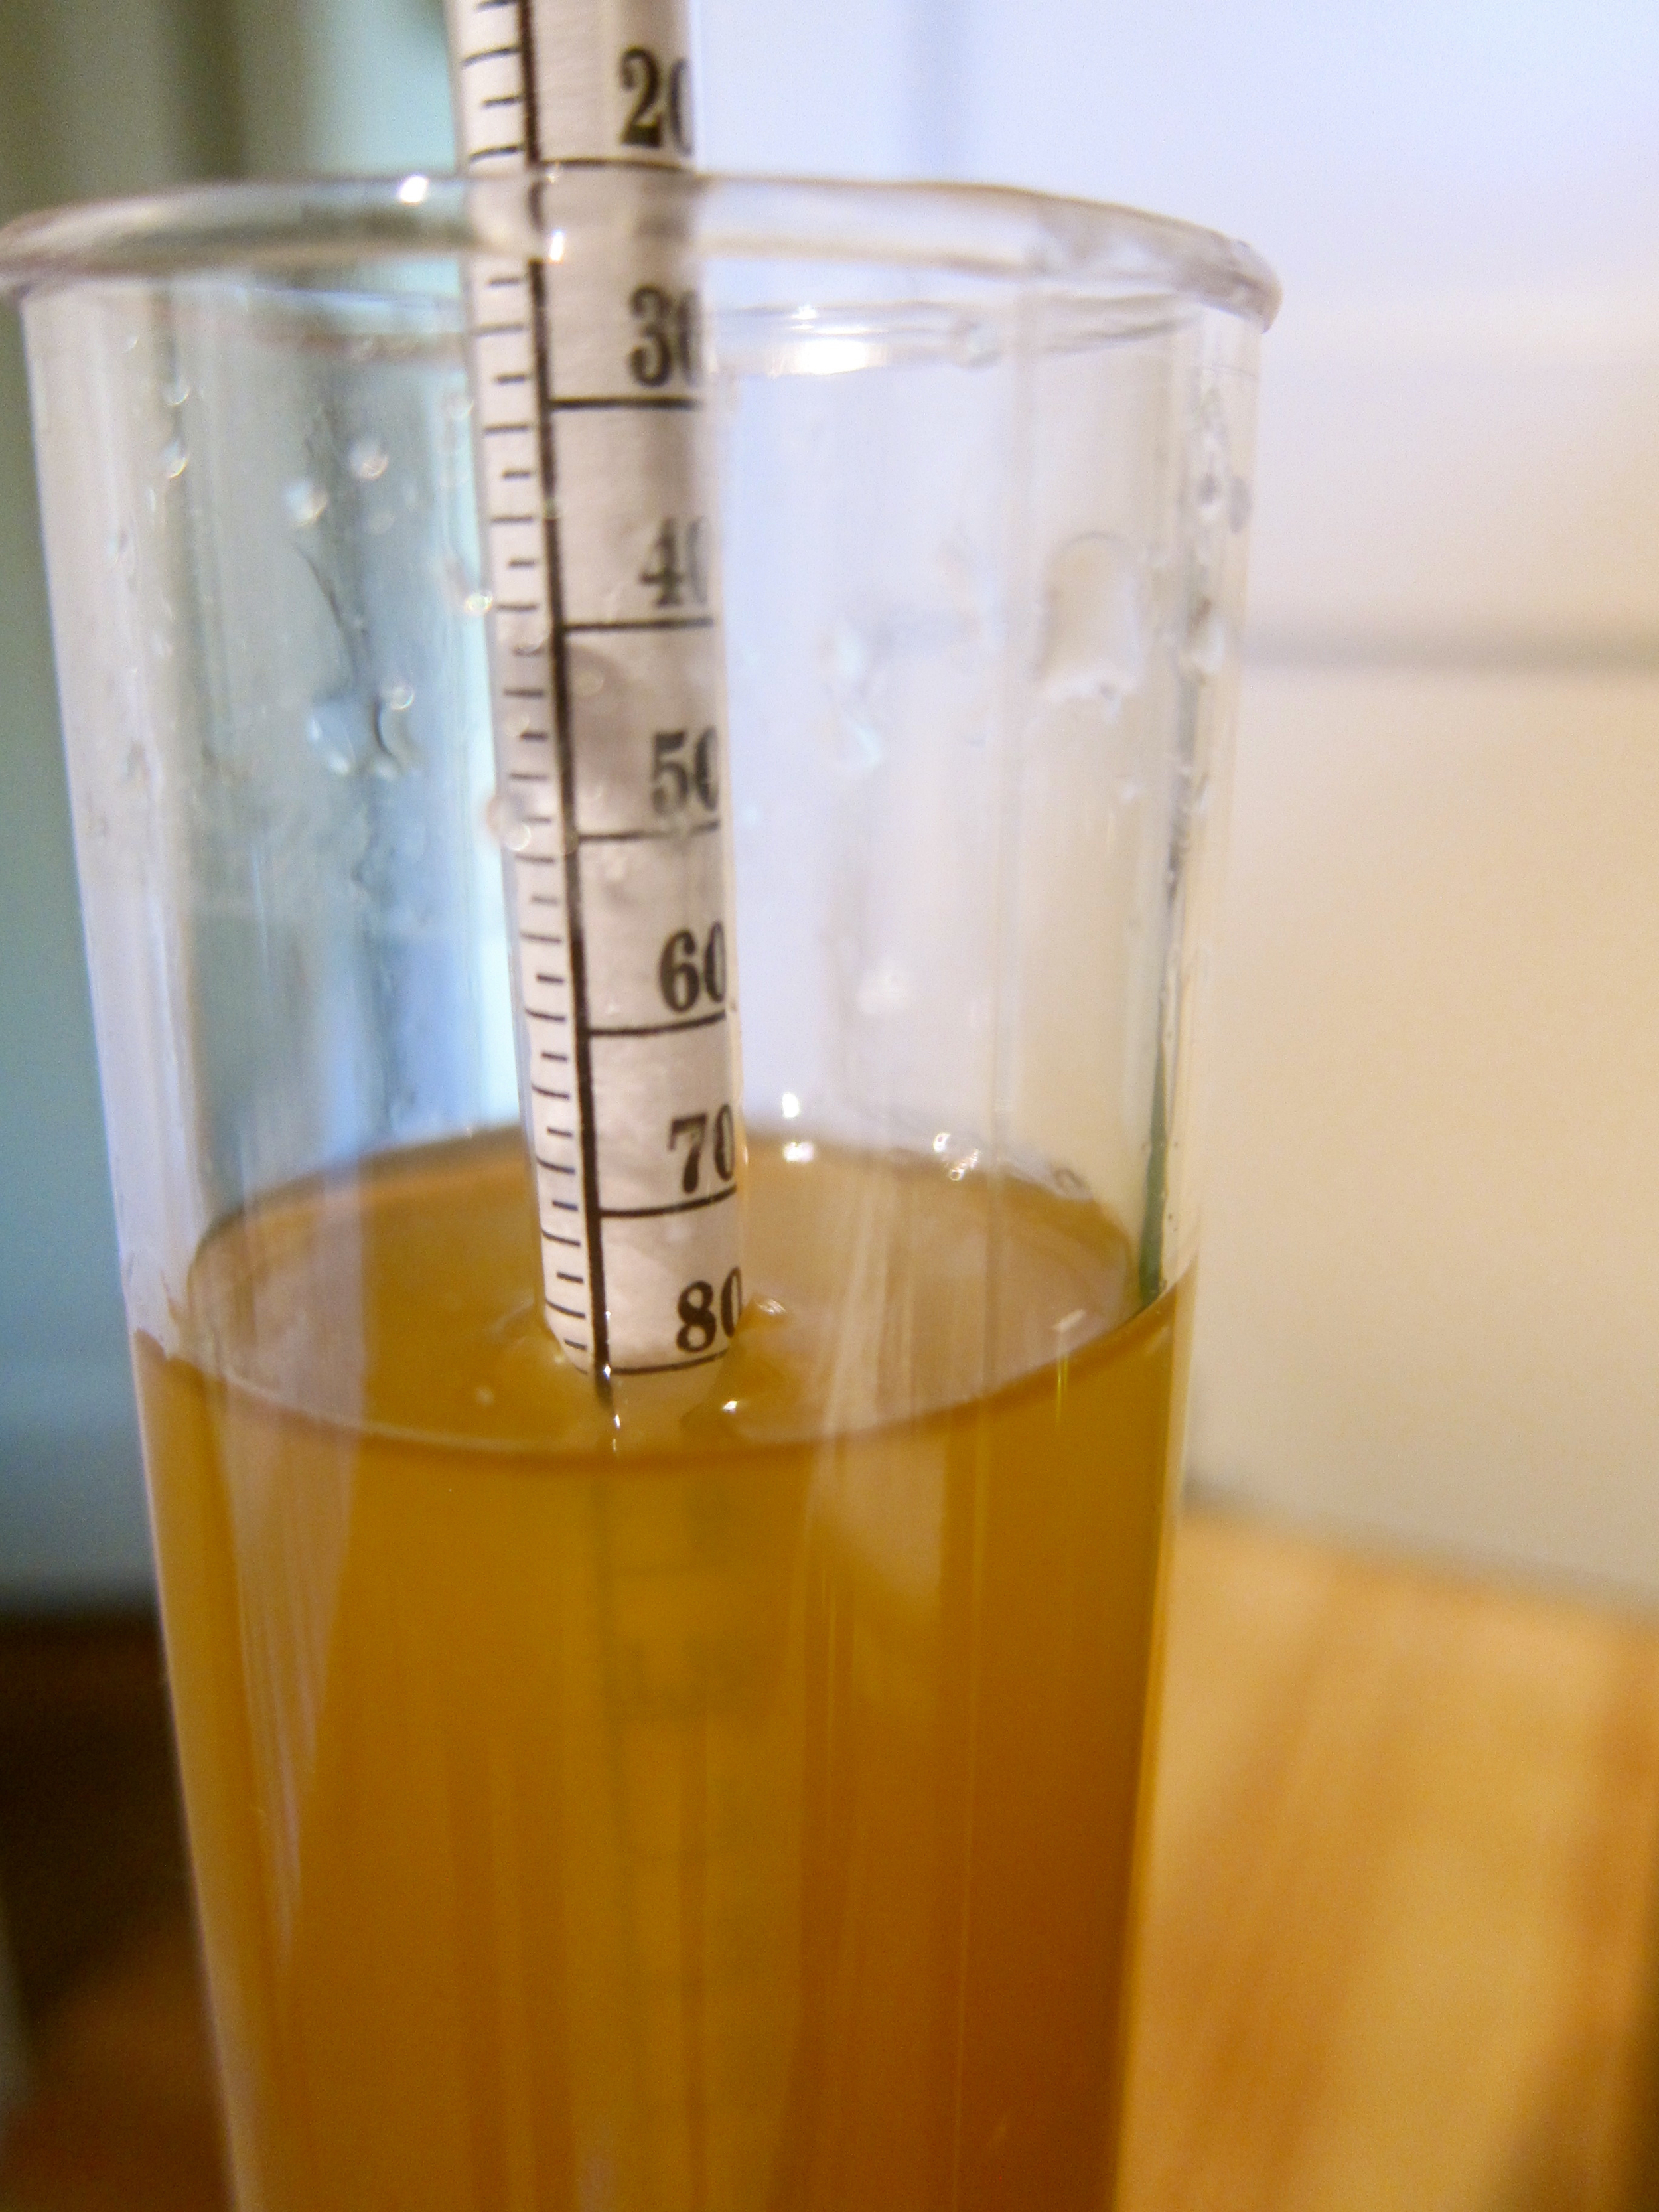
Take the specific gravity or brix to determine your “Potential Alcohol”. Essentially, by measuring the sugar content, you can determine how much nutrient is available for the yeast to turn into alcohol, but depending on where you stop fermentation, your wine will have more or less alcohol. My specific gravity at this point was 1.08 (Brix = 20%), which is a PA of 11%. There’s a calculation that I got really excited about, but ended up using this table.
Put in jug with yeast and nutrient, cork with fermentation lock or cover with cheesecloth (more risky bacteria-wise, I used lock) for 1-3 weeks, or until bubbling stops. You can stop the process anywhere you’d like, depending on desired alcohol content and sweetness (longer=more alcohol, less sweet). I stopped mine after bubbling stopped.
Take specific gravity/brix again so you can determine the alcohol %. My specific gravity was 1.00, or 0% alcohol, meaning that all of the sugar had been eaten by the yeast. This took about 2 weeks because the weather was quite warm. To determine the total alcohol, I just subtract this from the PA, 11-0 = 11%. No residual sugar, which I prefer.
Process Three - Aging (6 months - 1 year)
When your wine has reached the desired alcohol/sugar content, remove from large jug and bottle. I tasted it at this point - definitely tastes like ridiculously young (and not so good wine - but has potential!)
Age 6 months - 1 year in cool place.
See you at the winter solstice!
Update: Here's how it tasted after 6 and 12 months. An 8 month fermentation may be optimal!

Beer of many flavors (and yeasts)

A fine day for an afternoon beer tasting at the lab with Noma stagiers. The tasting was informal in nature, including four (strong and delicious) beers as well as various yeasts, grains, and malts.
What most stuck with me was the complexity of using different yeasts in the various beers. Although I was aware of this, it was interesting to first smell the yeasts in all of their glory and then hear a conversation about how “Brett" (or the yeast Brettanomyces) is gaining in popularity for its funky, wild, and mushroom-like characteristics that are very apparent in both the yeasty grain and the finished brew.
I was proud to also note a California ale yeast on the table.